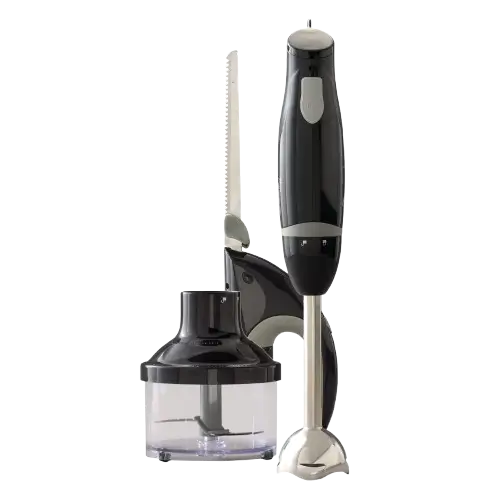
Oster Food Prep Kit FPSTHBEKFC-AL
The Oster Food Prep Kit FPSTHBEKFC-AL combines three kitchen tools that share one motor housing: an immersion blender (called the mixer in the instructions) with a stainless steel beater shaft, a food chopper with a chopping bowl and cover, and an electric knife with stainless steel blades. The motor housing locks onto whichever attachment you want to use. The blender and chopper handle everyday mixing and chopping jobs, and the electric knife slices food for carving. Each tool has its own run-time limits and cautions, covered below.
Parts and Controls
Your appliance is a two-part assembly. The upper part is the motor housing. The lower part is the shaft, the food chopper or the electric knife attachment.
| No. | Part |
|---|---|
| 1 | Motor Housing |
| 2 | On/Off Button |
| 3 | Hanging Loop |
| 4 | Stainless Steel Beater Shaft |
| 5 | Chopping Bowl |
| 6 | Chopping Blade |
| 7 | Chopping Bowl Cover |
| 8 | Electric Knife |
| 8a | Stainless Steel Blades |
| 8b | Eject Button |
| 8c, 8d | On/Off Electric Knife Buttons |
The mixer also comes with a cup that works as both a mixing cup and a measuring cup.
How the Controls Behave
- Mixer and chopper: The unit only runs while the on button is pressed. Release the button to switch it off.
- Electric knife: Both the “c” and “d” buttons must be pressed at the same time to activate the knife. They sit on the top and bottom of the handle.
- Eject button (8b): Do not press it while inserting the knife blades.
Important Safety Information
Basic safety precautions should always be followed to reduce the risk of fire, electric shock and injury. Read all instructions before using the appliance. The points below are the ones that matter most day to day.
General Safety
- Household use only. Do not use outdoors or for commercial purposes.
- Never leave the appliance unattended while it is in use.
- This appliance is not intended for use by children or by persons with reduced physical, sensory or mental capabilities, or lack of experience and knowledge. Close supervision is necessary when any appliance is used near children. Keep the appliance and its cord out of reach of children.
- Turn the appliance off, then unplug it from the outlet when not in use, before putting on or taking off parts and before cleaning. To unplug, grasp the plug and pull it from the outlet. Never pull on the power cord.
- Use only attachments recommended or sold by the manufacturer. Others may cause fire, electric shock or injury.
- Do not operate any appliance with a damaged cord or plug, or after it malfunctions or has been damaged in any manner. Do not attempt to replace or splice a damaged cord.
- Use the appliance on a dry, stable, level surface. Do not use it in the immediate vicinity of water, and do not use it in the presence of explosive or flammable fumes.
- Do not place the appliance on or near a hot burner or in a heated oven. Do not let the cord hang over the edge of a table or counter or touch hot surfaces, including the stove.
- Blades are sharp. Handle them carefully.
- Do not operate the appliance when it is empty.
Electrical and Cord Safety
- Do not place or immerse the cord, plugs or motor in water or any other liquid.
- Polarized plug: One blade is wider than the other. The plug fits a polarized outlet only one way. If it does not fit fully, reverse the plug. If it still does not fit, contact a qualified electrician. Do not modify the plug. If the plug fits loosely in the outlet or the outlet feels warm, do not use that outlet.
- Do not pull, twist or otherwise abuse the power cord. Do not wrap the cord around the main body of the appliance during or after use.
- If a longer detachable power-supply cord or an extension cord is used on short-cord models, its electrical rating must be at least as great as the appliance’s rating. If the appliance is the grounded type, the extension cord must be a grounding-type 3-wire cord. Arrange the longer cord so it does not drape over a counter or table top where it can be pulled on or tripped over.
- For the electric knife: Do not use with an extension cord.
Immersion Blender Safety
- Keep hands, hair, clothing and utensils out of the container while blending. A scraper may be used only when the unit is not running.
- When mixing liquids, especially hot ones, use a tall container or make small quantities at a time to reduce spillage.
- Do not use over a stove or other heat source. When mixing soups or other hot foods or liquids, remove the saucepan from the heat source first.
- After each operation, allow the hand blender to cool for 3 minutes before using it again.
- This immersion blender is not intended to chop ice. Add ice to a beverage after mixing.
- Do not process food containing hard objects that cannot be safely broken up by the blade.
Food Chopper Safety
- Keep hands and utensils away from the cutting blade while chopping. A scraper may be used only when the chopper is not running.
- Never attach the cutting blade to the blender motor without first putting the bowl properly in place.
- Be certain the cover is securely locked in place before operating. Always wait until all moving parts have stopped before opening the bowl.
- Check the bowl for foreign objects before operating. Do not use the bowl for food storage.
- If the bowl is chipped, cracked or damaged in any way, stop using the product. If the blades appear damaged, discard the food and stop using the product.
Electric Knife Safety
- Do not operate the knife in water or under running water.
- Avoid any contact with blades or moving parts. Keep hair, loose clothing, jewelry and similar items away from the blades, moving parts and the blade insert opening. If anything jams, turn the appliance off and unplug it before trying to clear the jam.
- Handle blades with your hand away from the cutting edge. Store blades with the cutting edge away from you.
- Route the power cord carefully so the knife blades cannot damage it while cutting.
- Models with dual blades: Always operate with both blades installed. Do not operate with a single blade.
- Unplug the appliance when changing blades.
Before First Use and Assembly
Read and follow all the instructions for use and care, and choose a place to keep the instruction manual for future reference.
Caution: The use of attachments not recommended or sold by the manufacturer may cause fire, electrical shock, injury or damage to the product.
Locking and Unlocking the Motor Housing
To lock:
- Hold the motor housing in your right hand and the accessory in your left hand.
- Attach the motor housing to the accessory.
- Rotate the motor housing to the left. The assembly locks firmly.
To unlock:
- Hold the motor housing in your right hand and the accessory in your left hand.
- Rotate the motor housing to the right to separate the units.
The mixer section uses the same left-to-lock, right-to-remove direction for the beater shaft. The chopper section describes its own locking directions, which are listed under the chopper steps below.
Using the Immersion Blender
- Attach the beater shaft to the motor housing by rotating the housing to the left until it locks firmly into place.
- Immerse the blade housing completely into the ingredients.
- Press the on button and begin mixing by moving the appliance up and down and in circles. The unit only works while the on button is pressed.
- Hold the mixer firmly.
- When the desired consistency has been reached, release the button and lift the mixer from the mixture. To prevent splashing, always release the button before removing the mixer from the ingredients.
- To remove the beater shaft, hold it firmly and rotate the motor housing to the right.
Note: During mixing, it is normal for suction to be created at the bottom of the container.
Caution: To extend the life of the appliance, never let it operate continuously for more than 1 minute at a time. After 1 minute of continuous operation, release the button and let the appliance rest for 1 minute before using it again.
Warning: Do not use the mixer in a saucepan directly on the stovetop. Remove the pan from the heat before mixing.
Using the Food Chopper
The chopper is intended for chopping a wide range of vegetables, dried fruits, nuts and similar foods.
Caution: Unplug the appliance before attaching the chopper attachment. Put the food ingredients in the chopping bowl, secure the bowl cover to the chopping bowl, and attach the motor housing to it.
- Insert the chopping blade into the chopping bowl.
- For best results, cut large ingredients into pieces of approximately 12.7 mm (1/2-inch) cubed before chopping. Do not chop large ice cubes or extremely hard foods.
- Secure the chopping bowl cover by setting it on the bowl, pressing down and turning it to the right until firmly locked into place. The upper shaft of the chopping blade fits into the receiving hole in the underside of the cover.
- Attach the motor housing to the top of the chopping bowl cover and turn it to the right until the motor housing is firmly locked into place.
- Plug the cord into a convenient outlet.
- Press and hold the on button to switch the unit on. Release the button to switch the unit off.
- If ingredients stick to the sides of the chopping bowl, loosen them by adding a small amount of liquid or by using a spatula to scrape the food back into the inner part of the bowl.
- Release the on button and allow the blade to come to a complete stop before removing the bowl cover by turning the cover to the left.
- Take care when removing the blade and hold it only by the shaft handle, because the metal blade is sharp.
Caution: Do not clean blades with your fingers. After the blade is removed, use a spoon or spatula to scrape food into the bowl.
Important: Place the food chopper on a level surface while using it. Never use it while holding it up in the air, because the bowl might detach from the motor compartment and fall.
Do not use the food chopper accessory for more than 15 seconds continuously without taking a break for one minute. The food chopper accessory is not for processing hot food.
Using the Electric Knife
Installing the Blades
Make sure the electric cord is not connected to the outlet when attaching the electric knife or inserting or removing the knife blades.
- Pick up the knife blades inside the protective cover, holding them between your thumb and forefinger. Avoid touching the sharp, scalloped edges of the blades.
- Insert the raised rivet on one blade into the keyhole slot on the other blade. This locks the ends of the blades together.
- Hold the blades with the drip guards between your thumb and forefinger, with the scalloped edges facing away from your hand. Slide the ends of the blades into the opening on the front of the power handle.
- Push gently on each drip guard toward the electric knife until the blades click into place. Make sure the blades are firmly engaged. The cutting edges should face downward, away from the handle.
- Attach the motor housing to the back of the electric knife and turn the motor housing to the left until it locks firmly into place.
Note: Do not press the blade release button when inserting the blades.
Slicing
- Plug the electrical cord into an electrical outlet. Use only the voltage specified on the bottom of the unit.
- Press the on/off buttons on the top and bottom of the handle to activate the knife and begin carving. Both the “c” and “d” buttons must be pressed at the same time.
- Guide the knife blades through the food, pressing down lightly. A back-and-forth sawing motion is unnecessary, because the movement of the blades slices the food for you.
- When slicing is complete, release the on/off buttons to stop the blade action. Unplug the plug from the electrical outlet.
Caution: To increase the life of the appliance, never operate it continuously for more than 3 minutes at a time. After a minute of continuous operation, release the button and let the appliance rest for 1 minute before using it again.
Note: This knife should not be used to cut bones, frozen foods in solid form, or hard seeds, stones or pits in fruits.
Run-Time Limits at a Glance
| Attachment | Printed limit |
|---|---|
| Immersion blender (mixer) | Never operate continuously for more than 1 minute at a time. After 1 minute of continuous operation, release the button and rest the appliance for 1 minute. |
| Immersion blender (cooling) | Allow the hand blender to cool for 3 minutes after each operation before using it again. |
| Food chopper | No more than 15 seconds continuously without a break of one minute. Not for processing hot food. |
| Electric knife | Never operate continuously for more than 3 minutes at a time. After a minute of continuous operation, release the button and rest the appliance for 1 minute. |
Cleaning, Storage and Service
Cleaning
- Make sure the unit is unplugged before cleaning.
- Wipe the motor housing clean with a damp cloth or sponge.
- After use, the beater shaft, mixing cup, chopping bowl, chopping blade and electric knife blades may be washed by hand with mild soap and water.
- Wash the chopping bowl cover by hand using warm, soapy water with a cloth or sponge.
- Make sure all parts are completely dry before using them again.
Caution: Never immerse the motor unit in water. Blades are sharp, so handle them carefully.
Note: Do not place the components of the appliance in a dishwasher.
Storage
Unplug the unit and store it in a clean, dry place. Never wrap the cord tightly around the appliance. Do not put any stress on the cord where it enters the unit, because it could fray and break. The motor housing has a hanging loop (part 3).
Service
This appliance has no user serviceable parts. Any servicing beyond what is described in the cleaning section should be performed only by an Authorized Service Representative. See the warranty section.
Warranty and Customer Support
The appliance carries a 1-year limited warranty from Sunbeam Products, Inc., covering defects in material and workmanship for one year from the date of purchase. At its option, Sunbeam will repair or replace the product or any defective component during that period. The warranty is valid for the original retail purchaser only and is not transferable. Keep the original sales receipt, because proof of purchase is required for warranty service. Do not attempt to repair or adjust any electrical or mechanical function of the product, because doing so voids the warranty.
The warranty does not cover normal wear of parts, or damage from negligent use or misuse, use on improper voltage or current, use contrary to the operating instructions, or disassembly, repair or alteration by anyone other than Sunbeam or an authorized Sunbeam service center. It also excludes acts of God such as fire, flood, hurricanes and tornadoes.
In the U.S.A., call Sunbeam Consumer Service at 1.800.334.0759 for warranty questions or service, and a convenient service center address will be provided. Do not return the product to the warranty addresses or to the place of purchase. Product information is also listed at www.oster.com.
Frequently Asked Questions
How do I lock and unlock the motor housing on an attachment?
Hold the motor housing in your right hand and the attachment in your left. Fit the housing onto the attachment and rotate it to the left until the assembly locks firmly. To separate them, hold the pieces the same way and rotate the housing to the right. The beater shaft and the electric knife both attach by turning the motor housing to the left. The chopper steps are worded differently: the bowl cover is turned to the right to lock it onto the bowl, and the motor housing is also turned to the right to lock it onto the cover. In every case, the parts should feel firmly locked before you plug in the unit.
How long can I run the immersion blender at one time?
Run it for no more than 1 minute at a time. After 1 minute of continuous operation, release the button and let the appliance rest for 1 minute before using it again. After you finish an operation, also let the hand blender cool for 3 minutes before using it again. The blender only runs while the on button is held down, so releasing the button stops it.
Can I blend hot soup with the immersion blender while the pot is on the stove?
No. Do not use the mixer in a saucepan directly on the stovetop or over any heat source. Take the pan off the heat before you start. When mixing hot liquids, use a tall container or work in small quantities to reduce spillage, and move the blender up and down and in circles with the blade housing fully immersed.
Can the immersion blender crush ice?
No. It is not intended to chop ice. If a drink needs ice, mix the ingredients first and add the ice afterward. The chopper has a related limit: do not chop large ice cubes or extremely hard foods in it.
How long can I run the food chopper?
Run the chopper for no more than 15 seconds continuously, then take a one-minute break before running it again. It is also not meant for hot food. Hold the on button down while chopping, release it to stop, and let the blade come to a complete stop before you turn the cover to the left to remove it.
How should I prepare food before chopping?
For best results, cut large ingredients into pieces of roughly 12.7 mm (1/2-inch) cubes before they go into the bowl. The chopper suits vegetables, dried fruits, nuts and similar foods. Large ice cubes and extremely hard foods should stay out of it.
What should I do if food sticks to the sides of the chopping bowl?
Release the on button and let the blade come to a complete stop. A scraper or spatula may be used only when the chopper is not running. Loosen the food by adding a small amount of liquid, or scrape it back toward the inner part of the bowl with a spatula. Do not use your fingers near the blade.
Why does the electric knife only run when I press two buttons?
The knife only activates when the “c” and “d” on/off buttons, located on the top and bottom of the handle, are pressed at the same time. If only one is pressed, the knife will not run. Release both buttons to stop the blade action when you finish slicing, then unplug the cord.
What can’t I cut with the electric knife?
Do not use it to cut bones, frozen foods in solid form, or hard seeds, stones or pits in fruits. For ordinary slicing, guide the blades through the food with light downward pressure. A back-and-forth sawing motion is unnecessary because the blades do the cutting.
How do I install the electric knife blades?
Start with the cord unplugged and pick the blades up inside their protective cover, holding them by the drip guards between your thumb and forefinger so you do not touch the scalloped edges. Insert the raised rivet on one blade into the keyhole slot on the other, then slide the joined ends into the opening on the front of the power handle with the scalloped edges facing away from your hand. Push gently on each drip guard toward the knife until the blades click into place, with the cutting edges facing down and away from the handle. Do not press the blade release button during this step. Finish by attaching the motor housing to the back of the knife and turning it to the left until it locks.
Can I put the parts in the dishwasher?
No. Do not place any components of the appliance in a dishwasher. Unplug the unit first, wipe the motor housing with a damp cloth or sponge, and never immerse the motor unit in water. The beater shaft, mixing cup, chopping bowl, chopping blade and electric knife blades can be washed by hand with mild soap and water. Wash the chopping bowl cover by hand in warm, soapy water with a cloth or sponge, handle the blades carefully, and make sure everything is completely dry before the next use.
How do I get warranty service for the Oster FPSTHBEKFC-AL?
In the U.S.A., call Sunbeam Consumer Service at 1.800.334.0759. A convenient service center address will be provided. The product carries a 1-year limited warranty from the date of purchase for the original retail purchaser, and the original sales receipt is required as proof of purchase. Do not return the product to the place of purchase, and do not try to repair or adjust its electrical or mechanical functions yourself, because that voids the warranty.