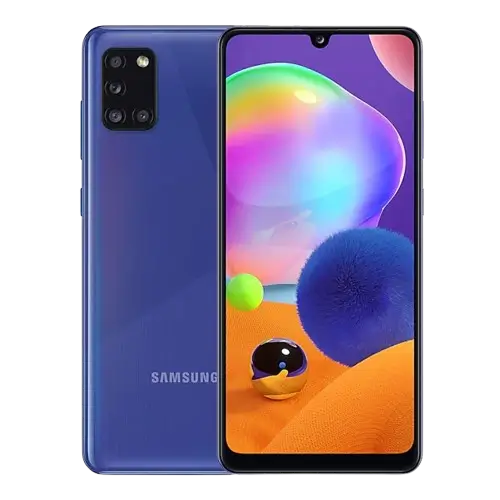
Samsung Galaxy A31 SM-A315F
The Samsung Galaxy A31 is an Android smartphone designed for everyday communication, photography, entertainment, and productivity. It features a touchscreen interface, front and rear cameras, a USB Type-C charging connection, a fingerprint recognition sensor, and an expandable storage option using a microSD card.
The Galaxy A31 provides access to Samsung applications and services, including Samsung Notes, Samsung Health, Samsung Pay, Samsung Members, and SmartThings. It also supports everyday functions such as voice calls, messaging, Bluetooth connectivity, Wi-Fi, and mobile data.
The device uses a physical Side key and Volume key for basic controls. Its software provides additional functions through the Settings app, including biometric security, battery management, display customization, and device maintenance.
This user manual covers the following models:
- SM-A315F
- SM-A315F/DS
- SM-A315G/DS
Some features and settings depend on the model, region, mobile service provider, and installed software. Dual-SIM functions are available on supported dual-SIM models, while NFC functions are limited to NFC-enabled models.
Device Layout and Physical Controls
The Galaxy A31 has several physical components that support everyday operation, charging, photography, audio, and wireless communication.
Main Device Components
| Component | Function |
|---|---|
| Front camera | Captures selfies and supports front-camera functions. |
| Rear camera | Captures photographs and videos using the available camera modes. |
| Flash | Provides additional light when taking photographs. |
| Light sensor | Detects surrounding light conditions for supported display functions. |
| Volume key | Controls the device’s volume. |
| Side key | Turns the device on or off and locks or activates the screen. |
| Fingerprint recognition sensor | Recognizes registered fingerprints for screen unlocking. |
| SIM card / Memory card tray | Holds supported nano-SIM cards and a microSD card. |
| Multipurpose jack (USB Type-C) | Connects the charging cable and supported USB accessories. |
| Earphone jack | Connects compatible wired earphones. |
| Microphone | Captures voice during calls and audio recordings. |
| Speaker | Outputs sound for calls, media, and other device functions. |
| GPS antenna | Supports location-related functions. |
| NFC antenna | Supports NFC functions on compatible models. |
| Main antenna | Supports wireless communication. |
The fingerprint recognition sensor is located at the bottom center of the touchscreen.
Physical Key Functions
The Side key and Volume Down key provide several important controls.
| Control | Function |
|---|---|
| Press and hold Side key | Turns the device on or off. |
| Press Side key | Turns the screen on or locks it. |
| Press Side key twice | Launches the app or feature assigned to the shortcut. |
| Side key + Volume Down key | Captures a screenshot when pressed simultaneously. |
| Press and hold Side key + Volume Down key | Forces the device to restart when held for more than 7 seconds. |
Customize the Side Key Shortcut
You can assign an application or feature to the double-press action.
- Open the Settings app.
- Tap Advanced features.
- Select Side key.
- Choose the app or feature to launch when you press the Side key twice.
The assigned shortcut provides quicker access to frequently used functions.
Charging the Samsung Galaxy A31
Charge the battery before using the smartphone for the first time or after leaving it unused for an extended period.
Wired Charging Procedure
- Connect the USB Type-C cable to the USB power adapter.
- Connect the other end of the cable to the device’s multipurpose jack.
- Plug the power adapter into an electrical outlet.
- Allow the battery to charge.
- When charging is complete, disconnect the charger from the device.
Important charging precautions:
- Use only a Samsung-approved battery, charger, and cable specifically designed for the device.
- Use the USB Type-C cable supplied with the device. A Micro USB cable may damage it.
- Connecting the charger incorrectly can cause serious damage.
- Do not charge the device if its multipurpose jack is wet. Thoroughly dry the connection before charging.
- Disconnect the charger when it is not being used.
- Keep the charger close to an electrical outlet and easily accessible during charging.
Enable Fast Charging
The Galaxy A31 manual describes fast charging using a charger that supports Adaptive fast charging.
To enable the setting:
- Open Settings.
- Tap Battery and device care.
- Select Battery.
- Tap More battery settings.
- Activate the available fast charging option.
Fast charging can operate more quickly when the device or its screen is turned off. Actual charging speed depends on the charger and operating conditions.
Reduce Battery Consumption
The device provides several options to extend battery usage time.
- Turn off the screen by pressing the Side key when the smartphone is not in use.
- Activate Power saving mode.
- Close unnecessary background applications.
- Turn off Bluetooth when it is not needed.
- Deactivate automatic synchronization for applications that do not require it.
- Reduce screen brightness.
- Shorten the screen timeout period.
- Use the Battery and device care optimization function.
Battery Charging Precautions
The smartphone and charger may become warm during charging. This is generally normal.
If the battery becomes unusually hot, charging may slow down or stop automatically.
If the device becomes excessively warm while charging:
- Disconnect the charger.
- Close running applications.
- Allow the device to cool.
- Resume charging after the temperature has returned to normal.
If the lower part of the smartphone overheats because of a damaged USB cable, replace the cable with a new Samsung-approved one.
If the device does not charge properly, take the device and charger to a Samsung Service Centre.
Installing SIM and microSD Cards
The Galaxy A31 uses a removable tray for nano-SIM cards and compatible microSD memory cards.
The available tray configuration depends on the device model.
Install a Nano-SIM Card
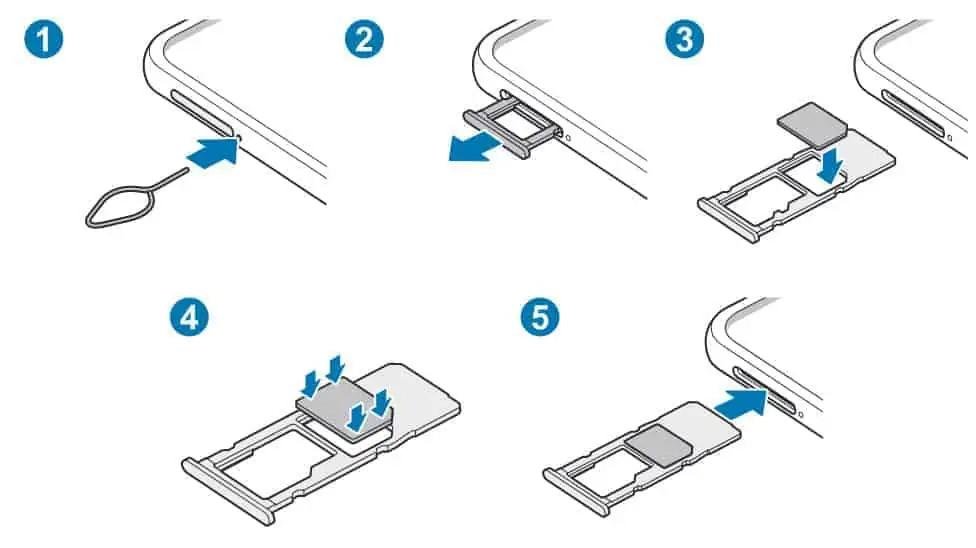
- Insert the SIM ejector pin into the hole beside the SIM card tray.
- Push the pin gently to loosen the tray.
- Pull the tray carefully out of the device.
- Place the nano-SIM card on the tray with its gold-colored contacts facing downward.
- Press the card gently into the tray to secure it.
- Insert the tray completely back into its slot.
SIM card precautions:
- Use only a nano-SIM card.
- Insert the ejector pin perpendicular to the tray hole.
- Make sure the SIM card is secured properly so it cannot fall out.
- Ensure the tray is completely dry before inserting it.
- Fully insert the tray to prevent liquid from entering the device.
- Keep SIM cards secure because a lost or stolen SIM card can cause inconvenience or misuse.
Configure Dual-SIM Settings
On supported dual-SIM models, you can use two SIM or USIM cards with different phone numbers or service providers.
- Open Settings.
- Tap Connections.
- Select SIM card manager.
- Activate the SIM cards you want to use.
- Configure the preferred SIM card for supported functions, such as voice calls.
- Adjust other available SIM settings as required.
The SIM card manager provides these options:
| Setting | Function |
|---|---|
| SIM cards | Activates SIM cards and allows their settings to be customized. |
| Preferred SIM card | Selects the preferred SIM for supported functions, including voice calls. |
| Auto data switching | Uses another SIM for data services if the preferred SIM cannot connect to the network. |
| More SIM card settings | Provides additional call-related settings. |
Using two SIM cards may reduce data transfer speeds in some areas compared with using one SIM card.
Install a microSD Memory Card
The Galaxy A31 supports expandable storage through a compatible microSD card.
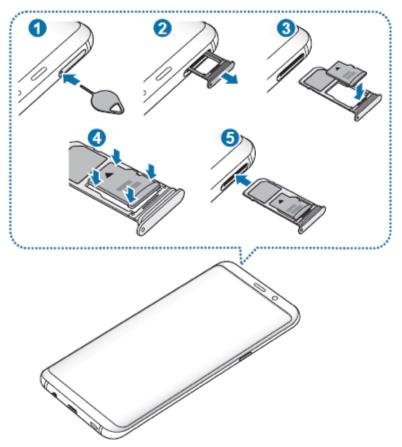
- Insert the SIM ejector pin into the hole beside the tray.
- Remove the tray carefully.
- Place the microSD card in its designated tray position with the gold-colored contacts facing downward.
- Press the card gently to secure it.
- Insert the tray completely into the device.
Memory card compatibility and maximum supported capacity depend on the card manufacturer, card type, and device model. Check Samsung’s specifications for the applicable model before purchasing a card.
Remove a microSD Card Safely
Do not remove a memory card while the device is reading, writing, or transferring information.
- Open Settings.
- Tap Battery and device care.
- Select Storage.
- Swipe left to display the SD card page.
- Tap the additional options menu.
- Select Unmount.
- Remove the memory card after it has been safely unmounted.
Removing a card during data access can corrupt files or damage the card and device.
Format a Memory Card
A memory card formatted using a computer may not be compatible with the smartphone.
To format it using the device:
- Open Settings.
- Tap Battery and device care.
- Select Storage.
- Swipe left to open the SD card page.
- Tap the additional options menu.
- Select Format.
Important: Formatting deletes the information stored on the memory card. Back up important files before starting.
The device supports FAT and exFAT file systems. A card formatted using another file system may require reformatting before it can be used.
Turning the Device On and Off
Turn On the Galaxy A31
- Locate the Side key on the device.
- Press and hold the Side key for a few seconds.
- Wait for the Samsung startup screen.
- Follow the on-screen instructions if the device requires initial configuration.
If the battery is completely discharged, connect the charger and allow it to charge for a few minutes before attempting to turn it on.
Turn Off the Device
- Press and hold the Side key.
- When the power menu appears, tap Power off.
- Confirm the action if prompted.
You can also open the notification panel, swipe downwards, and tap the power icon to access the power options.
To restart the smartphone, select Restart from the power menu.
Force Restart an Unresponsive Device
If the screen freezes or the smartphone becomes unresponsive:
- Press and hold the Side key and Volume Down key simultaneously.
- Continue holding both keys for more than 7 seconds.
- Release the keys when the device restarts.
This procedure forces a restart and is useful when normal screen controls are unavailable.
Use Emergency Mode
Emergency mode reduces battery consumption by restricting certain applications and functions.
To activate it:
- Press and hold the Side key.
- Tap Emergency mode.
- Review the available emergency functions.
You can also access Emergency mode through the notification panel’s additional options.
Emergency mode can provide functions such as emergency calling, location sharing, and an emergency alarm.
To deactivate it, tap the additional options menu and select Turn off Emergency mode.
Initial Smartphone Setup
When you turn on the Galaxy A31 for the first time, follow the instructions displayed on the screen.
The initial setup process guides you through the available device configuration options.
- Turn on the device using the Side key.
- Select the appropriate options presented during setup.
- Connect to a Wi-Fi network when available.
- Follow the instructions for configuring accounts and device features.
- Complete the remaining on-screen setup steps.
A Wi-Fi connection may be necessary to configure certain features during initial setup.
If you are restoring or transferring data from another device, you can use Samsung Smart Switch.
Transfer Data Using Smart Switch
Smart Switch allows you to transfer supported information from an older device.
- Open Settings.
- Tap Accounts and backup.
- Select Bring data from old device.
- Follow the on-screen instructions.
- Choose the available transfer method and the data you want to transfer.
The transfer options depend on the previous device and the connection method.
You can also transfer information using external storage, such as a microSD card, when supported.
Fingerprint and Face Recognition Security
The Galaxy A31 provides biometric security options for unlocking the screen. These include fingerprint recognition and face recognition.
Both features require an additional screen lock method, such as a pattern, PIN, or password.
Register a Fingerprint
The fingerprint sensor is located at the bottom center of the screen.
- Open Settings.
- Tap Biometrics and security.
- Select Fingerprints.
- Read the instructions and tap Continue.
- Set a screen lock method if one has not already been configured.
- Place your finger on the fingerprint recognition area.
- Lift your finger when prompted and place it on the sensor again.
- Repeat the process until registration is complete.
- Tap Done.
You can check registered fingerprints by selecting Check added fingerprints.
Enable Fingerprint Unlocking
- Open Settings.
- Tap Biometrics and security.
- Select Fingerprints.
- Unlock the screen using your existing screen lock method.
- Activate the Fingerprint unlock switch.
- Place your registered finger on the sensor when unlocking the screen.
For better recognition, keep your finger and the sensor area clean and dry. Place your finger over the wider fingerprint recognition area rather than touching it only with the fingertip.
A damaged or unsuitable screen protector can interfere with fingerprint recognition.
Register Face Recognition
Face recognition allows the device to unlock when it recognizes your face.
- Open Settings.
- Tap Biometrics and security.
- Select Face recognition.
- Read the instructions and tap Continue.
- Set a screen lock method.
- Position your face inside the frame displayed on the screen.
- Allow the front camera to scan your face.
- Complete the registration process.
For better registration results, use a well-lit indoor area away from direct sunlight and ensure that the camera lens is clean.
Enable Face Unlocking
- Open Settings.
- Select Biometrics and security.
- Tap Face recognition.
- Unlock the screen using your existing screen lock method.
- Activate the Face unlock switch.
- Look at the screen when attempting to unlock the device.
If the device does not recognize your face, use your preset pattern, PIN, or password.
Security warning: Samsung identifies face recognition as less secure than a pattern, PIN, or password. The device could potentially be unlocked by someone or something that resembles your registered image.
The first unlock after turning on the smartphone requires the preset screen lock method rather than biometric recognition.
Understanding the Screen and Navigation
The Galaxy A31 uses a touchscreen interface for accessing applications, changing settings, entering information, and controlling device functions.
Basic Touchscreen Gestures
| Gesture | How to Use It |
|---|---|
| Tap | Touch the screen once to select an item or activate a function. |
| Tap and hold | Keep your finger on an item for approximately 2 seconds to access additional actions. |
| Drag | Hold an item and move it to another position. |
| Double-tap | Touch the screen twice quickly. |
| Swipe | Move your finger upwards, downwards, left, or right. |
| Pinch | Bring two fingers together to zoom out or reduce the view. |
| Spread | Move two fingers apart to zoom in or enlarge the view. |
Avoid excessive pressure and sharp objects on the touchscreen. Electrostatic discharge from other electrical devices can also cause touchscreen malfunctions.
Navigate Using the Soft Buttons
The default navigation bar contains three buttons.
| Button | Function |
|---|---|
| Recents | Opens the list of recently used applications. |
| Home | Returns to the Home screen. Press and hold to launch Google Assistant. |
| Back | Returns to the previous screen. |
Switch to Gesture Navigation
You can hide the navigation bar and use swipe gestures instead.
- Open Settings.
- Tap Display.
- Select Navigation bar.
- Under Navigation type, select Swipe gestures.
- Open More options to choose your preferred gesture arrangement.
You can also deactivate the Gesture hint switch to hide the gesture indicator at the bottom of the screen.
Use the Home Screen and Apps Screen
The Home screen provides access to frequently used applications, widgets, and shortcuts.
To open the Apps screen, swipe upwards from the Home screen.
To return to the Home screen, swipe upwards or downwards on the Apps screen, or use the Home navigation button.
You can customize the Home screen by:
- Adding or removing panels.
- Moving application shortcuts.
- Creating folders.
- Adding widgets.
- Changing wallpapers and themes.
- Adjusting the Home screen layout.
To access the Home screen editing options, tap and hold an empty area of the screen.
Using the Galaxy A31 Camera
The Camera app supports multiple shooting modes and settings for capturing photographs and recording videos.
Take a Photograph
- Open the Camera app.
- Point the camera at the subject.
- Tap the area of the preview screen where you want the camera to focus.
- Adjust brightness using the adjustment bar if necessary.
- Tap the camera button to capture the photograph.
You can also open the Camera app by pressing the Side key twice quickly or dragging the camera shortcut to the left on the locked screen.
The camera may automatically shut off when it is not being used.
Switch Between Front and Rear Cameras
- Open the Camera app.
- Tap the camera-switching icon.
- Select the front camera for selfies or the rear camera for regular photographs.
- Position the subject within the preview.
- Tap the camera button.
The front camera also provides a wider-angle selfie option where supported.
Use the Camera Zoom
When using the rear camera, the available zoom controls include:
| Zoom Setting | Camera Function |
|---|---|
| 0.5 | Uses the Ultra wide camera for wider-angle photographs and videos. |
| 1 | Uses the wide-angle camera for standard photographs and videos. |
You can select a zoom setting or drag the zoom control to adjust the view.
Alternatively, spread two fingers apart to zoom in or pinch them together to zoom out.
Zoom availability depends on the selected camera and shooting mode.
Available Camera Modes
The Galaxy A31 manual documents several photography and video modes.
| Mode | Function |
|---|---|
| PHOTO | Automatically adjusts shooting options according to the surroundings. |
| VIDEO | Records videos using automatic camera adjustments. |
| PORTRAIT | Blurs the background to make the subject stand out. |
| PRO | Allows manual adjustment of ISO, exposure value, and white balance. |
| FOOD | Highlights food using a circular focus area and adjustable color tone. |
| PANORAMA | Combines a series of photographs into a wider scene. |
| MACRO | Captures subjects at close range. |
Some camera options may vary depending on the model and shooting mode.
Record a Video
- Open the Camera app.
- Select VIDEO from the shooting modes list.
- Tap the recording button.
- To capture a still image while recording, tap the capture option.
- To change the focus manually, tap and hold the desired area.
- Tap the stop button to finish recording.
Use Portrait Mode
Portrait mode creates a photograph with a blurred background.
- Select PORTRAIT from the shooting modes list.
- Position the subject within the camera preview.
- Adjust the background blur level using the adjustment bar.
- Wait until Ready appears on the screen.
- Tap the camera button to capture the photograph.
Portrait effects may not work correctly when the subject is moving, has a similar color to the background, or has a thin or transparent appearance. Sufficient lighting is also important.
Use Pro Mode
Pro mode provides manual control over selected camera settings.
- Open the Camera app.
- Tap MORE.
- Select PRO.
- Choose the setting you want to adjust.
- Configure the available values.
- Tap the camera button to take the photograph.
| Setting | Function |
|---|---|
| ISO | Controls camera light sensitivity. Higher values can help with fast-moving or poorly lit subjects but may introduce image noise. |
| EV | Adjusts exposure value and determines how much light reaches the camera sensor. |
| WB | Adjusts white balance and color temperature for more natural-looking colors. |
You can also separate the focus and exposure areas by tapping and holding the preview screen and dragging the AF/AE frame to the desired position.
Use Food Mode
- Open the Camera app.
- Tap MORE.
- Select FOOD.
- Tap the screen and drag the circular frame over the food.
- Resize the frame by dragging one of its corners if necessary.
- Adjust the color tone using the adjustment bar.
- Tap the camera button.
The area outside the selected circular frame is blurred.
Use Panorama Mode
- Open the Camera app.
- Tap MORE.
- Select PANORAMA.
- Tap the capture button.
- Move the smartphone slowly in one direction.
- Keep the image within the guide frame.
- Tap the stop button to finish capturing the panorama.
Avoid using panorama mode with indistinct backgrounds, such as an empty sky or plain wall.
Customize Camera Settings
Open the Camera app and tap the Settings icon to access additional options.
Important settings include:
| Setting | Function |
|---|---|
| Scene optimiser | Automatically adjusts colors and effects based on the subject or scene. |
| Scan QR codes | Enables QR code scanning through the camera preview. |
| High efficiency pictures | Saves photographs in HEIF format. |
| Save selfies as previewed | Saves front-camera photographs without flipping them. |
| Reduce file size | Records videos using HEVC compression to conserve storage. |
| Auto HDR | Reproduces details in bright and dark areas. |
| Grid lines | Displays composition guides in the viewfinder. |
| Location tags | Adds GPS location information to photographs. |
| Shooting methods | Provides additional methods for capturing photos and videos. |
| Settings to keep | Retains selected camera settings between sessions. |
| Storage location | Selects the storage location when a memory card is installed. |
| Watermark | Adds a watermark to the bottom-left corner of photographs. |
HEVC videos may not play on other devices or be shareable online, depending on compatibility.
If you do not want location information attached to your photographs, deactivate Location tags.
Everyday Apps and Smartphone Features
The Galaxy A31 includes applications for communication, productivity, entertainment, and device management.
Phone and Calling Functions
To make a voice call:
- Open the Phone app.
- Tap Keypad.
- Enter the phone number.
- Tap the voice call button.
For a video call, select the appropriate video calling option when available.
You can also make calls from the Recents or Contacts screens.
To answer an incoming call, drag the answer icon outside the large circle. To reject it, drag the reject icon outside the circle.
Set Up Speed Dial
- Open the Phone app.
- Select Keypad or Contacts.
- Tap the additional options menu.
- Select Speed dial numbers.
- Choose a speed dial number.
- Add the required phone number.
To call a saved speed dial number, tap and hold its assigned number on the keypad.
Send and Receive Messages
To send a text message:
- Open the Messages app.
- Tap the new message icon.
- Add the recipient.
- Enter the message.
- Tap the Send button.
You can attach files, add emojis or stickers, and send voice messages when the relevant options are available.
To read an existing message, open Messages, select Conversations, and choose the conversation you want to view.
Manage Contacts
The Contacts app allows you to create, import, search, share, and organize contact information.
To create a new contact:
- Open Contacts.
- Tap the Add contact icon.
- Select a storage location.
- Enter the contact information.
- Tap Save.
To import contacts, select Manage contacts → Import or export contacts → Import and follow the instructions.
Use Multi Window
Multi window allows two applications to run simultaneously in split-screen view. You can also use pop-up view for supported applications.
To open split-screen view:
- Tap the Recents navigation button.
- Find the application you want to use.
- Tap its application icon.
- Select Open in split screen view.
- Choose the second application.
Drag the circle between the two application windows to adjust their sizes.
Some applications do not support multi-window functionality.
Use Samsung Notes
Samsung Notes allows you to create notes using text, handwriting, drawings, images, and voice recordings.
Open the Samsung Notes app and tap the Create icon to start a new note.
Use Smart View
Smart View allows supported content to be displayed on a larger compatible screen.
Open the notification panel, access the media or device controls, select Smart View where available, and choose the compatible display device.
Use Voice Recorder
The Voice Recorder app allows you to capture and play audio recordings.
- Open Voice Recorder.
- Tap the recording button to begin.
- Speak into the microphone.
- Tap the stop button when finished.
- Save the recording if prompted.
Use FM Radio
The Radio app requires a connected earphone, which serves as the radio antenna.
Open the Radio app and allow it to scan for available stations when using it for the first time.
Battery, Storage, and Device Maintenance
The Galaxy A31 includes Battery and device care tools for monitoring system performance and managing available storage.
Optimize the Smartphone
- Open Settings.
- Tap Battery and device care.
- Select Optimise now.
The optimization feature can:
- Close applications running in the background.
- Manage abnormal battery usage.
- Scan for crashed applications and malware.
Configure Automatic Optimization
You can schedule the device to optimize itself when it is not in use.
- Open Settings.
- Tap Battery and device care.
- Open the additional options menu.
- Select Automation.
- Tap Auto optimise daily.
- Activate the feature.
- Select Time if you want to specify when optimization should take place.
Manage Internal Storage
To check storage usage:
- Open Settings.
- Tap Battery and device care.
- Select Storage.
- Review the available storage categories.
- Select unnecessary files or applications.
- Choose Delete or Uninstall, as appropriate.
The available internal storage is lower than the specified capacity because the operating system and default applications occupy part of the storage.
Manage Running Applications
- Open Settings.
- Tap Battery and device care.
- Select Memory.
- Review the applications currently using memory.
- Select applications you want to stop.
- Tap Clean now.
Scan for Security Threats
The Device protection function can scan the smartphone for malware.
- Open Settings.
- Tap Battery and device care.
- Select Device protection.
- Tap Scan phone.
Keep the device updated and use the available security functions to help protect personal information.
Important Safety and Care Instructions
Following the manufacturer’s precautions helps prevent unnecessary device damage, overheating, and data loss.
Prevent Overheating
The smartphone may become warm during demanding activities, including:
- Playing high-quality games for extended periods.
- Recording videos for long periods.
- Streaming videos at maximum brightness.
- Using mobile hotspot and tethering.
- Running several applications simultaneously.
- Downloading large files.
- Using navigation applications in direct sunlight.
- Charging with a damaged USB cable.
- Operating in areas with weak network signals.
If the device becomes unusually hot, close unnecessary applications and allow it to cool.
If overheating continues for a prolonged period, stop using the device and contact a Samsung Service Centre.
When the temperature becomes excessive, the device may restrict performance, reduce screen brightness, stop charging, close applications, or shut down to protect itself.
Protect the Screen and Camera
- Avoid displaying fixed graphics for extended periods because they may cause afterimages or screen burn-in.
- Use the Screen timeout setting to turn off the display automatically when it is not being used.
- Activate Adaptive brightness to adjust brightness according to surrounding light.
- Avoid exposing the camera lens directly to strong light sources such as direct sunlight.
- Clean the camera lens if photographs appear blurry.
- Avoid exposing the touchscreen to water or excessive moisture.
- Use a Samsung-approved screen protector where possible.
Protect the Device’s Physical Components
- Do not use the device if its glass or acrylic body is broken. Have it repaired at a Samsung Service Centre.
- Do not insert sharp objects into the microphone, speaker, or receiver openings.
- Avoid covering the antenna areas with metallic stickers or metallic covers.
- Keep magnets away from objects that may be affected by magnetic fields, including credit cards and implantable medical devices.
- Avoid storing the device near heaters, microwaves, or hot cooking equipment.
- Do not use damaged chargers, batteries, or cables.
Protect Stored Information
Regularly back up important information.
You can use Samsung Cloud or Smart Switch to transfer and back up supported information.
Samsung does not accept responsibility for data loss resulting from improper use of external storage or failure to maintain backups.
Battery Removal
The Galaxy A31 battery should not be removed by the owner.
Samsung instructs users to contact an authorized service center for battery removal. Attempting to remove the battery improperly can damage the battery or device and cause personal injury.
Troubleshooting the Samsung Galaxy A31
The following checks cover problems and corrective actions documented for the Galaxy A31.
The Device Does Not Respond
If the smartphone freezes or stops responding:
- Try closing the applications that are causing the problem.
- If normal controls are unavailable, press and hold the Side key and Volume Down key simultaneously for more than 7 seconds.
- Wait for the device to restart.
- If the problem continues, contact a Samsung Service Centre.
A factory data reset is another documented troubleshooting option, but it should only be considered after other methods fail.
To perform a factory data reset:
- Open Settings.
- Tap General management.
- Select Reset.
- Tap Factory data reset.
- Select Reset.
- Tap Delete all.
Back up all important information before performing this procedure. A factory data reset deletes stored information.
The Touchscreen Responds Slowly or Incorrectly
Try the following manufacturer-recommended checks:
- Remove screen protectors or optional accessories that may interfere with touchscreen operation.
- Make sure your hands are clean and dry.
- Avoid using sharp objects on the screen.
- Avoid operating the touchscreen in humid conditions or when it is wet.
- Restart the device to clear temporary software problems.
- Check whether a software update is available.
If the touchscreen is scratched or damaged, visit a Samsung Service Centre.
Calls Cannot Be Connected
If you cannot make or receive calls:
- Check that the device is connected to the correct cellular network.
- Make sure call barring has not been enabled for the number you are dialing.
- Check whether call barring has been enabled for incoming numbers.
If the problem continues, contact your mobile service provider.
Other People Cannot Hear You During Calls
Check the microphone and connected accessories.
- Make sure your hand is not covering the built-in microphone.
- Keep the microphone close to your mouth while speaking.
- If using an earphone, make sure it is connected properly.
Remove accessories, such as screen protectors or stickers, that cover the upper microphone area.
The Battery Does Not Charge Properly
For Samsung-approved chargers, check that the charger is connected correctly.
If charging still does not work properly, take the device to a Samsung Service Centre.
If the battery requires replacement, have it handled by an authorized service provider.
The Battery Drains Faster Than Before
Battery consumption may increase when using GPS, games, internet services, and other demanding applications.
Battery performance may also be affected by very cold or hot temperatures.
The battery is a consumable component, so its useful charge gradually decreases over time.
Use Battery and device care and Power saving mode to help manage consumption.
Camera Error Messages Appear
The Camera app requires sufficient available storage and battery power.
If camera error messages appear:
- Charge the battery.
- Free up storage by transferring files to a computer or deleting unnecessary files.
- Restart the device.
- Try opening the Camera app again.
If the problem continues, contact a Samsung Service Centre.
Bluetooth Does Not Connect Properly
If another Bluetooth device cannot be found or the connection is unstable:
- Make sure the other Bluetooth device is ready to be discovered or connected.
- Keep both devices within the maximum Bluetooth range of 10 m.
- Open Settings on the Galaxy A31.
- Tap Connections.
- Turn Bluetooth off and activate it again.
If the problem continues, you can reset network settings:
- Open Settings.
- Tap General management.
- Select Reset.
- Tap Reset network settings.
- Select Reset settings.
- Tap Reset.
Be aware that resetting network settings may remove registered information.
The Device Cannot Find Its Current Location
GPS signals may be obstructed indoors or in certain surroundings.
When GPS reception is limited, configure the device to use Wi-Fi or a mobile network to help determine its location.
There Is Not Enough Storage Space
Open Settings → Battery and device care → Storage and review the available storage.
Delete unnecessary files, clear unnecessary cached data using device care, or uninstall applications that are no longer needed.
The Screen Brightness Control Is Missing
If the brightness adjustment bar does not appear in the notification panel:
- Swipe down from the status bar to open the notification panel.
- Swipe down again to expand the panel.
- Tap the additional options menu.
- Select Quick panel layout.
- Tap Brightness control.
- Select Show always.
This restores the brightness control to the expanded notification panel.
Frequently Asked Questions
How do I turn on the Samsung Galaxy A31?
Press and hold the Side key for a few seconds until the Samsung startup screen appears. If the battery is completely discharged, connect the charger and allow the device to charge for a few minutes before trying again.
How do I restart the Galaxy A31 if the screen freezes?
Press and hold the Side key and Volume Down key simultaneously for more than 7 seconds. The smartphone should restart. If it continues to freeze after restarting, Samsung recommends further troubleshooting or contacting a Samsung Service Centre.
Can I use two SIM cards in the Samsung Galaxy A31?
The manual supports dual-SIM operation on compatible models. You can activate both SIM cards through Settings → Connections → SIM card manager and configure preferred SIM settings for supported functions. Network availability and data speeds may vary depending on your service provider and location.
How do I insert a microSD card into the Galaxy A31?
Use the SIM ejector pin to remove the card tray. Place the compatible microSD card in its designated tray position with the gold-colored contacts facing downward, then insert the tray completely. Check card compatibility and the maximum supported capacity for your model before purchasing a memory card.
How do I remove a microSD card without losing data?
First open Settings → Battery and device care → Storage. Swipe left to display the SD card page, open the additional options menu, and select Unmount. Wait until the card is safely unmounted before removing the tray. Removing external storage while files are being accessed or transferred can cause data corruption or loss.
How do I unlock the Galaxy A31 using my fingerprint?
Register your fingerprint through Settings → Biometrics and security → Fingerprints. Follow the on-screen instructions and repeatedly place your finger on the fingerprint recognition area until registration is complete. Activate Fingerprint unlock to use the registered fingerprint for screen unlocking.
Does the Galaxy A31 support face recognition?
The manual documents face recognition as a screen-unlocking option. Register your face through Settings → Biometrics and security → Face recognition, then activate Face unlock. Face recognition is less secure than a pattern, PIN, or password, so retain your alternative screen lock method.
How do I take better photographs with the Galaxy A31?
Clean the camera lens, select the appropriate shooting mode, and tap the subject on the preview screen to focus. Use the available brightness adjustment and rear-camera zoom controls when needed. Portrait mode can blur the background, while Pro mode provides manual ISO, exposure, and white balance adjustments.
Why are my Galaxy A31 photographs blurry?
Blurry photographs may result from a dirty camera lens, insufficient lighting, subject movement, or unsuitable focusing conditions. Clean the lens and try taking the photograph again. In Portrait mode, the background blur may not work properly when the subject is moving, transparent, or similar in color to the background.
What should I do if my Galaxy A31 overheats?
Close applications that are using substantial processing power and allow the device to cool. If it becomes hot while charging, disconnect the charger and wait before charging again. Avoid direct sunlight, damaged charging cables, and prolonged operation in very hot environments. If overheating continues for an extended period, contact a Samsung Service Centre.
How can I improve Bluetooth connectivity on the Galaxy A31?
Make sure the other Bluetooth device is discoverable and keep both devices within 10 m of each other. If the connection remains unstable, open Settings → Connections and deactivate and reactivate Bluetooth. If necessary, use the Reset network settings option under General management → Reset, remembering that registered network information may be lost.