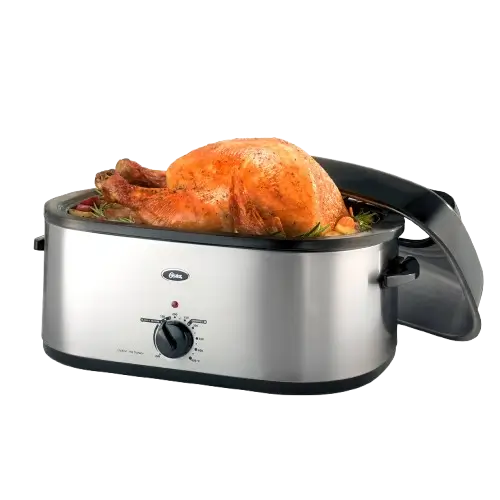
Oster Roaster Oven CKSTRS20-SBHVW
The Oster Roaster Oven is a countertop electric appliance that cooks inside a removable roasting pan under a lid with a glass viewing window. It is controlled by a single temperature dial that includes dedicated Defrost and Keep Warm settings, so one unit can roast meat and poultry, bake, slow cook and hold food warm until serving. A roasting rack sits inside the pan for roasts and for bake pans, and an indicator light shows when the roaster has reached the set temperature. The Defrost setting is designed to take a frozen turkey from frozen to roasted in hours instead of days. This entry covers the parts, setup, everyday operation, Defrost and Keep Warm settings, cooking charts, cleaning, safety information and warranty contacts for model CKSTRS20-SBHVW.
Parts and Controls
The parts shown in the diagram are listed below.
| Label | Part |
|---|---|
| a | Lid Handle |
| b | Viewing Window |
| c | Lid |
| d | Roasting Rack |
| e | Removable Roasting Pan |
| f | Indicator light |
| g | Handle |
| h | Roaster Oven Body |
| i | Temperature Control |
| j | Bottom Cover |
Temperature Control Settings
The Temperature Control turns the roaster on and sets the cooking temperature. It has an OFF position, a DEFROST setting and a Keep Warm setting, and the guide gives cooking temperatures in degrees Fahrenheit.
Indicator Light
During preheating, the light turns off once the set temperature is reached.
Electrical and Placement Requirements
| Item | Requirement |
|---|---|
| Power supply | 120 volt AC outlet |
| Plug type | Polarized plug (one blade wider than the other) |
| Use | Household countertop use only; not for outdoor or commercial use |
| Clearance | Keep 6 inches (152 mm) clear from the wall and on all sides |
| Surface | Dry, stable, level surface |
| Surface protection | Place a hot pad or trivet under the roaster; do not set the heated unit on a finished wood table |
Important Safeguards
Read all instructions before using the roaster oven, and save them. The following precautions reduce the risk of fire, electric shock and injury.
Electrical Safety
- Do not place or immerse the cord, plugs or appliance in water or other liquid.
- Do not operate the appliance with a damaged cord or plug, or after it malfunctions or has been damaged in any manner. Do not attempt to replace or splice a damaged cord. Return the appliance to the manufacturer for examination, repair or adjustment (see the warranty section).
- To disconnect, turn any control to OFF, then unplug the power cord from the outlet. Do not disconnect by pulling on the cord.
- Unplug the appliance when it is not in use, before putting on or taking off parts, and before cleaning.
- Do not let the cord hang over the edge of a table or counter, or touch hot surfaces. Never drape the cord over the edge of the counter and never use an outlet below the counter.
- Do not pull, twist or otherwise abuse the power cord.
Polarized Plug
The plug is polarized, which is a safety feature to reduce the risk of electric shock. It fits a polarized outlet only one way. If it does not fit, reverse the plug. If it still does not fit, contact a qualified electrician. Do not defeat this safety feature or modify the plug in any way. If the plug fits loosely into the AC outlet, or the outlet feels warm, do not use that outlet.
Power Cord and Extension Cords
A short power-supply cord is provided to reduce the risk of becoming entangled in or tripping over a longer cord. If you use a longer detachable power-supply cord or an extension cord on a short-cord model:
- The marked electrical rating of the cord should be at least as great as the electrical rating of the appliance.
- If the product is of the grounded type, the extension cord must be a grounding-type 3-wire cord.
- Arrange the longer cord so it does not drape over the countertop or tabletop where it can be pulled on by children or tripped over unintentionally.
Burn and Heat Precautions
- The appliance generates heat during use. Do not touch hot surfaces; use handles or knobs.
- The roaster oven body retains residual heat from the cooking cycle. Do not touch it immediately after removing the roasting pan, and allow it to cool before handling.
- Use caution when opening the lid during or after cooking. Escaping steam can cause burns, so always lift the lid away from your body.
- The roasting pan and roasting rack are hot after cooking. Use caution when removing them.
- Use extreme caution when moving an appliance that contains hot oil or other hot liquids.
- Spilled food can cause serious burns.
- Avoid sudden temperature changes, such as adding refrigerated foods or cold liquids to a heated roasting pan.
- Do not place the appliance on or near wet surfaces or heat sources, such as a hot gas or electric burner or a heated oven.
Use and Supervision
- The appliance is not to be used by children or by persons with reduced physical, sensory or mental capabilities. Close supervision is necessary when any appliance is used near children, and children should not play with it.
- Do not use the appliance outdoors, for commercial purposes, or for anything other than its intended use.
- Accessory attachments not recommended by the manufacturer may cause injuries.
- Cook only in the roasting pan provided. Do not cook directly in the roaster oven body, to protect against electric shock and product damage.
Glass Window Lid
On models with glass window lids, the window is made of tempered glass. Always inspect the glass for chips, cracks or other damage. Do not use the lid if it is damaged, because it may shatter during use.
Notices
- Some countertop and table surfaces are not designed to withstand the prolonged heat generated by certain appliances. Place a hot pad or trivet under the roaster.
- During initial use, some slight smoke or odor may be detected. This is normal with many heating appliances and will not recur after a few uses.
- The rough bottom of the roasting pan may scratch some surfaces, such as a ceramic or smooth glass cooktop, countertop or table. Always place heat-resistant protective padding under the roasting pan before setting it on a surface.
Before First Use
- Remove all packaging materials.
- Wash the removable roasting pan, roasting rack and lid in hot, soapy water using a sponge or wash cloth. Rinse and dry thoroughly. Do not use abrasive cleaners.
- Clean the outside of the roaster oven body with a soft cloth and warm soapy water. Do not immerse the roaster oven body in water.
How to Use the Roaster Oven
- Place the removable roasting pan into the roaster oven body. Do not cook food in the roaster without the removable roasting pan.
- Place the lid on the roaster.
- Make sure the Temperature Control is in the OFF position, then plug the cord into a 120 volt AC outlet.
- Turn the roaster on by turning the Temperature Control to the desired temperature.
- Preheat for 15 to 20 minutes. The light turns off once the set temperature is reached.
- Place the roasting rack into the removable roasting pan, put the food on the rack and place the lid on the roaster oven. Some foods or recipes do not require the roasting rack.
- When finished, turn the Temperature Control to the OFF position and unplug the roaster oven from the outlet.
- Remove the lid and, using oven mitts, remove the roasting rack with the food and serve.
Helpful Tips
- Always use pot holders or oven mitts when placing or removing food, a baking pan or a casserole in the preheated roaster.
- Significant heat escapes whenever the lid is removed, so cooking time must be extended. Avoid frequent lid removal to check progress or stir.
- Convenience foods can be baked in the roaster oven. Place the container on the roasting rack and follow the package directions.
- Meats roasted in the roaster oven are moist and tender. For additional browning, brush oil or butter over the meat before cooking.
- For darker, crispier poultry skin, remove the poultry from the roaster oven for the last 30 minutes of roasting time and finish it in a conventional oven at 425°F for those 30 minutes.
- High-moisture foods such as turkey and roasts may cause temporary condensation on the glass window as cooking starts. It dissipates during cooking and gives a clear view of the food.
Using the Lid Rest
Hold the lid upright by the handle and place the edge of the lid under the metal tabs just above either side handle.
Using the Defrost Setting
The Defrost setting is for a frozen turkey that was not defrosted ahead of time. To plan your day, estimate that roasting a turkey from frozen takes around twice the time it normally takes to roast an already defrosted turkey in this roaster. Use a good meat thermometer to check temperatures, and avoid opening the lid more than necessary so as much heat as possible stays in the roaster.
Defrost and Roast Steps
- Turn the temperature knob to DEFROST and preheat the roaster for about 15 to 20 minutes.
- Unwrap the frozen turkey, place it on the roasting rack inside the roaster and put the lid on. The defrosting process begins.
- Check that the legs and thighs have reached between 90°F and 100°F before basting. Once they have, brush the outside of the turkey with butter or oil and season with salt and pepper.
- Continue cooking on the Defrost setting until the thighs and legs reach at least 130°F to 150°F and the breast reaches at least 50°F to 60°F. Then use a baster to remove any excess liquid or ice chunks remaining in the cavity. Using tongs, remove the bag of giblets and the neck, then brush the outside with additional butter or oil. If the giblets and neck are hard to remove, let the turkey defrost slightly longer, checking about every 10 to 15 minutes until they come out relatively easily.
- Turn the temperature knob to 325°F and roast the turkey. It is done when the breast reaches at least 165°F and the legs and thighs reach at least 175°F. The temperature inside the cavity must also reach at least 165°F, or you risk contaminating the rest of the bird when you carve it. Take readings in different areas of the turkey. If any area has not reached these temperatures, roast a little longer, checking about every 10 to 15 minutes.
Estimated Defrost Times
| Step | Smaller turkey (about 17 lbs) | Larger turkey (about 23 lbs) |
|---|---|---|
| Roaster preheat (steps 1 and 2) | 20 minutes | 20 minutes |
| First check of temperatures (step 3) | 1 hour 30 minutes | 4 hours 30 minutes |
| Finish defrosting (step 4) | 2 hours | 1 hour |
| Total DEFROST time | 3 hours 50 minutes | 5 hours 50 minutes |
| Roasting turkey (step 5) | 2 hours | 1 hour |
| Total DEFROST + ROAST time | 5 hours 50 minutes | 6 hours 50 minutes |
These times are estimates for planning. The temperatures the turkey reaches at each stage are the best indicators. A smaller turkey can take longer to roast once thawed because the process depends on temperature and turkey size: a larger turkey is heated for longer while it defrosts, which shortens its roasting time.
Using the Keep Warm Setting
When food is done cooking, switch the temperature dial to the Keep Warm setting. The roaster maintains a low heat to keep the food warm until you are ready to serve, which is convenient when entertaining.
Care and Cleaning
Clean the appliance after every use.
- Turn the Temperature Control to the OFF position.
- Unplug the roaster oven from the outlet and allow the unit to cool.
- Allow the roaster oven to cool completely before cleaning.
- Wash the removable roasting pan, lid and roasting rack in hot, soapy water with a sponge or cloth. Rinse thoroughly in hot water, then towel dry. Do not use abrasive cleaners.
- Wipe the inside and outside of the roaster oven body with a damp cloth.
Do not immerse the roaster oven body in water or other liquid, and do not put the removable roasting pan in the dishwasher. The appliance has no user-serviceable parts. Any servicing beyond the cleaning described here should be performed only by an Authorized Service Representative (see the warranty section).
Cooking Guide
Determining Meat Doneness
Insert an instant-reading thermometer into the center of the meat or poultry, making sure not to touch bone. The temperature rises about 5 degrees after the meat is removed from the roaster. Let meats stand about 10 minutes before carving and serving. Rare pork, ham or poultry is not recommended.
| Meat | Medium rare | Medium | Well done |
|---|---|---|---|
| Beef roast | 145°F | 155°F | 170°F |
| Beef meatloaf | 160°F | ||
| Veal roast | 155°F | ||
| Lamb roast | 140°F | 155°F | 170°F |
| Pork roast | 155°F | 160°F | |
| Roast chicken or turkey | 180°F | ||
| Chicken or turkey breast or parts | 180°F |
Roasting Meats and Poultry
Meats cook more rapidly in the roaster oven than in a conventional oven. Reducing the temperature and increasing the time results in a browner, crispier crust. The times below are approximate and are a guideline only.
The roasting chart and the doneness table list some different internal temperatures (for example, 160°F for medium beef in the chart and 155°F in the doneness table); both are shown as printed.
| Meat | Weight | Roasting temperature | Minutes per lb | Approximate cooking time | Internal temperature |
|---|---|---|---|---|---|
| Beef standing rib | 6 to 8 lbs | 350°F | Rare: 10 to 12 / Medium rare: 12 to 15 / Medium: 15 to 17 / Well: 17 to 19 | 1 hour / 1 ¼ hours / 1 ½ hours / 1 ¾ hours | 124°F / 145°F / 160°F / 170°F |
| Beef sirloin tip | 3 to 5 lbs | 325°F | Rare: 11 to 13 / Medium rare: 13 to 15 / Medium: 15 to 17 / Well: 17 to 19 | 1 hour / 1 ¼ hours / 1 ½ hours / 1 ¾ hours | 124°F / 145°F / 160°F / 170°F |
| Beef tenderloin | 2 to 4 lbs | 450°F | Rare: 10 to 12 / Medium rare: 12 to 14 / Medium: 15 to 16 / Well: 16 to 18 | 25 minutes / 40 minutes / 50 minutes / 1 hour | 124°F / 145°F / 160°F / 170°F |
| Corned beef | 3 lbs | 350°F | 25 to 28 | 1 ¼ hours | 160°F |
| Meatloaf | 2 lbs | 350°F | 45 to 50 | 1 ½ hours | 160°F |
| Meatballs | 2 lbs / 36 meatballs | 350°F | 12 to 15 | 25 minutes | 160°F |
| Lamb leg | 6 lbs | 350°F | Medium rare: 12 to 15 / Medium: 15 to 17 / Well: 17 to 19 | 1 ¼ hours / 1 ½ hours / 1 ¾ hours | 145°F / 160°F / 170°F |
| Crown rack (listed without a category label) | 3 lbs | 350°F | Medium rare: 12 to 15 / Medium: 15 to 17 / Well: 17 to 19 | 35 minutes / 45 minutes / 1 hour | 145°F / 160°F / 170°F |
| Pork loin roast | 5 lbs | 350°F | 22 to 25 | 2 hours | 160°F |
| Pork chops | 4 lbs / 6 chops | 325°F | 11 to 15 | 45 minutes | 160°F |
| Rolled pork shoulder | 4 lbs | 350°F | 24 to 28 | 2 hours | 160°F |
| Spareribs, country ribs | 4 to 5 lbs | 325°F | 22 to 25 | 1 ½ hours | 160°F |
| Spareribs, baby back ribs | 4 to 5 lbs | 325°F | 18 to 20 | 1 ¼ hours | 160°F |
| Smoked ham, bone in | 10 to 12 lbs | 325°F | 8 to 12 | 1 ¾ hours | 160°F |
| Smoked ham, boneless | 6 to 8 lbs | 325°F | 12 to 14 | 1 ¼ hours | 160°F |
| Smoked ham, fully cooked | 6 to 8 lbs | 325°F | 10 to 12 | 1 hour | 160°F |
| Veal loin | 5 lbs | 325°F | 24 to 28 | 2 hours | 155°F |
| Fresh chicken | 4 to 5 lbs | 350°F | 12 to 15 | 1 ¼ hours | 180°F |
| Roasting chicken | 6 to 8 lbs | 350°F | 10 to 12 | 1 ¾ hours | 180°F |
| Fresh turkey | 12 to 14 lbs | 325°F | 6 to 8 | 1 ¾ hours | 180°F |
| Frozen turkey (defrosted) | 14 to 16 lbs | 325°F | 6 to 8 | 2 hours | 180°F |
| Fresh turkey breast (bone in) | 5 to 6 lbs | 325°F | 10 to 15 | 1 ½ hours | 180°F |
Baking
Always preheat the roaster before baking. Place baking pans on the roasting rack, never on the bottom of the removable roasting pan. Metal pans are recommended because they provide better heat transfer and browning.
| Food | Amount or size | Baking pan | Temperature | Estimated time |
|---|---|---|---|---|
| Muffins | 2 ½-inch | 12 muffin pan | 400°F | 14 to 18 minutes |
| Quick bread | 1 loaf | 9 x 5 x 3 inch | 350°F | 25 to 30 minutes |
| Yeast bread | 1 ½ lb loaf | Baking sheet | 375°F | 25 to 30 minutes |
| Yeast rolls | 12 rolls | 9-inch square baking pan | 400°F | 15 to 20 minutes |
| Coffeecake | 9 squares | 9-inch square baking pan | 350°F | 40 to 45 minutes |
| Brownies | 9 squares | 9-inch square baking pan | 350°F | 25 to 30 minutes |
| Cupcake | 2 ½-inch | 12 muffin pan | 400°F | 14 to 18 minutes |
| Sheet cake | 12 servings | 13 x 9 x 3 inches | 350°F | 20 to 25 minutes |
| Pound cake | 10 servings | 10-inch tube pan | 325°F for dark pan, 350°F for light pan | 50 to 55 minutes |
| Bundt cake | 10 to 12 servings | 10-inch Bundt pan | 325°F for dark pan, 350°F for light pan | 50 to 55 minutes |
| Cheesecake | 10 to 12 servings | 10-inch spring form pan | Crust 400°F, then with filling 350°F | 10 minutes, then 50 to 55 minutes |
| Fruit pie | 8 to 10 servings | 9-inch glass pie plate | 400°F | 40 to 45 minutes |
| Quiche | 8 servings | 9-inch glass pie plate or 10-inch metal tart pan | 400°F for 10 minutes, then 300°F | 35 to 40 minutes after the 10 minutes |
| Pizza | 4 servings | 9-inch pizza pan | 425°F | 20 to 25 minutes |
| Mini pizzas | 6 servings | Baking sheet | 425°F | 15 to 20 minutes |
| Baked potatoes | 6 / 1 lb each | On rack | 400°F | 55 to 60 minutes |
| Baked potatoes | 10 / 8 oz each | On rack | 400°F | 45 to 50 minutes |
| Sweet potatoes | 8 / 10 oz each | On rack | 400°F | 45 to 50 minutes |
| Scalloped potatoes | 9-inch square baking dish | On rack | 350°F | 60 to 70 minutes |
| Casserole | 9-inch square baking dish | On rack | 350°F | 50 to 60 minutes |
| Winter squash, halved | In shallow baking pan | On rack | 375°F | 25 to 30 minutes |
| Baked apples | In shallow baking pan | On rack | 350°F | 35 to 40 minutes |
Warranty and Support
The roaster oven carries a 1 Year Limited Warranty from the date of purchase against defects in material and workmanship. The warranty is valid for the original retail purchaser, is not transferable and requires proof of purchase, so keep the original sales receipt. Do not attempt to repair or adjust any electrical or mechanical functions of the product, because doing so voids the warranty.
In the U.S.A., call 1-888-233-3214 for questions or warranty service, and a convenient service center address will be provided. In Canada, call 1-800-667-8623. The warranty states not to return the product to the listed addresses or to the place of purchase. For product questions, visit www.oster.com.
Frequently Asked Questions
How long should I preheat my Oster roaster oven?
Preheat for 15 to 20 minutes. With the removable roasting pan and lid in place and the cord plugged into a 120 volt AC outlet, turn the Temperature Control from OFF to the temperature you want. The indicator light turns off once the set temperature is reached. Add the food after preheating, using oven mitts.
What does the indicator light on the roaster oven mean?
During preheating, the light stays on until the roaster reaches the temperature you set, and it turns off once that temperature is reached. That is the signal that the roaster is ready for food. The guide describes the light only in this preheating context.
Can I cook directly in the roaster oven body?
No. Cook only in the removable roasting pan that came with the roaster. Cooking directly in the body can cause electric shock and product damage. Make sure the roasting pan is in place before you add any food, and never immerse the body in water when cleaning.
How do I cook a frozen turkey in the Oster roaster oven?
Use the Defrost setting. Turn the knob to DEFROST, preheat for about 15 to 20 minutes, then place the unwrapped frozen turkey on the roasting rack, add the lid and let it defrost. Check the legs and thighs for 90°F to 100°F, then baste with butter or oil and season. Keep going on Defrost until the thighs and legs reach at least 130°F to 150°F and the breast reaches at least 50°F to 60°F, remove the giblets and neck, then turn the knob to 325°F to roast. Use a meat thermometer throughout and avoid opening the lid more than needed.
How long does the Defrost setting take?
For planning, a turkey of about 17 lbs needs roughly 3 hours 50 minutes on Defrost and about 5 hours 50 minutes total once roasting is included. A turkey of about 23 lbs needs roughly 5 hours 50 minutes on Defrost and about 6 hours 50 minutes total. These are estimates only. The temperatures the turkey reaches at each stage are the best guide, and roasting from frozen generally takes around twice as long as roasting an already defrosted turkey.
What temperature should a turkey reach when roasted with the Defrost method?
After the 325°F roasting step, the turkey is done when the breast reaches at least 165°F and the legs and thighs reach at least 175°F. The cavity must also reach at least 165°F, or you risk contaminating the rest of the bird when carving. Take readings in several areas, and if any area falls short, roast a little longer and check about every 10 to 15 minutes.
What is the Keep Warm setting for?
It holds cooked food at a low heat until you are ready to serve. When the food is done, switch the temperature dial to the Keep Warm setting. It is handy for entertaining, when food finishes before guests are ready to eat.
Can I put the roasting pan in the dishwasher?
No. Wash the removable roasting pan, lid and roasting rack by hand in hot, soapy water with a sponge or cloth, rinse thoroughly in hot water and towel dry. Avoid abrasive cleaners. Turn the control to OFF, unplug the roaster and let it cool completely first, and wipe the body inside and out with a damp cloth rather than immersing it.
How much space does the roaster oven need around it?
Keep 6 inches (152 mm) clear from the wall and on all sides, and use the roaster on a dry, stable, level surface. Place a hot pad or trivet underneath, because some surfaces cannot withstand prolonged heat, and do not set the heated unit on a finished wood table. The roaster is intended for household countertop use only.
Is it normal for the roaster to smoke or smell the first time I use it?
Yes. Slight smoke or odor can occur during initial use, as it does with many heating appliances, and it will not recur after a few uses. Washing the roasting pan, rack and lid and wiping the outside of the body before first use is part of the recommended preparation.
Can I use an extension cord with my roaster oven?
You can use a longer detachable power-supply cord or an extension cord if you take care. Its marked electrical rating should be at least as great as the roaster’s rating, and if the product is the grounded type, it must be a grounding-type 3-wire cord. Arrange it so it does not drape over the countertop or tabletop where it could be pulled on or tripped over. Do not let any cord hang over the edge of the counter, and never use an outlet below the counter.
Where do baking pans go in the roaster oven?
Always put baking pans on the roasting rack, not on the bottom of the removable roasting pan. Preheat the roaster before baking, and use metal pans when you can, since they provide better heat transfer and browning. Use pot holders or oven mitts when placing or removing a pan in the preheated roaster.