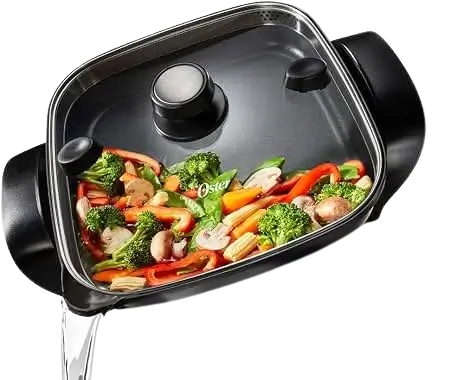
Oster Strain & Pour Electric Skillet
The Oster Strain & Pour Electric Skillet is a countertop skillet with a Titanium-Infused DuraCeramic™ nonstick ceramic coating that is free of PTFE and PFOA. A detachable temperature control probe sets the cooking temperature, and an indicator light shows when the skillet is heating and when it is holding temperature. The tempered glass lid has straining holes, thumb pads and a pour spout so you can drain excess liquid or oil without a separate strainer. A Warm setting keeps food at serving temperature. The skillet is intended for household use only. It is not intended for deep frying, and it does not require preheating.
Parts and Controls
Parts of the skillet
| No. | Part | Replaceable? |
|---|---|---|
| 1 | Tempered glass lid | Yes |
| 2 | Lid handle | No |
| 3 | Thumb pads | No |
| 4a | Large straining holes | No |
| 4b | Small straining holes | No |
| 5 | Cool-touch handles | Yes |
| 6 | Pour spout | No |
| 7 | Temperature probe | Yes |
| 8 | Temperature control knob | No |
Parts marked as replaceable can be ordered on oster.com or by calling 1-800-334-0759.
Temperature control and indicator light
Turn the knob until the temperature you want is opposite the indicator light. The light comes on while the skillet heats. When the skillet reaches the chosen temperature, the light turns off. During cooking, the light blinks on and off to show that the temperature is being maintained.
Use the Warm setting to hold food at serving temperature, or turn the control to Off when you are ready to serve. When the control is turned to Off, the On indicator light shuts off.
Before First Use
Wash the inside of the pan with warm, soapy water, then rinse and dry it thoroughly. Remove the temperature controller before washing the skillet.
Caution: Do not immerse the variable temperature control, power cord or plug in water or any other liquid.
During initial use you may notice slight smoke or an odor. The manufacturer says this is normal because of the manufacturing process and is no reason for concern.
How to Use the Skillet
Setting up and starting
- Place the unit on a flat, level, heat-resistant surface with the drain spout facing away from you. Leave enough space around the unit for heat to flow without damaging walls or cabinets.
- Push the temperature controller firmly into its socket on the side of the appliance.
- Make sure the variable temperature control is set to Off, then plug the cord into a standard 120 Volt AC outlet.
- Turn the knob to the temperature you want. The indicator light will illuminate.
- Cook, using the temperature guide below. Preheating is not required.
Caution: Hot steam escapes through the straining holes and drain spout during cooking.
Caution: Always plug the temperature control probe into the skillet first, then plug the power cord into the wall outlet. Do not cook with the skillet standing on temperature-sensitive surfaces.
Simmering
Set the temperature control to 300°F and wait until the contents boil. Then set the temperature controller to WARM.
Utensils
Use only nylon, wood or heatproof plastic cooking utensils. Metal utensils may scratch the ceramic surface.
Finishing and disconnecting
- When cooking is finished, turn the control to Warm to keep food at serving temperature, or to Off if you are ready to serve.
- To remove the temperature controller, first unplug the cord from the wall outlet.
- Gently remove the variable temperature control probe from the skillet.
Caution: The probe is hot after use. Let it cool before handling.
Recommxended Cooking Temperature Guide
The listed temperatures are estimates. Adjust the cooking temperature to suit your recipe or preference.
| Food | Temperature | Approximate Time |
|---|---|---|
| Bacon | 350°F | 5–8 minutes |
| Eggs (fried) | 300°F | 3–5 minutes |
| Eggs (scrambled) | 325°F | 2–3 minutes |
| Pancakes | 375°F | 1–3 minutes |
| Hamburger (1/2-inch thick) | 375°F | Rare: 4–8 minutes; well done: 9–12 minutes |
| Ham (1/2-inch to 1/4-inch slices) | 325°F | 10–20 minutes |
| Potatoes (country fried) | 325°F | 10–12 minutes |
| Potatoes (crispy brown) | 350°F | 10–12 minutes |
| Sausage | 340°F | 12–15 minutes |
| Fish | 375°F | 5–8 minutes |
| Pork chops (breaded) | 375°F | 10–15 minutes |
| Pork chops (brown) | 225°F | 30–40 minutes |
| Cube or minute steak | 400°F | 2–4 minutes |
| Liver (calf’s, lamb or tender beef) | 350°F | 5–10 minutes |
| French toast | 325°F | 4–6 minutes |
| Crusty chicken (use 4 Tbsp. oil) | 400°F | 12–18 minutes |
| Crusty chicken, continued: “Do not add water” | 300°F | 10–15 minutes |
Draining Excess Liquid or Oil
The lid has a thumb pad on each side. Together with the straining holes and the pour spout, they make it easier to drain excess liquid.
- Make sure the lid is securely in place.
- Unplug the power cord from the electrical outlet.
- Remove the variable temperature control probe from the unit.
- Hold both handles firmly, then place one thumb on top of each thumb pad on the lid.
- Press the thumb pads firmly while still holding the handles. Tilt the skillet away from you and drain the excess liquid through the spout into a bowl.
- Carefully set the skillet back in the cooking position. You can remove the lid to check the food or add ingredients.
- To continue cooking, place the lid over the skillet, plug the control into the skillet, then plug the unit into the wall outlet.
- Set the temperature control to the setting you want.
Caution: Burn hazard. The contents of the skillet and its outer surfaces are hot. Always pour away from your body.
Important Safeguards
Basic safety precautions should always be followed, including these:
- Read all instructions before using the appliance.
- Do not touch hot surfaces. Use the handles.
- Do not immerse the variable temperature control, cord or plug in water or other liquids.
- The appliance is not to be used by children or by persons with reduced physical, sensory or mental capabilities. Close supervision is necessary when it is used near children, and children should not play with it.
- Unplug the appliance when it is not in use and before cleaning. Let it cool before putting on or taking off parts and before cleaning.
- Do not operate the appliance with a damaged cord or plug, or after it malfunctions or has been damaged in any manner. Return it to an authorized Oster service facility for examination, repair or electrical or mechanical adjustment. Do not attempt to replace or splice a damaged cord.
- Accessory attachments not recommended by the manufacturer may cause injuries.
- Do not use outdoors.
- Do not let the cord hang over the edge of a table or counter or touch hot surfaces.
- Do not place the appliance on or near a hot gas or electric burner, or in a heated oven.
- Use extreme caution when moving the appliance if it contains hot oil or any other hot liquid.
- Always attach the variable temperature control to the appliance first, then plug it into the wall outlet. To disconnect, switch off, remove the plug from the wall outlet, then remove the variable temperature control from the appliance.
- Use the appliance only with the OSTER® Strain & Pour Electric Skillet variable temperature control probe P/N 193787.
- Do not use the appliance for anything other than its intended use.
- Do not cook with the skillet or the probe standing on temperature-sensitive surfaces.
- To prevent the risk of burns, never fill oil in the skillet pan more than 1/2 inch (12.7 mm) high.
- This appliance is not intended for deep frying foods.
Polarized plug
The appliance has a polarized plug, with one blade wider than the other. As a safety feature to reduce the risk of electric shock, the plug fits a polarized outlet only one way. If the plug does not fit fully, reverse it. If it still does not fit, contact a qualified electrician. Do not defeat this safety feature or modify the plug in any way. If the plug fits loosely or the outlet feels warm, do not use that outlet.
Power cord and extension cords
A short power-supply cord or detachable power-supply cord is provided to reduce the risk of becoming entangled in or tripping over a longer cord. Longer detachable cords or extension cords may be used if care is exercised. If you use one on a short-cord model:
- The marked electrical rating of the cord should be at least as great as the electrical rating of the appliance.
- If the product is the grounded type, the extension cord must be a grounding-type 3-wire cord.
- Arrange the longer cord so it does not drape over a countertop or tabletop where children can pull on it or someone can trip over it.
Care, Cleaning and Storage
Cleaning after every use
The skillet should be cleaned after every use.
- Turn the variable temperature control to Off. Unplug the skillet and let it cool completely before cleaning.
- Remove the variable temperature control probe. Do not immerse the probe, cord or plug in water or any other liquid.
- Wash the skillet and the lid by hand only, in hot, soapy water. The skillet may be immersed in water. Rinse and dry thoroughly.
- Do not use steel wool or other metal pads, which may scratch the surface. Never use abrasive cleaning agents, which may damage the surfaces.
- Wipe the temperature control with a damp cloth, then wipe it dry.
Note: To protect the DuraCeramic™ coating, do not run cold water over the cooking surface immediately after use.
Caution: The temperature control probe must always be completely dry before use.
Removing stubborn stains
- Sprinkle some baking soda on the stained area.
- Add enough water to moisten the baking soda into a paste.
- Let it sit for a few minutes. For tougher stains, let it sit up to an hour.
- Lightly scrub with a plastic scouring pad or a damp cloth, then dry thoroughly.
- Repeat if necessary.
Stubborn stains will not affect the performance or nonstick quality of the coating.
Storage
- Unplug the unit and let it cool. Never store it while it is hot.
- Clean and thoroughly dry the skillet before storing it.
- The temperature control probe can be stored inside the covered skillet.
- To avoid scratching the nonstick surface, place a paper towel in the skillet.
User maintenance
Periodically check for looseness and retighten the handle and feet screws. Do not overtighten, because overtightening can strip screws or nuts or crack the handle or feet. The appliance has no user-serviceable parts. Any service beyond what is described here and in the cleaning section should be done only by an Authorized Service Representative.
Troubleshooting
| Problem | Possible cause | What to do |
|---|---|---|
| Skillet does not heat up. | The skillet is not plugged in, or the probe is not fully inserted in the probe socket. | Check that the appliance is plugged into a working outlet and that the probe is fully inserted into the probe receptacle. |
| Skillet does not heat up. | The control may be set to Off. | Turn the variable temperature control to select a cooking temperature. |
| On indicator does not come on. | The variable temperature control might be in the Off position. | Set the temperature control to the temperature you want. |
| Skillet smokes or has a slight odor on first use. | This is normal when heating an appliance for the first time. | Some slight smoke or odor may be detected during initial use because of the manufacturing process. |
| Liquid or oil splatters outside the pan. | The lid might not be closed securely. | Check that the lid is firmly closed. |
| Finish on the cooking surface is cut or scratched. | Metal utensils were used. | Use silicone, heatproof plastic or wood utensils to avoid scratching the nonstick surface. |
Warranty and Support
The manufacturer’s 1 Year Limited Warranty covers defects in material and workmanship for one year from the date of purchase. At its option, Sunbeam will repair or replace the product or any defective component. The warranty is valid for the original retail purchaser only and is not transferable. Keep the original sales receipt, because proof of purchase is required. Do not attempt to repair or adjust any electrical or mechanical functions, because doing so voids the warranty. Normal wear of parts and damage from misuse, improper voltage or current, use contrary to the operating instructions, or repair by anyone other than Sunbeam or an authorized service center are not covered.
For questions or warranty service, call Sunbeam Consumer Service at 1-800-334-0759 in the U.S.A. or 1-800-667-8623 in Canada. Do not return the product to the warranty addresses or to the place of purchase.
Frequently Asked Questions
Do I need to preheat the Oster Strain & Pour Electric Skillet?
No. Preheating is not required with this skillet. Set the control to the temperature you want and cook. The indicator light stays on while the skillet heats and turns off when it reaches the chosen temperature.
What does the indicator light mean while I’m cooking?
The light comes on when you turn the control to a temperature. It turns off once the skillet reaches that temperature. After that, it blinks on and off during cooking, which shows the skillet is maintaining the temperature. Turning the control to Off shuts the light off.
In what order should I connect the temperature control and the power cord?
Push the temperature control probe firmly into the socket on the side of the skillet first, with the control set to Off. Then plug the cord into a standard 120 Volt AC outlet. To disconnect, turn the control off, unplug the cord from the wall outlet, and only then remove the probe from the skillet. The probe is hot after use, so let it cool before handling it.
How do I drain liquid or grease from the skillet?
Make sure the lid is securely in place, unplug the cord and remove the temperature probe. Hold both handles, put one thumb on each thumb pad on the lid, and press down firmly. Tilt the skillet away from you and pour through the spout into a bowl. The food and the outside of the skillet are hot, so always pour away from your body. To keep cooking, set the skillet back down, put the lid on, reconnect the probe, plug in the unit and set the temperature again.
How do I simmer food in this skillet?
Set the temperature control to 300°F and wait for the contents to boil. Then turn the control to WARM to continue simmering.
What temperature should I use for bacon, eggs and pancakes?
The temperature guide lists bacon at 350°F for 5–8 minutes, fried eggs at 300°F for 3–5 minutes, scrambled eggs at 325°F for 2–3 minutes and pancakes at 375°F for 1–3 minutes. These are estimates, so adjust the temperature to your recipe or preference.
Why won’t my skillet heat up?
First check that the skillet is plugged into a working outlet and that the temperature probe is pushed all the way into its socket. Then check the control. If it is set to Off, turn it to a cooking temperature. The indicator light also will not come on while the control is in the Off position.
Is it normal for the skillet to smoke or smell the first time I use it?
Yes. A slight smoke or odor can appear during first use because of the manufacturing process, and the manufacturer says it is no reason for concern. Before the first use, wash the inside of the pan with warm, soapy water, rinse it and dry it thoroughly, with the temperature controller removed.
Can I wash the skillet in the dishwasher or put the probe in water?
No to both. The skillet and lid are hand wash only, in hot, soapy water, and the skillet itself may be immersed. The temperature control probe, cord and plug must never be immersed in water or any other liquid. Wipe the control with a damp cloth, dry it, and make sure it is completely dry before using it again.
What utensils and cleaners are safe for the ceramic coating?
Use nylon, wood, silicone or heatproof plastic utensils. Metal utensils can scratch the ceramic surface, and cuts or scratches in the finish are linked to metal utensil use. For cleaning, avoid steel wool, metal pads and abrasive cleaning agents. Also avoid running cold water over the cooking surface right after use. For stubborn stains, make a paste of baking soda and a little water, let it sit a few minutes (up to an hour for tough stains), and scrub lightly with a plastic scouring pad or damp cloth.
How much oil can I put in the skillet, and can I deep fry in it?
Never fill oil in the skillet pan more than 1/2 inch (12.7 mm) high, to prevent the risk of burns. The skillet is not intended for deep frying foods. Use extreme caution when moving the appliance if it contains hot oil or any other hot liquid.
Why is liquid or oil splattering outside the pan?
The lid might not be closed securely. Check that it is firmly closed. Hot steam also escapes through the straining holes and drain spout during cooking, so keep the drain spout facing away from you.
How should I store the skillet, and can I replace parts?
Unplug the unit and let it cool, since it should never be stored hot. Clean and dry it thoroughly. You can keep the temperature probe inside the covered skillet, and a paper towel placed in the pan helps prevent scratching the nonstick surface. The tempered glass lid, cool-touch handles and temperature probe can be replaced through oster.com or by calling 1-800-334-0759.Use only the OSTER® Strain & Pour Electric Skillet probe P/N 193787 with this appliance.