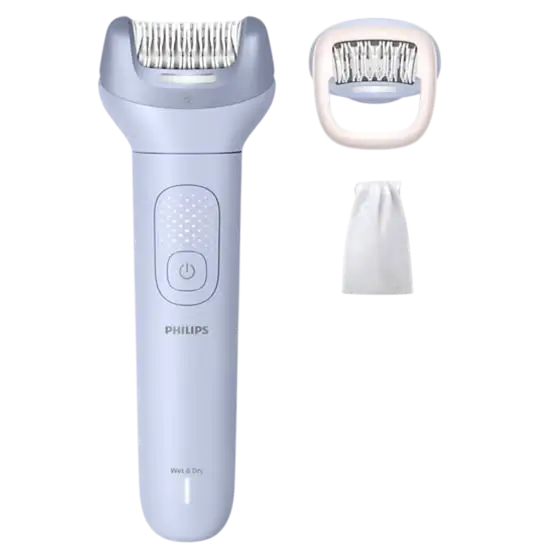
Philips Epilator BRE708
This cordless, rechargeable Philips epilator is waterproof. You can use it in the bath or shower and rinse it under the tap, and for safety it works only without the cord connected. It runs at two speeds, has an integrated light on some heads, and charges in about 3 hours for up to 60 minutes of cordless use. The epilating head works below the neck (legs, underarms and bikini line). Depending on your model, the box also includes shaving and bikini trimming heads, a ProGuide skin stretcher, and a coupling unit for a body exfoliation brush, facial cleansing brush, pedicure disk or SkinLED attachment. Heads and accessories differ by model number, so check the table below against your box.
Covered Models and Included Attachments
The handle carries a “Model BREXXX” label, and this sheet covers 13 models. The accessory matrix shows which items come with each one. Philips also lists replacement parts at www.philips.com/parts-and-accessories.
| Model | Items supplied (per the accessory matrix) |
| BRE708 | Epilating head with top cover, ProGuide attachment, pouch |
| BRE709 | Epilating head, ProGuide, shaving head with shaving comb, pouch |
| BRE711 | Epilating head, ProGuide, bikini trimming head with comb, pouch |
| BRE717 | Epilating head, ProGuide, shaving head with comb, bikini trimming head with comb, pouch, exfoliation glove |
| BRE718 | Epilating head, ProGuide, shaving head with comb, coupling unit, body exfoliation brush with protection cap, pouch |
| BRE719 | Epilating head, ProGuide, shaving head with comb, bikini trimming head with comb, coupling unit, body exfoliation brush, pouch |
| BRE728 | Same as BRE719, plus pedicure disk with protection cap |
| BRE729 | Epilating head, ProGuide, shaving head with comb, bikini trimming head with comb, coupling unit, body exfoliation brush, pouch |
| BRE738 | Epilating head, ProGuide, SkinLED attachment, coupling unit, facial cleansing brush, body exfoliation brush, luxury pouch |
| BRE739 | Epilating head, flexible shaving head with light and comb, bikini trimming head with comb, SkinLED attachment, coupling unit, pedicure disk, facial cleansing brush, body exfoliation brush, luxury pouch |
| BRE748 | Flexible shaving head with light and comb, SkinLED attachment, coupling unit, pedicure disk, facial cleansing brush, body exfoliation brush, luxury pouch |
| BRE749 | Epilating head, ProGuide, flexible shaving head with light and comb, bikini trimming head with comb, SkinLED attachment, coupling unit, pedicure disk, facial cleansing brush, body exfoliation brush, luxury pouch |
| BRE750 | Same as BRE749 |
Parts and Controls
Handle and Cable
| No. | Part |
| 14 | Handle |
| 15 | On/off button |
| 16 | Battery status indicator |
| 17 | Socket for small plug |
| 18 | USB cable |
| 19 | Release button |
| 20 | Cleaning brush |
A suitable USB power source (for example, the Philips HQ87) is available through www.philips.com/support. A USB power source is not included.
Heads and Attachments
| No. | Item |
| 1 | Epilating head with integrated light and top cover |
| 2 | ProGuide attachment |
| 3 | Flexible shaving head with integrated light and shaving comb |
| 4 | Shaving head and shaving comb |
| 5 | Bikini trimming head and bikini trimming comb |
| 6 | SkinLED attachment |
| 7 | Coupling unit |
| 8 | Pedicure disk and protection cap |
| 9 | Facial cleansing brush and protection cap |
| 10 | Body exfoliation brush and protection cap |
| 11 | Pouch |
| 12 | Luxury pouch |
| 13 | Exfoliation glove |
Important Safety Instructions
Read all instructions before using the product and save them. When using any electric product, basic precautions should always be followed.
Danger: Electric Shock
- To charge the product, use only a USB power source on a certified product with an output rating of 5 V, ≥ 1.5 A.
- For safe charging in a moist environment such as a bathroom, use only an IPX4 (splash-proof) power source.
- For help finding the right USB power source, contact Philips support at 1-888-744-5477. A non-certified USB power source may cause hazards or serious injuries.
- Keep the USB cable and USB power source dry.
- Do not reach for a corded product that has fallen into water. Unplug it from the power outlet immediately.
- Do not place or store the product where it can fall or be pulled into a tub or sink. Do not place or drop it into water or other liquid.
- The product does not work while connected to the power outlet. Except when charging, always unplug it.
- Remove the USB power source from the power outlet and the product before cleaning the product with water.
Warning: Burns, Fire, Electric Shock or Injury
- The product is not intended for people (including children) with reduced physical, sensory or mental capabilities, or without experience and knowledge, unless supervised or instructed by a person responsible for their safety. Supervise children so they do not play with it.
- Use it only for its intended household use. Do not use attachments not recommended by Philips North America LLC.
- Never operate the product if the USB power source is damaged, if it is not working properly, after it has been dropped or damaged, or after the product or USB power source has fallen into water. For assistance, call 1-888-744-5477.
- Keep the USB cable and USB power source away from heated surfaces.
- Never drop or insert any object into any opening.
- Do not use the USB power source in or near an outlet that contains an electric air freshener.
- Do not use the product outdoors, where aerosol (spray) products are being used, or where oxygen is being administered.
- Check cutting units and other attachments before every use. Never use the product with a damaged cutting unit, attachment or accessory.
- Attach the USB cable to the USB power source and the product first, then plug the power source into the outlet. To disconnect, set all controls to off, then remove the power source from the outlet.
- Plug the USB power source directly into an outlet. Do not use an extension cord.
- Unplug the USB power source before plugging the product in or unplugging it.
- For hygiene, only one person should use the product.
- There are no other user-serviceable parts. For assistance, call 1-888-744-5477.
- Use only original Philips accessories or consumables.
Intimate Areas
- Never use any part of the product on the inner labia.
- Never epilate the inner labia or the outer labia.
- You may shave or trim the outer labia, but always attach a comb to the head.
- To remove hair from the bikini area, heads can be used without additional combs or caps.
Skin and Health Precautions
- Do not use the product on damaged, inflamed, irritated or healing skin, on varicose veins, spots or moles (with hairs), or on skin affected by skin disease.
- If you plan to epilate, consult a doctor if you have diabetes mellitus, haemophilia, reduced immune response or immunodeficiency, if your skin lacks normal sensitivity, or if you feel abnormal pain during or after use.
- Some skin irritation is normal during initial use but decreases as your skin gets used to hair removal.
- Keep the operating product away from scalp hair, eyebrows, eyelashes and clothes.
- Do not use brush attachments if you take steroid-based medication.
- Do not exfoliate within 24 hours before or 48 hours after hair removal.
- Do not use bath or shower oils when epilating, because this may cause serious skin irritation.
- If you have been or begin taking hormone medication, or have recently been pregnant, changing hormone levels may affect hair thickness, color or amount. This is caused by hormonal changes, not by this method of hair removal.
- The pedicure disk is for feet only.
- If an attachment produces light, do not point it at open or closed eyes.
SkinLED Precautions
- Use the SkinLED attachment only on clean facial skin, never on or around the eyes.
- Do not use it if you have sunburn, are receiving medical care for a disease involving photosensitivity, or are taking photosensitizing medication.
- Do not keep it on one spot for more than 10 seconds. Use it only once a day, during the preprogrammed 5-minute session.
- If you have unexpected side effects such as itching within 48 hours after your first session, get medical advice before using it again.
Battery and Temperature
- The batteries may present a fire or chemical burn hazard if mistreated. Do not disassemble, heat above 100 °C (212 °F) or incinerate.
- Charge, use and store the product between 50 °F / 10 °C and 95 °F / 35 °C.
- Keep the product and batteries away from fire, direct sunlight and high temperatures. Do not place them in microwave ovens or on induction cookers.
- If the product becomes abnormally hot or smelly, changes color, or takes longer than usual to charge, stop using and charging it and contact Philips.
- Do not open, modify, pierce, damage or dismantle the product or battery. Do not short-circuit, overcharge or reverse charge batteries.
- If batteries are damaged or leaking, avoid contact with skin or eyes. If contact occurs, rinse well with water immediately and seek medical care.
- Handle batteries only with dry hands, product and batteries.
- After removal, keep battery terminals away from metal objects such as coins, hairpins and rings. Do not wrap batteries in aluminum foil. Tape the terminals or put the batteries in a plastic bag before discarding.
Charging the Epilator
Charge the product before first use and whenever the battery status indicator shows the battery is almost empty. After 3 hours of charging, the cordless operating time is up to 60 minutes.
| Battery status | Indicator |
| Almost empty | Flashing orange light |
| Charging | Flashing white light |
| Fully charged | Solid white light |
About 60 seconds after the battery is fully charged, the indicator switches off automatically.
Warning: Keep the USB cable and the USB power source dry.
- Make sure the product is switched off.
- Insert the small plug of the USB cable into the socket in the bottom of the product.
- Insert the USB plug into the USB power source (not included).
- Insert the USB power source into the power outlet.
- After charging, remove the USB power source from the outlet and pull the small plug out of the product.
Before You Start
Check the Cutting Units
Always check cutting units before use to confirm they are clean, in good condition, and not damaged or worn. A damaged cutting unit can cause skin irritation and reduced performance. If one is damaged, throw it away and start using a new one. You can order a new cutting unit from the Philips website or contact Philips support at 1-888-744-5477.
Tips for Better Results
- Exfoliate one day before hair removal to clear dead skin cells around the follicles.
- Clean your skin first. If it is wet after cleaning, pat it dry rather than rubbing.
- Epilate before bed so your skin can recover overnight.
- Keep the product moving slowly instead of staying on one spot, and avoid passing over the same spot many times.
- Afterward, gently apply an alcohol-free soothing cream or lotion, and give your skin time to recover between sessions.
- If you have not removed hair for a while, some irritation is normal as your skin readjusts.
Wet and Dry Use
The product is suitable for wet and dry use. Use it on completely wet skin or completely dry skin, never on moist skin.
- Dry use: Gives the most efficient session, because dry hairs stick to the skin less. Make sure your skin is clean and completely dry.
- Wet use: Feels comfortable and glides smoothly, though wet hairs tend to stick to the skin, so removal may be less effective. Rinse the attachment regularly to clear hairs, make sure skin is thoroughly wet (not just moist), and pat skin dry afterward.
Everyday Operation
Switching On and Off, and Speed
- Press the on/off button once to switch on. The epilator starts at the highest speed.
- Press the on/off button again for the low speed.
- Press it once more to switch off.
Use the low speed for areas with little hair growth, hard-to-reach places, and areas where bones are close to the skin, such as ankles and knees.
Integrated Light
Some heads have an integrated light that goes on automatically when you switch on the product, for a better view during hair removal. With the product switched off, press and hold the on/off button for 2 seconds to switch the light off or back on.
Detaching and Attaching Heads
- To detach a head, press the release button at the back of the handle and gently lift the head off.
- To attach a head, align it with the top of the handle and press down gently until it clicks into place.
Using the Coupling Unit
The coupling unit attaches and detaches like a head. It must be used with the body exfoliation brush, facial cleansing brush and pedicure disk.
- Attach the coupling unit to the handle.
- Attach the accessory to the coupling unit.
Attaching and Detaching Combs
Shaving head comb:
- To attach, align the indent in the comb with the notch on the back of the shaving head and snap it on (“click”).
- To detach, place a fingernail between the comb and the head to the left or right of the notch and pull the back of the comb upward. Do not pull at the sides or teeth.
Bikini trimming head comb:
- To attach, place the notch on one side of the comb in the indent in the trimming head, then press until the notch on the other side snaps into the indent on the other side.
- To detach, place a fingernail between the comb and the head on one side and pull until the comb comes off. Do not pull at the back or teeth.
Epilating
Use the epilator attachment only below the neck, such as legs, underarms and bikini line. Never epilate the inner or outer labia. Never use the epilating head without the top cover or the skin stretcher attached.
Epilation is easier and more comfortable when hair is 1/8 to 5/32 in (3 to 4 mm) long. If hairs are longer, pretrim them first, or shave first and epilate after 1 to 2 weeks.
- Make sure either the top cover or the skin stretcher is on the epilating head.
- Place the epilator on the skin at a 75° angle, with the on/off button pointing in the direction you are moving.
- On sensitive areas, stretch the skin with your free hand. For underarms, raise your arm and put your hand on the back of your head.
- Press the on/off button. The epilator starts at the highest speed, and the built-in light goes on automatically. Press again for the lower speed.
- Gently press the epilating head onto the skin and move it slowly against the direction of hair growth.
- Afterward, you can apply a mild, non-alcohol-based cream or body lotion to help reduce irritation.
- Clean the product and attachments after each use.
Using the ProGuide Attachment
The ProGuide stretches the skin during epilation and keeps the head at the correct 75° angle. It has a 360° LED light for better visibility of hairs.
- Pull the top cover of the epilating head upward and lift it off the epilating disks.
- Attach the ProGuide to the epilating head.
- Place the epilator with the ProGuide flat on the skin and epilate as described above.
Keep the ProGuide flat on the skin throughout, and do not tilt it upward. To use the epilating head without the ProGuide, always put the top cover back on first.
Shaving and Trimming
Never use any part of the product on the inner labia. To shave or trim the outer labia, always attach a comb to the head. For best results, use the product dry.
- Place the product so the cutting unit or comb is in full contact with the skin.
- On sensitive areas, stretch the skin with your free hand. For underarms, raise your arm and put your hand on the back of your head.
- Move the product slowly against the direction of hair growth. Moving too fast may not give a smooth result.
Shaving Head
On specific models, the flexible shaving head follows contours for optimal skin contact. You can use it on legs, arms, underarms and the bikini area, but never on your face. Place it flat on the skin. To shave the outer labia, use only the shaving head with the shaving comb attached. The shaving comb trims hair to a length of 0.12 inch / 3 mm.
Bikini Trimming Head
Use it for hard-to-reach bikini-area spots and for styling and shaping. Place it flat on the skin to trim, or perpendicular to the skin to create different hair styles. To trim the outer labia, use only the trimming head with the trimming comb attached. With the comb attached, it trims bikini-area hair to 0.12 inch / 3 mm.
Skin-Care and Foot Attachments
Body Exfoliation Brush
It helps remove dead skin cells from the body. Do not use it on your face, and do not exfoliate within 24 hours before or 48 hours after hair removal.
- Attach the brush to the coupling unit.
- Moisten your skin with water.
- Place the brush flat on the skin.
- Switch on the product.
- Move the brush across the skin in straight lines.
Facial Cleansing Brush
- Attach the brush to the coupling unit.
- Moisten your face with water.
- Moisten the brush with water. If you like, add a mild facial cleansing product.
- Switch on the product.
- Move the brush across your face in straight lines, starting in the center and moving outward.
- Rinse your face with water and dry it with a soft towel.
SkinLED Attachment
Use the SkinLED attachment for 5 minutes once every 24 hours, only on clean facial skin. Never point its light at open or closed eyes, and never use it on or around the eyes.
- Attach the SkinLED attachment onto the handle.
- Switch on the product. The lights flash to show it is heating up.
- After 60 seconds you hear a beep and the lights stay on continuously.
- Place it on one of the 3 facial zones: left cheek, right cheek or forehead.
- Move it over the zone in straight lines for 20 seconds.
- A beep after 20 seconds tells you to move to the next zone.
- Treat all 3 zones for 20 seconds each, then start at the first zone again and repeat the cycle 4 times. Do not exceed 20 seconds per zone.
- After the preprogrammed 5 × 20 seconds (5 minutes), the attachment switches off automatically.
Pedicure Disk
The pedicure disk is for feet only. Attach it to the coupling unit, then choose how to use it:
- Large, flat areas: Use the entire disk, placed flat on the skin for good control.
- Smaller areas with good visibility: Use the top part of the disk that sticks out beyond the top of the head.
- Precision work and fast buffing of hard skin: Use the narrow edge of the protruding top part.
Move the disk back and forth gently. Do not push too hard, or the disk might stop rotating.
Cleaning and Maintenance
Switch off the product before attaching or removing attachments and before cleaning. Use only cold or lukewarm water. Never use scouring pads, abrasive cleaning agents, aggressive liquids such as gasoline or acetone, or compressed air. Never dry cutting units with a towel or tissue, which can catch in the cutting unit and damage it.
- Make sure the product is disconnected from the USB cable.
- Switch off the product.
- Remove the cutting unit from the shaving head and rinse it under the tap. Do not clean the cutting unit of the shaving head with the brush. The brush is fine for all other parts and attachments.
- Clean the hair chamber with the brush and rinse it under the tap.
- Clean all other parts with the brush, then rinse them under the tap.
- Shake off excess water and let all parts air dry completely. Wipe the flat top surface of the SkinLED attachment dry with a soft cloth.
- Put the cutting unit back into the shaving head until it clicks.
Every six months, lubricate the trimmer teeth and foil of the cutting unit with a drop of sewing machine oil.
Detaching and Attaching the Shaving Cutting Unit
The cutting unit is a precision part, so hold it by its plastic housing only. To detach it, hold the housing on both sides and gently pull it out of the shaving head. To attach it, align it with the shaving head and snap it into place.
Storage
- Switch the product off and remove the USB power source from the outlet and the product.
- Do not wrap the USB cable around the product.
- Put combs on heads that come with a comb, and protection caps on attachments that come with one.
- Store the product, heads and accessories in the pouch (if supplied) or another safe, dry place where they will not be crushed or banged.
- Make sure the product and accessories are dry before storing.
Replacement, Disposal and Warranty
Replacement Schedule
Replace worn parts such as cutting units after a set period, or sooner if results decline. If a part is damaged, stop using it and replace it right away. Use only original Philips replacement parts.
| Replace every | Part |
| 6 months | Facial cleansing brush, pedicure disk, body exfoliation brush |
| 12 months | Cutting unit of shaving head |
Battery Disposal and Recycling
The product contains a rechargeable lithium-ion battery that must be disposed of properly. Contact your local town or city officials for battery disposal information. In the US, you can also call 1-800-822-8837 or visit www.call2recycle.org. In Canada, call 1-888-224-9764 or visit www.call2recycle.ca. For recycling information on the product itself, contact local waste facilities or visit www.recycle.philips.com.
Warranty and Support
Philips provides a two-year warranty against defects in materials or workmanship from the date of purchase (with valid proof of purchase). Philips North America LLC covers US purchases and Philips Electronics Ltd. covers Canadian purchases. Philips replaces a defective product free of charge, or refunds the purchase price if it cannot provide a replacement. Normal-wear parts, accessories, replacement batteries and consumables such as blades and foils are not covered, and the warranty is transferable. A 45-day money-back guarantee is also offered (see www.PhilipsMoneyBack.com). For service or assistance, visit www.philips.com/support or call 1-888-744-5477 (toll-free). Register your product at www.philips.com/welcome.
Frequently Asked Questions
How do I charge the Philips epilator, and how long does a charge last?
Switch the epilator off, plug the small end of the USB cable into the socket at the bottom of the handle, and plug the USB end into a USB power source (not included). Then plug the power source into the wall outlet. Charge before first use, and again whenever the battery indicator flashes orange. A 3-hour charge gives up to 60 minutes of cordless use. When you finish, unplug the power source from the outlet first and then pull the small plug from the handle.
What do the battery indicator lights mean?
A flashing orange light means the battery is almost empty, a flashing white light means it is charging, and a solid white light means it is fully charged. About 60 seconds after the battery is full, the indicator turns off by itself, so a dark indicator on a charged unit is normal.
Which USB power source should I use to charge it?
Use a certified USB power source rated 5 V, ≥ 1.5 A. If you charge in a damp place such as a bathroom, it must be an IPX4 (splash-proof) power source. The Philips HQ87 is given as an example and can be found through www.philips.com/support. A non-certified power source can cause hazards or serious injuries, so if you are unsure which one to buy, call Philips support at 1-888-744-5477.
Can I use the epilator in the shower or while it is plugged in?
You can use it in the bath or shower and rinse it under the tap, because the product is waterproof. It only works cordless, though, and it does not run while connected to the power outlet. Keep the USB cable and power source dry at all times, and unplug the power source from the outlet and the product before cleaning the epilator with water.
How do I change the speed or turn the light off?
Press the on/off button once to start at the highest speed, press it again for the lower speed, and press once more to switch off. The lower speed suits areas with little hair growth, hard-to-reach spots and bony areas like ankles and knees. To turn the integrated light off or back on, hold the on/off button for 2 seconds while the product is switched off. The light comes on automatically whenever you switch on a head that has one.
How long should my hair be before I epilate?
Epilation is easiest and most comfortable when hair is 1/8 to 5/32 inch (3 to 4 mm) long. If your hair is longer, trim it first, or shave and wait 1 to 2 weeks before epilating.
Do I have to keep the top cover or ProGuide on the epilating head?
Yes. Never use the epilating head without either the top cover or the skin stretcher (the ProGuide) attached. To fit the ProGuide, pull the top cover upward, lift it off the epilating disks and attach the ProGuide. Keep the ProGuide flat on the skin and do not tilt it upward. If you switch back to epilating without it, put the top cover on again first.
Can I use the epilator, shaver or trimmer on the bikini area?
You can remove hair from the bikini area, but never use any part of the product on the inner labia, and never epilate the inner or outer labia. You may shave or trim the outer labia only with a comb attached to the head (the shaving head with its shaving comb, or the trimming head with its trimming comb). For the rest of the bikini area, the heads can be used without extra combs or caps.
How do I use the SkinLED attachment correctly?
Attach it to the handle and switch on. The lights flash for 60 seconds while it heats up, then a beep sounds and the lights stay on. Move it in straight lines over each of three zones (left cheek, right cheek, forehead) for 20 seconds each, switching zones at each beep and going around four times. The attachment switches off on its own after 5 minutes. Use it only once per 24 hours, on clean facial skin, never near the eyes, and never stay on one spot longer than 10 seconds.
How do I clean the epilator and the shaving head?
Switch the product off and disconnect the USB cable first. Pull the cutting unit out of the shaving head by its plastic housing and rinse it under the tap, without using the brush on it. Clean the hair chamber and all other parts with the cleaning brush and rinse them under the tap with cold or lukewarm water. Shake off excess water, let everything air dry completely, and snap the cutting unit back in. Do not dry cutting units with a towel or tissue.
How often should I replace the cutting unit or brushes?
Replace the facial cleansing brush, pedicure disk and body exfoliation brush every six months, and the shaving head’s cutting unit every 12 months, or sooner if results decline or a part is damaged. Use only original Philips replacement parts, which you can order from the Philips website or through Philips support at 1-888-744-5477. Once every six months, put a drop of sewing machine oil on the cutting unit’s trimmer teeth and foil.
Should I use the epilator on wet or dry skin?
Either works, but the skin should be completely dry or completely wet, never just moist. Dry skin gives the most efficient hair removal because dry hairs stick to the skin less. Wet skin feels more comfortable and glides smoothly, though wet hairs cling to skin and removal may be less effective. When using it wet, rinse the attachment often to clear hairs, and pat your skin dry afterward.