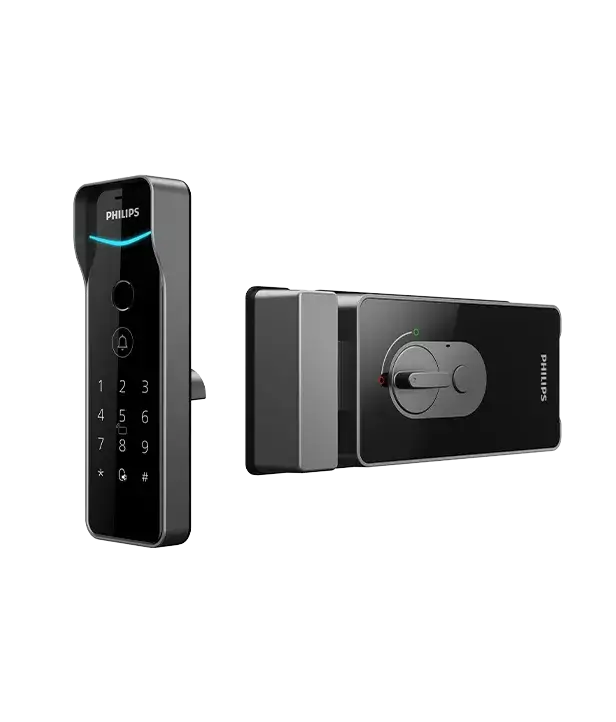
Philips Home Access Smart Deadbolt 5000 Series
The Philips Home Access Smart Deadbolt 5000 Series is a battery-powered deadbolt with a touchscreen keypad, a Palm ID reader, a doorbell button and a keyhole for backup keys on the outside, and a thumb turn on the inside. You can unlock it with a PIN code, a registered palm, a backup key or the Philips Home Access app, and you can lock it with a long press on the keypad, the thumb turn or the app. Other documented features include Auto-Lock, Away Mode, Privacy Mode, Grab and Go, temporary PIN codes, lock activity notifications and sharing through the app. An optional Door Position Sensor and a plug-in Chime can be added.
Safety and Battery Precautions
Safety
- Read and understand all instructions before using the product. Damage caused by not following the instructions is not covered by the warranty.
- Use only the components the manufacturer provided and suggested accessories.
- Use only non-rechargeable CR123A lithium batteries.
- Do not forcibly disassemble the product to trigger an alarm or damage it.
- Do not scrape the fingerprint sensor with sharp objects, because this may cause permanent damage.
- Do not remove the batteries during lock setup and operation.
- Change the default master PIN code immediately through the Philips Home Access app after installation.
Caution
- Keep the batteries away from fire sources.
- Do not connect the two poles of a battery to metal. This avoids a short circuit and a possible explosion.
- Have any replacement component handled by Philips, a Philips-authorized service center or a professional technician.
- Do not use parts or accessories made by others, except batteries.
- Do not expose the product to places with water leakage or splashing.
Returns and Disposal
Locks can be returned to an authorized Philips service center. Compensation is provided if the returned product meets Philips’s conditions. Follow local regulations and do not put used products or batteries in normal household waste.
What Comes in the Box
The package includes the Exterior Assembly, Latch Bolt, Mounting Plate, Interior Assembly, 4 CR123A lithium batteries, Battery Cover, 2 Interior Assembly Screws, 2 Mounting Plate Screws, a Strike Plate with 2 Strike Plate Screws, 2 Latch Bolt Screws, 2 Backup Keys, a Door Position Sensor with 2 Door Sensor Screws, a Door Position Sensor Cap, a Door Position Sensor Mounting Template, a Wireless Chime, a Drilling Template, a User Manual and a Quick Start Guide.
Several parts are marked optional: the Reinforcement Plate with 2 Reinforcement Plate Screws, the Upper Screw and Screw Post, the Drive-In Collar, the Door Position Sensor Cap and the Door Position Sensor mounting screws.
Lock Parts and Controls
Exterior Assembly
| No. | Part |
| 1 | Exterior Proximity Sensor |
| 2 | Status Indicator |
| 3 | Touchscreen Keypad |
| 4 | Cancel Key |
| 5 | Confirm Key |
| 6 | Palm ID Reader |
| 7 | Doorbell |
| 8 | Keyhole Cover |
| 9 | Keyhole |
Interior Assembly
| No. | Part |
| 1 | Battery Cover |
| 2 | CR123A Lithium Batteries |
| 3 | Reset Button |
| 4 | Interior Proximity Sensor |
| 5 | Privacy Button |
| 6 | Installation Buckle |
| 7 | Thumb Turn |
Door Requirements Before Installing
You need a #2 Phillips screwdriver. Before you start, confirm all of the following:
| Check | Required value |
| Hole in the door face | 1-1/2″ or 2-1/8″ (38 mm or 54 mm) |
| Hole in the door edge | 1″ (25 mm) |
| Backset | 2-3/8″ or 2-3/4″ (60 mm or 70 mm) |
| Door thickness | 1-3/8″ to 2″ (35 mm to 50 mm) |
| Hole in the door frame | Drilled at least 1″ (25 mm) deep so the deadbolt can extend into the frame when locked |
Make sure the door frame is aligned with the door and nothing obstructs it.
Installing the Lock
Optional Upper Screw
The Upper Screw is optional. It adds security or helps when a door is weak or warped. If you will use it, drill a 19/32″ hole in the door before you start, using the Drilling Template. Fasten the Screw Post into the hole of the Exterior Assembly before you install the Upper Screw.
Install the Latch Bolt and Strike Plate
- Hold the Latch Bolt in front of the door hole with its face flush against the door edge. If the slotted hole is centered in the door hole, no adjustment is needed. If it is not centered, rotate and pull the Latch Bolt to extend it to the correct backset, 2-3/8″ (60 mm) or 2-3/4″ (70 mm).
- Install the Latch Bolt. The figures show two cases: on a chiseled door edge, fasten it with the Latch Bolt Screws; on an edge that is not chiseled, use the Drive-In Collar.
- Use a screwdriver to confirm the deadbolt locks and unlocks smoothly.
- Install the Strike Plate on the door frame with the Strike Plate Screws. The Reinforcement Plate Screws are optional. Make sure the frame hole is at least 1″ (25 mm) deep.
Install the Exterior Assembly
Before installing the Exterior and Interior Assembly, make sure the Latch Bolt is fully retracted (unlocked position). Do not insert the key during installation.
- Check the door hole diameter. For a 1-1/2″ (38 mm) hole, remove the spacer. For a 2-1/8″ (54 mm) hole, go on to the next step.
- With the Latch Bolt fully retracted, route the cable below the Latch Bolt and insert the tailpiece through the slot in the Latch Bolt.
- Move the Installation Buckles on both sides of the Interior Assembly upward and remove the Mounting Plate from the interior base.
- Route the cable through the hole in the Mounting Plate, then secure the plate with the Mounting Plate Screws. Do not overtighten them.
Install the Interior Assembly and Batteries
- Push the Battery Cover up in the direction shown in the figure. Do not load batteries before the lock installation is finished.
- Push the cable connector from the Exterior Assembly firmly into the socket on the Interior Assembly until it is completely attached.
- Keep the Thumb Turn vertical, toggle the Installation Buckle upward and fit the Interior Assembly. Then attach it to the Mounting Plate, toggle the Installation Buckle downward and fasten it with the Interior Assembly Screws. Do not use other screws, and make sure the cable is not pinched or the lock will not work properly.
- Install the 4 CR123A batteries.
- Press and hold the Reset Button for at least 5 seconds until you hear a beep. This starts the lock-handing process and must be done before you set up the lock.
Installing the Door Position Sensor
The Door Position Sensor can be installed two ways: Surface Mount or Flush Mount. Follow the Door Position Sensor Mounting Template in the box for the exact steps. Surface Mount is recommended because it avoids drilling extra holes in the door. If you do not want to drill into the door frame, install the surface-mounted sensor with the Mounting Tape only.
Setting Up the Lock
Download the App and Create an Account
Scan the QR code on the manual’s setup page to download the Philips Home Access app, then register and log in.
Add the Lock
Turn on Bluetooth on your phone and tap “Add device” in the app. Scan the QR code, or enter the ESN printed on the back of the Battery Cover by hand. Then follow the in-app pairing steps.
Calibrate the Door Position Sensor
Follow the app instructions until the lock and the Door Position Sensor are calibrated together. Do this near the smart lock. If the app fails to calibrate, check that the sensor is installed correctly and try again.
Connect to Wi-Fi
Follow the app instructions to connect the lock to your home network. The lock works only with 2.4 GHz Wi-Fi, and your phone should be on the same 2.4 GHz network. For the best connection, keep the router no more than 26 feet (8 meters) from the lock. During connection, stand between the lock and the router.
Features and Modes
| Feature | How it works |
| Master PIN code | Unlocks the deadbolt in Away Mode and Privacy Mode. The default is 12345678 and must be changed before setup. |
| Multiple ways to unlock | Palm, PIN codes, backup keys or the app. Palm IDs and PIN codes are managed in the app. |
| Simple sharing | Tap “Share device” in the app. Access can be shared and accepted only through the app. |
| Lock activity | Records lock and unlock history and user access. Real-time notifications are sent while the lock is on your home Wi-Fi. |
| Temporary PIN codes | Created remotely in the app. A one-time code is deleted after use; a duration code works repeatedly during a set period. |
| One-Touch Locking | Press and hold any touchscreen key for 2 seconds. |
| Auto-Lock | Disabled by default. The delay can be set from 30 to 180 seconds in the app. After the Door Position Sensor is calibrated, it can also lock immediately when the door closes. |
| Wrong entry limit | After 10 failed PIN code or Palm ID attempts, the keypad is disabled for 3 minutes. |
| Silent Mode | Mutes keypad sounds. Low battery warnings and system alerts still sound. |
| Grab and Go | Disabled by default. Unlocks the deadbolt as you approach and grab the door knob or lever indoors. Enable it in the app. |
| Low battery alarm | The battery indicator flashes and a voice says “Low battery. Please replace batteries as soon as possible.” A notification is also sent through the app. |
Away Mode
Away Mode is meant for vacations or long trips. It blocks all User PIN codes and Palm IDs until the Master PIN code is entered on the keypad. If the lock is opened with the Thumb Turn, an alarm sounds for 1 minute and the app sends a notification. Turn Away Mode on in the app. Entering the Master PIN code on the keypad, or switching it off in the app, stops the alarm and ends Away Mode.
Privacy Mode
Press and hold the Privacy Button on the Interior Assembly for 3 seconds. This blocks all User PIN codes and Palm IDs. Privacy Mode ends automatically when you unlock with the Thumb Turn or the Master PIN code.
PIN Codes, Palm IDs and Default Settings
Entry Method Limits
- Master PIN code: 4 to 10 digits. Change the default 12345678 before setting other codes.
- User PIN codes: 4 to 10 digits, up to 100 stored in the lock.
- Palm IDs: up to 50 stored in the lock.
- Master and User PIN codes cannot be a forward sequence (12345678), a backward sequence (87654321), a repeated digit (22222222) or a code that contains an existing code. For example, if 5683 exists, then 568391 and 915683 are not allowed.
Default Settings
| Function | Default |
| Master PIN code | 12345678 |
| Auto-Lock | Disabled |
| Silent Mode | Disabled |
| Shut down time | 3 minutes |
| Away Mode | Disabled |
Add a Palm ID
- Tap “Add Palm ID” in the app.
- Follow the in-app instructions and hold your palm in front of the Palm ID Reader, about 2″–6″ (50–150 mm) away. Keep it still while the reader scans your palm vein pattern. Palm IDs are stored locally.
- Name the new Palm ID in the app.
Make sure nothing covers the reader or your palm. After enrollment the reader recognizes the palm in any direction within a 180-degree range centered on the palm. Adding two Palm IDs per palm is recommended: palm upward for the first, the same palm downward for the second.
Unlock with Palm ID
The Palm ID reader wakes when you approach. Hold your palm still in front of the reader, 2″–6″ (50–150 mm) away, until both the Palm ID Reader and the keypad lights go out.
Locking and Unlocking
| Unlock | Lock | |
| Outside | PIN code; Palm ID; backup key; app | Press and hold any keypad key for at least 2 seconds (Manual Mode); Auto-Lock extends the Latch Bolt after unlocking and the door shutting; app; backup key |
| Inside | Rotate the Thumb Turn to unlocked; app; voice assistant; Grab and Go (disabled by default) | Rotate the Thumb Turn to locked; Privacy Button (Manual Mode); Auto-Lock; app; voice assistant |
Factory Reset
Press the Reset Button for at least 5 seconds until you hear the tone asking you to restore default settings. This erases all user and network settings, unpairs the lock from user accounts and removes all paired accessories. It also starts the lock-handing process again.
Adding the Chime
Chime Controls
The Chime plugs into an outlet that supports 90 to 240V AC. It has a Setup Indicator, a Volume Button, a Speaker and a Melody Button.
| Action | Result |
| Single-click the Volume Button | Changes volume among 5 levels: 40 dB, 50 dB, 60 dB, 65 dB, 75 dB |
| Press and hold the Volume Button | Enters Pairing Mode (see the FAQ on the hold time) |
| Melody Button arrows | Scroll through 38 melodies; the chosen melody is saved after power-off |
Pair the Chime with the Lock
- Plug the Chime into a standard outlet, ideally near the lock. After pairing, it can be moved to another room. The maximum distance to the lock is 328 feet (100 m) in an open space, and no more than three walls is recommended.
- In the app, select the lock and find “Add accessories” under Settings.
- Press and hold the Chime’s setup button for 3 seconds. The indicator flashes once and then stays on, and you hear a “Ding Dong.” Pairing lasts 1 minute.
- Follow the in-app instructions. When the indicator flashes once and the Chime rings again, they are connected.
- Press the doorbell on the lock and check that the Chime works.
One Philips smart deadbolt can connect to multiple Chimes, and one Chime can be added to multiple Philips smart deadbolts.
Troubleshooting
| Problem | What to try |
| Latch Bolt does not work correctly after installation | Check the backset is set to the right length; confirm the Latch Bolt was retracted before installing; restore the lock to default settings and use the default Master PIN code to set up. |
| Lock does not lock or unlock smoothly with the Thumb Turn | Confirm the Mounting Screws are properly installed. |
| Setup fails in the app | Confirm correct installation; insert fresh batteries and make sure the cable is not pinched; reset to factory settings to finish setup. |
| Cannot connect to Wi-Fi | Strengthen the signal; use 2.4 GHz or dual-band Wi-Fi; check the password (under 26 characters, no spaces); try another phone; factory reset and repeat setup. |
| Cannot add the device by Bluetooth | Make sure the lock has enough power and the phone is close; turn Bluetooth on; on Android, enable Location Service. |
| Cannot scan the QR code | Use good lighting or the phone flashlight, keep enough distance with the code centered, and avoid reflections from direct light or sunlight. |
| Palm ID will not unlock | Clear the reader and palm; confirm the palm was added; hold 2″–6″ away and still; delete and re-add the Palm ID; match the palm direction used at enrollment; check battery power. |
| Device shows offline | Check battery power; check the router has Internet access, since the lock should reconnect when the network recovers; if not, try resetting the lock. |
| App shows door open when closed | Remove nearby metal or magnetic interference and recalibrate the Door Position Sensor in the app. |
| Lock rotates only with the key inserted | Make sure the Latch Bolt is installed correctly. |
| Door handing not activated after batteries installed | Press the Reset Button for at least 5 seconds until you hear the tone. |
| Keypad not responding | Check the batteries are inserted correctly; a continuously flashing battery indicator means low batteries; check the cable is connected and undamaged. |
| Master PIN code cannot be changed | Restore factory settings and reprogram all user PIN codes. |
| Auto-Lock not working | Replace low batteries if the indicator flashes; make sure Auto-Lock is activated. |
For help, call U.S.A. and Canada: +1 (833) 599-9111.
Frequently Asked Questions
What batteries does the Philips 5000 Series smart deadbolt use?
It uses four non-rechargeable CR123A lithium batteries. Use only that type, keep them away from fire, and never let the two poles touch metal, which can cause a short circuit and a possible explosion. When they run low, replace all four with new CR123A lithium batteries.
What should I do right after installing the batteries?
Press and hold the Reset Button on the Interior Assembly for at least 5 seconds until you hear a beep. This activates the lock-handing process, and it has to be done before you set up the lock in the app. Do not load the batteries earlier than the final installation steps, and do not remove them during setup.
How do I change the default Master PIN code?
Use the Philips Home Access app, and do it immediately after installation. The default is 12345678, and the Master PIN code can be 4 to 10 digits. It cannot be a forward or backward sequence, a repeated digit or a code containing an existing code.
How do I connect the lock to Wi-Fi?
Follow the in-app instructions, standing between the lock and your router. The lock works only with 2.4 GHz Wi-Fi, so connect your phone to the same 2.4 GHz network first. A router within about 26 feet (8 meters) gives the best connection. If it fails, check the password (under 26 characters, no spaces), strengthen the signal, try another phone, or factory reset and repeat setup.
Why can’t I add the lock through Bluetooth?
Check that the lock has enough battery power and that your phone is close to it. Turn on Bluetooth on the phone, and on an Android device also turn on Location Service. If the QR code won’t scan, move to a well-lit spot, use the phone flashlight, center the code and avoid glare from direct light or sunlight. You can also enter the ESN under the Battery Cover by hand.
How do I set up Palm ID so it works reliably?
Tap “Add Palm ID” in the app and hold your palm still about 2″–6″ (50–150 mm) from the reader while it scans. Add two Palm IDs for each palm, one with the palm upward and one downward, so the lock recognizes you in either position. The lock stores up to 50 Palm IDs.
What can I do if Palm ID won’t unlock the door?
Make sure nothing covers the reader or your palm, and that you are holding it still 2″–6″ away until the reader and keypad lights go out. If you registered only one palm direction, flipping your hand can fail, so match the enrollment direction or add a second Palm ID. If problems continue, delete and re-add the Palm ID. If the batteries are low, unlock with the backup key and replace all four.
How does Auto-Lock work, and why isn’t it working?
Auto-Lock is off by default. Turn it on in the app and choose a delay of 30 to 180 seconds. With the Door Position Sensor calibrated, you can also set it to lock as soon as the door is closed. If it still doesn’t work, check whether the battery indicator is flashing continuously, and if so replace the batteries.
What is the difference between Away Mode and Privacy Mode?
Away Mode is turned on in the app. It blocks all User PIN codes and Palm IDs until the Master PIN code is entered on the keypad, and opening the lock with the Thumb Turn sounds an alarm for 1 minute and sends an app notification. Privacy Mode is turned on at the door by holding the Privacy Button for 3 seconds, and it also blocks user codes and Palm IDs. It ends automatically when you unlock with the Thumb Turn or the Master PIN code.
What happens after too many wrong PIN or Palm ID attempts?
After 10 unsuccessful attempts by PIN code or Palm ID, the keypad is disabled for 3 minutes. Wait for that period to pass before trying again.
What should I do if I forgot the Master PIN code?
Perform a factory reset. Press the Reset Button for at least 5 seconds until you hear the tone prompting you to restore default settings. This deletes all PIN codes and Palm IDs, resets the Master PIN code to 12345678 and unpairs the lock from user accounts, so you will need to set everything up again and change the Master PIN code.
Why does the app say the door is open when it is closed?
Metal objects or changing magnetic fields near the lock can throw off the Door Position Sensor. Remove any likely sources of interference and recalibrate the sensor in the app, doing the calibration near the lock.
How do I pair the Chime, and how long should I hold the button?
Plug the Chime in, open the app, select your lock and choose “Add accessories,” then hold the Chime button to start Pairing Mode. The Chime table says 5 seconds on the Volume Button, while the pairing steps say 3 seconds on the Setup Button, so these two instructions differ. Pairing mode lasts 1 minute. Follow the in-app prompts, and when the indicator flashes once and the Chime rings again, test it with the lock’s doorbell.