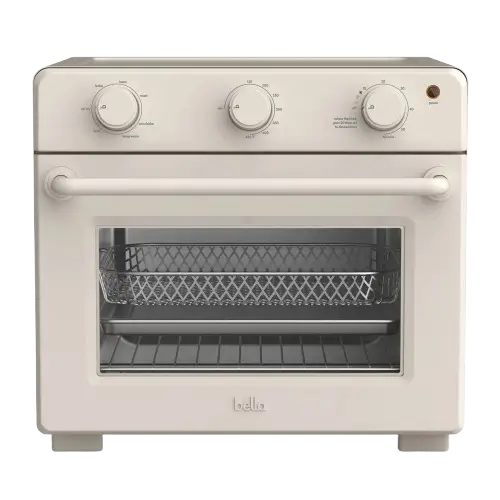
Bella Air Fry Toaster Oven
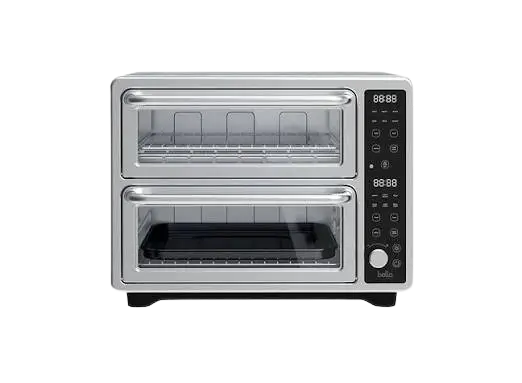
The Bella Air Fry Toaster Oven is a countertop oven for household use that handles seven cooking functions: air fry, bake, toast, roast, convection bake, keep warm, and broil. Three dials control it: a function control, a temperature control, and a timer control that also sets toast browning. The temperature range is 150° to 450°, and the timer runs up to 60 minutes. An orange indicator light shows when the timer is on.
The oven works with an air fry mesh basket, a bake pan, a wire rack, and a crumb tray, and it has three shelf heights. It can cook up to a 4 lb chicken or turkey and up to a 4 lb roast, as long as the food fits without touching the upper or lower heating elements. The cord plugs directly into a 120 V AC wall outlet. The sections below cover safety, parts, first use, shelf positions, the timer, cooking, USDA temperature guidelines, cleaning, storage, and warranty.
Important Safeguards
When using electrical appliances, always follow basic safety precautions, including these:
- Read all instructions.
- Do not touch hot surfaces. Use handles or knobs.
- To protect against electrical shock, do not immerse the cord, plugs, or appliance in water or other liquid.
- This appliance is not intended for use by persons (including children) with reduced physical, sensory, or mental capabilities, or lack of experience and knowledge, unless they have been given supervision or instruction on its use by a person responsible for their safety.
- Supervise children so they do not play with the appliance.
- Unplug from the outlet when not in use and before cleaning. Let the oven cool before putting on or taking off parts.
- Do not operate any appliance with a damaged cord or plug, or after the appliance malfunctions or has been damaged in any manner. Contact Consumer Service.
- Accessory attachments not recommended by the manufacturer may cause injuries.
- Do not use outdoors.
- Do not let the cord hang over the edge of a table or counter, or touch hot surfaces.
- Do not place the oven on or near a hot gas or electric burner, or in a heated oven.
- Use extreme caution when moving an appliance containing hot oil or other liquids.
- To disconnect, turn the timer dial knob to OFF, then remove the plug from the wall outlet.
- Do not use the appliance for anything other than its intended use.
- Do not insert oversize foods or metal utensils into the oven. They may create a fire or risk of electric shock.
- A fire may occur if the oven is covered or touching flammable material, including curtains, draperies, and walls, while in operation. Do not store any item on top of the appliance while it is operating.
- Do not clean with metal scouring pads. Pieces can break off the pad and touch electrical parts, creating a risk of electric shock.
- Use extreme caution with containers made of anything other than metal or glass.
- Do not store any materials in the oven when it is not in use, other than the manufacturer’s recommended accessories.
- Do not place paper, cardboard, plastic, or the like in the oven.
- Do not cover the crumb tray or any part of the oven with metal foil. This will cause overheating.
- Use extreme caution when removing the crumb tray or disposing of hot grease.
- Do not cover the oven with anything that would prevent steam from escaping. This may cause warping, discoloration, malfunction, or even fire.
NOTE: Do not attempt to repair the unit yourself. Doing so will void the warranty.
FOR HOUSEHOLD USE ONLY. SAVE THESE INSTRUCTIONS.
Additional Important Safeguards
CAUTION, HOT SURFACES: This appliance generates heat and escaping steam during use. Take proper precautions to prevent burns, fires, and other injury or property damage.
- All users must read and understand this manual before operating or cleaning the oven. A person who has not read and understood all operating, toasting, and safety instructions is not qualified to operate it.
- If the appliance falls or is accidentally immersed in water, unplug it from the wall outlet immediately. Do not reach into the water.
- Provide adequate air space above and on all sides for air circulation. Do not operate the oven while it is touching or near curtains, wall coverings, clothing, dishtowels, or other flammable materials.
- To reduce the risk of fire, do not leave the appliance unattended during use.
- If the oven begins to malfunction during use, turn the timer knob to OFF and remove the plug from the wall outlet. Do not use or attempt to repair a malfunctioning appliance. Contact Consumer Service.
- Plug the cord only directly into a 120 V AC electrical wall outlet.
- Do not use the oven in an unstable position.
- Do not touch hot surfaces. Protective oven mitts or gloves and long-handled utensils are recommended.
- Unplug the oven before inserting food, and keep it unplugged from the wall outlet when not in use.
CAUTION: Never leave the toaster oven unattended while in use.
Plug, Cord, and Power Notes
Polarized plug: The plug has one blade wider than the other and fits a polarized outlet only one way. If it does not fit fully, reverse the plug. If it still does not fit, contact a qualified electrician. Do not modify the plug in any way.
Cord: A short power-supply cord reduces the risk of tangling in or tripping over a longer cord. Longer detachable power-supply cords or extension cords may be used if care is exercised. If you use one:
- Its marked electrical rating must be at least as great as the oven’s electrical rating.
- If the appliance is the grounded type, the extension cord must be a grounding-type 3-wire cord.
- Arrange the longer cord so it does not drape over the countertop or tabletop where children can pull it or anyone can trip over it.
Plasticizer warning: To keep plasticizers from migrating to the finish of a countertop, tabletop, or other furniture, place non-plastic coasters or placemats between the appliance and the surface. Otherwise the finish may darken, and permanent blemishes or stains may appear.
Electric power: An electrical circuit overloaded with other appliances may keep the oven from operating properly. Run it on a separate circuit from other appliances.
Parts and Controls
Oven Parts
| No. | Part |
| 1 | Door Handle |
| 2 | Function Control |
| 3 | Timer Control |
| 4 | Temperature Control |
| 5 | Indicator Light |
| 6 | Power cord (not shown in the illustration) |
| 7 | Air Fry Mesh Basket |
| 8 | Bake Pan |
| 9 | Wire Rack |
| 10 | Crumb Tray |
The product may vary slightly from the manual’s illustrations.
Controls
| Control | Function | Notes |
| Function Control | Selects air fry, bake, toast, roast, conv. bake, keep warm, or broil | Seven preset functions |
| Temperature Control | Sets cooking temperature | 150° to 450° |
| Timer Control | Sets cooking time and toast browning | Turn clockwise; a bell rings at the end of the set time |
| Indicator Light | Shows the timer is on | Orange; lights only when the unit is plugged in and the time is set |
Before First Use
- Read all instructions in the manual.
- Make sure the oven is unplugged and the timer is in the “off” position.
- Wash all accessories in hot, soapy water.
- Dry all accessories thoroughly, reassemble them in the oven, and plug the oven into the outlet.
- After reassembling, run the oven at 450° for approximately 15 minutes to burn off packing residue left from shipping. This also removes any odor present at first.
PLEASE NOTE: Initial start-up may produce some smell and smoke (about 15 minutes). This is normal and harmless. It comes from burning off the protective substance applied to the heating elements.
WARNING: To avoid injury or burns, do not touch hot surfaces while the oven is in use. Wearing gloves is suggested.
CAUTION: Be extremely careful when removing the bake pan, wire rack, air fry mesh basket, or any hot container from a hot oven.
Shelf Positions
Foods may need different shelf positions depending on the recipe, size, amount of food, and personal taste. Use the following as a guide only. The wire rack or bake/broil pan can go in any of three height positions.
| Function | Recommended shelf position |
| Broil | Upper |
| Toast and air fry | Center (commonly used) |
| Bake, conv. bake, roast, and keep warm | Lower |
WARNING: Never set the bake/broil pan directly onto the lower heating elements.
Weight and Size Limits
- Food on the shelf must fit comfortably in the oven without touching the lower or upper heating elements.
- The oven can cook up to a 4 lb chicken or turkey and up to a 4 lb roast.
- Check cooking progress periodically with a meat thermometer.
Setting the Timer and Toast Browning
The timer dial has these settings: OFF; TOAST BROWNING (LIGHT, MEDIUM, DARK); and 0–60 MINUTES.
- The oven will not turn on unless the timer is set. With the knob in the off position, it will not operate.
- To set the time, turn the knob clockwise to the desired time and include the preheat time.
- The indicator light is lit only when the unit is plugged in and the time has been set.
- When the timer reaches the off position, a bell sounds and the power is cut off automatically.
- You can change the timer during a cooking cycle by turning the knob to the new time.
IMPORTANT: To time less than 20 minutes, turn the dial past the 20-minute mark, then turn it back to the time or toast browning setting you want.
CAUTION: Bread may catch fire if the toasting time is set too long. Supervise closely during toasting, and do not set the timer too long.
Using the Oven
IMPORTANT: The oven gets hot. Always use oven mitts or pot holders when touching the outer or inner surfaces.
- Plug in the unit.
- Place the rack at the position that fits the height of the food. Keep the food at least 1½ inches from the upper and lower heating elements.
- Set the food on the rack in an ovenproof container. Never use plastic or cardboard containers in the oven.
- Select one of the 7 preset functions.
- Set the temperature as the recipe calls for or as you prefer.
- Shut the door securely and set the cooking time to begin operating.
- When the timer reaches “off,” a beep sounds and the power light turns off.
- If the food finishes before the timer signals, turn the temperature control to its lowest position and the timer control to “off,” and confirm the power light is off.
- Open the door, and use mitts or pot holders to slide the rack out and remove the cooked food.
- Unplug the oven when not in use and let it cool completely before cleaning.
IMPORTANT:
- Do not put any container directly on the lower heating elements.
- Never use containers with lids.
- Do not let juices run to the bottom of the oven. Use the baking pan and crumb tray when cooking.
- You must set the timer for the oven to function.
NOTE: Make sure food does not extend past the edges of the pan, so liquids do not drip onto the heating elements.
Helpful Hints
- The orange power indicator light comes on when the oven is turned on and stays lit until the oven is turned off manually or automatically after the timer has run.
- Include preheat time when choosing a cook time.
- If food needs covering, use aluminum foil. Tuck the foil edges against the sides of the baking dish or pan. Never cover the crumb tray or any part of the oven with foil.
- Keep the top of any container or food at least 1½ inches from the upper heating elements.
- Turn the timer knob to off before inserting or removing the plug.
- For best performance, do not overfill the oven and avoid opening the door too often, which causes heat loss.
USDA Cooking Guidelines
Always use a meat thermometer. Insert it into the thickest part of the roast, away from bones and fatty areas. The U.S. Department of Agriculture recommends these internal temperatures:
| Food | Internal temperature |
| Ground turkey and ground chicken | 165°F |
| Ground beef, veal, lamb, and pork | 160°F |
| Chicken and turkey, white meat | 170°F |
| Chicken and turkey, dark meat | 180°F |
| Goose and duck | 180°F |
| Fresh beef, veal, and lamb | At least 145°F |
| Fresh pork | At least 160°F |
| Reheated meat and poultry products | 165°F |
Care and Cleaning
The oven contains no user-serviceable parts. Do not try to repair it yourself. Any servicing beyond cleaning must be done by a qualified appliance repair technician.
- Let the oven and all accessories cool completely before cleaning.
- Clean the outside with a damp cloth and dry thoroughly. A nonabrasive liquid cleaner may be used for stubborn stains. Rinse and dry. Do not use metal scouring pads or abrasive cleaners that will scratch the surface.
- After each use, clean the interior with a mild or non-abrasive cleaner and a plastic scouring pad to avoid build-up. Do not rub too hard, as the surface can be scratched.
- For baked-on food, pour a small amount of cooking oil onto it and let it stand 5 to 10 minutes. Remove the softened food with a soft cloth. Do not use steel wool, scouring pads, or abrasive cleaners.
- Rinse and dry thoroughly before closing the glass door. Clean the glass door with a cloth or sponge dampened with warm, sudsy water, then dry thoroughly.
- Wash the bake/broil pan, wire rack, air fry mesh basket, and crumb tray in soapy water and dry thoroughly.
- If crumbs and spills have built up on the crumb tray, wipe it with a damp cloth. Dry it thoroughly before replacing it.
- Do not use abrasive cleaners or metal scouring pads on the bake/broil pan, wire rack, or crumb tray. For stubborn stains, use a nylon or polyester mesh pad and a mild, non-abrasive cleaner. Rinse and dry thoroughly.
CAUTION: Do not use spray-on or other oven cleaners. They may cause cosmetic or electrical damage to the oven.
Storing the Oven
- Unplug the unit, let it cool, and clean it before storing.
- Slide the bake/broil assembly (wire rack and bake/broil pan) into the lower shelf position.
- Store the oven in its box in a clean, dry place.
- Never store the appliance while it is hot or still plugged in.
- Never wrap the cord tightly around the appliance. Do not stress the cord where it enters the unit, as it could fray and break.
Warranty and Support
Limited two-year warranty. SENSIO Inc. warrants the product against mechanical defects in material and workmanship for two years from the date of purchase, and against defects in non-mechanical parts for 90 days. At its sole discretion, SENSIO Inc. will repair or replace a defective product, or issue a refund, during the warranty period.
The warranty is valid only for the original retail purchaser from the date of initial retail purchase and is not transferable. Keep the original sales receipt, because proof of purchase is required for warranty validation.
Exclusions. The warranty does not cover normal wear of parts or damage from negligent use, improper voltage or current, improper routine maintenance, use contrary to the operating instructions, or disassembly, repair, or alteration by anyone other than qualified SENSIO Inc. personnel. It also does not cover Acts of God such as fire, floods, hurricanes, or tornadoes. SENSIO Inc. is not liable for incidental or consequential damages from breach of any express or implied warranty. Some states, provinces, or jurisdictions do not allow these exclusions or limitations, so they may not apply to you, and the warranty gives specific legal rights that may vary by location.
How to get warranty service.
- Call Customer Service at the toll-free number 1-866-832-4843. A representative will try to resolve the problem by phone.
- If it cannot be resolved by phone, you will receive a case number and be asked to return the product to SENSIO Inc.
- Attach a tag to the product with your name, address, daytime telephone number, case number, and a description of the problem.
- Include a copy of the original sales receipt.
- Package the tagged product carefully with the receipt and send it, with shipping and insurance prepaid, to SENSIO Inc.’s address. SENSIO Inc. bears no responsibility or liability for the product in transit.
For customer service questions or comments, call 1-866-832-4843 or email help@bellahousewares.com. Product registration is available at bellakitchenware.com.
Frequently Asked Questions
What temperature range does the oven offer?
The temperature control runs from 150° to 450°. Set it as your recipe calls for, and choose the function (air fry, bake, toast, roast, conv. bake, keep warm, or broil) with the function control.
Why won’t my oven turn on?
The oven only works when the timer is set, so a timer knob left at “off” means no heat. Plug the oven in, choose a function and temperature, then turn the timer knob clockwise to the time you want, including preheat time. The orange indicator light comes on once the unit is plugged in and the time is set. If the oven still malfunctions, turn the timer to OFF, unplug it, and contact Consumer Service rather than trying to repair it.
How do I set the timer for less than 20 minutes?
Turn the timer dial clockwise past the 20-minute mark, then turn it back to the shorter time or toast browning setting you want. For toast, the dial offers LIGHT, MEDIUM, and DARK. Watch toasting closely, because bread can catch fire if the time is set too long.
Which shelf position should I use?
Use the upper position for broil, the center position for toast and air fry, and the lower position for bake, conv. bake, roast, and keep warm. These positions are a guide, so adjust for the recipe and food size. Keep food at least 1½ inches from the heating elements, and never set the bake/broil pan directly on the lower heating elements.
Is it normal for the oven to smell or smoke the first time?
Yes. During the first start-up the oven may smell and smoke for about 15 minutes as the protective substance on the heating elements burns off. After washing and drying the accessories and reassembling the oven, run it at 450° for about 15 minutes to clear shipping residue and the initial odor.
Can I cover food with aluminum foil?
You can cover food that needs covering with aluminum foil, as long as you tuck the foil edges against the sides of the baking dish or pan. Never cover the crumb tray or any other part of the oven with metal foil, because this causes overheating.
How do I clean baked-on food?
Let the oven and accessories cool completely, then pour a small amount of cooking oil onto the baked-on food and let it stand for 5 to 10 minutes. Wipe away the softened food with a soft cloth. Do not use steel wool, metal scouring pads, abrasive cleaners, or spray-on oven cleaners.
What does the warranty cover and how do I use it?
The warranty covers mechanical defects in material and workmanship for two years from purchase, and non-mechanical parts for 90 days, for the original retail purchaser only. Keep your sales receipt. Call 1-866-832-4843, and if the problem can’t be solved by phone you’ll be given a case number and told how to return the product.