Document Information
Document Title: Jump Starter/Power Pack Owner’s Manual
Document Type: Owner’s Manual and User Guide
Brand Name: Schumacher
Product Name: Jump Starter Power Pack
Model Number: SL1643
Revision Code: E115376 6-2
Document Code: 0099002413-00
PDF File Size: Approximately 2.5 MB
Total Number of Pages: 32 pages
Languages Covered: English, Spanish, and French
Product Overview
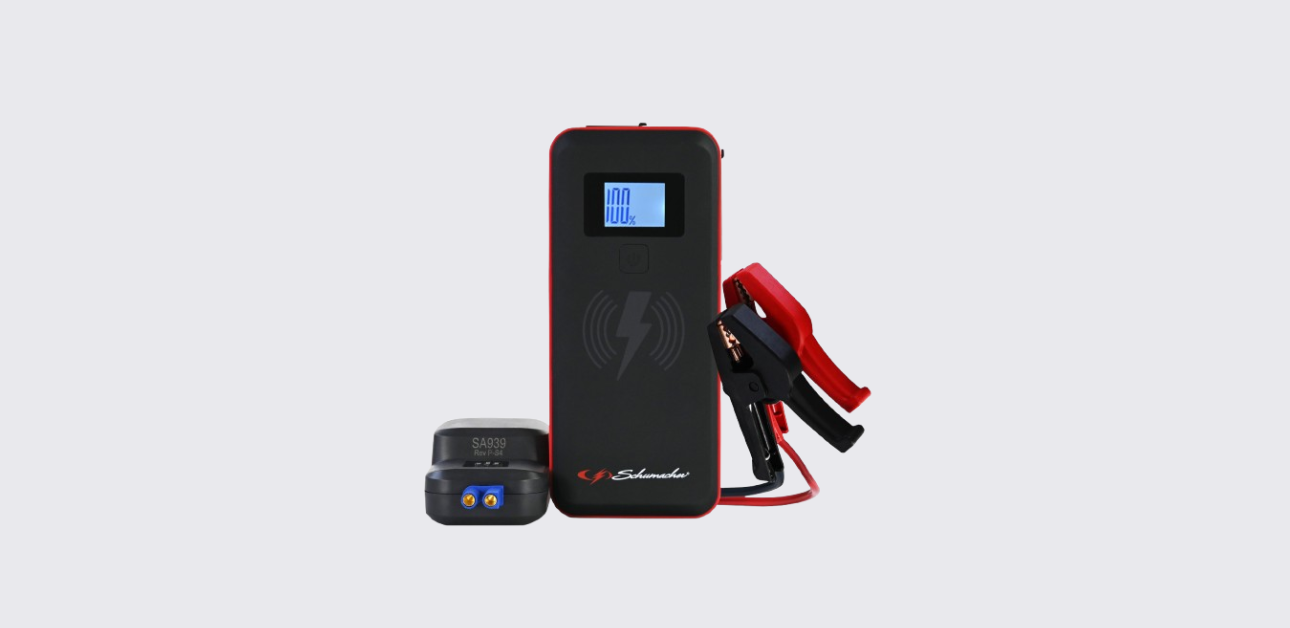
The Schumacher Jump Starter Power Pack SL1643 combines multiple functions in a single compact device. Beyond jump-starting a vehicle’s engine, this power pack serves as a mobile charging station with multiple USB ports and wireless charging capabilities. The unit features an intelligent cable system with built-in safety protections and an LCD display that shows the battery charge level at a glance.
The jump starter is powered by a lithium-ion polymer battery with a capacity of 59.2 Wh, providing enough power to jump-start vehicles with 12-volt lead-acid batteries. The device includes protective features to prevent damage from reversed polarity, short circuits, and temperature extremes. It operates effectively across a wide temperature range, making it suitable for use in various climates.
What’s Included in the Box
When unpacking the Schumacher SL1643 Jump Starter Power Pack, the following items should be present:
- One Schumacher SL1643 Jump Starter Power Pack unit
- One battery clamp cable with smart cable connector (model SA939)
- One USB charging cable
- One carrying bag for storage and transport
- One owner’s manual in multiple languages
Verify that all items are present and undamaged before attempting to use the device for the first time.
Parts and Components Guide
Main Unit Components
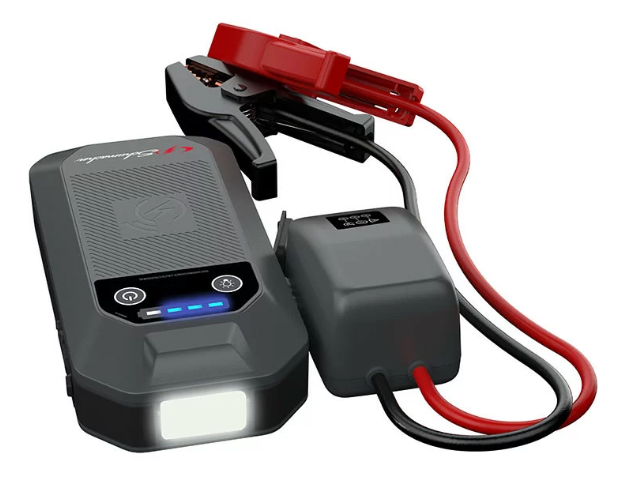
The Schumacher SL1643 features a compact rectangular design with several functional elements distributed across its surface:
- Display Button – Located on the front face, this button activates the LCD display to show battery charge percentage. Pressing and holding this button for two seconds activates the LED light.
- LCD Display – A small screen that shows the internal battery’s charge percentage (0–100%). A fully charged battery displays as “100%”. The display also shows “IN” when charging is in progress.
- Jump Start Output Socket – The connection point where the battery clamp cable plugs in to deliver jump-starting power to a vehicle’s battery.
- LED Light – A built-in emergency light located below the jump start output socket. This light operates in three modes: steady glow, SOS flash pattern, and strobe flash.
- 2A USB Input Port for Recharging – Located on the side of the unit, this port accepts a standard USB charging cable connected to a 2A USB charger for recharging the internal battery.
- 2.4A USB Output Port – A standard USB port that supplies up to 2.4 amperes at 5 volts DC for charging compatible mobile devices.
- 3A USB Output Port – A high-capacity USB port that supplies up to 3 amperes at 5 volts DC, or higher voltages (9V at 2A, 12V at 1.5A) when using a compatible fast-charging cable.
- Wireless Charging Pad – An inductive charging surface on the unit that provides 10 watts of wireless charging power to compatible Qi-enabled devices.
- Battery Clamps and Smart Cable – Heavy-duty clamps in red (positive) and black (negative) connected to an intelligent smart cable with LED indicators and protective circuitry.
Technical Specifications
Understanding the technical specifications helps users operate the Schumacher SL1643 safely and effectively within its design parameters.
Power and Battery Specifications
| Specification | Value |
|---|---|
| Internal Battery Type | Lithium-ion polymer |
| Battery Capacity | 59.2 Wh (watt-hours) |
| Jump Start Output | 2000A peak |
| USB Input (Charging) | USB 2A standard |
| USB Output (Standard) | 5V DC at 2.4A |
| USB Fast Charging Output | 5V at 3A / 9V at 2A / 12V at 1.5A |
| Wireless Charging Output | 10W power |
Operating Temperature Range
| Temperature Type | Temperature Range |
|---|---|
| Charging Temperature | 32°F to 113°F (0°C to 45°C) |
| Discharging Temperature | -4°F to 140°F (-20°C to 60°C) |
| Maximum Safe Temperature | 265°F (130°C) – exceeding this may cause explosion |
Important Safety Instructions
The Schumacher SL1643 operates with powerful electrical current and involves connection to lead-acid batteries that generate explosive gases. Users must observe all safety warnings and precautions to prevent serious injury or death.
Warnings and Hazards
RISK OF EXPLOSIVE GASES: Batteries generate explosive gases during normal operation. Working in the vicinity of a lead-acid battery is dangerous. Follow all instructions each time the unit is used.
RISK OF ELECTRIC SHOCK OR FIRE: Improper use can result in serious electrical injuries or fire. Never expose the unit to rain, snow, or excessive moisture.
RISK OF BATTERY ACID CONTACT: Lead-acid batteries contain highly corrosive sulfuric acid. Accidental contact can cause severe burns or permanent eye damage.
General Safety Precautions
Before Using the Device:
- Read the entire manual completely before operation
- Keep the unit out of reach of children
- Do not insert fingers or hands into any outlet
- Do not expose the unit to rain or snow
- Use only recommended attachments (model SA939 jump cable)
- Pull by the adapter rather than the cord when disconnecting
During Operation:
- Do not operate the unit with damaged cables or clamps
- Do not operate if the unit has been dropped or physically damaged
- Do not attempt to disassemble the unit; take it to a qualified service technician
- Do not set the unit on flammable materials such as carpets or paper
- Never place the unit directly above a battery being jump-started
- Do not use the jump starter while charging the internal battery
- Charge the internal battery only when it falls below 85% capacity or after each use
Do Not Modify:
- Changes or modifications not approved by the manufacturer may void the user’s authority to operate the device
- Do not disassemble or repair the power pack except as instructed in the manual
Personal Safety Precautions
Protective Equipment:
- Wear complete eye and body protection, including safety goggles
- Wear protective clothing when working near a battery
- Avoid touching eyes while working near a battery
- Remove personal metal items (rings, bracelets, watches, necklaces) when working with a lead-acid battery
Work Environment:
- Never smoke or allow sparks or flames in the vicinity of a battery or engine
- Be extra cautious to prevent dropping metal tools onto a battery
- Ensure the area around the battery is well ventilated during use
- Keep metal clamps from touching each other or contacting the same piece of metal
- Consider having someone nearby to assist in case of emergency
In Case of Acid Contact:
- If battery acid contacts skin or clothing, immediately wash with soap and water
- If acid enters eyes, immediately flood the eye with cold running water and seek medical attention right away
- If battery acid is accidentally swallowed, drink milk, egg whites, or water (do not induce vomiting) and seek immediate medical attention
- Have fresh water, soap, and baking soda nearby for emergency use
- Neutralize any acid spills thoroughly with baking soda before cleanup
Fire Safety for Lithium-Ion Battery
The Schumacher SL1643 contains a lithium-ion battery. In case of fire, the following extinguishing agents may be used:
- Water
- Foam extinguisher
- Halon
- CO2
- ABC dry chemical powder
- Powdered graphite
- Copper powder
- Soda (sodium carbonate)
After extinguishing the fire, douse the product with water or aqueous-based extinguishing agents to cool it and prevent the battery from re-igniting. Never attempt to pick up or move a hot, smoking, or burning product.
Checking the Internal Battery Level
Before using the jump starter for any purpose, verify the charge level of the internal battery to ensure adequate power is available for the intended operation.
Steps to Check Battery Level:
- Press the display button once
- The LCD display will illuminate and show the battery’s percentage of charge
- A fully charged internal battery displays “100%”
- If the display shows below 85% charge, the internal battery should be recharged
For jump-starting vehicles, the internal battery must have at least 40% charge. If the battery falls below this threshold, the jump starter will not have sufficient power to crank the engine.
Charging the Jump Starter
Proper charging procedures extend the lifespan of the internal battery and ensure the device is ready for emergency use.
Charging Requirements and Schedule
Important: The manufacturer recommends charging the internal battery immediately after purchase, after each use, every 30 days, or whenever the charge level falls below 85%.
Charging Location:
- Charge in a well-ventilated area
- Do not restrict ventilation in any way
- Do not charge outdoors
- Do not place on flammable materials
Safety Before Charging:
- Unplug the charging cable from a USB or wall charger before attempting any maintenance or cleaning
- Simply turning off the controls does not reduce the risk of electric shock
- Never charge a frozen battery; allow it to warm to room temperature first
Charging Procedure
Equipment Needed:
- A 2A USB charger (not included with the device)
- The USB charging cable included in the package
- A live AC or DC power outlet
Charging Steps:
- Take the USB charging cable included with the jump starter
- Plug the USB end of the charging cable into the jump starter’s 2A USB input port for recharging
- Plug the opposite end of the USB cable into a standard USB port on a 2A USB charger
- Plug the USB charger into a live AC or DC power outlet
- The LCD display will light up, the digit will begin to flash, and “IN” will appear on the screen, indicating that charging has begun
- The jump starter requires 7–8 hours for a complete charge from an empty battery state
- When the unit reaches full charge, the LCD display will show “100%”
- Once fully charged, disconnect the charger from the outlet first, then remove the charging cable from both the charger and the jump starter unit
Charging Frequency: Recharge the device as soon as possible after each use, or at least once every month if not used frequently, to maintain optimal battery health and prevent over-discharge.
Preparing to Use the Jump Starter
Before connecting the jump starter to any vehicle, several preparatory steps ensure safe and effective operation.
Pre-Use Inspection
- Battery Voltage Verification – Determine the voltage of the vehicle’s battery by referring to the vehicle owner’s manual. The Schumacher SL1643 is designed for 12-volt batteries only. Do not attempt to use this device on vehicles with 6-volt, 24-volt, or other voltage systems.
- Battery Terminal Cleaning – Clean the battery terminals before connecting the jump starter to remove corrosion buildup, which can interfere with electrical contact and reduce power transfer. When cleaning, keep airborne corrosion particles away from eyes, nose, and mouth. Use baking soda mixed with water to neutralize battery acid and help eliminate airborne corrosion.
- Cable Clamp Inspection – Make sure the unit’s cable clamps make tight connections. Loose clamps will result in poor electrical contact and may prevent the jump starter from functioning properly.
- Work Area Ventilation – Ensure the area around the battery is well ventilated while the jump starter is in use, as batteries generate explosive gases during operation.
Jump Starting a Vehicle Engine
Understanding Your Vehicle’s Electrical System
Vehicles use one of two grounding configurations for their electrical systems. Determining which type your vehicle has is essential before connecting the jump starter.
Negative-Grounded Vehicles (Most Common):
- The negative terminal of the battery is connected (grounded) to the vehicle’s chassis
- The positive terminal is ungrounded
- Most modern vehicles use this configuration
Positive-Grounded Vehicles (Rare, Older Models):
- The positive terminal of the battery is connected (grounded) to the vehicle’s chassis
- The negative terminal is ungrounded
- Some older vehicles use this configuration
If unsure, check the vehicle owner’s manual or consult a qualified technician.
Connection Steps for Negative-Grounded Vehicles
Most vehicles sold today use a negative-grounded electrical system. Follow these steps for this configuration:
- Prepare the Jump Starter – Plug the battery clamp cable into the jump starter’s output socket
- Position Cables – Lay the DC cables away from any fan blades, belts, pulleys, and other moving engine parts
- Turn Off Electrical Systems – Make sure all of the vehicle’s electrical devices are turned off before connecting the jump starter
- Connect Positive Clamp – Connect the red (positive) clamp from the jump starter to the positive (+, POS, or P marked) terminal of the vehicle’s battery
- Connect Negative Clamp – Connect the black (negative) clamp to the vehicle’s chassis or engine block, positioned away from the battery itself
- Do not connect to the carburetor, fuel lines, or sheet-metal body parts
- Connect to a heavy-gauge metal part of the frame or engine block for the best ground connection
- Verify Connection – The green LED on the smart cable should light, indicating a proper connection
- Start the Engine – After confirming proper connections, crank the engine
- If the engine does not start within 5–8 seconds, stop cranking and wait at least 1 minute before attempting again
- Do not attempt to jump-start the vehicle more than three consecutive times
- If the vehicle will not start after three attempts, consult a qualified service technician
Connection Steps for Positive-Grounded Vehicles
For the rare positive-grounded vehicle:
- Prepare the Jump Starter – Plug the battery clamp cable into the jump starter’s output socket
- Position Cables – Lay the DC cables away from any fan blades, belts, pulleys, and other moving engine parts
- Turn Off Electrical Systems – Make sure all of the vehicle’s electrical devices are turned off
- Connect Negative Clamp – Connect the black (negative) clamp from the jump starter to the negative (-, NEG, or N marked) ungrounded terminal of the vehicle’s battery
- Connect Positive Clamp – Connect the red (positive) clamp to the vehicle’s chassis or engine block, positioned away from the battery
- Do not connect to the carburetor, fuel lines, or sheet-metal body parts
- Connect to a heavy-gauge metal part of the frame or engine block
- Verify Connection – The green LED on the smart cable should light, indicating a proper connection
- Start the Engine – Crank the engine following the same process as negative-grounded vehicles
Starting an Engine in Cold Weather
Cold weather can temporarily reduce lithium battery performance. If the engine fails to turn over with only a clicking sound:
- Keep the jump starter connected to the car battery with the green LED illuminated on the smart cable
- Turn on all lights and electrical accessories in the vehicle for one minute
- This procedure draws current from the jump starter and generates heat in the battery
- After one minute, attempt to crank the engine again
- If unsuccessful, repeat the entire procedure
- Extremely cold weather may require two or three battery warming cycles before the engine will start successfully
After Successful Starting
- Once the engine starts, unplug the battery clamps from the jump starter socket
- Remove the black (negative) clamp first
- Remove the red (positive) clamp second
- Recharge the unit as soon as possible after each use
Important Operational Notes
Smart Cable Auto-Shutdown:
- If no activity is detected, the smart cable will automatically shut off after 90 seconds with solid red and green LEDs
- To reset the system, disconnect the clamps from the vehicle battery and then reconnect
Insufficient Charge Warning:
- The internal battery must have at least 40% charge to jump-start a vehicle
- If the battery level falls below 40%, the jump starter will not function for starting vehicles
Do Not Use While Charging:
- Never attempt to jump-start a vehicle while the internal battery of the jump starter is being charged
- This can damage the device and pose a safety risk
Using the USB Charging Ports
The Schumacher SL1643 includes two USB output ports for charging mobile devices such as smartphones, tablets, and other USB-compatible equipment.
Standard USB Output Port (2.4A)
- Check the mobile device manufacturer’s charging specifications
- Connect the mobile device’s charging cable to the standard USB output port
- Charging should begin automatically
- The LCD display indicates which port is in use
- Charging time varies based on the device’s battery size and the charging port used
- When finished, disconnect the charging cable from the mobile device first, then from the jump starter
USB Fast Charging Port (3A/9V/12V)
- This port provides enhanced charging speeds for compatible devices
- It delivers up to 3 amperes at 5 volts, 2 amperes at 9 volts, or 1.5 amperes at 12 volts
- A specific USB fast-charging cable (not included) may be required for optimal performance
- Most devices will charge with any USB port, though charging speeds may vary
- Connect the device and charging should begin automatically
USB Port Auto-Shutdown
- If no USB device is connected to the USB ports, power to those ports will automatically shut off after 30 seconds to conserve battery power
- Reconnect a device to reactivate the USB ports
Charging Mobile Devices After Use
Recharge the jump starter as soon as possible after using its USB ports for mobile device charging, ensuring the device is ready for emergency vehicle starting if needed.
Wireless Charging for Qi-Enabled Devices
The Schumacher SL1643 features a wireless charging pad that provides 10 watts of power for rapid wireless charging of compatible mobile devices.
Using the Wireless Charging Pad
- Check your mobile device manufacturer’s specifications to confirm wireless charging compatibility (Qi standard)
- Place the compatible device face-up on the charging pad at the bottom of the jump starter unit
- Charging should begin automatically when the device is properly positioned
- When charging is complete, remove the mobile device from the pad
- Recharge the jump starter as soon as possible after use
Using the LED Emergency Light
The Schumacher SL1643 includes a built-in LED light for emergency illumination in three operational modes.
LED Light Activation
- Press and hold the display button for 2 seconds
- The LED light will illuminate
LED Light Modes
Once the light is on, press and release the display button to cycle through the following modes:
- Steady Glow – The light remains continuously illuminated for standard emergency lighting
- SOS Flash Pattern – The light flashes an SOS distress signal pattern
- Strobe Mode – The light flashes at a rapid strobe frequency
Turning Off the LED Light
- Press and hold the display button until the light turns off
- The display button controls both the LED light and the battery display
Recharging After LED Use
Recharge the jump starter as soon as possible after using the LED light to ensure adequate power for emergency vehicle starting.
Maintenance Instructions
Proper maintenance preserves the device’s functionality and safety.
Regular Maintenance
After Each Use:
- Unplug and disconnect the unit from all cables and connections
- Use a dry cloth to wipe all battery corrosion and debris from:
- The battery clamps
- All cords and cables
- The outer case
- Clean away any dirt or oil accumulation
Important: Do not open or disassemble the unit, as there are no user-serviceable parts inside. Internal maintenance or repairs must be performed by a qualified service technician only.
When to Seek Professional Service
Bring the unit to a qualified service technician if:
- The unit has received a sharp blow or has been dropped
- The device has been damaged in any way
- Service or repair is needed beyond basic cleaning
- The unit will not charge or operate despite following all instructions
Storage Instructions
Proper storage extends the lifespan of the battery and ensures the jump starter is ready for use when needed.
Storage Temperature Range
Store the Schumacher SL1643 at ambient temperatures between 14°F and 113°F (-10°C and 45°C). Extreme heat or cold can damage the lithium-ion battery and reduce performance.
Storage Checklist
- Charge Before Storage – Charge the battery to full capacity (100%) before storing the unit for extended periods
- Never Fully Discharge – Do not allow the battery to completely discharge during storage, as this can cause permanent damage
- Charge After Each Use – Charge the device after each use
- Monthly Charging – If the device is not used frequently, charge it at least once every month to prevent over-discharge
- Protect from Elements – Store indoors and protect from rain, snow, sleet, and other moisture
- Temporary Outdoor Use – If using the device outdoors temporarily, take steps to reduce exposure to rain, snow, and other moisture during use; do not charge the device outdoors
Troubleshooting Guide
Jump Starter Display and Charging Issues
| Problem | Possible Cause | Solution |
|---|---|---|
| The jump starter’s display will not turn on | Battery is depleted or disconnected | Ensure the unit is charged. Connect to a power source to reset the device. |
| The thermometer symbol is flashing on the display | Unit temperature is too high or too low | The symbol will disappear when the temperature returns to the normal operating range. Allow the unit to warm or cool as appropriate. |
| The jump starter will not recharge | Power source is not providing power | Check that the power source (charger) is live and functioning. Try a different outlet. |
Jump Starting and Smart Cable Issues
| Problem | Possible Cause | Solution |
|---|---|---|
| The jump starter turns on but won’t jump-start the vehicle | Connection issues or insufficient charge | Check all cable connections for proper seating. Verify the jump starter charge level is at least 40%. Do not attempt more than three consecutive starting attempts; if unsuccessful, consult a qualified technician. |
| When cable is correctly connected to both battery and jump starter: Green LED blinking; Red LED off; no beep | Fake high battery voltage detected | Reverse charging protection has not been activated. User can proceed to turn the key and start the vehicle. |
Smart Cable LED and Alarm Behavior Reference
Understanding the smart cable’s LED indicators and sounds helps diagnose connection and battery issues.
| LED Behavior and Sound | Meaning | Action Required |
|---|---|---|
| Green Ready LED blinking; Red Fault and Clamp Reverse LEDs off; no beep | Cable is connected to jump starter only | Connect the black clamp to the vehicle chassis or engine to complete the connection |
| Green Ready LED solid; Red Fault and Clamp Reverse LEDs off; no beep | Cable is connected correctly to both battery and jump starter | Proceed with starting the vehicle |
| Red Fault and Clamp Reverse LEDs solid, Green Ready LED off; rapid beeping | Reverse polarity protection activated (clamps are reversed) | Check clamp connections. Ensure red clamp is on positive battery terminal and black clamp is on chassis/engine. Disconnect and correct. |
| No LED illuminated; no beep | Battery exhausted or poor connection | Recharge the jump starter. Check for loose clamp connections or corrosion on battery terminals. |
| Red Fault LED solid, Green Ready and Red Reverse Clamp LEDs off; rapid beeping | Short circuit protection activated | Discontinue use. Disconnect clamps. Wait for automatic reset. Recharge the unit. If problem persists, contact customer service. |
| Red Fault and Green Ready LEDs solid; Red Clamp Reverse LED off; beeps once per second | Temperature protection activated (unit is too hot or cold) | Allow the unit to reach normal temperature. The smart cable will automatically reset when the issue is resolved. |
Auto-Reset Note: When the condition causing an LED indication or alarm is corrected, the smart cable will automatically reset and resume normal operation.
Replacement Parts and Accessories
Genuine replacement parts and accessories ensure optimal performance and safety. Original Schumacher parts are available through authorized retailers and the manufacturer.
Available Replacement Parts
| Part Name | Part Number |
|---|---|
| Battery Clamps and Smart Cable | 94500939Z |
| USB Charging Cable | 3899004188Z |
Recommended Accessory
Original SA939 Jump Cable: This is the manufacturer-recommended jump cable for use with the Schumacher SL1643. Using only approved accessories reduces the risk of fire, electric shock, injury, or damage to the vehicle’s electrical system.
Where to Purchase Replacement Parts
Visit schumacherelectric.com to purchase genuine replacement parts and accessories for the SL1643. Using original parts maintains warranty coverage and ensures compatibility.
Warranty Information
Coverage
Schumacher Electric Corporation provides a limited one-year warranty on the SL1643 Jump Starter Power Pack. This warranty covers manufacturing defects in materials and workmanship under normal use.
Warranty Coverage Includes
- Manufacturing defects in the internal battery
- Defects in the smart cable and clamps
- Defects in the charging circuit
- Defects in the USB ports and wireless charging pad
- Defects in the LED light and display
Warranty Coverage Does Not Include
- Damage from misuse, abuse, or negligence
- Damage from exposure to water, rain, or snow (except temporary outdoor use as instructed)
- Damage from physical impact or dropping
- Normal wear and tear
- Unauthorized modifications or repairs
- Damage from non-approved charging cables or accessories
How to Register Your Warranty
Register the product online at schumacherelectric.com to activate and manage your warranty coverage.
Making a Warranty Claim
For warranty claims, repairs, or returns, visit 365rma.com to initiate a return merchandise authorization (RMA) process.
Contacting Schumacher Customer Service
For warranty inquiries or to request a copy of the complete warranty terms:
Phone: 1-800-621-5485
Website: schumacherelectric.com
Frequently Asked Questions
How long does it take to fully charge the Schumacher SL1643?
The jump starter requires 7–8 hours to fully charge from a completely empty state using a 2A USB charger. Charging time may be shorter if using a higher amperage charger, but a minimum 2A rating is recommended for safe operation.
Can I use this jump starter on a 6-volt or 24-volt vehicle battery?
No. The Schumacher SL1643 is designed exclusively for 12-volt batteries. Do not attempt to use it on vehicles with 6-volt, 24-volt, or other voltage systems, as this could damage both the jump starter and the vehicle’s electrical system.
What is the minimum battery charge level needed to jump-start a vehicle?
The internal battery must have at least 40% charge to successfully jump-start a vehicle. If the charge level falls below 40%, the jump starter will not have sufficient power to crank the engine.
Is it safe to jump-start a vehicle while the jump starter is being charged?
No. Never attempt to jump-start a vehicle while the jump starter’s internal battery is being charged. This can damage the device and create a safety hazard. Always charge the jump starter separately before using it to start a vehicle.
Q: Can I charge my mobile device while jump-starting a vehicle?
A: While technically possible, this is not recommended. The USB ports will continue to provide power to connected devices even during jump-starting, which may drain the jump starter’s battery more quickly. For best results, charge mobile devices before or after jump-starting, not simultaneously.
Q: Why is the thermometer symbol flashing on my jump starter’s display?
A: The thermometer symbol indicates that the unit’s temperature is outside the normal operating range. This typically occurs in extremely cold or hot conditions. Allow the unit to warm or cool to normal temperatures, and the symbol will disappear. The device will automatically resume normal operation once temperature returns to the safe range.
Q: What should I do if the green LED doesn’t light when I connect the clamps to the vehicle?
A: If the green LED doesn’t light, the connection may be incomplete or improper. Check that:
- The red clamp is securely connected to the positive battery terminal
- The black clamp is securely connected to the vehicle’s chassis or engine block
- No corrosion or dirt is interfering with the connection
- The battery terminals are clean
- All clamps are fully tightened
If the green LED still doesn’t appear after checking these items, disconnect the clamps and consult the troubleshooting section or contact customer service.
Q: Can I use the wireless charging pad and the USB ports at the same time?
A: While it is technically possible to use multiple charging methods simultaneously, this approach will drain the jump starter’s battery more quickly. For best results and to preserve battery life, use one charging method at a time and prioritize charging the jump starter’s internal battery before using the device for vehicle starting.
FCC Compliance and Regulatory Information
This equipment has been tested and found to comply with the limits for a Class B digital device pursuant to Part 15 of the FCC Rules. These limits are designed to provide reasonable protection against harmful radio frequency interference in a residential setting.
The equipment generates, uses, and can radiate radio frequency energy. If not installed and used in accordance with the instructions, it may cause harmful interference to radio communications. However, there is no guarantee that interference will not occur in any particular installation.
If the equipment causes harmful interference to radio or television reception, which can be determined by turning the equipment off and on, the user is encouraged to try to correct the interference by one or more of the following measures:
- Reorient or relocate the receiving antenna
- Increase the separation between the equipment and the receiver
- Connect the equipment into an outlet on a circuit different from that to which the receiver is connected
- Consult a dealer or experienced radio/TV technician for additional help
FCC ID: E115376
Before Returning for Repairs
If the Schumacher SL1643 requires repair or is being returned under warranty, follow the process established by Schumacher Electric Corporation.
Return and Repair Process
- Visit 365rma.com to initiate a return merchandise authorization (RMA)
- Provide the device’s serial number and description of the issue
- Print the RMA authorization label provided
- Ship the device with the RMA label to the address provided
- The manufacturer will diagnose and repair the device under warranty terms
- Repaired units are returned via the original shipping method
Repair Not Covered by Warranty
If the device requires repair outside of warranty coverage, contact customer service at:
Phone: 1-800-621-5485
Website: schumacherelectric.com
Support and Contact Information
Customer Service Phone: 1-800-621-5485
Returns and Warranty Claims: 365rma.com
Product Registration: schumacherelectric.com (product registration recommended for warranty activation)
Replacement Parts: schumacherelectric.com (visit for genuine parts and accessories)
The Schumacher logo is a registered trademark of Schumacher Electric Corporation.
This manual covers the complete operation, maintenance, and troubleshooting of the Schumacher SL1643 Jump Starter Power Pack (Model SL1643). For the most current information and updates, visit schumacherelectric.com.