| Brand Name | Orbit |
| Product Name | Easy Dial Sprinkler Timer |
| Model Number(s) | 96954, 96956, 96874, 96876 |
| File Size | 0.30 MiB |
| Number of Pages | 11 |
| Languages Covered | English |
Orbit Easy Dial Sprinkler Timer 96954
The Orbit Easy Dial sprinkler timer is an automatic irrigation controller designed to operate 24 VAC irrigation valves. Models 96954, 96956, 96874, and 96876 use Orbit’s Easy-Set Logic™ system and support automatic watering schedules as well as semi-automatic and manual watering.
The timer provides two independent watering programs, A and B. Each program can contain its own start times, station run times, and watering frequency. This makes it possible to group irrigation zones that have different watering needs, such as lawn areas, drip irrigation, newly planted grass, or rotary sprinklers.
The manual’s wiring illustrations show station terminals for multiple irrigation zones, while the covered model family includes the Easy Dial controllers users commonly search for as 4- and 6-station timers. Actual available stations should be confirmed on the terminal strip of the specific controller.
Easy Dial Timer Controls
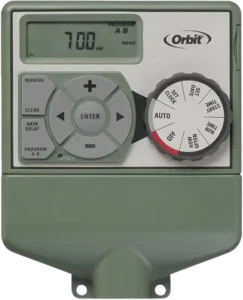
The front panel includes a digital display, programming buttons, a rotary dial, and a side battery compartment. The page 3 diagram in the PDF shows the complete control layout. Orbit-Sprinkler-Timer-User-Manu…
Button Functions
| Button | Function |
| ENTER | Confirms a new setting |
| MANUAL | Starts manual watering |
| CLEAR | Clears a setting |
| PROGRAM A-B | Switches between Program A and Program B |
| Right Arrow | Advances to the next station, option, program, or setting |
| Left Arrow | Returns to the previous station, option, program, or setting |
| RAIN DELAY | Suspends scheduled watering for 24-72 hours |
| + | Increases a numeric value |
| – | Decreases a numeric value |
Dial Positions
| Dial Position | Purpose |
| AUTO | Runs the programmed watering schedule automatically |
| SET CLOCK | Sets the current time |
| SET DATE | Sets year, month, and date |
| START TIME | Sets when a watering program begins |
| RUN TIME | Sets how long each station waters |
| HOW OFTEN | Sets watering days or frequency |
| OFF | Turns all stations and timer functions off |
How the Easy Dial Programming System Works
A complete watering schedule has three main pieces:
- Start Time — when the watering program begins.
- Run Time — how long each station operates.
- How Often — which days or intervals watering occurs.
The timer supports Program A and Program B, which operate independently. Each program can contain different stations and schedules.
What Is a Station?
A station is a group of sprinklers controlled by one irrigation valve.
When a station is activated, the timer sends electrical power to that valve so water can flow to that irrigation area.
Installation Requirements
Tools
The installation section lists:
- Phillips screwdriver
- Wire strippers
Choosing a Location
The timer should be installed:
- Near an electrical outlet.
- Where sprinkler-valve wiring can easily reach the controller.
- In an environment between 0°C and 70°C operating temperature.
How to Mount the Orbit Timer
The manual includes a mounting template.
- Use the template to mark the upper mounting-screw position.
- Install a No. 8 screw at the marked location.
- Leave the screw head approximately 3 mm away from the wall.
- Use the included expanding anchors when mounting to plaster or masonry if needed.
- Hang the controller on the screw using the rear keyhole slot.
- Install another No. 8 screw through one of the lower mounting holes to secure the timer.
The diagrams on page 4 show the mounting template, keyhole slot, lower mounting holes, and required screw spacing.
How to Wire Sprinkler Valves
Preparing the Wires
Strip approximately 12 mm of insulation from each timer and valve wire.
Each irrigation valve has two wires.
One wire from every valve is connected together to form the Common connection. The remaining wire from each valve connects to the individual station wire that controls that valve.
Common Wire
One wire from each valve can be joined to a single common sprinkler wire, which is often white.
That common wire connects to the timer’s COM/Common terminal.
Station Wires
The remaining wire on each valve connects to its own station terminal.
For example:
- Valve 1 → Station 1
- Valve 2 → Station 2
- Valve 3 → Station 3
Only one valve should be connected to each station. Connecting more than one valve to a station can permanently damage the controller.
Electrical Load Limits
The manual specifies:
| Electrical Limit | Maximum |
| Each station / pump | 250 mA |
| Entire timer | 500 mA |
Recommended Wire Gauge
| Distance Between Timer and Valves | Recommended Wire |
| Under 210 m | Orbit sprinkler wire or 20 AWG plastic-jacketed thermostat wire |
| Over 210 m | 16 AWG wire |
Wire connections in wet environments should be protected against corrosion and water infiltration. The manual recommends suitable waterproof connections such as Orbit Grease Caps or Speed Seals.
Connecting the Transformer
Connect the transformer’s power connector to the controller and insert the transformer into a 120V electrical outlet.
The controller operates irrigation valves through its transformer. The backup battery by itself cannot run the sprinkler valves. Orbit-Sprinkler-Timer-User-Manu…
The manual also warns to use only power-unit model WR1-41-065R-1 or WT1-41-065R with the timer.
Backup Battery
A CR2032 lithium battery preserves the programmed schedule when AC power is lost.
The timer ships with a battery already installed. Remove the plastic strip from the battery compartment to activate it.
Orbit recommends replacing the battery approximately once every year.
How to Program the Orbit Easy Dial Sprinkler Timer
Before creating a new watering schedule, the manual instructs the user to press RESET to clear previous factory programming.
Step 1: Set the Clock
- Turn the dial to SET CLOCK.
- Use + / – to set the current time.
- Hold + or – for faster adjustment.
- Use the left/right arrows to set AM or PM.
- Turn the dial away from SET CLOCK to accept the setting.
Step 2: Set the Date
- Turn the dial to SET DATE.
- The display uses year, month, and day fields.
- Use + / – to set the year.
- Press ENTER or an arrow to continue.
- Set the month with + / – and press ENTER.
- Set the day/date.
- Turn the dial to save the date.
Step 3: Set the Watering Start Time
Turn the dial to START TIME and use + / – to select when watering should begin. Start time changes in one-minute increments.
What Does Start Time Mean?
A Start Time is the time when the program begins watering its first programmed station. The remaining stations with programmed Run Times then operate sequentially.
Multiple Start Times
Each program can have up to four start times.
Multiple start times are useful when watering more than once on the same day, such as newly planted grass that requires several shorter watering sessions.
For example, the manual describes a schedule using:
- 5:00 a.m.
- 12:00 p.m.
- 5:00 p.m.
The programmed stations run in sequence at each of those start times.
Start-Time Stacking
If a new Start Time arrives before the previous watering program has finished, the next program does not run at the same time.
Instead, it is stacked, meaning it waits until the previous program finishes and then begins.
Step 4: Set Run Time for Each Station
- Turn the dial to RUN TIME.
- Press PROGRAM to choose Program A or B.
- Use the arrow buttons to choose a station.
- Use + / – to set how long that station should water.
- Press ENTER or an arrow to continue to the next station.
- Repeat for each required station.
A Run Time is the watering duration assigned to an individual station.
Step 5: Set How Often to Water
Turn the dial to HOW OFTEN.
The timer provides three scheduling methods:
- Specific days of the week
- Interval watering
- Odd or even calendar days
Watering on Specific Days of the Week
To choose individual weekdays:
- Set the dial to HOW OFTEN.
- Choose Program A or B with PROGRAM.
- Move through the days using the arrow buttons.
- Press + or ENTER to select a watering day.
- A frame appears around selected days.
- To remove a selected day, press – or CLEAR.
For example, a schedule could run Monday, Wednesday, and Friday.
What Does INT Mean on an Orbit Sprinkler Timer?
INT means Interval.
Interval watering tells the timer to water once every selected number of days instead of using fixed weekdays.
To set an interval:
- Turn the dial to HOW OFTEN.
- Use the arrows to move to INT.
- Use + / – to choose the number of days between watering.
Examples:
- INT 1 = water every day.
- INT 3 = water every third day.
This directly addresses one of the existing search queries reaching the page. Pasted markdown
Odd or Even Day Watering
To water only on odd or even dates:
- Go to HOW OFTEN.
- Use the arrows to select ODD or EVEN.
- Press + or ENTER.
Examples:
- Odd = 1st, 3rd, 5th, etc.
- Even = 2nd, 4th, 6th, etc.
Choosing another frequency option or pressing CLEAR removes the previous selection.
Start Automatic Watering
After programming is complete, turn the dial to AUTO.
The programmed irrigation schedule will then run automatically.
When reviewing or changing Start Times, Run Times, or watering frequency later, the dial must be returned to AUTO afterward for automatic operation.
Program A and Program B
Programs A and B are independent schedules.
They can be used when different irrigation areas need different frequencies or watering lengths. For example, lawn sprinklers may use one schedule while drip irrigation uses another.
When making changes, confirm whether Program A or Program B is currently selected so the wrong schedule is not edited.
Factory Fail-Safe Watering Program
If programming is lost, the timer contains a fail-safe schedule that activates each station every day for 10 minutes.
Because a weak or missing backup battery can cause the time, date, and program to be lost following a power failure, annual battery replacement is recommended.
How to Manually Run the Orbit Sprinkler System
Manual watering lets a station or programmed group run without changing the normal automatic schedule.
Run All Programmed Stations Manually
- Turn the dial to AUTO.
- Press MANUAL.
- The screen displays Program A, Program B, and All.
- Wait a few seconds or press ENTER.
- Programmed stations begin watering one after another for their stored Run Times.
If no Run Times have been programmed, manual watering will not start.
Manually Run One Program
- Turn the dial to AUTO.
- Press MANUAL.
- Use the arrows to select Program A or B.
- Press ENTER.
Manually Run One Station
- Turn the dial to AUTO.
- Press MANUAL.
- Use the arrows until the required station number appears.
- Use + / – to choose a manual watering duration from 1 to 240 minutes.
- Wait five seconds or press ENTER to start.
For example, to run station 3 for five minutes, select station 3 after pressing MANUAL, set the duration to five minutes, and press ENTER.
Stop Manual Watering
Press CLEAR.
The controller returns to its normal automatic watering schedule.
Rain Delay
Rain Delay temporarily suspends automatic watering without deleting the programmed schedule.
Available delay periods are:
- 24 hours
- 48 hours
- 72 hours
How to Set Rain Delay
- Turn the dial to AUTO.
- Press RAIN DELAY for a 24-hour delay.
- Use + / – to select a longer delay when needed.
- Press ENTER or wait 10 seconds.
- The delay begins.
During Rain Delay, the screen alternates every two seconds between the current time and the number of delay hours remaining.
Cancel Rain Delay
Press CLEAR.
The normal watering schedule resumes.
Connecting a Rain Sensor
Rain-sensor wires connect to the yellow terminal ports labeled SENSOR.
After wiring:
- Follow the rain sensor’s own manual for its wiring requirements.
- Move the sensor ON/OFF switch to ON.
Rain Sensor Bypass
The controller includes a sensor override switch so it can still be operated during testing, maintenance, or repair.
If the sensor switch is set to ON but no rain sensor is connected, the sprinkler timer will not operate. Move the switch to OFF to restore timer operation when no sensor is installed.
Pump Start and Master Valve
The timer can operate a master valve or pump-start relay whenever a station is running.
For a master valve or pump-start relay:
- Connect one relay/master-valve wire to the Pump terminal.
- Connect the other to Common.
A Pump Start Relay must be purchased when a pump is being activated through the timer.
How to Replace the Orbit Timer Battery
The controller uses one CR2032 lithium battery.
The battery preserves time, date, and programming during an AC power failure but does not operate irrigation valves.
Battery Replacement Steps
- Slide the battery tray to the right.
- Remove the old battery.
- Insert a CR2032 battery with the + side facing up.
- Slide the tray back into place.
The battery is expected to last approximately one year, and annual replacement is recommended.
Orbit Easy Dial Troubleshooting
One or More Valves Will Not Turn On
Possible causes listed in the manual are:
- Faulty solenoid connection.
- Damaged or severed wiring.
- Flow-control stem closed.
- Incorrect programming.
Check wiring and programming first, then inspect the valve and solenoid if necessary.
Stations Turn On When They Should Not
Possible causes include:
- Water pressure is too high.
- More than one Start Time has been programmed.
- AM/PM is set incorrectly.
- Program B is also active.
Multiple Start Times are one of the most common schedule-related items to check because every active Start Time runs all stations assigned a Run Time in that program.
One Station Will Not Shut Off
Possible causes are:
- Faulty valve.
- Dirt or debris lodged in the valve.
- Damaged valve diaphragm.
None of the Valves Turn On
Check:
- Whether the transformer is connected and working.
- Whether the timer has been programmed correctly.
If a rain sensor is not connected, also make sure its sensor switch is not incorrectly set to ON.
Timer Will Not Power On
The troubleshooting chart lists an unplugged transformer or a non-working electrical outlet as the primary cause.
Verify:
- Transformer connection.
- Wall outlet power.
- Correct compatible power unit.
Valves Turn On and Off When They Are Not Programmed
The manual lists:
- Multiple overlapping Start Times.
- Excessive water pressure.
- Program B being active.
Review both Program A and B rather than checking only the schedule currently visible.
Timer Is Losing Time or Programming
The CR2032 battery maintains the clock, date, and watering program during loss of AC power.
A weak or missing battery can cause these settings to be erased after a power failure. Replace the battery with a fresh CR2032 and reprogram the timer if settings have already been lost.
Technical Reference
| Specification / Feature | Manual Information |
| Models | 96954, 96956, 96874, 96876 |
| Irrigation valve type | 24 VAC |
| Programming | Easy-Set Logic™ |
| Independent programs | A and B |
| Maximum start times | 4 per program |
| Watering frequency | Weekdays, interval, odd/even |
| Rain Delay | 24, 48, or 72 hours |
| Manual station duration | 1-240 minutes |
| Backup battery | CR2032 lithium |
| Recommended battery replacement | Annually |
| Each station/pump maximum load | 250 mA |
| Timer maximum load | 500 mA |
| Transformer outlet | 120V |
| Operating temperature | 0°C to 70°C |
| Application | Automatic control of 24 VAC irrigation valves |
The manual describes the product specifically as an automatic sprinkler timer used to activate 24 VAC irrigation valves.
Irrigation Terms Used in the Manual
| Term | Meaning |
| Start Time | Time a program starts watering its first programmed station |
| Valve | Electrically controlled device supplying water to an irrigation station |
| Master Valve | Main valve controlling water to the irrigation system |
| Multiple Start Times | Allows the same program to run several times on one watering day |
| Overlapping Programs | A scheduled program starts before a previous one has finished |
| Program A or B | Two independent user-created watering schedules |
| Rain Delay | Temporarily postpones scheduled watering |
| Solenoid | Electrical part that opens and closes an irrigation valve |
| Sprinkler Timer | Controller that instructs valves to operate |
| Station | Sprinkler group controlled by one valve |
Three-Year Limited Warranty
Orbit Irrigation Products, Inc. warrants the timer against defects in materials and workmanship for three years from the purchase date.
For an eligible defect under normal use and service, the defective part or parts may be replaced without charge. Proof of purchase is required, and Orbit reserves the right to inspect defective parts before replacement.
Orbit states that its liability under the warranty is limited to repair or replacement of defective parts and does not include consequential or incidental costs or damage caused by product failure.
To make a warranty claim, the unit should be returned to the dealer with a copy of the sales receipt.
FCC and Regulatory Information
The timer complies with Part 15 of the FCC Rules.
Its operation is subject to two conditions:
- The device may not cause harmful interference.
- It must accept received interference, including interference that may cause undesired operation.
The equipment is classified as a Class B digital device. The manual also states compliance with Canadian ICES-003.
Orbit Customer Support
The manual provides the following technical-support contacts:
Orbit Technical Service
Phone: 1-800-488-6156
Alternative Phone: 1-801-299-5555
Website: orbitonline.com
Orbit recommends contacting Technical Service before returning the sprinkler timer to the store.
Frequently Asked Questions
How do you program an Orbit Easy Dial sprinkler timer?
Set the clock and date first. Then choose Program A or B, set one or more Start Times, assign a Run Time to each required station, select watering days or an interval under HOW OFTEN, and return the dial to AUTO.
What does INT mean on an Orbit sprinkler timer?
INT means Interval watering. It determines the number of days between watering cycles. INT 1 waters every day, while INT 3 waters every third day.
How do you manually turn on an Orbit Easy Dial sprinkler system?
Turn the dial to AUTO and press MANUAL. To run one station, use the arrow buttons to select it, choose a duration between 1 and 240 minutes with + / –, and press ENTER or wait for the manual cycle to begin. Press CLEAR to stop manual watering.
How do you set the watering days on an Orbit Easy Dial timer?
Turn the dial to HOW OFTEN, choose Program A or B, and use the arrows to move through weekdays. Press + or ENTER to select a day; press – or CLEAR to remove it. Interval and odd/even schedules are also available.
Why are my Orbit sprinklers turning on more than once?
Check whether multiple Start Times are programmed, whether AM/PM is correct, and whether Program B is also active. Overlapping Start Times are queued and run after the previous watering program finishes.
How do you set Rain Delay on the Orbit Easy Dial?
With the dial on AUTO, press RAIN DELAY. The initial delay is 24 hours. Use + / – to change it to 48 or 72 hours, then press ENTER or wait 10 seconds. Press CLEAR to cancel the delay.
What battery does the Orbit Easy Dial timer use?
It uses one CR2032 lithium battery to preserve the clock and programming during an AC power outage. Orbit recommends replacing it approximately once per year. The battery does not operate the sprinkler valves by itself.
Why won’t my Orbit Easy Dial sprinkler timer turn on?
Check that the transformer is plugged into a working outlet. If the controller has power but valves still do not operate, check the transformer connection, programming, valve wiring, and rain-sensor bypass setting.