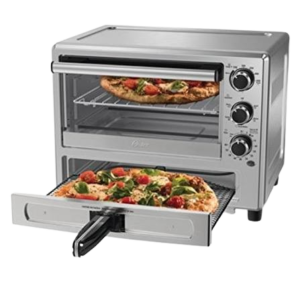
| Field | Details |
| Document Title | Convection Oven with Pizza Drawer — User Manual |
| Document Type | User Manual / Instruction Manual |
| Brand Name | Oster |
| Product Name | Convection Oven with Pizza Drawer |
| Model Number(s) | TSSTTVPZDS |
| PDF File Size | 1.35 MB |
| Number of Pages | 16 |
| Languages Covered | English and Spanish |
Oster Convection Oven with Pizza Drawer
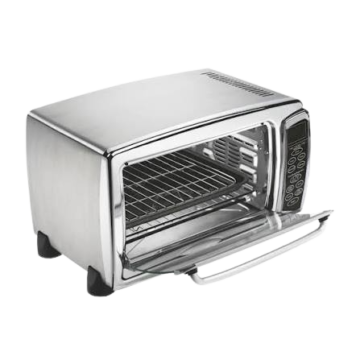
The Oster Convection Oven with Pizza Drawer TSSTTVPZDS is a household countertop cooking appliance designed for baking, broiling, toasting, warming, and Turbo Convection Heat cooking. It features a dedicated lower pizza drawer that accommodates pizzas up to 12 inches, along with foods such as bruschetta, appetizers, and quesadillas.
The upper oven includes a removable wire rack, a baking pan that also serves as a cookie sheet, easy-clean interior walls, and a tempered glass door. The lower pizza drawer includes a removable pizza tray with folding handles for inserting and removing food.
Three rotary knobs control the oven’s temperature, cooking function, and timer. The mechanical timer supports cooking periods of up to 60 minutes and automatically switches the appliance off when the selected time finishes. A separate Stay On setting allows continuous operation until the timer is manually switched off.
The Turbo Convection Heat function uses a built-in fan to circulate hot air inside the upper oven, helping food cook faster and more evenly. The adjustable broiling function supports different temperatures, including 150°F for melting cheese and 400°F for cooking fish.
The pizza drawer has a dedicated Pizza setting that automatically selects the appropriate cooking temperature. While the pizza drawer is operating, the upper oven’s heating elements remain off because of the appliance’s power limitations.
The TSSTTVPZDS is designed for household use with a 120V AC electrical outlet. Correct rack positioning, adequate ventilation, timer adjustments, and regular cleaning are important for safe operation and consistent cooking results.
Technical Specifications
| Specification | Details |
| Brand | Oster |
| Model Number | TSSTTVPZDS |
| Product Type | Convection Countertop Oven with Pizza Drawer |
| Electrical Supply | 120V AC |
| Control Type | Three Rotary Control Knobs |
| Upper Oven Cooking Functions | Toast/Bake, Broil, Warm, Turbo |
| Pizza Function | Dedicated Lower Pizza Drawer |
| Pizza Capacity | Up to 12-Inch Pizza |
| Pizza Temperature Control | Automatically Preset |
| Turbo Convection Fan | Yes |
| Adjustable Broil Temperature | Yes |
| Broiling Temperature Examples | 150°F for Melting Cheese; 400°F for Fish |
| Toast Temperature | 450°F / TOAST |
| Toast Timer Range | 0–10 Minutes |
| Mechanical Timer | Up to 60 Minutes |
| Timer Completion | Bell Signal and Automatic Shut-Off |
| Stay On Function | Yes |
| Turbo Convection Preheating | Approximately 5–7 Minutes |
| Upper Oven Rack Positions | 2 |
| Baking Pan | Combined Baking Pan and Cookie Sheet |
| Pizza Tray | Removable |
| Pizza Tray Handles | Foldable |
| Upper Crumb Tray | Removable |
| Lower Pizza Drawer Crumb Tray | Removable |
| Oven Door | Tempered Glass |
| Interior Walls | Easy-Clean |
| Power Indicator | Yes |
| Required Clearance | 6 Inches (152 mm) on All Sides |
| Electrical Plug | Polarized on North American Models |
| Intended Use | Household Countertop Use Only |
| Warranty | 1-Year Limited Warranty |
The actual cooking temperature and time depend on the selected function and the food being prepared. The Pizza function uses its own preset temperature, while the upper oven functions use the Temperature Control knob.
Parts and Components
The Oster TSSTTVPZDS has 12 main components identified in the product diagram.
| Part Number | Component | Description and Function |
| 1 | Temperature Control Knob | Adjusts the thermostat to the desired temperature. |
| 2 | Function Selector Knob | Selects the cooking function. |
| 3 | Timer Control Knob with Bell | Sets cooking time up to 60 minutes and automatically switches the oven off when the timer finishes. |
| 4 | Upper Removable Crumb Tray | Collects crumbs and fallen food particles from the upper oven. |
| 5 | Removable Wire/Broil Rack | Supports food during baking, toasting, broiling, and grilling. |
| 6 | Tempered Glass Door | Provides access to the upper oven and allows food to be viewed. |
| 7 | Baking Pan and Cookie Sheet | Holds food during baking and collects drippings during broiling. |
| 8 | Easy-Clean Interior Walls | Interior surfaces designed for easier cleaning. |
| 9 | Pizza Tray | Removable tray used to hold pizza and other suitable foods. |
| 10 | Pizza Tray Handles | Folding handles for moving the pizza tray. |
| 11 | Pizza Drawer | Lower cooking compartment accommodating pizzas up to 12 inches. |
| 12 | Lower Removable Crumb Tray | Collects crumbs and food particles from the pizza drawer. |
Temperature Control Knob
The Temperature Control knob adjusts the heat level used by the oven’s cooking functions.
The temperature should be selected according to the food being prepared and the required cooking method.
For Toast, the recommended temperature setting is 450°F / TOAST.
During Pizza operation, the pizza drawer automatically selects its preset cooking temperature.
Function Selector Knob
The Function Selector knob determines the cooking mode.
Available settings include:
- Toast/Bake
- Broil
- Warm
- Turbo
- Pizza
Each function operates the appliance according to its intended cooking method.
Timer Control Knob
The mechanical timer controls cooking time and the automatic shut-off function.
It can be set for up to 60 minutes.
When the selected cooking time finishes, a bell sounds and the oven switches off automatically.
For cooking periods shorter than 20 minutes, the timer must first be turned past the 20-minute mark and then returned to the required time.
The timer also includes a Stay On setting that allows continued operation until manually switched off.
Upper Removable Crumb Tray
The upper crumb tray collects fallen food particles from the main oven.
It can be removed for cleaning.
The crumb tray must be emptied after each use to prevent food accumulation.
Removable Wire/Broil Rack
The wire rack supports food and cooking accessories.
It can be positioned in either the upper or lower rack guide.
Rack placement depends on the food’s size and the desired browning.
The rack must not be placed in the lowest position while broiling.
Tempered Glass Door
The glass door allows food inside the upper oven to be monitored during cooking.
The door must be inspected for chips, cracks, or other damage.
A countertop oven with damaged door glass must not be operated.
Baking Pan and Cookie Sheet
The supplied pan can be used for baking and as a cookie sheet.
During baking, the pan can be positioned on top of the wire rack.
During grilling or broiling, the pan can be placed in the guide rails below the rack to collect drippings, subject to the rack-position restrictions.
Easy-Clean Interior Walls
The upper oven has interior walls designed for easier cleaning.
The surfaces should be wiped with a damp cloth and mild, soapy water after the appliance has cooled.
Removable Pizza Tray
The pizza tray holds pizza and other suitable foods inside the lower drawer.
It can be removed from the appliance using its folding handles.
The tray must be placed on a clean, flat surface when food is being arranged.
Pizza must remain centered and must not extend beyond the tray edges.
Folding Pizza Tray Handles
The pizza tray has two folding handles.
The handles are extended to insert or remove the tray from the pizza drawer.
During pizza cooking, the handles must remain extended.
Only the pizza tray handles are identified as cool to the touch while the drawer is operating.
Dedicated Pizza Drawer
The lower pizza drawer is designed for pizzas up to 12 inches.
It can also be used for bruschetta, appetizers, quesadillas, and similar foods.
The Pizza function automatically selects the drawer’s cooking temperature.
The upper oven does not heat while the pizza drawer operates.
Lower Removable Crumb Tray
The lower crumb tray collects food particles inside the pizza drawer.
It can be pulled out for cleaning and must be emptied after each use.
Control Knobs and Cooking Modes
The Oster Convection Oven with Pizza Drawer uses three rotary control knobs.
Control Knob Guide
| Control | Function |
| Temperature Control | Selects the required temperature for supported cooking functions. |
| Function Selector | Chooses Toast/Bake, Broil, Warm, Turbo, or Pizza. |
| Timer Control | Sets cooking time, activates timed automatic shut-off, or selects Stay On. |
Cooking Function Overview
| Function | Operation | Important Setting |
| Toast/Bake | Uses upper and lower heating elements for toasting and baking. | Toast at 450°F / TOAST. |
| Broil | Provides adjustable broiling. | Leave approximately a 3-inch door opening at the top. |
| Warm | Warms prepared food. | Turn Temperature Control past Warm. |
| Turbo | Circulates hot air using the built-in convection fan. | Preheat for approximately 5–7 minutes. |
| Pizza | Activates the dedicated lower pizza drawer. | Temperature is automatically preset. |
Mechanical Timer Operation
| Timer Position | Function |
| 0–60 Minutes | Timed cooking with automatic shut-off. |
| Stay On | Continuous operation until manually turned off. |
| OFF | Stops oven operation. |
The Timer Control knob must be properly engaged for a timed cooking cycle to begin.
For settings under 20 minutes, turning the dial past 20 minutes and then back to the required time is necessary.
Important Safety Instructions
The Oster Convection Oven with Pizza Drawer generates high temperatures during operation. Incorrect handling can cause burns, fire, electric shock, or personal injury.
General Safety Precautions
- All operating instructions must be read before using the oven.
- Hot surfaces must not be touched. The handles and control knobs must be used during operation.
- Non-slip oven mitts or similar protective equipment must be used when handling hot food, racks, and pans.
- The power cord, electrical plug, and appliance must never be immersed in water or another liquid.
- The appliance must not be operated by children or persons with reduced physical, sensory, or mental capabilities.
- Close supervision is required when the oven is used near children.
- Children must not play with the appliance.
- Unplug the oven when it is not in use, before removing or installing parts, and before cleaning.
- Allow the appliance to cool before cleaning or handling removable components.
- Turn all controls to OFF before disconnecting the power cord.
- A damaged, malfunctioning, or dropped appliance must not be operated.
- A damaged power cord must not be replaced or spliced by the owner.
- Accessories not recommended by the manufacturer must not be used.
- The oven must not be used outdoors or for commercial purposes.
- The power cord must not hang over a countertop edge or contact hot surfaces.
- The appliance must not be placed on wet surfaces or near gas burners, electric burners, or heated ovens.
- Extreme caution is required when moving the appliance or removing pans containing hot oil or other hot liquids.
- Oversized foods and metal utensils must not be inserted if they create a fire or electric shock hazard.
- The oven must only be used for its intended household purpose.
Fire Prevention and Ventilation
The appliance must be operated on a dry, stable, and level surface.
Maintain a minimum clearance of 6 inches (152 mm) between the oven and surrounding walls, objects, and cords.
The following fire prevention precautions apply:
- Do not cover the oven during operation.
- Keep curtains, towels, draperies, and other flammable materials away.
- Do not store objects on top of the oven while it is operating.
- Do not place paper, cardboard, plastic, or other flammable materials inside the cooking compartments.
- Do not cover either crumb tray or any other part of the oven with aluminum foil.
- Do not insert oversized food or metal utensils.
- Empty the crumb trays after each use.
- Make sure the electrical cord does not rest against the rear of the oven.
Covering the crumb trays or other oven components with metal foil can cause overheating.
Hot Surface and Burn Prevention
The oven housing, interior walls, baking pan, wire rack, and pizza tray can become extremely hot during operation.
The appliance must be allowed to cool before cleaning or removing accessories.
When using the pizza drawer, only the pizza tray handles are identified as cool to the touch. The handles must remain extended during cooking.
Extreme caution is required when removing food or accessories containing hot grease or other liquids.
Tempered Glass Door Safety
The upper oven door is made of tempered glass.
Before operation, the glass must be inspected for:
- Chips
- Cracks
- Other visible damage
Warning: The countertop oven must not be used if the glass door is damaged because it may shatter during operation.
Electrical Safety and Polarized Plug
North American models have a polarized electrical plug with one blade wider than the other.
The plug fits a polarized outlet in only one direction.
If the plug does not fit:
- Remove it from the outlet.
- Reverse its orientation.
- Attempt to insert it again.
- If the plug still does not fit, contact a qualified electrician.
The plug must not be modified.
An electrical outlet must not be used if the plug fits loosely or becomes warm.
Extension Cord Safety
The oven is supplied with a short power cord to reduce the risk of entanglement and tripping.
If a longer detachable cord or extension cord is used, the following requirements apply:
| Requirement | Instruction |
| Electrical Rating | Must be at least equal to the rating of the appliance. |
| Placement | Must not hang over the edge of a table or countertop. |
| Child Safety | Must be positioned where children cannot pull it. |
| Trip Prevention | Must not create a tripping hazard. |
| Grounding | A three-wire grounding-type extension cord is required if the appliance is of the grounded type. |
The power cord must not be pulled, twisted, or otherwise misused.
Remote-Controlled Outlet Restrictions
The oven must not be operated using:
- External programmers
- Separate automatic timers
- Wireless plug adapters
- Outlets that allow remote operation
- Electrical circuits regularly switched on and off by the utility
Countertop Heat Protection
Some countertop and table surfaces cannot withstand prolonged exposure to heat.
The manufacturer recommends placing a hot pad or trivet beneath the oven to help prevent surface damage.
The heated oven must not be placed directly on a finished wooden table.
Cleaning Safety
Metal scouring pads must never be used.
Pieces can break away and touch internal electrical components, creating an electric shock hazard.
The oven must be disconnected from electrical power and allowed to cool before cleaning.
Before First Use
The countertop oven must be unpacked, cleaned, positioned, and prepared before its first cooking cycle.
Step 1: Remove Packaging Materials
Remove all stickers from the exterior.
Open the upper glass door and remove printed documents, paper, and other packing materials from the cooking chamber.
Step 2: Clean the Accessories
Clean the removable racks and baking pan using:
- Hot water
- A small amount of dishwashing liquid
- A non-abrasive cleaning pad
Rinse and dry the accessories thoroughly.
Caution: The main appliance must never be immersed in water.
Step 3: Dry the Oven
Make sure the oven and its removable components are thoroughly dry before connecting electrical power.
Step 4: Position the Appliance
Place the oven on a flat, dry, stable countertop in an open area.
Make sure the electrical cord can reach the wall outlet without contacting the rear of the oven.
Maintain at least 6 inches of clearance on every side.
Step 5: Connect Electrical Power
Plug the appliance into a 120-volt AC electrical outlet.
Step 6: Complete the Initial Heating Cycle
The manufacturer recommends operating the oven at its maximum temperature for approximately five minutes during initial startup.
This helps clear manufacturing residue associated with the first heating cycle.
Initial Smoke or Odor
A slight smell or small amount of smoke may be detected during initial use.
The manufacturer identifies this as normal for many heating appliances and states that it should disappear after a few uses.
How to Open the Upper Oven Door
The glass door must be opened using its handle.
Step 1: Grasp the Handle
Place the fingertips beneath the center of the handle using an underhand grip.
Step 2: Open the Door
Carefully pull the door downward.
Caution: The oven generates heat during operation. Hot glass and metal surfaces must not be touched.
How to Use the Broil Function
The adjustable Broil function allows food to be broiled at different temperatures.
The manufacturer provides examples of using 150°F to melt cheese and 400°F to cook fish.
Step-by-Step Broiling Instructions
- Select the appropriate wire rack position.
- Place the food on the broiling rack or baking pan as required.
- Make sure the rack is not installed in the lowest position.
- Close the upper glass door while leaving an opening of approximately 3 inches at the top.
- Turn the Function Selector knob to BROIL.
- Turn the Temperature Control knob to the desired temperature.
- Turn the Timer Control knob to the required cooking time.
- Allow the food to broil.
- When broiling is complete, open the door completely.
- Carefully remove the food using oven mitts.
Broiling Temperature Examples
| Food or Task | Temperature Example |
| Melting Cheese | 150°F |
| Cooking Fish | 400°F |
The cooking temperature can be adjusted according to the food being prepared.
Broiling Door Position
The glass door must remain partially open during broiling.
An opening of approximately three inches should remain at the top of the door.
Broiling Rack Restriction
The wire rack must not be placed in the lowest position during broiling.
The baking pan also must not be inserted into the guide rails below the rack when the rack occupies its lowest position.
Setting Short Broiling Times
For broiling periods shorter than 20 minutes:
- Turn the Timer Control knob past the 20-minute mark.
- Turn the knob back to the required cooking time.
This engages the timer mechanism.
Warning: Cooked food and the metal rack can be extremely hot. The oven must not be left unattended during broiling.
How to Use the Warm Function
The Warm function is used to warm prepared food.
Step-by-Step Warming Instructions
- Place the food inside the baking pan.
- Position the baking pan on the wire rack.
- Close the glass door completely.
- Turn the Function Selector knob to WARM.
- Turn the Temperature Control knob past the Warm marking.
- Turn the Timer Control knob to the desired warming time.
- Allow the selected warming cycle to finish.
- Open the glass door completely.
- Carefully remove the food using oven mitts.
Setting Warming Times Under 20 Minutes
If the warming time is shorter than 20 minutes, the timer must first be turned past the 20-minute mark and then returned to the required setting.
Warming Safety
The baking pan, wire rack, and heated food can become very hot.
Oven mitts must be used when removing food.
The appliance must not be left unattended while operating.
How to Use the Toast Function
The Toast function uses the upper oven to prepare bread, waffles, muffins, English muffins, and similar foods.
The manufacturer specifies the 450°F / TOAST temperature setting.
Step-by-Step Toasting Instructions
- Select the required rack position.
- For the best results, use the middle rack guide for toasting.
- Place the bread or other food directly on the wire rack.
- Close the upper glass door completely.
- Turn the Function Selector knob to TOAST/BAKE.
- Turn the Temperature Control knob to 450°F / TOAST.
- Turn the Timer Control knob past the 20-minute mark to engage the timer.
- Turn the timer back to the desired toasting time between 0 and 10 minutes.
- Allow the toasting cycle to finish.
- When the bell sounds, open the door completely.
- Carefully remove the food using oven mitts.
Toasting Time and Browning
Different types of bread require different settings.
| Food Type | Recommended Browning |
| Light-Colored Bread | Lighter Toast Setting |
| Waffles | Lighter Toast Setting |
| Darker Bread | Darker Toast Setting |
| Muffins | Darker Toast Setting |
| English Muffins | Darker Toast Setting |
The toasting time should be adjusted to achieve the desired browning.
Toasting Settings
| Setting | Value |
| Function | Toast/Bake |
| Temperature | 450°F / TOAST |
| Toast Timer | 0–10 Minutes |
| Recommended Rack Placement | Middle Rack Guide |
| Door Position | Fully Closed |
During Toast/Bake, both upper and lower heating elements operate.
Warning: The wire rack and food can become extremely hot. The oven must not be left unattended during toasting.
How to Use the Bake Function
The Bake function operates using the Toast/Bake setting and an adjustable cooking temperature.
Step-by-Step Baking Instructions
- Place the food inside the baking pan.
- Position the baking pan on the wire rack.
- Close the glass door completely.
- Turn the Function Selector knob to TOAST/BAKE.
- Turn the Temperature Control knob to the desired temperature.
- Turn the Timer Control knob to the required cooking time.
- Allow the food to bake.
- When the selected cooking time finishes, open the door completely.
- Carefully remove the food using oven mitts.
Baking Times Under 20 Minutes
For cooking periods shorter than 20 minutes:
- Turn the timer knob past the 20-minute mark.
- Rotate it back to the desired cooking time.
Baking Safety
The baking pan and wire rack can become extremely hot.
The oven must not be left unattended.
Food must be removed carefully after baking.
How to Use Turbo Convection Heat
The Turbo Convection Heat function uses a built-in fan to circulate hot air throughout the upper oven.
The circulating air helps food cook faster and more evenly.
The manufacturer particularly identifies baked goods as benefiting from the more consistent temperature produced by convection.
Step 1: Preheat the Oven
Position the wire rack before preheating.
The manufacturer recommends preheating for approximately 5–7 minutes at the desired cooking temperature.
Step 2: Prepare the Food
Arrange the food inside the baking pan.
Place the pan on the wire rack.
Step 3: Close the Door
Close the upper glass door completely.
Step 4: Select Turbo
Turn the Function Selector knob to TURBO.
Step 5: Set the Temperature
Turn the Temperature Control knob to the desired cooking temperature.
Step 6: Set the Timer
Turn the Timer Control knob to the required cooking time.
If the selected cooking time is shorter than 20 minutes, turn the timer past the 20-minute mark and then back to the desired time.
Step 7: Allow Cooking to Finish
The oven circulates heated air using its built-in convection fan.
Step 8: Remove the Food
When cooking finishes:
- Open the door completely.
- Use oven mitts to remove the baking pan or food.
- Avoid touching hot metal surfaces.
Turbo Convection Cooking Time
Turbo Convection Heat can shorten cooking time, but the amount depends on the food.
The manufacturer recommends starting with a shorter cooking time and adding additional time if necessary.
Foods Suitable for Turbo Convection Heat
Baked goods can benefit from convection because circulating air helps keep the oven temperature consistent throughout the cooking chamber.
How to Use the Pizza Drawer
The dedicated Pizza Drawer is located in the lower part of the appliance.
It accommodates pizzas up to 12 inches and can also prepare foods such as bruschetta, appetizers, and quesadillas.
Important Pizza Drawer Operating Information
When the Pizza function is selected:
- The lower pizza drawer is used for cooking.
- The temperature is automatically preset.
- The upper oven does not heat because of the appliance’s wattage limitations.
- Residual heat in the upper oven can be used for plate or food warming.
- The pizza tray handles must remain extended during cooking.
- Only the pizza tray handles are identified as cool to the touch.
Step 1: Extend the Pizza Tray Handles
Fold out both pizza tray handles.
The handles provide the gripping points for inserting and removing the tray.
Step 2: Remove the Pizza Tray
Pull the pizza tray out of the lower drawer using the handles.
Step 3: Position the Pizza
Place the pizza tray on a clean, flat surface.
Position the pizza in the center of the tray.
The pizza must not extend beyond the tray edges.
Step 4: Reinsert the Pizza Tray
Hold the two handles together and carefully slide the pizza tray back into the lower drawer.
Step 5: Select the Pizza Function
Turn the Function Selector knob to PIZZA.
The oven automatically selects the preset temperature for pizza cooking.
The Pizza function does not require a separate temperature adjustment.
Step 6: Set the Cooking Time
Turn the Timer Control knob to the desired time.
For cooking times shorter than 20 minutes:
- Turn the timer past the 20-minute mark.
- Turn it back to the required cooking time.
Step 7: Keep the Handles Extended
Leave both pizza tray handles in their extended position throughout cooking.
Caution: Only the pizza tray handles are identified as cool to the touch. The tray and surrounding surfaces may be hot.
Step 8: Remove the Cooked Pizza
When the selected cooking cycle finishes, grasp the tray handles and carefully pull the pizza tray out of the drawer.
Step 9: Place the Tray on a Heat-Resistant Surface
Position the hot pizza tray on a suitable heat-resistant surface.
Carefully remove the cooked pizza.
Pizza Drawer Cooking Guidelines
| Setting | Instruction |
| Maximum Pizza Size | 12 Inches |
| Cooking Function | Pizza |
| Temperature | Automatically Preset |
| Cooking Time | Selected with Timer Control |
| Preheating | Follow the pizza package instructions. |
| Pizza Placement | Centered on the tray without extending beyond its edges. |
| Tray Handles | Remain extended during cooking. |
| Upper Oven Heating | Disabled while the pizza drawer operates. |
Pizza Cooking Time Adjustments
Pizza cooking times may differ from those printed on the pizza packaging.
The appliance may cook pizza in less time than the package instructions suggest.
The first cooking cycle should be monitored closely so that the time can be adjusted for future use.
Using Residual Heat from the Upper Oven
The upper oven does not actively heat while the pizza drawer is operating.
However, residual heat in the upper compartment may be used for warming plates or food.
Pizza Drawer Safety
The pizza tray and cooked food can become extremely hot.
The tray must be handled by its designated handles.
The oven must not be left unattended during operation.
How to Use the Timer and Stay On Function
The Timer Control knob operates the appliance for a selected duration or allows continuous operation using Stay On.
Setting a Timed Cooking Cycle
- Select the desired cooking function.
- Set the required temperature where applicable.
- Turn the Timer Control knob clockwise to the desired cooking time.
- Allow the appliance to cook.
When the selected time finishes, a bell sounds and the oven switches off automatically.
How to Set the Timer for Less Than 20 Minutes
For short cooking cycles:
- Turn the timer clockwise past the 20-minute mark.
- Rotate it back to the desired time.
This engages the mechanical timer.
How to Use Stay On
The Stay On function allows cooking to continue until it is manually stopped.
- Select the desired cooking function.
- Set the required temperature where applicable.
- Turn the Timer Control knob counterclockwise to STAY ON.
- Allow the appliance to operate.
How to Turn Off Stay On
Turn the Timer Control knob manually to OFF.
The oven stops operating and a bell sounds.
Timer vs. Stay On
| Setting | Function | How Cooking Ends |
| Timed Cooking | Operates for the selected duration, up to 60 minutes. | Automatically switches off and sounds a bell. |
| Stay On | Continues operating without a timed automatic shut-off. | Must be manually switched to OFF. |
The Pizza function can also operate using Stay On without separately setting the temperature.
Important: The Stay On function requires manual shut-off. The oven must not be left unattended during operation.
How to Position the Oven Rack
The upper oven provides two rack positions.
The correct rack position depends on the size of the food and the desired browning.
Rack Position Guide
| Position | Purpose |
| Upper Rack Position | Helps prevent food from burning on the bottom. |
| Lower Rack Position | Helps prevent excessive browning on top. |
How to Reposition the Rack
- Allow the oven to cool.
- Open the glass door.
- Pull the wire rack toward the front.
- Remove the rack from its guide rails.
- Select the required upper or lower rack position.
- Slide the rack into the selected guides.
Rack Handling Precaution
The rack may tilt downward when pulled out, causing food to shift.
The rack must be handled carefully when removing food.
Broiling Rack Restriction
The rack must not be placed in the lowest position during broiling.
How to Position the Baking Pan
The baking pan can be used in two arrangements, depending on the cooking method.
Baking Pan Positioning Chart
| Cooking Method | Baking Pan Position |
| Baking | Place the baking pan on top of the wire rack. |
| Grilling | Insert the baking pan into the guide rails below the wire rack. |
| Broiling | Place the baking pan beneath the wire rack to collect drippings. |
Important Pan Positioning Restriction
The baking pan must not be inserted into the guide rails below the rack when the rack is in its lowest position.
The oven must be allowed to cool before the pan is repositioned, unless hot accessories must be removed using appropriate heat protection.
Cleaning and Maintenance Instructions
The Oster TSSTTVPZDS Convection Oven with Pizza Drawer must be switched off, unplugged, and allowed to cool before cleaning.
Regular cleaning helps prevent food residue and crumbs from accumulating inside the upper oven and lower pizza drawer.
How to Clean the Convection Oven
- Turn all three control knobs to OFF.
- Disconnect the power cord from the electrical outlet.
- Allow the appliance to cool completely.
- Wipe the oven surfaces using a damp cloth.
- Use only mild, soapy water.
- Remove and clean both crumb trays.
- Clean the wire rack.
- Allow all cleaned components to dry before using the appliance again.
Caution: The appliance must never be immersed in water or another liquid.
Cleaning the Oven Interior
The easy-clean interior walls should be wiped with a damp cloth and mild, soapy water.
The following cleaning products must not be used:
- Abrasive cleaners
- Scrubbing brushes
- Harsh chemical cleaners
- Metal scouring pads
These materials can damage the oven’s coating.
Metal scouring pads are particularly dangerous because loose metal pieces can contact electrical components and create an electric shock hazard.
How to Clean the Upper Crumb Tray
- Make sure the appliance is unplugged and cool.
- Pull the upper crumb tray out of the oven.
- Shake the tray to remove accumulated crumbs.
- Clean the tray as needed.
- Return it to its proper position.
The upper crumb tray should be emptied after each use.
How to Clean the Lower Pizza Drawer Crumb Tray
- Turn the oven off and unplug it.
- Allow the pizza drawer to cool completely.
- Pull the lower crumb tray out of the pizza drawer.
- Shake out the crumbs and food particles.
- Clean the tray as needed.
- Reinstall the tray.
Regular cleaning of both crumb trays prevents excessive food buildup.
How to Clean the Wire Rack
The removable wire rack can be cleaned using a damp cloth.
It may also be placed on the top rack of a dishwasher.
Cleaning the Pizza Drawer and Tray
The appliance must be allowed to cool before the pizza tray or surrounding surfaces are cleaned.
The removable pizza tray and drawer surfaces should be cleaned using the manufacturer’s mild, non-abrasive cleaning precautions.
Appliance Maintenance
The oven contains no user-serviceable internal parts.
Any service beyond routine cleaning must be performed by an authorized service representative.
Electrical and mechanical parts must not be disassembled or repaired by the owner.
Storage Instructions
The countertop oven must be completely cool, clean, and dry before storage.
How to Store the Convection Oven
- Turn all control knobs to OFF.
- Unplug the appliance.
- Allow the oven to cool completely.
- Remove accumulated crumbs and food particles.
- Clean the upper oven and lower pizza drawer as required.
- Make sure all components are dry.
- Store the appliance in a dry location.
Suitable storage locations include:
- Table
- Countertop
- Cupboard shelf
For long-term storage, the oven and pizza drawer must be free of food particles.
Other than routine cleaning, no additional user maintenance is necessary.
Troubleshooting Guide
The following troubleshooting instructions address the operating and cooking problems identified for the Oster TSSTTVPZDS.
Quick Troubleshooting Table
| Problem | Possible Cause | Recommended Solution |
| Food is overcooked. | Incorrect time or temperature setting. | Adjust the cooking time and temperature. |
| Food is undercooked. | Incorrect time, temperature, or rack position. | Adjust the settings or reposition the rack. |
| Burning smell during operation | Food residue inside the oven, on heating elements, or in a crumb tray. | Allow the oven to cool and clean the affected areas. |
| Only one heating element operates. | The selected function determines which heating elements operate. | Check whether Broil or Warm is selected. |
| Heating elements do not remain continuously on. | Heating elements cycle to maintain the required temperature. | Confirm that the correct cooking function is selected. |
Food Is Overcooked or Undercooked
Possible Causes
- Incorrect temperature setting
- Incorrect cooking time
- Improper rack placement
Recommended Actions
- Adjust the cooking temperature.
- Change the cooking duration according to the desired results.
- Check the rack position.
- Reposition the rack when necessary.
The convection oven is smaller than a conventional full-size oven.
As a result, it can heat more quickly and generally cook food in a shorter period.
Burning Smell During Operation
A burning smell may result from accumulated food particles.
Food residue may collect:
- Inside the upper oven
- On heating elements
- In the upper crumb tray
- In the lower pizza drawer crumb tray
Recommended Actions
- Turn all controls to OFF.
- Unplug the appliance.
- Allow the oven to cool.
- Remove accumulated crumbs and food residue.
- Clean the appliance using the recommended procedure.
Both crumb trays should be emptied regularly.
Only One Heating Element Is Working
The selected cooking function determines which heating elements operate.
The manufacturer recommends checking whether Broil or Warm is selected.
The heating arrangement may be different from the one expected for another function.
Recommended Action
Confirm that the Function Selector knob is set to the intended cooking mode.
Heating Elements Do Not Stay On Continuously
The heating elements are designed to cycle on and off to maintain the proper cooking temperature.
This is normal operation.
The selected cooking function should be checked to confirm it matches the intended cooking method.
Warranty Information
The Oster TSSTTVPZDS Convection Oven with Pizza Drawer is covered by a 1-year limited warranty provided by Sunbeam Products, Inc., or Sunbeam Corporation (Canada) Limited in Canada.
Warranty Coverage
The manufacturer warrants that the product will be free from defects in materials and workmanship for one year from the original retail purchase date.
During the warranty period, Sunbeam may:
- Repair a defective appliance or component.
- Replace the defective appliance or component.
- Provide a new or remanufactured replacement.
- Provide a similar product of equal or greater value if the original product is unavailable.
The manufacturer determines whether repair or replacement is appropriate.
Warranty Eligibility
The warranty applies to the original retail purchaser.
It begins on the original purchase date and is not transferable.
The original sales receipt must be retained because proof of purchase is required for warranty service.
Warranty Exclusions
The warranty does not cover normal wear or damage resulting from:
- Negligent operation
- Product misuse
- Incorrect electrical voltage or current
- Operation contrary to the manufacturer’s instructions
- Unauthorized disassembly
- Unauthorized repair or modification
- Events such as fires, floods, hurricanes, or tornadoes
Attempting to repair or adjust the appliance’s electrical or mechanical functions may void the warranty.
Warranty Limitations
The warranty contains limitations relating to incidental and consequential damages, implied warranties, and other liabilities.
Some limitations may not apply in certain states, provinces, or jurisdictions.
Additional rights may vary according to applicable local laws.
How to Obtain Warranty Service
Customers requiring warranty assistance should contact the manufacturer using the appropriate customer service number.
The manufacturer will provide information about a convenient authorized service center.
The appliance must not be returned directly to the manufacturer’s corporate address or to the original place of purchase for warranty service.
Customer Support Information
For product questions, warranty service, and authorized repair assistance, the manufacturer provides the following contact details.
| Contact Type | Details |
| Brand | Oster |
| Customer Service | Sunbeam Consumer Service |
| United States Phone | 1-800-334-0759 |
| Canada Phone | 1-800-667-8623 |
| Official Website | www.oster.com |
United States Support
Sunbeam Products, Inc.
Boca Raton, Florida 33431
United States
Canada Support
Sunbeam Corporation (Canada) Limited
20 B Hereford Street
Brampton, Ontario L6Y 0M1
Canada
Authorized Repairs
The appliance contains no user-serviceable internal parts.
Any electrical or mechanical servicing beyond routine cleaning must be performed by an authorized service representative.
Customers should contact Sunbeam Consumer Service for warranty assistance and information about authorized service centers.
Frequently Asked Questions
1. What size pizza fits in the Oster TSSTTVPZDS pizza drawer?
The dedicated pizza drawer accommodates pizzas up to 12 inches. The pizza must be centered on the removable tray and must not extend beyond its edges.
2. How do I use the pizza drawer on the Oster Convection Oven?
Extend both pizza tray handles and remove the tray. Place the pizza in the center of the tray, then slide it back into the lower drawer. Turn the Function Selector knob to Pizza and set the required cooking time. The temperature is automatically preset.
Keep the handles extended during cooking and use them to remove the tray when finished. The upper oven does not heat while the pizza drawer is operating.
3. How do I use Turbo Convection Heat on the Oster TSSTTVPZDS?
Position the wire rack and preheat the oven for approximately 5–7 minutes at the desired temperature. Place the food in the baking pan on the wire rack, close the glass door, and turn the Function Selector knob to Turbo. Select the required temperature and cooking time.
4. How do I set the toaster oven timer for less than 20 minutes?
Turn the Timer Control knob clockwise past the 20-minute mark, then rotate it back to the required cooking time. This engages the timer mechanism. When the selected time finishes, a bell sounds and the oven switches off automatically.
5. What does the Stay On function do?
The Stay On function allows the oven to continue cooking until it is manually switched off. After selecting the cooking function and required temperature, turn the Timer Control knob counterclockwise to Stay On. When cooking is complete, turn the timer to OFF. A bell sounds as the oven switches off.
6. Why does only one heating element operate on the Oster TSSTTVPZDS?
The selected cooking mode determines which heating elements operate. The manufacturer recommends checking whether Broil or Warm is selected. Heating elements can also cycle on and off to maintain the required temperature.
7. How do I clean the Oster TSSTTVPZDS Convection Oven with Pizza Drawer?
Turn all controls to OFF, unplug the appliance, and allow it to cool completely. Wipe the oven using a damp cloth and mild, soapy water. Remove and empty both the upper oven crumb tray and lower pizza drawer crumb tray. The wire rack may be wiped clean or placed on the top rack of a dishwasher.