Philips Norelco Beard Trimmer BT5785
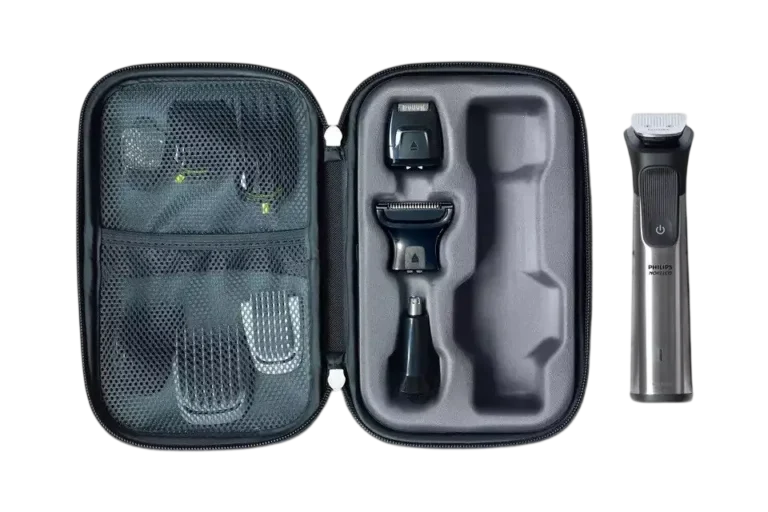
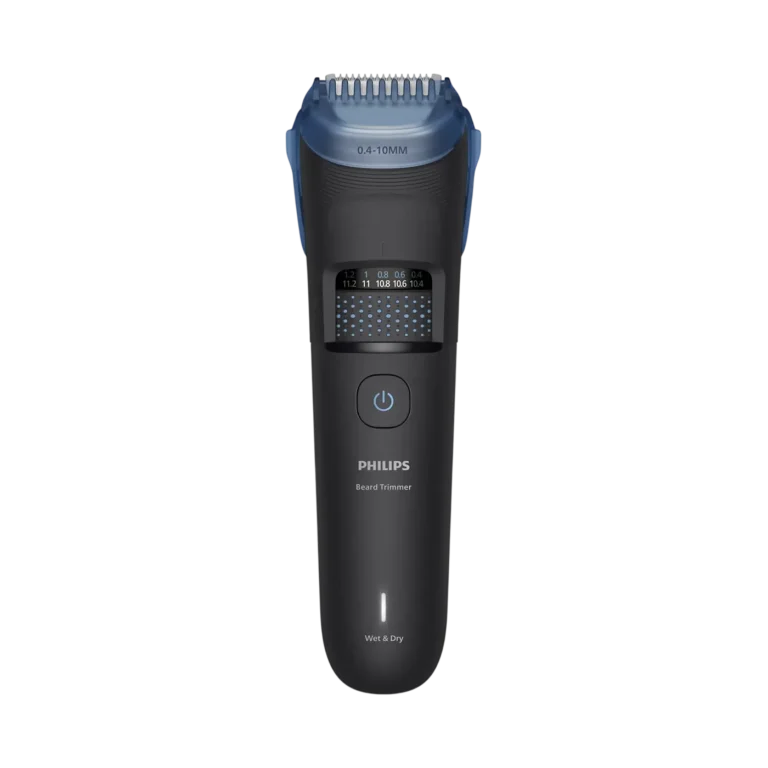
The Philips Norelco BT5785 is a cordless, rechargeable, waterproof trimmer for facial hair. It trims beard and mustache to a chosen length with a 32 mm cutting element and two adjustable trimming guards (0.4 mm to 10 mm and 10.4 mm to 20 mm), and a hair collector can catch some of the cut hair. Beyond the standard guards, the BT5785 includes two fading guards for a faded beard line, a precision trimmer for fine lines and contours, and a charging stand. It runs up to 100 minutes cordless after 60 minutes of charging. It is for facial hair only; do not use it on body or scalp hair. The same instructions also cover models BT5775 and BT7670, and the differences are listed below.
Differences Between Models BT5775, BT5785 and BT7670
All three models share the same instructions. Only the items below are limited to specific models.
| Feature | BT5775 | BT5785 | BT7670 |
| Charging stand | No | Yes | Yes |
| Fading guards (1 mm – 5 mm and 5 mm – 1 mm) | No | Yes | Yes |
| Extra-wide cutting element (41 mm) | No | No | Yes |
| Cordless operating time after 60 minutes of charging | Up to 100 minutes | Up to 100 minutes | Up to 120 minutes |
The model number is on the back of the product. The full model number (for example, BT1234/56) is on the bottom of the packaging, your receipt or your order confirmation.
Parts and Controls
The general description lists these numbered parts.
| No. | Part | Notes |
| 1 | Extra-wide cutting element (41 mm) | Only with model BT7670 |
| 2 | Precision trimmer | |
| 3 | Cutting element (32 mm) | |
| 4 | Hair collector | |
| 5 | Hair length setting wheel | |
| 6 | On/off button | |
| 7 | Battery status indicator | |
| 8 | Socket for small plug | |
| 9 | USB cable | |
| 10 | Charging stand | Only with models BT5785, BT7670 |
| 11 | Adjustable trimming guard | 0.4 mm – 10 mm (1/64 in. – 25/64 in.) |
| 12 | Adjustable trimming guard | 10.4 mm – 20 mm (13/32 in. – 25/32 in.) |
| 13 | Fading guard | 1 mm – 5 mm (3/64 in. – 13/64 in.), only with models BT5785, BT7670 |
| 14 | Fading guard | 5 mm – 1 mm (13/64 in. – 3/64 in.), only with models BT5785, BT7670 |
| 15 | Small plug |
A storage pouch and a cleaning brush are also supplied but are not shown in the illustration. The USB power source is not included. A suitable power source (for example, Philips HQ87) is available at www.philips.com/support.
Charging and Battery Status
Charge the product fully before you use it for the first time, and charge it again when the battery status indicator shows that the battery is almost empty.
Battery Status Indicator
| Battery status | Indicator mode |
| Almost empty | Flashing orange light |
| Charging | Flashing white light |
| Fully charged | Solid white light |
About 60 seconds after the battery is fully charged, the battery status indicator switches off automatically.
Charging Time, Operating Time and Quick Charge
After 60 minutes of charging, the product has a cordless operating time of up to 100 minutes (models BT5775, BT5785) or 120 minutes (model BT7670). After about 5 minutes of charging, the product holds enough power for one trimming session.
Power Source Requirements
- Use only a USB power source on a certified product with an output rating of 5 V, ≥ 1 A.
- For safe charging in a moist environment such as a bathroom, use only an IPX4 (splash-proof) power source.
- Using a non-certified USB power source may cause hazards or serious injuries.
- Plug the USB power source directly into a power outlet. Do not use an extension cord.
- Keep the USB cable, the USB power source and the charging stand (if provided) dry.
Charging with a USB Power Source
- Make sure that the product is switched off.
- Insert the small plug of the USB cable into the socket in the bottom of the product (Fig. 3).
- Insert the USB plug into the USB power source (not included) (Fig. 5).
- Insert the USB power source into the power outlet (Fig. 6).
- After charging, remove the USB power source from the power outlet and pull the small plug out of the product.
Charging with the Charging Stand (BT5785, BT7670)
- Make sure that the product is switched off.
- Insert the small plug into the charging stand (Fig. 4).
- Insert the USB plug into the USB power source (not included) (Fig. 5).
- Insert the USB power source into the power outlet (Fig. 6).
- Put the product in the charging stand (Fig. 7).
- After charging, take the product out of the charging stand, remove the power source from the power outlet, pull the USB plug out of the power source and then pull the small plug out of the charging stand.
Temperature Limits
Charge, use and store the product at a temperature between 50 °F / 10 °C and 95 °F / 35 °C. Charging or using it below 50 °F / 10 °C or above 95 °F / 35 °C adversely affects the lifespan of the battery. If the product is subjected to a major change in temperature, pressure or humidity, let it acclimatize for 30 minutes before use.
Water Use and Cord Restrictions
The product is waterproof. It is suitable for use in the bath or shower and for cleaning under the tap. For safety reasons, it can therefore only be used without the cord, and it does not work while connected to the power outlet. Except when charging, always unplug the product from the power outlet.
Changing Attachments
Switch off the product before removing or attaching attachments and before cleaning. Always check the product and all accessories before use. Do not use the product or any accessory if it is damaged, as this may cause injury, and always replace a damaged part with one of the original type.
Attaching and Detaching the Hair Collector
If you use the hair collector together with an adjustable trimming guard, first attach the hair collector and then the trimming guard. To detach, first remove the trimming guard and then the hair collector.
- To attach the hair collector, align the top wings of the hair collector with the top of the handle and press the hair collector down until both sides click into place (Fig. 8).
- To detach it, place your hand around the hair collector to prevent it from falling. Then use your thumb to unhook one of the wings of the hair collector and remove it from the handle (Fig. 9).
Hold the product over a bin when detaching the hair collector to avoid spilling the hairs.
Attaching and Detaching the Adjustable Trimming Guards
- To attach an adjustable trimming guard, slide the guard legs straight into the guiding grooves of the product until the guard clicks into place (Fig. 10).
- To detach it, hold the guard on both sides and gently pull it upwards off the product (Fig. 11).
Attaching and Detaching the Fading Guards (BT5785, BT7670)
- To attach a fading guard onto the cutting element, slide the front part of the guard onto the teeth and press the plastic notch at the back of the guard downwards until it clicks into place (Fig. 12).
- To detach it, carefully push the back part of the guard off the product and then slide it off the cutting element (Fig. 13).
Detaching and Attaching Cutting Elements
- To detach a cutting element, place your thumb below the teeth of the cutting element and gently push upwards until the cutting element comes off the handle (Fig. 14).
- To attach a cutting element, insert the plastic notch at the back of the cutting element into the guiding slot in the handle. Then gently press the teeth of the cutting element downwards until it clicks into place (Fig. 15).
Using the Trimmer
Press the on/off button once to switch the product on or off (Fig. 16).
Trimming Tips
- When trimming for the first time, start with the guard set to the maximum trimming length to get familiar with the product.
- Hairs do not all grow in the same direction, so you may want to try different trimming positions (upwards, downwards or across).
- Make smooth, gentle movements and keep the surface of the guard in contact with your skin.
- When too many hairs have accumulated on the product, remove them before or during use for the best trimming results (see Cleaning below).
- When using the hair collector, hold the product upwards to prevent caught hair from spilling.
Using the Hair Collector
The hair collector is optional. It is designed to catch some, but not all, of the cut hairs, so it is normal for some hairs to fall down during trimming. Use it with these attachments:
| Attachment | Used with hair collector |
| Cutting element (32 mm) | Yes |
| Adjustable trimming guards | Yes |
| Extra-wide cutting element (41 mm) | No |
| Fading guards | No |
| Precision trimmer | No |
Trimming Without a Guard
Use the product without any guard, with or without the hair collector, to trim your beard close to the skin, to a length of approx. 1/32 in. or 0.5 mm.
- Attach the hair collector to the product (optional).
- Switch on the product (Fig. 16).
- Place the flat side of the cutting element against your skin and make strokes against the direction of hair growth (Fig. 17).
- Switch off and clean the product after each use.
Trimming with Adjustable Trimming Guards
Use an adjustable trimming guard attached to the cutting element, with or without the hair collector, to trim your beard and mustache in your preferred style. The product comes with two adjustable trimming guards, with settings from 0.4 mm to 10 mm (1/64 in. – 25/64 in.) and from 10.4 mm to 20 mm (13/32 in. – 25/32 in.).
- Attach the hair collector to the product (optional).
- Attach the adjustable trimming guard to the product.
- Turn the hair length setting wheel to the desired hair length setting (Fig. 18). The settings correspond to the remaining hair length after trimming, and the selected setting is shown in the center of the wheel.
- Switch on the product (Fig. 16).
- For the most effective trimming, move the guard against the direction of hair growth. Make sure the surface of the guard always stays in contact with the skin.
- Switch off and clean the product after each use.
Edging Without the Hair Collector
Use the product without any guard and without the hair collector to trim edges and single hairs.
- Detach any guard from the product.
- Detach the hair collector from the product.
- Switch on the product (Fig. 16).
- Hold the cutting element perpendicular to the skin. Make well-controlled movements to remove unwanted hairs, touching the hair lightly with the trimmer (Fig. 19).
- Switch off and clean the product after each use.
Fading Guards for a Faded Beard Line (BT5785, BT7670)
Use the cutting element with a fading guard but without the hair collector. The product comes with 2 fading guards, and each guard trims one side of your face.
- Attach one of the fading guards to the product.
- Place the trimmer on your face close to the ear so that the short teeth of the guard are higher and the long teeth are lower (Fig. 20).
- Switch on the product (Fig. 16).
- Move the trimmer once in a straight line from the ear to the corner of your mouth to achieve a faded beard style (Fig. 21).
- Attach the other fading guard to trim the other side of your face in the same way.
- Gently shake the hairs off the product between strokes to prevent hairs from collecting between the cutting element and the guard.
- Switch off and clean the product after each use.
Extra-Wide Cutting Element for Contouring (BT7670)
Use the extra-wide cutting element (41 mm) without the hair collector to edge and contour your beard line.
- Detach the cutting element from the product.
- Attach the extra-wide cutting element to the product (Fig. 22).
- Place the extra-wide cutting element at the edge of your beard, with the blade perpendicular to the skin.
- Switch on the product (Fig. 16).
- Make slow upward or downward strokes to cut unwanted hairs (Fig. 23).
- Switch off and clean the product after each use.
Precision Trimmer
Use the precision trimmer without the hair collector to create fine lines and contours around your facial style, close to the skin, to a length of 1/32 in. (0.5 mm).
- Detach the cutting element from the product.
- Attach the precision trimmer to the product.
- Switch on the product (Fig. 16).
- Hold the precision trimmer perpendicular to the skin and move it upwards or downwards with gentle pressure (Fig. 24).
- Switch off and clean the product after each use.
Cleaning and Storage
Clean the product after each use. Switch it off before removing or attaching attachments and before cleaning, and use only cold or lukewarm water.
Never use scouring pads, abrasive cleaning agents or aggressive liquids such as gasoline or acetone to clean the product. Never dry the cutting element with a towel or tissue, as they may get caught in the teeth and cause damage.
Cleaning Steps
- Make sure that the product is switched off and removed from the charging stand or power outlet.
- First detach any guard and then remove the hair collector, if attached. Hold the product over a bin or sink for easier clean-up.
- Empty the hair collector into a bin (Fig. 25). Use the cleaning brush to remove all the hairs from the hair collector and from the guard.
- Clean the whole handle under the tap or wipe it clean with a dry or moist cloth.
- Detach the cutting element from the product and clean it with a brush.
- Rinse all the attachments under the tap (Fig. 26).
- Carefully shake off excess water and let all parts air-dry completely.
Storage
- Make sure that the product is switched off and that the USB power source has been removed from the power outlet and from the product.
- Make sure the product and the accessories are dry before you store them in the pouch.
- Do not wrap the USB cable around the product when storing.
- Store the product, the USB power source and all accessories in the pouch supplied, in a safe, dry location where it will not be crushed, banged or subject to damage.
- Do not place or store the product where it can fall or be pulled into a tub or sink, water or other liquid.
Important Safety Information
Read all instructions before using this product. The product is intended only for trimming facial hair to the desired length, for household use as described in the instructions. Because of hygiene, only one person should use it.
Electrical Safety
- Do not reach for a corded product that has fallen into water. Unplug it immediately from the power outlet.
- Do not place or store the product where it can fall or be pulled into a tub or sink, and do not place or drop it into water or other liquid.
- Remove the USB power source from the power outlet and from the product before cleaning the product with water.
- Always attach the USB cable to the USB power source and the product first, then attach the USB power source to the power outlet. To disconnect, set all controls to the off position, then remove the USB power source from the power outlet.
- Unplug the USB power source before plugging in or unplugging the product.
- Keep the USB cable and the USB power source away from heated surfaces.
- Do not use the USB power source in or near a power outlet that contains an electric air freshener, to prevent damage to the power source.
- Never operate the product if it has a damaged USB power source, is not working properly, has been dropped or damaged, or if the product or the USB power source has been dropped into water. For assistance, call 1-800-243-3050.
General Use Warnings
- This product is not intended for use by persons (including children) with reduced physical, sensory or mental capabilities, or lack of experience and knowledge, unless they have been given supervision or instruction concerning use of the product by a person responsible for their safety. Children should be supervised to ensure that they do not play with it.
- Do not use attachments not recommended by Philips North America LLC, and use only original Philips accessories or consumables.
- Never drop or insert any object into any opening.
- Do not use the product outdoors or where aerosol (spray) products are being used or oxygen is being administered.
- Always check cutting units and other attachments and accessories before use. Never use the product with a damaged cutting unit, attachment or accessory, as injury may occur.
- The product has no other user-serviceable parts. For assistance, call 1-800-243-3050.
Battery Safety
- The batteries used in this product may present a fire or chemical burn hazard if mistreated. Do not disassemble, heat above 100 °C (212 °F) or incinerate.
- Keep the product and batteries away from fire and do not expose them to direct sunlight or high temperatures. Do not place them in microwave ovens or on induction cookers.
- If the product becomes abnormally hot or smelly, changes color, or if charging takes longer than usual, stop using and charging the product and contact Philips.
- Do not open, modify, pierce, damage or dismantle the product or battery. Do not short-circuit, overcharge or reverse charge batteries.
- If batteries are damaged or leaking, avoid contact with the skin or eyes. If this occurs, immediately rinse well with water and seek medical care.
- When you handle batteries, make sure your hands, the product and the batteries are dry.
- After removal, do not let battery terminals touch metal objects (for example, coins, hairpins, rings) and do not wrap batteries in aluminum foil. Tape battery terminals or put batteries in a plastic bag before you discard them.
Disposal, Warranty and Support
Disposal
The product contains a rechargeable lithium-ion battery that must be disposed of properly. Contact your local town or city officials for battery disposal information, or call 1-800-822-8837 or visit www.call2recycle.org for battery drop-off locations. For recycling information on the product itself, contact your local waste management facilities or visit www.recycle.philips.com.
Warranty
Philips North America LLC provides a Full Five-Year Warranty on this new product (except blade and guards) against defects in materials or workmanship, from the date of purchase, and agrees to repair or replace any defective product without charge. The warranty does not cover damage from accident, misuse or abuse, lack of reasonable care, attaching any attachment not provided with the product, loss of parts, or use with any but the specified voltage or batteries. To obtain warranty service, go to www.philips.com/support. A 45-day money-back guarantee is also described; to use it, go to www.PhilipsMoneyBack.com and follow the 3-step process.
Support and Registration
For assistance, visit www.philips.com/support or call toll free 1-800-243-3050. To register your product, go to www.norelco.com/register.
Frequently Asked Questions
How long does the Philips Norelco BT5785 run on a charge?
After 60 minutes of charging, the BT5785 runs cordless for up to 100 minutes. The same figure applies to the BT5775, while the BT7670 runs up to 120 minutes. If you are short on time, about 5 minutes of charging gives enough power for one trimming session. Charge the trimmer fully before first use, and charge it again when the battery status indicator flashes orange.
What do the battery status lights mean?
A flashing orange light means the battery is almost empty, a flashing white light means the trimmer is charging, and a solid white light means it is fully charged. About 60 seconds after the battery is fully charged, the indicator switches off automatically, so a dark indicator on a charged trimmer is normal.
What USB power source can I use to charge the trimmer?
Use a certified USB power source with an output rating of 5 V, ≥ 1 A. If you charge in a moist place such as a bathroom, use only an IPX4 (splash-proof) power source. The power source is not included with the trimmer; Philips names the HQ87 as an example of a suitable one, available at www.philips.com/support. Plug it straight into a wall outlet rather than an extension cord, and keep it, the cable and the charging stand dry. If you need help finding the right power source, call Philips support at 1-800-243-3050.
Can I use the trimmer while it is plugged in?
No. The trimmer does not work while it is connected to the power outlet, and for safety it can only be used without the cord. To charge, switch the trimmer off first, connect the small plug, USB cable and power source as described in the charging steps, and unplug everything when charging is finished.
Is the Norelco BT5785 waterproof, and can I use it in the shower?
Yes. The product is waterproof and suitable for use in the bath or shower and for cleaning under the tap. Because of that, it is used cordless only. Before rinsing it, remove the USB power source from the power outlet and from the product, and keep the USB cable, power source and charging stand dry.
How do I change the hair length setting?
Attach one of the two adjustable trimming guards, then turn the hair length setting wheel to the length you want. The wheel settings show the hair length that remains after trimming, and the selected setting appears in the center of the wheel. One guard covers 0.4 mm to 10 mm (1/64 in. – 25/64 in.) and the other covers 10.4 mm to 20 mm (13/32 in. – 25/32 in.). On your first trim, start with the maximum length setting to get used to the trimmer.
Which attachments can I use with the hair collector?
You can use the hair collector with the 32 mm cutting element, either alone or with an adjustable trimming guard. It does not work with the extra-wide cutting element, the fading guards or the precision trimmer. When you use it with a guard, attach the collector first and then the guard, and detach in the reverse order. The collector catches some, but not all, of the cut hairs, so some falling hair is normal. Holding the trimmer upwards helps keep caught hair from spilling.
How do I trim close to the skin or clean up edges?
For a close trim, remove all guards and place the flat side of the cutting element against your skin, using strokes against the direction of hair growth. This leaves hair at about 1/32 in. or 0.5 mm. For edges and single hairs, remove both the guard and the hair collector, hold the cutting element perpendicular to the skin and touch the hair lightly. For fine lines and contours, the precision trimmer works the same way, held perpendicular to the skin and moved up or down with gentle pressure, and it also trims to 1/32 in. (0.5 mm).
How do I create a faded beard line with the fading guards?
Fading guards come with the BT5785 and BT7670, not the BT5775. Attach one guard without the hair collector and place the trimmer near your ear with the short teeth of the guard higher and the long teeth lower. Switch on the trimmer and make one straight stroke from the ear to the corner of your mouth. Then attach the other fading guard and repeat on the other side of your face, since each guard is made for one side. Shake the hairs off gently between strokes so they do not collect between the cutting element and the guard.
How do I clean the trimmer after use?
Switch the trimmer off and make sure it is not on the charging stand or connected to a power outlet. Remove any guard, then the hair collector, over a bin or sink. Empty the collector and brush the hairs out of the collector and guard, clean the handle under the tap or with a dry or moist cloth, brush the cutting element after detaching it, and rinse all attachments under the tap. Shake off excess water and let every part air-dry completely. Use only cold or lukewarm water, never scouring pads, abrasive cleaners, gasoline or acetone, and never dry the cutting element with a towel or tissue because it can catch in the teeth and damage them.
What is different between the BT5775, BT5785 and BT7670?
The BT5775 has no charging stand and no fading guards. The BT5785 adds the charging stand and the two fading guards. The BT7670 has the same stand and fading guards and also includes the extra-wide 41 mm cutting element, and it runs up to 120 minutes after 60 minutes of charging, compared with up to 100 minutes for the other two. You can find your model number on the back of the product.
What does the Philips Norelco warranty cover?
Philips North America LLC gives a Full Five-Year Warranty from the date of purchase against defects in materials or workmanship, and it will repair or replace a defective product without charge. The blade and guards are excluded. Damage from accident, misuse or abuse, lack of reasonable care, attachments not provided with the product, or loss of parts is not covered. To request warranty service, go to www.philips.com/support or call 1-800-243-3050.