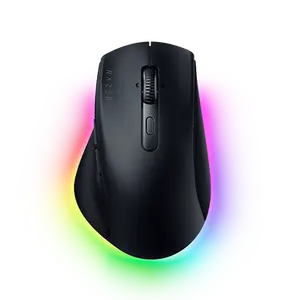
Razer Pro Click V2
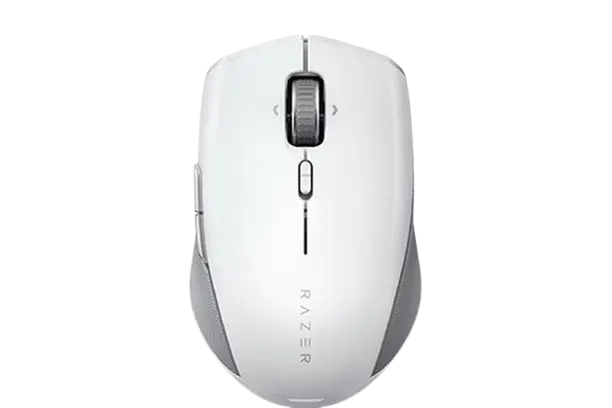
The Razer Pro Click V2 is a mouse that connects three ways: by USB cable, through the included 2.4GHz HyperSpeed Wireless dongle, or over Bluetooth. A mode switch on the underside selects wired or wireless use. The Connectivity button then moves between the HyperSpeed connection and three Bluetooth slots. It has a Razer Focus Pro 30K Optical Sensor, a Razer HyperScroll tilt wheel with a Scroll mode button for switching between Free-Spinning and Tactile Cycling, two side buttons (Mouse button 4 and Mouse button 5), and Razer Chroma RGB underglow that also shows connection status.
The default sensitivity is 1600 DPI, with five DPI stages available. Razer Synapse is the companion app for button remapping, DPI and polling rate, lighting, macros and profiles. It also enables the AI Prompt Master function on the HyperScroll wheel.
What’s in the Box
- Razer Pro Click V2 mouse
- 2.4GHz HyperSpeed Wireless dongle
- USB Type A to USB Type C cable
- Important Product Information Guide
Controls and Parts
The guide labels the mouse with letters A through M. The table below lists each part.
| Label | Part | Notes |
| A | Left mouse button | |
| B | Right mouse button | |
| C | Razer HyperScroll tilt wheel / AI Prompt Master button | Press and hold for AI Prompt Master. Razer Synapse is required. |
| D | Scroll mode button | Switches between Free-Spinning mode and Tactile Cycling mode |
| E | Mouse button 5 | |
| F | Mouse button 4 | |
| G | Razer Chroma RGB underglow | Also shows connection status |
| H | USB Type C port | |
| I | PTFE mouse feet | |
| J | Mode switch | Wireless (green) or Wired/Off (red) |
| K | Razer Focus Pro 30K Optical Sensor | |
| L | Connectivity button | Press to switch connection (HyperSpeed/Bluetooth). Press and hold for Bluetooth pairing. |
| M | USB dongle compartment |
DPI Stages
The DPI stages are 400, 800, 1600 (default), 3200 and 6400. You can customize the DPI stages and polling rate in Razer Synapse.
System Requirements
- Mouse connection: a USB Type A port or Bluetooth connectivity.
- Razer Synapse: Windows 10 64-bit (or higher), or macOS 15 with Apple Silicon “M” series (or higher).
- Software installation: an internet connection.
Serial Number and Warranty Registration
The serial number (S/N) is on the underside of the mouse. The guide’s illustration shows it near the edge of the underside. The guide also shows a 2-year warranty badge and invites you to register the product at razerid.razer.com/warranty. The current Limited Product Warranty terms are at razer.com/warranty. The guide also says the warranty is not valid outside the product’s intended region.
Charging the Mouse
- Connect the mouse to your computer’s USB Type A port using the provided USB Type A to USB Type C cable.
- Allow about 4 hours to charge. The guide shows “±4 Hours.”
For best results, connect the mouse directly to your computer’s USB port with the provided cable.
The guide’s charging illustration shows the underglow blinking red and labels it “Critical.”
Connecting to Your Device
Wired Mode
- Move the mode switch down, to the Wired position.
- Connect the mouse to a USB Type A port on your computer with the USB Type A to USB Type C cable.
Connection Slots and Underglow Colors
In both wireless modes, press the Connectivity button to toggle between devices and slots. The underglow shows which slot is active:
| Assigned Slot | Underglow Indicator Color |
| HyperSpeed (2.4GHz) | White |
| Bluetooth slot 1 | Blue |
| Bluetooth slot 2 | Green |
| Bluetooth slot 3 | Yellow |
2.4GHz Wireless Mode
- Take the 2.4GHz HyperSpeed Wireless dongle from the USB dongle compartment on the underside of the mouse.
- Plug the dongle into a USB Type A port on your computer.
- Move the mode switch up, to the Wireless position.
- Watch the underglow. Fast-blinking white means the mouse is connecting. Static white for 3 seconds means it is connected.
Install Razer Synapse when prompted, or download the installer from razer.com/synapse.
Bluetooth Mode: First-Time Pairing
- Move the mode switch up, to the Wireless position.
- Press the Connectivity button repeatedly to cycle between the Bluetooth slots.
- When the underglow blinks slowly, the mouse is pairing.
- On your computer, open Settings, then Bluetooth, and select PCV2.
- When the underglow is static for 3 seconds, the mouse is paired.
Re-Pairing the Mouse
- Press the Connectivity button repeatedly to cycle to the Bluetooth slot you want to re-pair.
- Press and hold the Connectivity button for 3 seconds to activate pairing.
- When the underglow blinks slowly, the mouse is pairing.
- On your computer, open Settings, then Bluetooth, and select PCV2.
- When the underglow is static for 3 seconds, the mouse is paired.
Connection Status Lights
| Underglow Behavior | Meaning |
| Fast-blinking white | Connecting (2.4GHz) |
| Static white for 3 seconds | Connected (2.4GHz) |
| Slow blinking | Bluetooth pairing |
| Static for 3 seconds | Bluetooth paired |
| Blinking red | Labeled “Critical” in the charging illustration |
Everyday Operation
Switching Scroll Modes
Press the Scroll mode button to switch the HyperScroll wheel between Tactile Cycling and Free-Spinning.
Invoking the AI Prompt Master
Press and hold the HyperScroll wheel. The guide’s illustration marks the hold as 1 second. This function requires Razer Synapse.
Configuring the Mouse with Razer Synapse
The guide covers the New Razer Synapse app. It says its overview may only partially cover the features of your device. Synapse needs an internet connection to install, update, access and save cloud-based features. A Razer ID account is recommended but optional. Features are subject to change based on the app version, connected devices and supported add-ons. In Synapse, you can customize DPI, lighting and button configurations, and create profiles for different tasks.
The Pro Click V2 Tab
This is the main tab for the mouse. It covers button assignments, stored profiles, DPI sensitivity, polling rate and lighting. Changes are saved automatically to your local system and cloud storage.
- Customize: change the mouse’s button assignments.
- Hypershift: a secondary set of button assignments active while the Hypershift key is held. By default the Hypershift key is the fn key of a Razer Synapse-supported keyboard, but you can set any mouse button as the Hypershift key.
- App Profile: a set of button mappings for one app. Select a thumbnail to enable or edit a profile. Use the delete button to remove one, or the add button to add an app.
- Profile Switching: choose Auto-Switch to change profiles automatically based on the app, or Manual Selection to keep one profile active.
Remapping Buttons
Select the Remap Menu button to see all current assignments, or select a specific assignment on the Customize tab. Each button can be changed to one of the following:
| Function | What it does |
| Default | Returns the button to its original setting |
| AI Launcher | Opens an overlay for AI queries, starting on the AI Prompt Master tab or the AI Chat tab |
| Keyboard Function | Assigns a keyboard function. Turbo mode repeats it while the button is held. |
| Mouse Function | Left Click, Right Click, Scroll Click, Double Click, Scroll Up, Scroll Down, Mouse Button 4 (Backward in most browsers), Mouse Button 5 (Forward in most browsers), Scroll Left, Scroll Right. Turbo mode is available for some. |
| Sensitivity | Sensitivity Clutch, Sensitivity Stage Up, Sensitivity Stage Down, On-The-Fly Sensitivity, Cycle Up Sensitivity Stages, Cycle Down Sensitivity Stages |
| Macro | Runs a prerecorded sequence. Visible only when the Macro module is installed. |
| Inter-device | Changes the functionality of other Razer Synapse-enabled devices |
| Switch Profile | Loads a new set of button assignments, with an on-screen notification |
| Switch Chroma Effect | Switches Chroma Effect Profiles in Chroma Studio. Visible only when the Chroma Studio module is installed. |
| Razer Hypershift | Activates Hypershift mode while the button is held |
| Launch | Opens an app or a website |
| Multimedia | Volume Down, Volume Up, Mute Volume, Mic Volume Up, Mic Volume Down, Mute Mic, Mute All, Play / Pause, Previous Track, Next Track |
| Windows Shortcuts | Assigns a Windows shortcut command |
| Text Function | Types prewritten text, with full Unicode support |
| Disable | Makes the button unusable |
The Sensitivity options work as follows:
- Sensitivity Clutch: switches to a predefined DPI while the button is held, then returns to the previous sensitivity on release.
- Sensitivity Stage Up / Down: raises or lowers the current sensitivity by one stage.
- On-The-Fly Sensitivity: press the designated button and move the scroll wheel up or down to raise or lower the DPI.
- Cycle Up / Cycle Down Sensitivity Stages: moves one stage at a time and wraps around at the highest or lowest stage.
Performance Settings
- Sensitivity Stages: create up to 5 preset sensitivity values and cycle through them with the DPI cycle button or the DPI Stage Up / Down buttons. Hovering over a stage lets you toggle it or enable Enable X-Y for it.
- Polling Rate: select your preferred polling rate. A higher rate means the computer receives mouse status information more often.
- Wireless Power Saving: extend battery life by adjusting when the mouse goes to sleep after inactivity.
Lighting Settings
- Brightness: toggle lighting off, or use the slider to raise or lower brightness.
- Switch Off Lighting: turn lighting off when your display turns off, or after a set idle time, to save power.
- Smart Dimming: saves battery life in Wireless Mode.
- Advanced Effects: choose a Chroma Effect Profile, or press Launch Chroma Studio to build your own.
| Quick Effect | Description | Setup |
| Audio meter | Lights up according to audio level with a default color spectrum | Select a Color Boost level |
| Breathing | Fades the selected color(s) in and out | Select up to 2 colors or randomize |
| Fire | Warm colors that mimic flames | None needed |
| Reactive | Lights up when you click any mouse button | Select a color and a duration |
| Spectrum cycling | Cycles through 16.8 million colors indefinitely | None needed |
| Starlight | Each LED fades in and out at random times and durations | Select up to 2 colors or randomize, and select a duration |
| Static | Stays lit in the selected color | Select a color |
| Wave | Lighting scrolls in the selected direction | Select a wave direction |
Some effects may not be available on every device. Only other Razer devices that support the selected effect will synchronize through the Chroma Sync button. Indicator LEDs are not customizable.
Linked Games, Macros and Synapse Settings
- Linked Games: link apps to your peripherals so the mouse switches to a chosen profile whenever the app launches. Add apps manually, scan for them, or drag and drop an executable file in the Devices subtab.
- Macros: record keystrokes, button presses and cursor movements. Recording options are Start Delay (1 to 5 seconds), Shortcut Key, Delay Settings and Mouse Movement Tracking. The Insert menu adds delays, keystrokes, button presses, macro groups, app launches, commands, text and loops. The Exchange tab lets you browse and download community macros.
- Settings: options include Auto Launch, Notifications, Recommendations, Tutorials Reset, Profile Migration (from Synapse 3 to the new Synapse), Device Lighting (which app controls lighting), Language and About.
Safety, Comfort and Care
Safety Guidelines
- If you have trouble operating the device and troubleshooting does not work, unplug the device and contact the Razer hotline or go to support.razer.com.
- Do not take the device apart. Doing so voids the warranty. Do not operate it under abnormal current loads.
- Keep the device away from liquid, humidity or moisture.
- Operate the device only within 0°C (32°F) to 40°C (104°F). If the temperature goes outside this range, unplug and/or switch off the device and let the temperature stabilize.
- Avoid looking directly at the tracking beam or pointing it at anyone’s eye. The beam is not visible to the naked eye and is set to Always-On mode.
Comfort
- Place the keyboard and monitor directly in front of you, with the mouse next to the keyboard.
- Keep the mouse and keyboard at or below elbow height.
- Keep your feet supported, your posture straight and your shoulders relaxed.
- Keep your wrist relaxed and straight, and avoid bending, extending or twisting your hands for long periods.
- Avoid resting your wrists on hard surfaces for long periods. Use a wrist rest.
- Customize keys to reduce repetitive or awkward motions.
- Do not sit in one position all day. Get up and stretch your arms, shoulders, neck and legs.
If you feel pain, numbness or tingling in your hands, wrists, elbows, shoulders, neck or back, consult a qualified medical doctor immediately.
Maintenance and Use
Once a month, unplug the device from the computer and clean it with a soft cloth or cotton swab to prevent dirt buildup. Do not use soap or harsh cleaning agents. Some surfaces cause undue wear on the mouse feet, which then need constant care and eventual replacement. Razer recommends a premium Razer mouse mat. The sensor is tuned for Razer mouse mats and tracks best on them.
Frequently Asked Questions
How long does it take to charge the Razer Pro Click V2?
The guide shows about 4 hours (“±4 Hours”). Connect the mouse to your computer’s USB Type A port with the included USB Type A to USB Type C cable. For best results, plug it directly into the computer’s USB port rather than another device.
How do I use the Razer Pro Click V2 with the cable?
Move the mode switch on the underside down to Wired. Then plug the USB Type A to USB Type C cable into a USB Type A port on your computer. The Wired/Off position is marked in red on the switch.
How do I connect it with the 2.4GHz HyperSpeed dongle?
Take the dongle from the USB dongle compartment on the underside and plug it into a USB Type A port. Then move the mode switch up to Wireless. Fast-blinking white underglow means the mouse is connecting. Static white for 3 seconds means it is connected.
How do I pair it over Bluetooth?
Move the mode switch up to Wireless. Press the Connectivity button repeatedly to cycle to a Bluetooth slot. Slot 1 is blue, slot 2 is green and slot 3 is yellow. When the underglow blinks slowly, open Settings, then Bluetooth, on your computer and select PCV2. Static underglow for 3 seconds confirms the pairing.
How do I re-pair the mouse to a Bluetooth slot?
Press the Connectivity button repeatedly to reach the slot you want. Press and hold the button for 3 seconds to start pairing. When the underglow blinks slowly, select PCV2 in your computer’s Bluetooth settings. The pairing is complete when the underglow is static for 3 seconds.
How do I switch between my devices or connection types?
In either wireless mode, press the Connectivity button to toggle between the HyperSpeed connection and the three Bluetooth slots. The underglow color shows where you are: white for HyperSpeed, blue for Bluetooth slot 1, green for slot 2 and yellow for slot 3.
How do I change the scroll wheel mode?
Press the Scroll mode button, which is below the wheel. Each press switches the HyperScroll wheel between Tactile Cycling and Free-Spinning.
How do I use the AI Prompt Master?
Press and hold the HyperScroll wheel. The guide’s illustration marks the hold as 1 second. This function requires Razer Synapse. You can also assign an AI Launcher function to a button in Synapse. It opens an overlay for AI queries, starting on either the AI Prompt Master tab or the AI Chat tab.
What are the default DPI settings, and can I change them?
The DPI stages are 400, 800, 1600 (default), 3200 and 6400. In Razer Synapse’s Performance tab you can create up to five sensitivity stages and adjust the polling rate. You can then cycle through the stages with the DPI cycle button or the DPI Stage Up / Down buttons.
What do I need to install Razer Synapse?
You need Windows 10 64-bit (or higher) or macOS 15 with an Apple Silicon “M” series chip (or higher). You also need an internet connection for installation. Install it when prompted, or download it from razer.com/synapse. A Razer ID account is recommended but optional.
Where do I find the serial number, and how do I register for the warranty?
The serial number (S/N) is on the underside of the mouse. You can register the product at razerid.razer.com/warranty. The guide shows a 2-year warranty badge and directs you to razer.com/warranty for the current terms.
How do I clean the mouse, and what temperature range is safe?
Once a month, unplug the mouse and wipe it with a soft cloth or cotton swab. Do not use soap or harsh cleaning agents. Operate it only between 0°C (32°F) and 40°C (104°F). If the temperature goes outside that range, unplug and/or switch it off and let it stabilize.