| Field | Details |
| Document Title | 6-Slice Toaster Oven User Manual |
| Document Type | User Manual / Instruction Manual |
| Brand Name | Oster |
| Product Name | 6-Slice Toaster Oven |
| Model Number(s) | 6058 |
| PDF File Size | 269.6 KB |
| Number of Pages | 13 |
| Languages Covered | English, Spanish, French |
Oster 6-Slice Toaster Oven 6058
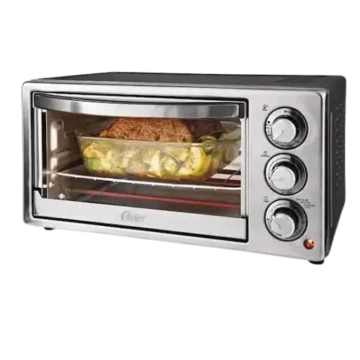
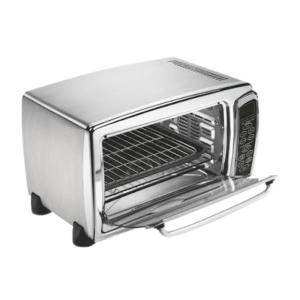
The Oster 6-Slice Toaster Oven 6058 is a countertop cooking appliance designed for baking, convection baking, broiling, toasting, preparing pizza, dehydrating, and defrosting foods. Its electronic control panel provides separate cooking functions, adjustable time and temperature settings, and a digital clock display.
The toaster oven features a removable wire rack with three positioning options, a baking pan, a broiling rack, a removable crumb tray, and a glass door. The interior includes easy-clean walls and a built-in lamp for viewing food during operation.
The convection fan circulates heated air to help food cook more evenly and quickly. For everyday use, the toaster oven provides dedicated settings for toasting bread and bagels, preparing 9–12-inch pizzas, and using the Bake or Broil functions.
The appliance also includes preset temperatures for specific cooking functions. The Pizza setting operates at 400°F, Dehydrate at 185°F, and Defrost at 150°F.
The Oster 6058 is intended for household use and operates from a 120-volt AC electrical outlet. Proper rack placement, cooking settings, cleaning, and ventilation are important for safe operation and consistent cooking results.
Technical Specifications
| Specification | Details |
| Brand | Oster |
| Model Number | 6058 |
| Product Type | Countertop Toaster Oven |
| Toasting Capacity | 6 slices |
| Electrical Supply | 120V AC |
| Cooking Functions | Bake, Convection Fan Bake, Broil, Toast, Pizza, Dehydrate, Defrost |
| Control Type | Electronic push-button controls |
| Display | Digital time display |
| Clock Function | Yes |
| Temperature Adjustment | Available on supported cooking functions |
| Cooking Time Adjustment | Available on supported functions |
| Toast Shade Adjustment | Yes |
| Pizza Size | 9–12 inches |
| Pizza Temperature | Fixed at 400°F |
| Pizza Default Time | 20 minutes |
| Dehydrate Temperature | Fixed at 185°F |
| Defrost Temperature | Fixed at 150°F |
| Preheating Procedure | 7-minute timed preheat |
| Rack Positions | 3 |
| Convection Fan | Yes |
| Interior Lamp | Yes |
| Glass Door | Yes |
| Removable Crumb Tray | Yes |
| Interior | Easy-clean walls |
| Electrical Plug | Polarized plug |
| Recommended Wall Clearance | Minimum 6 inches on all sides |
| Intended Use | Household only |
| Warranty | One-year limited warranty |
Parts and Components
The Oster 6058 has eight main components identified in the product diagram.
| Part Number | Component | Description |
| 1 | Removable Wire Rack | Supports food and cookware inside the oven. |
| 2 | Time Display | Shows clock information and selected cooking time. |
| 3 | Control Buttons | Select cooking functions and adjust operating settings. |
| 4 | External Removable Crumb Tray | Collects crumbs for cleaning. |
| 5 | Glass Door | Provides access to the cooking chamber and allows food to be viewed. |
| 6 | Easy-Clean Interior Walls | Interior surfaces designed for easier cleaning. |
| 7 | Baking Pan and Broiling Rack | Accessories used for baking and broiling food. |
| 8 | Three Rack Positions | Allow the wire rack to be positioned according to food size and browning requirements. |
Removable Wire Rack
The wire rack supports bread, pizza, baking pans, and other suitable foods during cooking.
The oven provides three rack positions to accommodate different food sizes and browning requirements.
For the best toasting and pizza results, the rack should be placed in the upward-facing position on the middle rack guide.
Baking Pan
The baking pan holds food during baking and convection cooking.
It is also used with the broiling rack when preparing foods under the Broil function.
Broiling Rack
The broiling rack fits inside the baking pan to form a broiler pan.
Food is placed on the broiling rack, and the assembled pan is positioned on the oven’s wire rack.
External Removable Crumb Tray
The crumb tray collects crumbs that fall during toasting and cooking.
It should be emptied frequently to prevent food accumulation and burning odors.
Glass Door
The glass door allows food to be monitored during cooking.
The door must be opened fully when removing finished food.
Care must be taken because the door and surrounding metal surfaces can become hot.
Interior Lamp
The built-in lamp illuminates the cooking chamber.
The Lamp button on the control panel switches on the interior light.
Control Panel and Button Functions
The Oster 6058 uses electronic controls to select cooking functions, adjust cooking time and temperature, set the clock, and start or stop operation.
Control Panel Button Guide
| Button | Function |
| Oven | Cycles through Bake, Fan Bake, and Broil. |
| Toast | Selects the toasting function. |
| Pizza | Selects the dedicated pizza cooking program. |
| Dehydrate | Selects the food dehydration function. |
| Defrost | Selects the food defrosting function. |
| Up Arrow / Down Arrow | Adjust cooking time, temperature, clock time, or toast shade. |
| Timer/Temp | Switches between time and temperature settings for Bake, Fan Bake, and Broil. |
| Clock | Sets the digital clock. |
| Lamp | Turns on the interior lamp. |
| Stop/Cancel | Stops heating or cancels the selected function. |
| Start | Begins the selected cooking operation. |
Oven Button
The Oven button selects among three cooking functions.
| Number of Presses | Selected Function |
| Once | Bake |
| Twice | Convection Fan Bake |
| Three Times | Broil |
The selected function appears on the display.
Toast Button
The Toast button selects the toasting program.
The arrow buttons adjust the desired toast shade.
Lighter settings are suitable for lighter breads and waffles, while darker settings are appropriate for darker breads, muffins, and English muffins.
Pizza Button
The Pizza button activates the dedicated pizza program.
When selected, the display shows a default cooking time of 20:00.
The cooking time can be adjusted with the arrow buttons.
The Pizza function uses a fixed temperature of 400°F.
Dehydrate Button
The Dehydrate button selects the dehydration function.
The temperature is preset to 185°F.
The cooking time is adjusted with the arrow buttons.
Defrost Button
The Defrost button selects the defrosting function.
The temperature is preset to 150°F.
The time can be adjusted using the arrow buttons.
Timer/Temp Button
The Timer/Temp button changes between temperature and cooking time adjustment for Bake, Fan Bake, and Broil.
After selecting one of these functions, the arrow buttons are used to change the applicable setting.
Stop/Cancel Button
The Stop/Cancel button stops heating or cancels a selected cooking function.
To turn the appliance off before disconnecting it from electrical power, press Stop/Cancel twice.
Start Button
The Start button begins the selected cooking operation after the required settings have been entered.
Important Safety Instructions
The Oster 6058 toaster oven operates at high temperatures and must be used with appropriate precautions to prevent burns, fire, and electrical hazards.
General Safety Precautions
- Read all operating instructions, product labels, and warnings before using the toaster oven.
- Do not touch hot surfaces while the appliance is operating.
- Always use oven mitts when handling hot materials or removing cooking accessories.
- Allow metal components to cool before cleaning, installing, or removing them.
- Use the oven handles when moving the appliance.
- Unplug the toaster oven when it is not in use or before cleaning.
- Make sure the oven is turned off before disconnecting the power cord.
- Never immerse the appliance in water or another liquid.
- Do not allow children to operate the toaster oven.
- Close supervision is required when the appliance is used near children.
- Do not operate the appliance with a damaged or frayed power cord or plug.
- Do not use the appliance if it has malfunctioned, fallen, or become damaged.
- Do not use accessories that are not recommended by the manufacturer.
- Do not use the toaster oven outdoors or for commercial purposes.
- Do not allow the power cord to hang over a table or countertop or touch hot surfaces.
- Do not place the appliance near a hot gas burner, electric burner, or inside a heated oven.
- Use extreme caution when cooking with containers made from materials other than metal or glass.
Fire Prevention and Ventilation
The toaster oven must have sufficient clearance from surrounding objects during operation.
- Keep the appliance at least 6 inches away from walls on all sides.
- Remove the power cords of other appliances from behind the oven.
- Do not cover the toaster oven while it is operating.
- Keep curtains, draperies, and other flammable materials away from the appliance.
- Do not place objects on top of the oven during operation.
- Do not place paper, cardboard, plastic, or other flammable materials inside the cooking chamber.
- Do not cover the oven with aluminum foil because it can cause overheating.
- Do not insert oversized foods or metal utensils that could create a fire or electrical hazard.
Hot Surfaces and Grease Safety
The baking pan, broiling rack, wire rack, oven door, and surrounding metal surfaces can become hot during operation.
Oven mitts must be used when handling hot accessories.
Extreme caution is required when removing the broiling pan or disposing of hot grease.
The appliance must be allowed to cool completely before cleaning or removing accessories.
Electrical Safety
For products purchased in the United States and Canada, the toaster oven has a polarized electrical plug.
One blade is wider than the other, allowing the plug to fit into a polarized electrical outlet in only one direction.
If the plug does not fit properly:
- Remove the plug from the outlet.
- Reverse its orientation.
- Try inserting it again.
- If it still does not fit, contact a qualified electrician.
The plug must not be modified.
Extension Cord Safety
The appliance is supplied with a short power cord to reduce the risk of tripping or entanglement.
If an extension cord is used:
- Its electrical rating must be at least equal to the rating of the toaster oven.
- It must not hang over the countertop or table.
- It must be positioned where children cannot pull it.
- It must not create a tripping hazard.
How to Turn Off and Disconnect the Oven
- Press Stop/Cancel twice to turn off the appliance.
- Make sure heating has stopped.
- Remove the electrical plug from the wall outlet.
Before First Use
The toaster oven must be unpacked, cleaned, and positioned correctly before its first cooking cycle.
Step 1: Remove Packaging Materials
Remove any stickers from the exterior surface of the toaster oven.
Open the glass door and remove all printed documents, paper, and packing materials from inside the cooking chamber.
Step 2: Clean the Accessories
Clean the removable wire rack, tray, and baking pan using:
- Hot water
- A small amount of dishwashing liquid
- A non-abrasive sponge or cleaning pad
Rinse and dry the accessories thoroughly.
The main toaster oven must not be immersed in water.
Step 3: Dry the Appliance
Make sure the toaster oven and accessories are completely dry before use.
Step 4: Position the Oven
Place the toaster oven on a flat countertop in an open area.
Make sure the electrical cord can reach a suitable wall outlet.
Maintain at least 6 inches of clearance from surrounding walls.
Step 5: Connect Electrical Power
Plug the toaster oven into a 120-volt AC electrical outlet.
The toaster oven is now ready for clock setup and cooking.
How to Set the Clock
The Oster 6058 includes a digital clock that can be adjusted using the Clock button and arrow controls.
Clock Setup Instructions
- Press and hold the Clock button for three seconds.
- Wait until the clock display begins flashing.
- Use the Up and Down arrow buttons to set the hour.
- Press Clock again.
- Use the arrow buttons to set the minutes.
- Press Clock once more to save the selected time.
The clock will display the newly selected time.
How to Preheat the Toaster Oven
The oven can be preheated before baking or other cooking operations that require a heated cooking chamber.
Preheating Instructions
- Position the wire rack in the required rack guide.
- Press the Oven button once to select Bake.
- Use the arrow buttons to select the desired temperature.
- Press Timer/Temp.
- Press the Down arrow until the display shows seven minutes.
- Press Start.
The oven begins heating for the selected seven-minute period.
The wire rack should be positioned before preheating begins.
How to Use the Bake Function
The Bake function is used for conventional oven baking.
Both heating elements cycle on and off during operation to maintain the selected temperature.
Step-by-Step Baking Instructions
- Place the wire rack into the desired rack position before heating the oven.
- Arrange the food directly on the wire rack or inside the baking pan.
- Press the Oven button once to select Bake.
- Use the Up and Down arrows to select the desired cooking temperature.
- Press Timer/Temp.
- Use the arrow buttons to select the desired baking time.
- Press Start to begin baking.
- Allow the food to cook for the selected time.
- When baking is complete, open the oven door fully.
- Carefully remove the food using oven mitts.
Heating Element Operation During Baking
Both heating elements switch on and off as needed to maintain the selected temperature.
This cycling is part of normal operation.
How to Use Convection Fan Bake
The Convection Fan Bake function circulates heated air through the oven.
The fan helps food cook more evenly and quickly than with conventional heating alone.
Step-by-Step Convection Baking Instructions
- Position the oven rack before heating.
- Arrange food on the wire rack or in the baking pan.
- Press the Oven button twice.
- Wait until Fan Bake appears on the display.
- Use the arrow buttons to select the desired temperature.
- Press Timer/Temp.
- Use the arrow buttons to select the required cooking time.
- Press Start.
- Allow the food to cook.
- Open the door fully when cooking is complete.
- Carefully remove the food.
Convection Heating Element Operation
During convection baking, both heating elements cycle on and off to maintain the selected temperature.
The convection fan operates to circulate air through the cooking chamber.
How to Use the Broil Function
The Broil function uses the upper heating element to cook food.
The supplied broiling rack and baking pan are used together to form a broiler pan.
Preparing the Broiling Pan
- Place the broiling rack inside the baking pan.
- Arrange the food on the broiling rack.
- Position the oven’s wire rack at the required height.
- Place the assembled broiling pan on the wire rack.
Step-by-Step Broiling Instructions
- Position the wire rack before heating.
- Prepare the broiling pan.
- Place the food on the broiling rack.
- Insert the broiling pan into the oven.
- Press the Oven button three times.
- Wait until Broil appears on the display.
- Press Timer/Temp.
- Use the arrow buttons to select the desired broiling time.
- Press Start.
- Allow the selected cooking time to finish.
- Open the oven door fully.
- Carefully remove the food.
Broiling Safety
The upper heating element cycles on and off to maintain the required temperature.
The broiling pan and collected grease may be extremely hot.
The toaster oven must not be left unattended during broiling.
How to Use the Toast Function
The Toast function is used for bread, bagels, waffles, muffins, and similar foods.
Toast shade can be adjusted according to the type of food and desired browning.
Step-by-Step Toasting Instructions
- Position the wire rack before heating.
- Arrange the bread or other food on the rack.
- Press Toast.
- Use the Up and Down arrows to select the desired toast shade.
- Press Start.
- Allow the toasting cycle to finish.
- Open the oven door fully.
- Carefully remove the food.
Choosing the Correct Toast Shade
Different bread types require different settings.
| Food Type | Recommended Setting |
| Light-Colored Bread | Lighter toast setting |
| Waffles | Lighter toast setting |
| Darker Bread | Darker toast setting |
| Muffins | Darker toast setting |
| English Muffins | Darker toast setting |
The toast shade should be selected according to the desired level of browning.
Recommended Rack Position for Toasting
For the best toasting results, position the wire rack facing upward on the middle rack guide.
How to Use the Pizza Function
The dedicated Pizza function is designed for pizzas measuring approximately 9–12 inches.
The default cooking time is 20 minutes.
The Pizza program uses a fixed temperature of 400°F.
Step-by-Step Pizza Instructions
- Position the wire rack before heating.
- Place the pizza directly on the wire rack.
- Press Pizza.
- The display will show the default time of 20:00.
- Use the arrow buttons to adjust the cooking time if required.
- Press Start.
- Allow the selected cooking cycle to finish.
- Open the oven door fully.
- Carefully remove the pizza.
Pizza Temperature Setting
| Setting | Value |
| Pizza Temperature | 400°F |
| Default Cooking Time | 20 minutes |
| Pizza Size | 9–12 inches |
| Temperature Adjustment | Fixed |
The temperature cannot be changed while using the Pizza function.
If a different temperature is required, cancel Pizza and use the Bake function instead.
Recommended Rack Position for Pizza
For the best pizza results, position the wire rack facing upward on the middle rack guide.
How to Use the Dehydrate Function
The Dehydrate function is designed for dehydrating foods.
The oven uses a preset temperature of 185°F.
Step-by-Step Dehydrating Instructions
- Press Dehydrate.
- The temperature control is automatically set to 185°F.
- Use the Up and Down arrow buttons to select the desired time.
- Press Start.
The appliance begins the dehydration program using the selected time.
Dehydrate Settings
| Setting | Value |
| Function | Dehydrate |
| Temperature | 185°F |
| Cooking Time | Adjustable using arrow buttons |
How to Use the Defrost Function
The Defrost function is used to thaw frozen foods.
The function operates at a preset temperature of 150°F.
Step-by-Step Defrosting Instructions
- Do not preheat the oven.
- Press Defrost.
- The temperature is automatically set to 150°F.
- Use the arrow buttons to select the required time.
- Press Start.
Defrosting Meat and Fish
The manufacturer recommends allowing approximately 15–20 minutes per side when defrosting meat or fish.
Food must be cooked promptly after thawing.
Defrost Settings
| Setting | Value |
| Function | Defrost |
| Temperature | 150°F |
| Preheating | Do not preheat |
| Meat or Fish Defrosting Time | Approximately 15–20 minutes per side |
| Time Adjustment | Adjustable using arrow buttons |
How to Position the Oven Rack
The Oster 6058 provides three rack positions to accommodate different food sizes and browning requirements.
Rack Position Guide
| Rack Position | Use |
| Upper Position | Rack placement option depending on food size and browning needs |
| Middle Position | Recommended for toast and pizza when the rack faces upward |
| Lower Position | Rack placement option depending on food size and browning needs |
How to Adjust the Rack
- Allow the oven to cool before removing the wire rack.
- Open the glass door.
- Remove the rack.
- Select one of the three available rack guides.
- Reinsert the rack in the required position.
For the best toasting and pizza results, use the upward-facing rack orientation on the middle guide.
Cleaning and Maintenance Instructions
The Oster 6058 must be unplugged and allowed to cool completely before cleaning.
Regular cleaning prevents crumbs and food particles from accumulating inside the appliance.
How to Clean the Toaster Oven
- Press Stop/Cancel twice to turn off the appliance.
- Unplug the power cord.
- Allow the toaster oven to cool completely.
- Wipe the oven surfaces with a damp cloth.
- Use mild, soapy water to remove food residue.
- Empty the crumb tray.
- Clean the removable racks as appropriate.
- Allow the cleaned components to dry before using the oven again.
The main appliance must never be immersed in water.
Cleaning the Interior
Use a damp cloth with mild, soapy water to clean the interior surfaces.
Abrasive cleaners, scrubbing brushes, and chemical cleaners must not be used because they can damage the oven’s coating.
Cleaning the Crumb Tray
The external removable crumb tray collects crumbs and food particles.
It should be emptied frequently to prevent excessive buildup.
Accumulated crumbs can contribute to burning odors during cooking.
Cleaning the Oven Racks
The toaster oven racks are dishwasher safe when placed on the top rack of the dishwasher only.
Cleaning Restrictions
The following must be avoided:
- Immersing the toaster oven in water.
- Using abrasive cleaning products.
- Cleaning with metal scouring pads.
- Using harsh chemical cleaners.
- Using scrubbing brushes that can damage the oven coating.
- Cleaning the appliance before it has cooled.
Pieces from metal scouring pads may break off and contact electrical components, creating a risk of electric shock.
Routine Maintenance
Other than the recommended cleaning procedures, no additional user maintenance is required.
Storage Instructions
The appliance must be completely cool, clean, and dry before storage.
How to Store the Toaster Oven
- Turn off the appliance.
- Disconnect it from the electrical outlet.
- Allow the toaster oven to cool completely.
- Remove remaining food particles and crumbs.
- Clean the appliance as instructed.
- Store it in a dry location.
Suitable storage locations include a table, countertop, or cupboard shelf.
When storing the toaster oven for an extended period, make sure no food residue remains inside.
Troubleshooting Guide
The following troubleshooting instructions cover the operating problems identified for the Oster 6058.
Quick Troubleshooting Table
| Problem | Possible Cause | Recommended Solution |
| Food is overcooked | Incorrect temperature or cooking time | Adjust the temperature or cooking time. |
| Food is undercooked | Incorrect time, temperature, or rack placement | Adjust the settings and check the rack position. |
| Burning smell | Food residue inside the oven, on heating elements, or in the crumb tray | Allow the appliance to cool and clean it. |
| Oven does not turn on | Appliance is unplugged | Connect it to a 120V AC outlet. |
| Oven does not start cooking | Cooking settings have not been selected or Start has not been pressed | Select the time and temperature as required, then press Start. |
| Only one heating element operates | Selected cooking function determines heating element operation | Check the selected function. |
| Heating elements turn on and off | Elements cycle to maintain temperature | Confirm that the intended cooking function is selected. |
| Cannot change cooking function | Current function must be canceled | Press Stop/Cancel before selecting another function. |
Food Is Overcooked or Undercooked
Possible causes:
- Incorrect temperature setting
- Incorrect cooking time
- Improper rack placement
Recommended Actions
- Adjust the selected cooking temperature.
- Adjust the cooking time to achieve the desired result.
- Check the wire rack position.
- Select another rack guide if necessary.
The toaster oven is smaller than a conventional oven, so it heats more quickly and may cook food in less time.
Burning Smell During Operation
A burning smell may result from accumulated food particles inside the oven, on the heating elements, or in the crumb tray.
Recommended Actions
- Turn off the oven.
- Unplug the power cord.
- Allow the appliance to cool.
- Clean the interior and crumb tray using the recommended cleaning method.
Oven Does Not Turn On
Possible causes:
- Appliance is not connected to electrical power.
- Cooking time or temperature has not been selected.
- Start has not been pressed.
Recommended Actions
- Confirm that the oven is plugged into a 120V AC electrical outlet.
- Select the required cooking function.
- Set the time and temperature as applicable.
- Press Start.
Only One Heating Element Is Working
The selected cooking function determines which heating element operates.
When the Broil function is selected, the upper heating element is used.
Recommended Action
Check that the correct cooking function has been selected.
When toasting, confirm that the oven has not been set to Broil.
Heating Elements Do Not Stay On Continuously
The heating elements automatically turn on and off to maintain the required cooking temperature.
This is normal operation.
Confirm that the selected cooking function is correct.
Cannot Change the Cooking Function
If the current cooking function cannot be changed, it must first be canceled.
Recommended Action
- Press Stop/Cancel.
- Select the required cooking function.
- Enter the necessary settings.
- Press Start.
Warranty Information
The Oster 6058 6-Slice Toaster Oven is covered by a one-year limited warranty provided by Sunbeam Products, Inc., doing business as Jarden Consumer Solutions, or Sunbeam Corporation (Canada) Limited in Canada.
Warranty Coverage
The manufacturer warrants that the product will be free from defects in materials and workmanship for one year from the original purchase date.
During the warranty period, Sunbeam may:
- Repair the defective appliance or component.
- Replace the defective product or component.
- Provide a new or remanufactured replacement.
- Provide a similar product of equal or greater value if the original product is unavailable.
Repair or replacement is determined by Sunbeam.
Warranty Eligibility
The warranty applies to the original retail purchaser.
It begins on the original retail purchase date and is not transferable.
The original sales receipt must be retained as proof of purchase.
Warranty Exclusions
The limited warranty does not cover normal wear or damage resulting from:
- Negligent operation
- Product misuse
- Incorrect electrical voltage or current
- Operation contrary to the instructions
- Unauthorized disassembly
- Unauthorized repair or modification
- Events such as fires, floods, hurricanes, or tornadoes
Warranty Limitations
The warranty contains limitations on certain implied warranties, incidental damages, consequential damages, and other liabilities.
These limitations may vary according to the applicable state, province, or jurisdiction.
The warranty grants specific legal rights, and additional rights may apply depending on local laws.
How to Obtain Warranty Service
Customers requiring warranty assistance must contact the manufacturer’s customer service department.
A convenient authorized service center address will be provided.
The appliance must not be returned directly to the manufacturer’s corporate addresses or to the original place of purchase for warranty service.
Customer Support Information
For product questions, warranty claims, and service assistance, the manufacturer provides the following contact information.
| Contact Type | Details |
| Brand | Oster |
| Customer Service | Sunbeam Consumer Service |
| United States Phone | 1-800-334-0759 |
| Canada Phone | 1-800-667-8623 |
| Official Website | www.oster.com |
United States Support
Sunbeam Products, Inc.
Doing business as Jarden Consumer Solutions
Boca Raton, Florida 33431
United States
Canada Support
Sunbeam Corporation (Canada) Limited
Doing business as Jarden Consumer Solutions
5975 Falbourne Street
Mississauga, Ontario L5R 3V8
Canada
Authorized Service
For examination, repair, or adjustment of a damaged or malfunctioning appliance, contact an authorized service facility.
Customer service can provide information about warranty service and the appropriate service center.
Frequently Asked Questions
1. How do I set the clock on the Oster 6058 toaster oven?
Press and hold Clock for three seconds until the display begins flashing. Use the arrow buttons to set the hour, then press Clock again. Set the minutes using the arrow buttons and press Clock once more to save the time.
2. How do I preheat the Oster 6058 toaster oven?
Place the wire rack in the required position before heating. Press Oven once to select Bake, then use the arrow buttons to select the desired temperature.
Press Timer/Temp and use the Down arrow until the display shows seven minutes. Press Start to begin preheating.
3. How do I use convection baking on the Oster 6058?
Place the food on the wire rack or in the baking pan. Press Oven twice until Fan Bake appears on the display. Use the arrow buttons to select the temperature, then press Timer/Temp to adjust the cooking time. Press Start.
The convection fan circulates heated air to help food cook more evenly and quickly.
4. What temperature does the Oster 6058 use for pizza?
The Pizza function operates at a fixed temperature of 400°F and has a default cooking time of 20 minutes. The time can be adjusted using the arrow buttons. To cook pizza at another temperature, cancel Pizza and select Bake.
5. How do I use the Defrost function on the Oster 6058?
Press Defrost without preheating the oven. The temperature is preset to 150°F. Use the arrow buttons to select the required time, then press Start.
For meat and fish, the manufacturer specifies approximately 15–20 minutes per side, followed by prompt cooking after thawing.
6. Why does only one heating element work on the Oster 6058?
The heating elements operate according to the selected cooking function. During Broil, the upper heating element is used. During Bake and Fan Bake, both heating elements cycle on and off to maintain the selected temperature. The selected cooking function should be checked if only one element appears to be operating.
7. Why won’t my Oster 6058 toaster oven turn on?
First, confirm that the appliance is connected to a 120V AC electrical outlet. Select the required cooking function and enter the time and temperature settings as applicable. Press Start to begin cooking. If the appliance is damaged or malfunctioning, it should be examined by an authorized service facility.
8. How do I clean the Oster 6058 toaster oven?
Turn off the oven, unplug it, and allow it to cool completely. Wipe the appliance with a damp cloth and mild, soapy water. Empty the removable crumb tray frequently to prevent food accumulation. The oven racks may be washed on the top rack of a dishwasher.
The appliance must never be immersed in water or cleaned using abrasive or chemical cleaners.