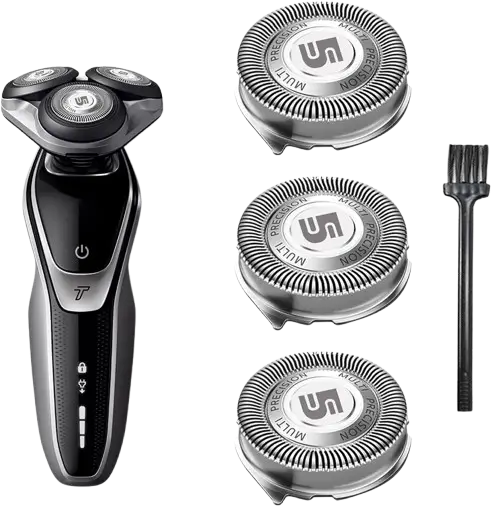
Philips Norelco Tripleheader Shaver S5000
The Philips Norelco Shaver 5000 Series is a rechargeable rotary electric shaver designed for wet and dry facial shaving. It features three rotary shaving heads, a built-in pop-up trimmer, battery status indicators, a cleaning reminder, and a travel lock that helps prevent accidental operation.
The shaver can be used on dry skin or with shaving foam or gel. Its waterproof construction also allows cordless shaving in the bath or shower and cleaning under running water. For electrical safety, the shaver operates only when disconnected from its charging cable.
The rechargeable battery provides up to 60 minutes of cordless operation after approximately one hour of charging. A five-minute quick charge supplies enough power for one complete shave.
The Philips Norelco Tripleheader Shaver also includes a three-level battery indicator that displays charging progress and remaining battery power. Its built-in pop-up trimmer can be used to groom sideburns, moustaches, and areas beneath the nose.
These operating instructions apply to the S5000 and S6000 Tripleheader Shaver series and cover charging, battery indicators, shaving techniques, trimming, cleaning, maintenance, travel lock operation, SH71 replacement heads, troubleshooting, and warranty support.
Product Overview and Features
The Philips Norelco Tripleheader Shaver uses three rotary shaving heads to remove facial hair growing in different directions. The shaving unit is designed to remain in contact with the skin while the shaver moves in circular motions.
The product supports cordless wet and dry shaving and includes removable shaving heads for routine cleaning and replacement.
Main Features
| Feature | Description |
| Tripleheader rotary shaving system | Three rotary shaving heads for removing facial hair. |
| Wet and dry shaving | Suitable for shaving dry or with water, shaving foam, or gel. |
| Waterproof construction | Allows cordless use in the bath or shower and rinsing under running water. |
| Rechargeable battery | Provides up to 60 minutes of cordless operation. |
| Quick charge | Approximately 5 minutes of charging provides enough energy for one complete shave. |
| USB charging | Charges using a certified 5 V USB power source. |
| Three-level battery indicator | Displays charging progress and remaining battery power. |
| Cleaning reminder | Indicates when the shaver should be cleaned. |
| Travel lock | Prevents accidental activation during storage or transportation. |
| Unplug-for-use reminder | Indicates that the shaver must be disconnected from charging power before use. |
| Pop-up trimmer | Trims sideburns, moustaches, and hair beneath the nose. |
| Removable shaving unit | Opens for cleaning and shaving head replacement. |
| Protective cap | Protects the shaving heads during storage. |
| Replaceable shaving heads | Uses Philips Norelco SH71 replacement heads. |
Parts and Components
The Philips Norelco Shaver 5000 Series consists of a rechargeable handle, rotary shaving unit, operating controls, and cleaning accessories.
Main Shaver Components
| Part No. | Component | Function |
| 1 | Pop-up trimmer | Trims sideburns, moustaches, and facial hair beneath the nose. |
| 2 | Trimmer release slide | Opens the built-in pop-up trimmer. |
| 3 | Shaving unit | Contains the three rotary shaving heads. |
| 4 | Shaving unit release button | Opens the shaving unit for cleaning and maintenance. |
| 5 | On/Off button | Switches the shaver on or off and controls the travel lock. |
| 6 | Handle | Houses the motor, rechargeable battery, and electronic controls. |
| 7 | Socket for small plug | Connects the USB charging cable to the shaver. |
| 8 | USB cable | Connects the shaver to a compatible USB power source. |
| 9 | Protection cap | Covers and protects the shaving heads. |
| 10 | Cleaning brush | Used for cleaning the shaver and removing debris. |
Internal Shaving Unit Components
The shaving unit contains removable components that can be accessed during thorough cleaning and replacement.
| Component | Function |
| Shaving head holder | Holds the three rotary shaving heads. |
| Cutters | Cutting components inside the shaving heads. |
| Guards | Precision-slotted components surrounding the cutters. |
| Retaining rings | Secure the shaving heads inside the holder. |
| Hair chamber | Collects hair removed during shaving. |
| Shaving head holder hinge | Connects the shaving head holder to the shaving unit. |
Each cutter and guard is a matching pair. Keep the original pairs together during cleaning.
Technical Specifications
| Specification | Details |
| Brand | Philips Norelco |
| Product | Tripleheader Shaver |
| Series | S5000, S6000 |
| Product type | Rechargeable rotary electric shaver |
| Shaving system | Three rotary shaving heads |
| Intended use | Facial shaving |
| Shaving operation | Wet and dry |
| Waterproof | Yes |
| Shower use | Supported |
| Operating method | Cordless only |
| Pop-up trimmer | Included |
| Battery type | Rechargeable lithium-ion |
| Full charging time | Approximately 1 hour |
| Quick charging time | Approximately 5 minutes |
| Quick charge capacity | Enough power for 1 complete shave |
| Maximum cordless runtime | Up to 60 minutes |
| Battery status indicator | 3 charging lights |
| USB charging voltage | 5 V |
| Minimum USB charging current | 1 A |
| Suitable USB power source example | Philips HQ87 |
| Charging source protection for moist environments | IPX4 splash-proof |
| Charging, operating, and storage temperature | 10°C–35°C (50°F–95°F) |
| Travel lock | Supported |
| Travel lock activation | Hold On/Off for 3 seconds |
| Shaving head cleaning frequency | After each use |
| Thorough shaving head cleaning | Once per month |
| Pop-up trimmer lubrication | Every 6 months |
| Shaving head replacement interval | Every 2 years |
| Replacement shaving heads | Philips Norelco SH71 |
| Warranty | 2 years |
| Money-back guarantee | 45 days, subject to conditions |
Important Safety Instructions
The Philips Norelco Tripleheader Shaver contains electrical components and a rechargeable lithium-ion battery.
Follow the safety instructions before charging, shaving, cleaning, or replacing parts to reduce the risk of electric shock, burns, fire, and personal injury.
Electrical Safety
- Read all instructions before using the shaver.
- Use only a certified USB power source rated at 5 V and at least 1 A.
- When charging in a moist environment, such as a bathroom, use an IPX4 splash-proof power source.
- Keep the USB cable and USB power source dry.
- Do not place or store the shaver where it may fall into a bathtub or sink while connected to electricity.
- Do not reach for a corded product that has fallen into water. Disconnect the power supply immediately.
- Do not immerse connected charging equipment in water or another liquid.
- Do not operate the shaver while it is connected to a power outlet.
- Remove the USB power source from the electrical outlet and disconnect the shaver before cleaning.
- Do not use a damaged USB cable or power source.
- Keep charging equipment away from heated surfaces.
- Do not use the USB power source near an electrical outlet containing an electric air freshener.
- Do not use an extension cord.
- Connect the USB power source directly to an electrical outlet.
- Do not use the product outdoors or in areas where aerosol sprays are being used or oxygen is being administered.
Warning: The shaver is waterproof, but it must be operated without a charging cable connected.
General Safety Precautions
- Use the product only for its intended household grooming purpose.
- Do not use accessories that Philips has not recommended.
- Check the shaving heads, cutters, and guards before every use.
- Do not use damaged cutters or guards, as they may cause injury.
- Do not operate the shaver if it has been dropped, damaged, or is not functioning correctly.
- Do not insert objects into the product’s openings.
- Use only original Philips replacement accessories and consumables.
- Do not apply excessive pressure while shaving.
- Do not use damaged or improperly assembled shaving components.
Battery Safety
The Philips Norelco Shaver contains a rechargeable lithium-ion battery.
- Do not open, modify, puncture, damage, or dismantle the battery.
- Do not expose the battery to fire.
- Do not heat the battery above 100°C (212°F).
- Do not place the shaver or its battery in a microwave oven or on an induction cooker.
- Do not short-circuit, overcharge, or reverse-charge the battery.
- Keep the shaver away from direct sunlight and high temperatures.
- Charge, use, and store the product between 10°C and 35°C (50°F and 95°F).
- Stop using and charging the shaver if it becomes unusually hot, produces an abnormal smell, changes color, or takes longer than normal to charge.
- Contact Philips if abnormal battery behavior occurs.
- Keep hands and battery components dry when handling batteries.
If a battery becomes damaged or leaks, avoid contact with the skin or eyes. If contact occurs, rinse immediately with water and seek medical care.
Safety for Children
The shaver is not intended for use by children or people with reduced physical, sensory, or mental capabilities unless they have received appropriate supervision or instructions from a person responsible for their safety.
Children should be supervised to prevent them from playing with the product.
Before First Use
Before using the Philips Norelco Shaver 5000 Series for the first time, inspect the shaving unit and charge the battery.
Initial Setup Instructions
- Remove the shaver and its accessories from the packaging.
- Check the shaving heads, cutters, and guards for visible damage.
- Make sure the shaving unit is correctly attached.
- Check that the shaver is switched off.
- Connect the supplied USB cable to a compatible power source.
- Charge the battery before regular use.
- Disconnect the charging cable before switching on the shaver.
A complete charge takes approximately one hour.
First-Time Shaving
The skin and beard may need time to adjust to a new rotary shaving system.
During initial use, the shave may not feel as close as expected, and mild facial irritation may occur.
Philips recommends using the shaver exclusively for three weeks to allow the skin and beard to adapt.
Charging the Philips Norelco Shaver 5000
The shaver charges through a USB cable connected to a suitable USB power source.
A USB power source is not included.
Use a certified 5 V power source rated at 1 A or higher. Philips identifies the HQ87 as an example of a suitable power source.
How to Charge the Shaver
- Make sure the shaver is switched off.
- Insert the small plug of the USB cable into the socket at the bottom of the shaver.
- Connect the USB plug to a certified USB power source.
- Plug the power source into an electrical outlet.
- Check the battery indicator lights.
- Allow the shaver to charge.
- After charging, disconnect the USB power source from the outlet.
- Remove the small plug from the shaver.
Important: The shaver cannot be operated while charging.
Charging Time and Battery Runtime
| Charging Information | Details |
| Full charging time | Approximately 1 hour |
| Quick charging time | Approximately 5 minutes |
| Quick charge capacity | 1 complete shave |
| Maximum cordless runtime | Up to 60 minutes |
Five-Minute Quick Charge
When the battery is nearly empty, the quick-charge function can provide enough power for one complete shave.
- Connect the switched-off shaver to the charging equipment.
- Allow it to charge for approximately five minutes.
- Check the bottom battery indicator.
- When the bottom indicator begins flashing after the quick-charge sequence, the battery has enough energy for one shave.
- Disconnect the USB cable.
- Use the shaver normally.
Battery Status Indicator Lights
The Philips Norelco Shaver 5000 uses three indicator lights to display the remaining battery power and charging status.
The number of illuminated bars shows the remaining charge when the shaver is picked up.
Battery Indicator Guide
| Indicator | Meaning |
| Bottom light flashes orange | Battery is almost empty. |
| Lights flash in sequence | Battery is charging. |
| Bottom light flashes, then becomes solid | Initial charging progress. |
| Second light flashes, then becomes solid | Battery charging is progressing. |
| All three lights remain solid | Battery is fully charged. |
| Lights switch off after approximately 30 minutes | Normal energy-saving behavior after full charging. |
| Unplug-for-use symbol flashes | Shaver must be disconnected from charging power before use. |
Low Battery Warning
When the battery is almost empty, the bottom battery status indicator flashes orange.
Recharge the shaver when this warning appears.
Charging Progress
During charging:
- The bottom battery indicator begins flashing.
- The bottom light becomes continuously illuminated.
- The second light starts flashing.
- The second light becomes solid.
- The remaining charging indicator follows the same sequence.
- When charging finishes, all three battery lights remain continuously illuminated.
Fully Charged Indicator
When the battery reaches full charge, all three battery indicator lights remain solid.
The indicators automatically switch off after approximately 30 minutes to conserve energy.
Unplug-for-Use Symbol
The unplug-for-use symbol flashes when the shaver is connected to electrical power and an attempt is made to switch it on.
To use the shaver:
- Disconnect the USB power source from the electrical outlet.
- Remove the small charging plug from the shaver.
- Press the On/Off button.
Control Button and Display Symbols
The shaver includes one main On/Off button and several indicator symbols.
On/Off Button Functions
| Button Action | Function |
| Press On/Off once | Switches the shaver on or off. |
| Press and hold On/Off for 3 seconds | Activates the travel lock when unlocked. |
| Press and hold On/Off for 3 seconds while locked | Deactivates the travel lock. |
Display Symbol Guide
| Symbol or Indicator | Behavior | Meaning |
| Cleaning reminder | Flashes when the shaver is switched off | Clean the shaver using warm water. |
| Travel lock | Flashes when On/Off is pressed while locked | Travel lock is active. |
| Battery status bars | Illuminate when the shaver is picked up | Show remaining battery charge. |
| Bottom battery light | Flashes orange | Battery is almost empty. |
| Battery lights | Flash sequentially | Battery is charging. |
| Battery lights | Remain illuminated | Battery is fully charged. |
| Unplug-for-use | Flashes | Disconnect charging equipment before operating the shaver. |
How to Use the Philips Norelco Shaver 5000
The Philips Norelco Tripleheader Shaver can be used for wet or dry facial shaving.
During shaving, move the rotary shaving heads gently across the skin using circular movements.
How to Turn the Shaver On and Off
- Make sure the USB charging cable is disconnected.
- Press the On/Off button once to switch on the shaver.
- Press the same button again to switch it off.
Basic Shaving Instructions
- Check that the shaving heads are clean and undamaged.
- Switch on the shaver.
- Place the shaving heads against the face.
- Move the shaver in small circular movements.
- Keep each shaving head fully in contact with the skin.
- Apply gentle pressure.
- Continue moving the shaver to capture hair growing in different directions.
- Use the narrow sides of the shaving unit for difficult-to-reach areas.
- Switch off the shaver when finished.
- Clean the shaving unit after use.
Important: Do not press too hard against the skin. Excessive pressure may cause irritation.
Shaving the Jawline and Under the Nose
The narrow sides of the shaving unit can be used to shave areas that are difficult to reach.
These include:
- Along the jawline.
- Beneath the nose.
Use gentle circular movements and keep the shaving heads in contact with the skin.
Dry Shaving Instructions
The Philips Norelco Shaver 5000 supports dry shaving without water, shaving foam, or gel.
How to Dry Shave
- Make sure the shaver is disconnected from charging equipment.
- Check that the shaving heads are clean.
- Press On/Off to start the shaver.
- Place the shaving heads against the skin.
- Move the shaver using small circular movements.
- Keep all shaving heads in contact with the skin.
- Apply gentle pressure.
- Continue until shaving is complete.
- Switch off the shaver.
- Clean the shaving unit.
Wet Shaving Instructions
The waterproof Philips Norelco Shaver 5000 can be used with water, shaving foam, or shaving gel.
How to Wet Shave
- Disconnect the USB charging cable.
- Apply water to the face.
- Apply shaving foam or gel.
- Rinse the shaving heads under warm running water.
- Switch on the shaver.
- Move the shaving heads gently across the skin in circular movements.
- Keep each shaving head fully in contact with the skin.
- Apply gentle pressure.
- Rinse the shaving unit regularly during shaving.
- Continue until the required areas have been shaved.
- Switch off the shaver.
- Rinse away all remaining shaving foam or gel.
- Clean the shaving unit.
Regularly rinsing the shaving unit during wet shaving helps it continue gliding smoothly over the skin.
Using the Shaver in the Shower
The Philips Norelco Tripleheader Shaver is waterproof and can be used in the bath or shower.
Warning: Never use the shaver while it is connected to a USB power source.
21-Day Shaving Adaptation Period
When changing to a new rotary shaving system, the skin and beard may need time to adjust.
During the first few shaving sessions:
- The shave may not feel as close as expected.
- Mild facial irritation may occur.
- The skin may need time to become familiar with the rotary shaving system.
Philips recommends using the shaver exclusively for three weeks.
Alternating between different shaving methods during this period may make the adjustment process more difficult.
If the shaving results remain unsatisfactory after 21 days, the product may qualify for the 45-day money-back guarantee, subject to the return conditions.
Using the Pop-Up Trimmer
The Philips Norelco Shaver 5000 includes a built-in pop-up trimmer.
The trimmer can be used to groom:
- Sideburns.
- Moustaches.
- Hair beneath the nose.
Pop-Up Trimmer Instructions
- Push the trimmer release slide downward.
- Open the pop-up trimmer.
- Switch on the shaver.
- Hold the trimmer perpendicular to the skin.
- Move the trimmer downward using gentle pressure.
- Continue trimming the required area.
- The trimmer can also be used beneath the nose.
- Switch off the shaver.
- Clean the trimmer after use.
- Close the trimmer.
Trimmer Maintenance
Clean the pop-up trimmer after every use to prevent clogging or damage.
For optimal performance, Philips recommends lubricating the trimmer teeth with one drop of mineral oil every six months.
Travel Lock Instructions
The Philips Norelco Shaver 5000 includes a travel lock designed to prevent accidental operation during travel or storage.
How to Activate the Travel Lock
- Make sure the shaver is switched off.
- Press and hold the On/Off button for three seconds.
- Watch the travel lock symbol.
- The symbol flashes to confirm that the travel lock has been activated.
The shaver is now protected against accidental activation.
How to Deactivate the Travel Lock
- Press and hold the On/Off button for three seconds.
- Wait for the travel lock to deactivate.
- The shaver switches on automatically after unlocking.
Automatic Travel Lock Release
Connecting the shaver to an electrical power source automatically releases the travel lock.
Cleaning and Maintenance
Regular cleaning helps maintain shaving performance and prevents hair, skin debris, and shaving product residue from accumulating inside the shaving unit.
Clean the shaver and its attachments after every use.
Philips also recommends thoroughly cleaning the individual shaving heads once a month or whenever shaving performance decreases.
How to Clean the Shaver Under Running Water
The waterproof shaving unit can be rinsed under warm running water.
Cleaning Instructions
- Make sure the shaver is disconnected from electrical power.
- Switch on the shaver.
- Rinse the shaving unit under warm running water.
- Switch off the shaver.
- Press the shaving unit release button.
- Open the shaving unit.
- Rinse the hair chamber with warm water.
- Rinse the shaving head holder with warm water.
- Carefully shake off excess water.
- Allow the shaving head holder to air-dry completely.
- Close the shaving unit.
Important: Never dry the shaving unit with a towel or tissue, as this may damage the shaving heads.
Water Dripping from the Shaver
Water may drip from the bottom of the shaver during cleaning.
This is normal when rinsing the shaving unit.
Drying the Shaving Unit
Allow the shaving components to air-dry completely.
Do not rub or dry the shaving heads with a towel or tissue.
Thorough Monthly Shaving Head Cleaning
Philips recommends thoroughly cleaning the shaving heads once a month or whenever the shaver does not perform as well as it previously did.
Each shaving head contains a cutter and matching guard.
Important: Clean only one cutter-and-guard pair at a time. Mixing the pairs may reduce shaving performance, and it may take several weeks to restore the expected results.
How to Thoroughly Clean the Shaving Heads
- Switch off the shaver.
- Disconnect the USB charging cable.
- Press the shaving unit release button.
- Pull the shaving head holder away from the shaving unit.
- Rinse the hair chamber and shaving head holder under warm water.
- Turn the retaining rings counterclockwise.
- Remove the retaining rings.
- Remove one shaving head from the holder.
- Separate the cutter from its matching guard.
- Rinse the cutter and guard under warm water.
- Shake off excess water.
- Return the cutter to its original guard.
- Repeat the cleaning process for the remaining shaving heads, one pair at a time.
- Place the shaving heads back into their holder.
- Reinstall the retaining rings and turn them clockwise until secured.
- Insert the hinge of the shaving head holder into the slot at the top of the shaving unit.
- Close the shaving unit.
Why Cutters and Guards Must Stay Together
Each cutter and guard is matched during manufacturing.
If a cutter is accidentally placed into another guard, shaving performance may decrease.
It may take several weeks before optimal performance is restored.
Always clean and reassemble one pair before moving to the next shaving head.
Cleaning the Pop-Up Trimmer
Clean the pop-up trimmer after every use to remove hair and prevent clogging.
Cleaning Instructions
- Make sure the shaver is switched off and disconnected from electrical power.
- Push the trimmer release slide downward.
- Open the trimmer.
- Switch on the shaver.
- Rinse the pop-up trimmer under warm running water.
- Switch off the shaver.
- Carefully shake off excess water.
- Allow the trimmer to air-dry.
- Close the trimmer.
Caution: Never dry the trimmer teeth with a towel or tissue, as this may damage them.
Lubricating the Pop-Up Trimmer
Philips recommends applying one drop of mineral oil to the trimmer teeth every six months.
The mineral oil is not included.
Maintenance Schedule
| Maintenance Task | Frequency | Instructions |
| Inspect shaving heads | Before every use | Check cutters and guards for damage. |
| Clean shaving unit | After every shave | Rinse under warm running water. |
| Clean hair chamber | After every shave | Remove accumulated hair and residue. |
| Thoroughly clean shaving heads | Once per month | Clean each cutter-and-guard pair separately. |
| Clean pop-up trimmer | After every use | Rinse and air-dry. |
| Lubricate pop-up trimmer | Every 6 months | Apply one drop of mineral oil. |
| Replace shaving heads | Every 2 years | Use original Philips Norelco SH71 replacement heads. |
| Replace damaged shaving heads | Immediately | Stop using damaged cutters or guards. |
| Inspect charging equipment | Before charging | Check the USB cable and power source for damage. |
| Dry before storage | After cleaning | Allow the shaver and attachments to dry completely. |
Replacing the Shaving Heads
Philips recommends replacing the shaving heads every two years for maximum shaving performance.
Damaged shaving heads should be replaced immediately.
Use original Philips Norelco SH71 replacement shaving heads.
How to Replace the Shaving Heads
- Switch off the shaver.
- Press the shaving unit release button.
- Pull the shaving head holder away from the shaving unit.
- Turn the retaining rings counterclockwise.
- Remove the retaining rings and place them in a safe location.
- Remove the used shaving heads.
- Discard the old shaving heads to avoid mixing them with the replacements.
- Insert the new SH71 shaving heads into the holder.
- Place the retaining rings over the replacement shaving heads.
- Turn each retaining ring clockwise until it clicks into place.
- Insert the hinge of the shaving head holder into the slot at the top of the shaving unit.
- Close the shaving unit.
Installing the Retaining Rings Correctly
Each retaining ring has two recesses that fit into matching projections on the shaving head holder.
Turn the ring clockwise until a click confirms that it is secured.
Important: Hold the shaving head holder in the hand when installing the shaving heads and retaining rings. Do not place the holder on a hard surface during assembly, as this may damage the shaving heads.
Replacement Head Compatibility
| Accessory | Model Number | Purpose |
| Philips Norelco Replacement Shaving Heads | SH71 | Replaces the rotary shaving heads. |
Original replacement accessories are available through:
Troubleshooting Guide
The Philips Norelco Shaver 5000 uses indicator lights and symbols to communicate charging status, cleaning requirements, and travel lock conditions.
Common Problems and Solutions
| Problem or Condition | Possible Cause | Recommended Solution |
| Shaver does not operate while connected to the USB cable | The shaver requires cordless operation. | Disconnect the charging equipment before use. |
| Shaver does not switch on | Travel lock may be active. | Hold On/Off for three seconds to unlock it. |
| Bottom battery indicator flashes orange | Battery is almost empty. | Recharge the shaver. |
| Charging lights flash sequentially | Battery is charging. | Continue charging. |
| Charging lights switch off after full charging | Automatic energy-saving behavior. | No action is required. |
| Cleaning reminder flashes after switching off | Shaver requires cleaning. | Rinse and clean the shaving unit. |
| Shaving performance decreases | Shaving heads may require thorough cleaning or replacement. | Clean the individual heads and replace them when needed. |
| Shaver does not glide smoothly during wet shaving | Shaving foam or gel may accumulate around the heads. | Rinse the shaving unit regularly. |
| Mild irritation occurs during initial use | Skin may still be adapting to rotary shaving. | Follow the 21-day adaptation instructions. |
| Shaving performance decreases after cleaning individual heads | Cutters and guards may have been mixed. | Keep matching cutter-and-guard pairs together during cleaning. |
| Shaver becomes unusually hot, produces an abnormal smell, or changes color | Abnormal product or battery condition. | Stop using and charging the shaver and contact Philips. |
| Charging takes longer than usual | Abnormal charging or product condition. | Stop charging the shaver and contact Philips support. |
| Shaving heads are damaged | Cutters or guards are damaged. | Stop using the shaver and replace the damaged heads. |
Why Is the Philips Norelco Shaver 5000 Flashing Orange?
The bottom battery status indicator flashes orange when the battery is almost empty.
Recharge the shaver using the supplied USB cable and a suitable certified USB power source.
Why Does the Shaver Not Work While Charging?
The Philips Norelco Shaver 5000 is designed for cordless operation.
It cannot operate while connected to electrical power.
Disconnect the charging cable before switching on the shaver.
Why Are the Charging Lights Flashing in Sequence?
The battery indicator lights illuminate sequentially while charging.
As the charge increases, each light becomes solid before the next light begins flashing.
All three lights remain illuminated when the battery is fully charged.
Why Do the Charging Lights Switch Off?
The charging indicators automatically switch off approximately 30 minutes after a full charge to conserve energy.
Why Does the Cleaning Reminder Flash?
The cleaning reminder flashes when the shaver is switched off.
This indicates that the shaving unit should be cleaned.
Rinse the shaving heads and hair chamber with warm water and allow the components to dry.
Why Is the Shaver Not Shaving as Closely as Before?
Shaving performance may decrease when the shaving heads become dirty, worn, or damaged.
Philips recommends thoroughly cleaning the shaving heads once a month or when shaving performance declines.
Replace the shaving heads every two years or immediately if damaged.
Why Does the Shaver Cause Mild Irritation?
The skin may need time to adapt to a new rotary shaving system.
Philips recommends using the shaver exclusively for three weeks.
Also, avoid pressing too hard against the skin, as excessive pressure may cause irritation.
Why Has Shaving Performance Decreased After Cleaning?
If cutters and guards were mixed during thorough cleaning, the original matching pairs may no longer be together.
This can affect shaving performance.
It may take several weeks for performance to return to normal.
Storage Instructions
The shaver should be cleaned, dried, and disconnected from charging equipment before storage.
How to Store the Shaver
- Switch off the shaver.
- Remove the USB power source from the electrical outlet.
- Disconnect the charging cable from the shaver.
- Clean the shaving unit and pop-up trimmer.
- Allow all components to dry completely.
- Fit the protective cap over the shaving heads.
- Store the shaver in a safe, dry location.
- Keep the USB cable and accessories protected from damage.
Storage Precautions
- Do not wrap the charging cord around the shaver.
- Do not store the shaver where it may be crushed, struck, or otherwise damaged.
- Keep the charging cable away from sharp edges and potential damage.
- Do not store connected charging equipment near water.
- Allow the shaver and attachments to dry completely before storage.
Battery Disposal and Recycling
The Philips Norelco Shaver 5000 contains a rechargeable lithium-ion battery.
The battery and electrical components must be recycled or disposed of according to applicable local regulations.
Do not discard the battery with ordinary household waste.
Battery Recycling Instructions
- Contact local waste management authorities for approved recycling options.
- Use an authorized battery recycling location.
- Follow local battery disposal requirements.
Battery Handling Precautions
- Do not puncture or dismantle the battery.
- Do not expose the battery to fire.
- Do not allow battery terminals to contact metal objects after removal.
- Do not wrap removed batteries in aluminum foil.
- Cover the terminals with tape or place the battery in a plastic bag before disposal.
- Keep hands and battery components dry when handling batteries.
Recycling Information
| Service | Contact |
| Battery Recycling | https://www.call2recycle.org |
| Battery Recycling Telephone | 1-800-822-8837 |
| Philips Recycling | https://www.recycle.philips.com |
| Philips Product Support | https://www.philips.com/support |
Warranty Information
Full Two-Year Warranty
Philips North America LLC provides a two-year warranty beginning on the date of purchase.
The warranty covers qualifying defects in materials or workmanship.
Philips agrees to repair or replace a defective product without charge during the warranty period.
Warranty Exclusions
The warranty does not cover:
- Shaving heads.
- Damage caused by accidents.
- Damage resulting from misuse or abuse.
- Damage caused by insufficient care.
- Damage resulting from attachments not supplied with the product.
- Lost parts.
- Damage caused by use with an incorrect voltage or batteries.
The warranty also limits responsibility for certain special, incidental, or consequential damages where permitted by law.
Warranty Service
For warranty assistance, visit:
https://www.philips.com/support
Philips recommends using prepaid insured shipping when returning a product for warranty service.
Damage occurring during shipment is not covered by the warranty.
The warranty provides specific legal rights, and additional rights may vary by state.
45-Day Money-Back Guarantee
Philips Norelco provides a 45-day money-back guarantee for qualifying purchases.
Philips recommends using the shaver exclusively for three weeks to allow the skin and beard to adjust.
If the shaving experience remains unsatisfactory after this period, the product may be returned according to the stated guarantee conditions.
Money-Back Guarantee Requirements
- Return the product with its original dated sales receipt.
- The receipt must show the purchase price and purchase date.
- Ship the product using prepaid, insured mail.
- Make sure the package is postmarked within 45 days of purchase.
- Philips may verify the original purchase price.
- Refunds cannot exceed the suggested retail price.
Philips does not accept responsibility for lost return shipments.
How to Request a Refund
- Visit https://www.PhilipsMoneyBack.com.
- Follow the return instructions.
- Prepare the shaver and original sales receipt.
- Ship the product using prepaid, insured mail.
- Make sure the shipment is postmarked within 45 days of purchase.
Refund checks are generally delivered within six to eight weeks after Philips receives the returned product.
Customer Support Information
Philips provides assistance with charging equipment, shaving head replacement, product operation, warranty service, and other product concerns.
Official Support Contacts
| Support Service | Contact |
| Philips Product Support | https://www.philips.com/support |
| Customer Support Telephone | 1-800-243-3050 |
| Product Registration | https://www.philips.com/welcome |
| Replacement Parts and Accessories | https://www.philips.com/store |
| Money-Back Guarantee | https://www.PhilipsMoneyBack.com |
| Battery Recycling | https://www.call2recycle.org |
| Battery Recycling Telephone | 1-800-822-8837 |
| Philips Recycling | https://www.recycle.philips.com |
Manufacturer Information
Philips Personal Health
A division of Philips North America LLC
P.O. Box 10313
Stamford, CT 06904
United States
Frequently Asked Questions
How do I use the Philips Norelco Shaver 5000?
Disconnect the USB charging cable and switch on the shaver. Move the three rotary shaving heads across the skin using small circular movements. Apply gentle pressure, keep the shaving heads in contact with the skin, and switch off and clean the shaver after use.
How long does the Philips Norelco S5000 take to charge?
A full charge takes approximately one hour and provides up to 60 minutes of cordless operation. A five-minute quick charge provides enough battery power for one complete shave.
What does the flashing orange light mean on the Philips Norelco Shaver 5000?
A flashing orange bottom battery indicator means the battery is almost empty. Recharge the shaver using the supplied USB cable and a compatible certified USB power source.
Can the Philips Norelco Shaver 5000 be used in the shower?
Yes. The shaver is waterproof and suitable for wet and dry shaving, including shower use. It must be disconnected from the charging cable before use.
How do I unlock the Philips Norelco S5000 travel lock?
Press and hold the On/Off button for three seconds. The travel lock deactivates, and the shaver switches on automatically. Connecting the shaver to an electrical power source also releases the travel lock.
How do I clean the Philips Norelco Shaver 5000?
Switch on the cordless shaver and rinse the shaving unit under warm running water. Switch it off, open the shaving unit, rinse the hair chamber and shaving head holder, and allow the components to air-dry. Thoroughly clean the individual shaving heads once a month.
Which replacement shaving heads fit the Philips Norelco S5000 and S6000?
The specified replacement shaving heads are Philips Norelco SH71. Philips recommends replacing the shaving heads every two years or immediately if they become damaged.
Why is my Philips Norelco Shaver 5000 not shaving closely?
The skin may need approximately three weeks to adapt to a new rotary shaving system. Reduced shaving performance may also result from dirty or worn shaving heads. Use gentle circular movements, clean the shaving heads regularly, and replace them at the recommended interval.