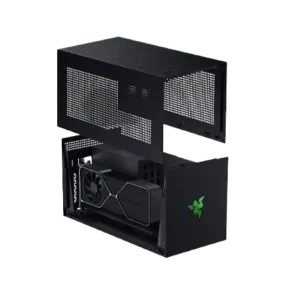
| Field | Details |
| Document Title | Razer Core X V2 Master Guide |
| Document Type | Master Guide |
| Brand Name | Razer |
| Product Name | Core X V2 |
| Model Number(s) | RC21-0227 |
| PDF File Size | 3 MB |
| Number of Pages | 26 |
| Languages | English |
Razer Core X V2 RC21-0227
The Razer Core X V2 is an external graphics processing unit (eGPU) enclosure designed to connect a compatible PCI-E graphics card to a computer through Thunderbolt 5, Thunderbolt 4, or USB4 connectivity. It features an aluminum chassis cover, internal graphics card slot, power supply mounting area, and a Thunderbolt 5 USB Type-C connection.
The enclosure requires a compatible graphics card and power supply unit (PSU), both purchased separately. Its Thunderbolt 5 connection supports Power Delivery 3.1 charging up to 140W, while Razer Synapse provides controls for fan operation, device profiles, and Razer logo lighting.
Product Features
The Razer Core X V2 includes the following features:
- External PCI-E graphics card enclosure.
- Thunderbolt 5 USB Type-C upstream connection.
- Compatibility with supported Thunderbolt 5, Thunderbolt 4, and USB4 systems that support external graphics.
- USB Power Delivery 3.1 charging support up to 140W.
- Aluminum chassis cover with ventilation openings.
- Internal PCI-E graphics card connection.
- Dedicated mounting area for a compatible power supply.
- Internal 24-pin ATX and 8-pin (or 4+4-pin) 12V EPS power connectors.
- Removable PCI-E slot covers.
- Backlit Razer logo with configurable lighting effects.
- Adjustable enclosure fan operation through Razer Synapse.
- Real-time chassis temperature, GPU usage, and fan speed information through Razer Synapse.
- Device profiles and application linking through Razer Synapse.
What’s Included in the Box
The Razer Core X V2 package includes the enclosure and accessories required for connecting and assembling its supported components.
| Item | Description |
| Razer Core X V2 | External graphics card enclosure |
| Thunderbolt 5 USB Type-C cable | Connects the enclosure to a compatible external-graphics-enabled computer |
| 4 spare power supply mount thumbscrews | Additional mounting screws for securing a compatible PSU |
| Important Product Information Guide | Product information and guidance |
Important: A compatible PCI-E graphics card and power supply unit are required separately. Neither component is included with the enclosure.
Parts and Components
The Core X V2 contains chassis components, mounting points, connection ports, and internal power connectors.
External and Internal Components
| Component | Description |
| Backlit Razer logo lighting | Illuminated logo with configurable lighting effects |
| Aluminum chassis cover | Removable outer enclosure cover |
| Chassis thumbscrews | Secure the chassis cover |
| Power supply mount thumbscrews | Hold the installed power supply in place |
| Slot cover thumbscrews | Secure the PCI-E slot covers or installed graphics card |
| Thunderbolt 5 / USB Type-C upstream port | Connects the enclosure to a compatible computer |
| PCI-E slot covers | Cover unused graphics card expansion openings |
| Chassis groove slots | Guide the chassis cover into position |
| Power supply seat | Internal mounting location for the PSU |
| PCI-E port | Connection slot for the graphics card |
| 8-pin (or 4+4-pin) 12V EPS power connector | Internal power connection for the installed PSU |
| 24-pin ATX power connector | Internal ATX power connection for the PSU |
Thunderbolt 5 Connection
The Thunderbolt 5 USB Type-C upstream port connects the Core X V2 to a compatible computer.
Supported host connections include:
- Thunderbolt 5.
- Thunderbolt 4.
- USB4.
The computer must support external graphics through its compatible connection.
The Thunderbolt 5 connection also supports Power Delivery 3.1 charging up to 140W.
Technical Specifications
The following specifications and compatibility requirements apply to the Razer Core X V2.
| Specification | Details |
| Brand | Razer |
| Product | Core X V2 |
| Model identifier | RC21-0227 |
| Product type | External GPU enclosure |
| Chassis material | Aluminum |
| Host connection | Thunderbolt 5 USB Type-C |
| Supported host interface types | Thunderbolt 5, Thunderbolt 4, USB4 with external graphics support |
| Power Delivery | USB PD 3.1, up to 140W |
| Graphics card interface | PCI-E |
| Compatible graphics card | Supported PCI-E graphics card |
| Power supply | Compatible PSU, purchased separately |
| Additional PSU power requirement | 230W beyond the graphics card’s power requirements |
| Internal power connectors | 8-pin (or 4+4-pin) 12V EPS, 24-pin ATX |
| Maximum PSU length | 150 mm (5.9 in) |
| Maximum PSU width | 160 mm (6.3 in) |
| Maximum PSU height | 86 mm (3.39 in) |
| Maximum graphics card length | 360 mm (14.2 in) |
| Maximum graphics card width | 82 mm (3.2 in) |
| Maximum graphics card height | 170 mm (6.7 in) |
| Lighting | Backlit Razer logo |
| Lighting effects | Static, Breathing |
| Fan control | Auto, Manual fan curve |
| Operating temperature | 0°C to 40°C (32°F to 104°F) |
| Razer Synapse operating system | Windows 10 64-bit or higher |
| Razer Synapse installation | Internet connection required |
| Limited warranty | 1 year |
System and Compatibility Requirements
Before installing a graphics card or power supply, the host computer and internal components must meet the requirements for the Core X V2.
Computer Requirements
The Core X V2 requires a computer with one of the following connection types:
- Thunderbolt 5.
- Thunderbolt 4.
- USB4.
The selected connection must support external graphics.
Important: A computer having a Thunderbolt or USB4 port does not automatically establish compatibility with external graphics. Razer instructs users to confirm external graphics support with the laptop manufacturer.
Graphics Card Requirements
A compatible PCI-E graphics card is required.
The graphics card must fit within the following maximum dimensions:
| Dimension | Maximum Supported Size |
| Length | 360 mm (14.2 in) |
| Width | 82 mm (3.2 in) |
| Height | 170 mm (6.7 in) |
The graphics card must also be compatible with the enclosure and installed power supply.
Power Supply Requirements
The Core X V2 requires a separate compatible PSU.
The selected power supply must provide enough power for both the graphics card and the enclosure.
Power requirement: The PSU must meet the graphics card’s power requirements and provide an additional 230W for the eGPU.
Razer recommends selecting a power supply with a higher wattage than the minimum required.
The PSU must fit within these maximum dimensions:
| Dimension | Maximum Supported Size |
| Length | 150 mm (5.9 in) |
| Width | 160 mm (6.3 in) |
| Height | 86 mm (3.39 in) |
Razer Synapse Requirements
| Requirement | Details |
| Operating system | Windows 10 64-bit or higher |
| Internet | Required for software installation |
| Software | Razer Synapse |
The available software features may vary depending on the installed version, connected devices, and supported modules.
Safety Instructions
The Razer Core X V2 contains electrical connections and supports separately installed computer components. Proper precautions must be followed before assembly, operation, maintenance, or graphics card replacement.
General Safety Precautions
- Switch off the enclosure and disconnect it from the electrical outlet before installing or removing internal components.
- Make sure all other connected devices are powered off and disconnected from the enclosure before working on its internal components.
- Use a power supply that meets the graphics card’s requirements, including an additional 230W for the eGPU.
- Use only the accessories supplied with the enclosure or accessories manufactured or approved by Razer.
- Keep hands dry when handling or operating the device.
- Keep the enclosure away from liquids, humidity, moisture, and heat sources.
- Place the enclosure on a clean, stable surface that provides adequate ventilation.
- Operate the device only between 0°C and 40°C (32°F and 104°F).
- If the temperature exceeds this range, unplug and/or switch off the enclosure until the temperature stabilizes.
- Switch off the device and disconnect its power supply during thunderstorms.
- When disconnecting cables, hold the plug or connector rather than pulling forcefully on the cable.
- Switch off the enclosure and disconnect all cables before moving it.
- Handle the device carefully to avoid impacts or drops.
If the enclosure cannot be operated correctly and troubleshooting does not resolve the issue, disconnect it from power and contact Razer Support.
Graphics Card Replacement Safety
Before replacing an installed graphics card:
- Switch off the Core X V2.
- Disconnect the enclosure from the electrical outlet.
- Disconnect the enclosure from the connected computer.
- Allow the installed graphics card to cool down.
- Begin replacement only after the necessary power connections have been disconnected and the graphics card has cooled.
Warning: Do not install, remove, or replace internal components while the enclosure is powered on or connected to an electrical outlet.
Static Electricity Precautions
Razer recommends using an antistatic or electrostatic discharge (ESD) wristband or gloves while installing internal components.
This helps protect sensitive electronic components against damage caused by static electricity.
Before First Use
Before assembling the Razer Core X V2, prepare the required components and verify their compatibility.
- Identify the Core X V2 enclosure and supplied accessories.
- Prepare a compatible PCI-E graphics card.
- Prepare a compatible power supply that fits the enclosure’s dimensions.
- Confirm that the power supply meets the graphics card’s power requirements, including an additional 230W for the enclosure.
- Confirm that the computer supports external graphics through Thunderbolt 5, Thunderbolt 4, or USB4.
- Prepare the supplied Thunderbolt 5 USB Type-C cable.
- Place the enclosure on a clean, stable surface with adequate ventilation.
- Keep the enclosure disconnected from electrical power during internal component installation.
- Prepare antistatic protection for handling the internal components.
The power supply and graphics card must be installed before completing the external connections.
Setup and Installation Instructions
The Razer Core X V2 requires a compatible PSU and PCI-E graphics card to be installed inside the enclosure.
The following installation procedure follows the order specified in the Master Guide.
Step 1: Remove the Chassis Cover
- Make sure the enclosure is disconnected from power.
- Locate the chassis thumbscrews.
- Loosen the chassis thumbscrews.
- Lift the aluminum chassis cover away from the enclosure.
- Locate and remove the power supply mount thumbscrews.
The internal power supply seat and PCI-E slot will now be accessible.
Step 2: Install the Power Supply
- Check that the selected PSU fits the supported dimensions.
- Position the power supply over the internal power supply seat.
- Orient the power supply with its fan facing outward.
- Lower the power supply into its mounting position.
- Fasten the power supply mount thumbscrews.
- Check that the power supply is securely held in place.
Important: The power supply fan must face outward, and the mounting screws must hold the PSU firmly.
The supported PSU dimensions are:
| Dimension | Maximum |
| Length | 150 mm (5.9 in) |
| Width | 160 mm (6.3 in) |
| Height | 86 mm (3.39 in) |
Power supply caution: The PSU must meet the graphics card’s power requirements and provide an additional 230W for the eGPU. Razer strongly recommends selecting a power supply with greater wattage than the minimum required.
Step 3: Connect the Internal Power Supply Cables
After mounting the PSU, connect it to the enclosure’s internal power connectors.
- Locate the 8-pin (or 4+4-pin) 12V EPS power connector.
- Connect the corresponding cable from the PSU.
- Locate the 24-pin ATX power connector.
- Connect the corresponding 24-pin cable from the PSU.
Both connections are required as shown in the enclosure’s installation diagram.
Step 4: Remove the Required PCI-E Slot Covers
The rear of the Core X V2 contains removable PCI-E slot covers.
- Identify the expansion openings required by the selected graphics card.
- Locate the thumbscrews securing those slot covers.
- Loosen and remove the required thumbscrews.
- Remove the necessary PCI-E slot covers.
Important: Remove only the slot covers required for the installed graphics card.
Step 5: Install the Graphics Card
The graphics card connects directly to the enclosure’s internal PCI-E port.
Before installation, confirm that the card fits the supported dimensions.
| Dimension | Maximum |
| Length | 360 mm (14.2 in) |
| Width | 82 mm (3.2 in) |
| Height | 170 mm (6.7 in) |
To install the graphics card:
- Locate the internal PCI-E port.
- Position the graphics card over the PCI-E connection.
- Insert the graphics card into the PCI-E port.
- Secure the card using the required slot thumbscrew or thumbscrews.
- Check that the graphics card is firmly secured in place.
The graphics card must remain within the supported enclosure dimensions.
Step 6: Connect the Graphics Card Power Cables
After the graphics card has been installed, connect its required power cables.
- Identify the power connection required by the graphics card.
- Locate the corresponding power cable or cables from the installed PSU.
- Connect the appropriate power connectors to the graphics card.
- Confirm that the required power connections have been made.
The graphics card’s power connections must match its requirements.
Step 7: Reinstall the Chassis Cover
After installing the PSU, graphics card, and required power cables:
- Position the aluminum chassis cover over the enclosure.
- Align the cover with the chassis groove slots.
- Lower the cover into position.
- Fasten the chassis thumbscrews to secure the cover.
The internal installation is now complete.
Step 8: Connect the Enclosure to Power
- Connect the appropriate regional power cord to the installed PSU.
- Connect the power cord to an electrical outlet.
Important: Use only a power cord appropriate for the region.
Step 9: Connect the Core X V2 to a Computer
The Core X V2 uses its Thunderbolt 5 USB Type-C upstream port to connect to a compatible external-graphics-enabled computer.
- Locate the Thunderbolt 5 USB Type-C upstream port on the enclosure.
- Connect one end of the Thunderbolt 5 USB Type-C cable to the enclosure.
- Locate the compatible Thunderbolt 5, Thunderbolt 4, or USB4 port on the computer.
- Connect the other end of the cable to the computer.
Important: Use a compatible Thunderbolt 5 USB Type-C cable, as instructed in the Master Guide.
The connected computer must support external graphics through the selected port.
Step 10: Connect an External Monitor (Optional)
An external monitor can be connected directly to a display output on the installed graphics card.
- Identify the available display output on the graphics card.
- Connect the external monitor using the corresponding display connection.
- Complete the monitor connection using the graphics card’s supported display port.
Available display ports depend on the installed graphics card.
Step 11: Switch On the Power Supply
Once the internal components and external connections have been installed:
- Locate the power switch on the installed PSU.
- Switch the power supply to the ON position.
The physical setup procedure is complete.
Razer Synapse can then be installed when prompted or obtained from the software download page.
Razer Synapse: https://www.razer.com/synapse
Operating Instructions
The Core X V2 operates as an external graphics enclosure connected to a compatible computer.
Its operation depends on the installed graphics card, installed power supply, and connected computer supporting external graphics.
How to Use the Core X V2 With a Computer
- Confirm that the compatible graphics card is installed and secured.
- Confirm that the PSU and graphics card power connections are in place.
- Make sure the chassis cover is secured.
- Connect the enclosure to its power source.
- Connect the Thunderbolt 5 cable between the enclosure and a compatible computer.
- Connect an external monitor to the installed graphics card if required.
- Switch on the installed power supply.
The computer’s external graphics support and the graphics card’s applicable drivers and firmware are important compatibility requirements.
Power Delivery Charging
The enclosure’s Thunderbolt 5 USB Type-C connection supports USB Power Delivery 3.1 charging up to 140W.
This charging capability operates through the upstream Thunderbolt connection.
Switching Off the Enclosure
When the enclosure must be powered down for component installation, replacement, cleaning, or transport:
- Switch off the power supply.
- Disconnect the enclosure from the electrical outlet.
- Disconnect it from the connected computer or other devices as required for the procedure.
For internal component replacement, allow the installed graphics card to cool before handling it.
Installing and Configuring Razer Synapse
Razer Synapse provides access to the Core X V2’s supported device settings, including enclosure fan control, Razer logo lighting, device profiles, and performance information.
How to Install Razer Synapse
- Connect the compatible computer to the internet.
- Visit the Razer Synapse download page at https://www.razer.com/synapse.
- Install Razer Synapse when prompted, or download the installer from the website.
- Follow the software installation instructions.
- Open Razer Synapse to access the supported configuration features.
The software supports Windows 10 64-bit or higher.
An internet connection is required for installation and for supported cloud-based functions.
A Razer ID account is recommended but optional.
Razer Synapse Interface Controls
The Synapse tab appears by default when Razer Synapse launches.
| Control | Function |
| Minimize | Minimizes the application while leaving it running in the background |
| Maximize | Expands the application window to fill the screen |
| Close | Closes the relevant tabs and exits the application |
| Previous Tab | Returns to the previously visited tab |
| Next Tab | Moves forward after using the Previous Tab function |
| Refresh Tab | Reloads the current page |
| Download Update | Provides access to available application updates |
| More | Opens Devices, Modules, and Other Installed Apps |
| Settings | Opens application settings |
| Profile | Displays account and application options |
| Info | Shows additional information about a feature |
The Profile menu includes Log In, Feedback, Rate This Software, Add WiFi Device, and Exit options.
Dashboard
The Dashboard provides an overview of Razer Synapse.
It displays connected Razer devices, installed modules, and available online services.
Gamer Room
The Gamer Room section displays devices that support Razer Aether Light.
Two functions are available in this section:
Synapse Override: Allows supported lighting to be controlled through Razer Synapse and respond to Chroma-enabled games and Chroma Connect applications.
Controlled by Gamer Room App: Displays supported devices controlled remotely through the Gamer Room application.
Devices and Modules
The Devices & Modules section displays installed Razer Synapse modules and additional modules available for installation.
Global Shortcuts
Global Shortcuts allows supported Razer Synapse operations to be assigned to custom key combinations.
These shortcuts can operate across device profiles.
Only input from Razer Synapse-enabled devices is recognized.
Core X V2 Device Configuration
The CORE X V2 tab is the main device-specific configuration area within Razer Synapse.
It provides controls for enclosure fan behavior, Razer logo lighting, and device profiles.
Settings changed through this tab are saved automatically to the local system and supported cloud storage.
Device Profiles
Profiles store Razer device settings and allow different configurations to be selected.
By default, the profile name is based on the system name.
The Profiles Dropdown Bar displays available profiles.
The Miscellaneous menu supports:
- Adding profiles.
- Importing profiles.
- Renaming profiles.
- Duplicating profiles.
- Exporting profiles.
- Deleting profiles.
Performance Bar
The Performance Bar displays real-time information about the enclosure and installed graphics card.
| Performance Metric | Description |
| Chassis temperature | Current enclosure temperature |
| GPU usage | Current graphics card usage |
| Fan speed | Current fan operating speed |
The Performance Bar can be customized or hidden through the Miscellaneous menu.
Customize Settings
The Customize section provides access to the Core X V2’s supported fan speed and lighting settings.
Fan Control Settings
The Razer Core X V2 supports configurable fan operation through Razer Synapse.
The available Fan Control settings are Auto and Manual fan curve.
| Fan Setting | Description |
| Auto | Adjusts fan speed automatically according to the current temperature |
| Manual fan curve | Allows fan speed to be customized according to chassis and GPU temperatures |
How to Change the Fan Settings
- Open Razer Synapse.
- Select the CORE X V2 tab.
- Open Customize.
- Locate Fan Control.
- Select Auto or Manual fan curve.
- Configure the available fan settings for the selected option.
Auto uses the current temperature to manage fan operation.
Manual fan curve allows fan speed behavior to be adjusted according to enclosure and graphics card temperatures.
Razer Logo Lighting Settings
The Razer Core X V2 includes backlit Razer logo lighting.
The Lighting section in Razer Synapse allows the logo illumination and lighting effects to be changed.
Brightness Control
The Brightness setting allows the lighting to be enabled, disabled, or adjusted.
To change the brightness:
- Open Razer Synapse.
- Select the CORE X V2 tab.
- Open Lighting.
- Locate Brightness.
- Use the available toggle to turn lighting on or off.
- Adjust the brightness slider to change the illumination level.
Switch Off Lighting
Switch Off Lighting controls whether the device lighting turns off when the connected system’s display switches off.
This function is available as a lighting-related power-saving option.
Razer Logo Lighting Effects
The Core X V2 supports two logo lighting effects described in the Master Guide.
| Lighting Effect | Description |
| Static | Keeps the Razer logo illuminated continuously |
| Breathing | Makes the Razer logo lighting gradually fade in and out |
How to Change the Logo Lighting Effect
- Open Razer Synapse.
- Select the CORE X V2 tab.
- Open Lighting.
- Locate Effects.
- Select Static or Breathing.
The selected lighting behavior will be applied to the Razer logo.
Linked Games and Application Profiles
Razer Synapse includes a Linked Games feature for associating applications with supported device profiles.
When a linked application starts, Razer Synapse automatically activates the assigned profile.
Games Tab
The Games section allows applications to be viewed, searched, sorted, and linked to devices.
Available functions include:
- Viewing listed games and applications.
- Adding applications manually.
- Scanning for applications automatically.
- Searching for a specific game or program.
- Sorting applications alphabetically.
- Sorting by most recently played.
- Sorting by most frequently played.
Applications can appear in the list even when they are not linked to a Razer device.
How to Link an Application to a Profile
- Open Razer Synapse.
- Select Linked Games.
- Locate the application.
- Use Add or Scan if the application is not listed.
- Select the application.
- Choose the supported Razer device.
- Select the profile to associate with the application.
The selected profile will be activated automatically when the application launches.
Devices Tab
The Devices section displays supported Razer peripherals and their linked applications.
It allows applications to be added to or removed from a selected device’s linked application list.
Applications can also be filtered by using the Views and Order controls.
Linking Through the Devices Tab
- Open the Devices section.
- Select the required Razer device.
- View the linked application list.
- Select the Add button to search for an application.
- Use Refresh, Search, or Browse within the application selection window.
- Select the checkbox for the required application.
- Associate the application with the selected device profile.
The linked profile will activate automatically when the application launches.
Razer Synapse Application Settings
The Settings tab provides controls for application preferences, software behavior, and other Razer Synapse functions.
Synapse Settings
| Setting | Function |
| Auto Launch | Controls how Razer Synapse starts |
| Notifications | Allows onscreen notifications, including while full-screen applications are running |
| Recommendations | Displays relevant products and features on the Dashboard |
| Tutorials Reset | Reactivates instructional tutorials |
| Synapse 3 Profile Migration | Transfers supported configuration information from Synapse 3 |
| Device Lighting | Selects which application controls device lighting effects |
Synapse 3 Profile Migration
This feature transfers supported Razer Synapse 3 settings to the newer Razer Synapse application.
Transferable information includes:
- Device profiles.
- Macros.
- Chroma effects.
Device Lighting
The Device Lighting setting allows users to choose which application controls the lighting effects on the device.
General Settings
The General section provides access to additional software preferences.
Language: Changes the display language of Razer Synapse.
About: Displays the installed software version, copyright information, and links to Razer’s terms of use and online communities.
Feedback
The Feedback section allows users to submit comments, suggestions, and software-related problems to Razer.
It also provides access to the software’s bug reporting features.
Cleaning Instructions
The Razer Core X V2 requires regular cleaning to help prevent dirt buildup.
Razer recommends cleaning the enclosure once a month.
How to Clean the Core X V2
- Switch off the enclosure.
- Disconnect it from the electrical outlet.
- Disconnect it from the connected computer.
- Use a soft cloth to clean the device.
- Remove accumulated dirt from the accessible exterior surfaces.
Important: Do not use soap or harsh cleaning agents.
Maintenance Instructions
The Core X V2 requires minimal routine maintenance, but the enclosure, installed components, and supporting firmware must be maintained according to the safety guidance.
Monthly Cleaning
Razer recommends cleaning the enclosure once a month.
Before cleaning, the enclosure must be switched off and disconnected from both the electrical outlet and connected computer.
A soft cloth should be used to prevent dirt buildup.
Firmware Updates
Razer recommends regularly checking for firmware updates.
Firmware updates can help improve device stability and compatibility.
Firmware and Support: https://support.razer.com
Maintenance Schedule
| Maintenance Task | Recommended Timing | Instructions |
| Clean the enclosure | Once a month | Switch off, unplug from power and computer, and clean with a soft cloth |
| Check firmware updates | Regularly | Check Razer Support for available firmware updates |
| Check installation safety | Before installing or replacing internal components | Disconnect power and connected devices before working inside the enclosure |
| Allow the graphics card to cool | Before graphics card replacement | Switch off, unplug, and wait for the card to cool before replacement |
Troubleshooting Guide
The following checks are based on the Core X V2’s compatibility requirements, software controls, and safety instructions.
| Problem or Situation | Check or Possible Explanation | Recommended Action |
| External graphics compatibility is uncertain | The host computer must support external graphics through Thunderbolt 5, Thunderbolt 4, or USB4 | Confirm external graphics support with the computer manufacturer |
| Graphics card compatibility is uncertain | The graphics card must meet the enclosure’s compatibility and dimensional requirements | Check the supported graphics card information through Razer Support |
| Power supply suitability is uncertain | The PSU must meet the graphics card’s power requirements plus an additional 230W | Verify the PSU power rating and supported dimensions before installation |
| Razer Synapse cannot access online features | Installation and cloud-based features require an internet connection | Connect the computer to the internet |
| A Razer Synapse page does not display correctly | The current page may need reloading | Use the Refresh Tab control |
| Razer Synapse has an available update | The application indicates a software update | Use the Download Update function |
| Firmware or compatibility information needs checking | Updated firmware and support information may be available | Check the Razer Support website |
| The enclosure cannot be operated correctly after troubleshooting | The operating problem remains unresolved | Unplug the enclosure and contact Razer Support |
Warning: Before investigating internal components, switch off the enclosure, disconnect it from the electrical outlet, and power off and disconnect other connected devices. Do not handle or replace an installed graphics card until it has cooled.
If the enclosure continues to experience operating problems, disconnect it and contact Razer Support.
Warranty Information
The Razer Core X V2 includes a 1-year limited warranty.
| Warranty Detail | Information |
| Warranty type | Limited product warranty |
| Warranty period | 1 year |
| Manufacturer | Razer |
| Product registration | https://razerid.razer.com/warranty |
| Warranty terms | https://www.razer.com/warranty |
If the enclosure cannot be operated correctly and the available troubleshooting checks do not resolve the issue, unplug the device and contact Razer Support.
Frequently Asked Questions
How do I set up the Razer Core X V2?
To set up the Razer Core X V2, install a compatible power supply and graphics card inside the enclosure. Connect the 8-pin (or 4+4-pin) 12V EPS and 24-pin ATX power cables, then connect the required graphics card power cables. Secure the chassis cover, connect the enclosure to power, connect it to a compatible computer using the Thunderbolt 5 USB Type-C cable, and switch on the power supply.
Does the Razer Core X V2 include a graphics card and power supply?
No. The Razer Core X V2 requires a compatible PCI-E graphics card and power supply unit, both purchased separately. The package includes the enclosure, a Thunderbolt 5 USB Type-C cable, four spare power supply mounting thumbscrews, and an Important Product Information Guide.
What graphics cards are compatible with the Razer Core X V2?
The Core X V2 supports compatible PCI-E graphics cards that fit within its maximum dimensions of 360 mm in length, 82 mm in width, and 170 mm in height. Graphics card compatibility and power requirements should be checked through Razer Support before installation.
What power supply does the Razer Core X V2 require?
The enclosure requires a compatible PSU that meets the installed graphics card’s power requirements and provides an additional 230W for the eGPU. The PSU must fit within maximum dimensions of 150 × 160 × 86 mm (length × width × height). Razer recommends a power supply with wattage above the minimum required.
Does the Razer Core X V2 support Thunderbolt 4 and USB4?
Yes. The Razer Core X V2 supports connections to compatible Thunderbolt 5, Thunderbolt 4, and USB4 systems. The connected computer must support external graphics. Razer instructs users to confirm this capability with the computer manufacturer.
How much charging power does the Razer Core X V2 support?
The Core X V2 supports USB Power Delivery 3.1 charging up to 140W through its Thunderbolt 5 USB Type-C upstream connection.
How do I change the Razer Core X V2 fan speed and lighting?
Open Razer Synapse and select the CORE X V2 device tab. Fan Control provides Auto and Manual fan curve options. The Lighting section allows the backlit Razer logo’s brightness to be adjusted and provides Static and Breathing lighting effects.
How do I clean the Razer Core X V2?
Razer recommends cleaning the enclosure once a month. Switch off the device, disconnect it from the electrical outlet and connected computer, and clean it using a soft cloth. Do not use soap or harsh cleaning agents.