| Field | Details |
| Document Title | Razer PWM PC Fan Controller Master Guide |
| Document Type | Master Guide |
| Brand Name | Razer |
| Product Name | PWM PC Fan Controller |
| Model Number(s) | RZ34-02140 |
| PDF File Size | 639 KB |
| Number of Pages | 9 |
| Languages | English |
Razer PWM PC Fan Controller RZ34-02140
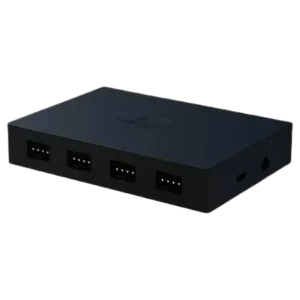
The Razer PWM PC Fan Controller is an internal computer accessory designed to manage the operation of multiple PC chassis fans. It features eight 4-pin PWM fan ports, a SATA-powered DC connection, a Micro-USB connection for motherboard communication, and a magnetic base for mounting inside a compatible PC chassis.
The controller works with Razer Synapse software, which allows users to customize pulse width modulation (PWM) fan speed curves for up to eight connected fans. This provides control over fan operation and can help reduce fan noise compared with traditional DC-powered fan configurations.
The controller supports 4-pin PWM chassis fans and can also accommodate 3-pin fans, although the latter do not receive the same fan speed control benefits. Installation involves connecting the fans, supplying power from the PC power supply unit, connecting the controller to a motherboard USB header, and securing it to a suitable metal surface.
Product Overview
The PWM PC Fan Controller provides a central connection point for chassis fans inside a desktop computer.
Its eight fan ports are arranged along two sides of the controller, with four ports on each side. A separate DC power connection supplies power through the included SATA-to-DC cable, while the Micro-USB connection allows communication with the computer through an internal motherboard USB header.
The controller also features a magnetized base for attachment to compatible metal surfaces inside the PC chassis.
Main Features
- Supports connection of up to eight chassis fans.
- Includes eight 4-pin PWM fan ports.
- Allows customizable fan speed curves through Razer Synapse.
- Uses SATA power from the PC power supply unit.
- Connects to a motherboard USB header using the included Micro-USB cable.
- Supports 3-pin chassis fans with limited control functionality.
- Features a magnetized mounting base.
- Provides Razer Synapse integration for fan adjustments.
- Includes a two-year limited warranty.
What’s Included in the Box
The Razer PWM PC Fan Controller package contains the controller, connection cables, and product documentation.
| Item | Description |
| Razer PWM PC Fan Controller | Main unit with eight 4-pin PWM fan ports |
| SATA to DC power cable | Connects the controller’s DC power port to the PC power supply unit’s SATA power connection |
| Micro-USB to USB pin header cable | Connects the controller to an internal motherboard USB header |
| Important Product Information Guide | Contains important product information and documentation |
Parts and Components
The Razer PWM PC Fan Controller has three main connection types and a magnetic mounting base.
Controller Ports and Components
| Component | Function |
| DC power port | Receives power from the PC power supply through the included SATA to DC power cable |
| Micro-USB port | Connects the controller to the motherboard using the supplied USB pin header cable |
| 4-pin PWM fan ports | Provide connections for up to eight compatible chassis fans |
| Magnetized base | Attaches the controller to a compatible metal surface inside the PC chassis |
4-Pin PWM Fan Ports
The controller includes eight numbered fan connections, with four ports along each side.
These connections support compatible 4-pin PWM chassis fans. The ports allow connected fans to be managed through Razer Synapse.
3-pin fan compatibility: A 3-pin chassis fan may also be connected. However, the Master Guide states that 3-pin fans do not receive the additional fan speed and lighting control benefits described for compatible fans.
DC Power Port
The DC power port is used with the supplied SATA to DC power cable.
The SATA end connects to a SATA power connection provided by the computer’s power supply unit (PSU).
Micro-USB Port
The Micro-USB port connects the fan controller to an internal USB header on the computer’s motherboard.
The included Micro-USB to USB pin header cable is used for this connection.
Magnetic Mounting Base
The controller has a magnetized base that allows it to attach to compatible metal surfaces inside a PC chassis.
The magnetic base adheres to metals with iron or nickel properties, such as steel.
It does not adhere to aluminum or lead surfaces in the manner described for compatible magnetic mounting surfaces.
Technical Specifications
The following specifications are identified in the Razer PWM PC Fan Controller Master Guide.
| Specification | Details |
| Brand | Razer |
| Product | PWM PC Fan Controller |
| Product type | Internal PC fan controller |
| Fan connection capacity | Up to 8 fans |
| Fan port type | 4-pin PWM |
| Number of fan ports | 8 |
| Additional fan compatibility | 3-pin chassis fans, with limited control functionality |
| Power connection | DC power port |
| Power cable | SATA to DC |
| Motherboard connection | Micro-USB to USB pin header |
| Controller mounting | Magnetized base |
| Compatible mounting surface | Metal with iron or nickel properties, such as steel |
| Fan speed configuration | Razer Synapse |
| Supported operating system for Synapse | Windows 10 64-bit or higher |
| Software installation | Internet connection required |
| Operating temperature | 0°C to 45°C (32°F to 113°F) |
| Warranty | 2-year limited warranty |
System Requirements
Before installation, the computer must have the appropriate fan, power, and motherboard connections.
Hardware Requirements
The Razer PWM PC Fan Controller requires:
- Compatible 4-pin PWM chassis fans.
- One available USB connection on the motherboard.
- One available SATA power connection from the PC power supply unit.
A suitable mounting surface is also needed for securing the controller using its magnetic base.
Razer Synapse Requirements
| Requirement | Details |
| Operating system | Windows 10 64-bit or higher |
| Internet connection | Required for software installation |
| Software | Razer Synapse |
Safety Instructions
The Razer PWM PC Fan Controller must be installed and operated according to the electrical and environmental safety requirements provided in the Master Guide.
Electrical and Installation Safety
Warning: The PC must be turned off before installing the controller to avoid electric shock.
The manufacturer recommends wearing an antistatic wrist strap during installation to help prevent damage to sensitive internal computer components. The antistatic wrist strap is not included.
The following precautions apply:
- Do not disassemble or attempt to repair the controller.
- Do not operate the controller under abnormal current loads.
- Power off the device before relocating it, making modifications, or connecting or disconnecting components.
- Use the accessories supplied with the controller or accessories manufactured or approved by Razer.
- Handle connection cables carefully.
- Hold the connector rather than pulling directly on a cable when disconnecting it.
- If an operating problem remains unresolved after troubleshooting, unplug the device and contact Razer Support.
Disassembling the device or operating it under abnormal current loads may void the warranty.
Environmental Safety
- Keep the controller and its components away from water, wet surfaces, and moisture.
- Do not install the device near solvents.
- Avoid exposing the controller to high temperatures or direct sunlight.
- Keep the device away from liquids and humidity.
- Operate the controller only within 0°C to 45°C (32°F to 113°F).
If the operating temperature exceeds this range, unplug and switch off the device until the temperature returns to an appropriate level.
Before First Use
Before installing the PWM PC Fan Controller, prepare the required computer connections.
- Turn off the computer before starting installation.
- Identify the available 4-pin PWM chassis fans.
- Locate an available SATA power connection from the PSU.
- Identify the motherboard’s internal USB header.
- Prepare the supplied SATA to DC power cable.
- Prepare the supplied Micro-USB to USB pin header cable.
- Identify a suitable metal mounting surface inside the computer chassis.
- Wear an antistatic wrist strap when handling the internal computer components.
Important: The correct location of the motherboard USB header should be confirmed using the motherboard’s user manual.
Setup and Installation Instructions
The Razer PWM PC Fan Controller is installed inside the computer chassis using the supplied connection cables.
The following steps describe the installation sequence.
Step 1: Connect the Chassis Fans
The controller has eight 4-pin PWM fan ports.
- Make sure the computer is powered off.
- Identify the fan ports on the controller.
- Select an available 4-pin PWM port.
- Align the pins of the chassis fan connector with the selected port.
- Insert the fan connector into the port.
- Repeat the process for the remaining compatible fans.
The controller can accommodate up to eight fans.
Important: The fan connector pins must be correctly aligned with the selected port before making the connection.
A compatible 3-pin fan can also be connected, but it will not receive the same fan speed and lighting control benefits described for compatible fans.
Step 2: Connect the SATA Power Cable
After connecting the chassis fans, the controller must be connected to the PC power supply unit.
- Locate the controller’s DC power port.
- Identify the included SATA to DC power cable.
- Connect the DC end of the cable to the controller’s DC power port.
- Locate an available SATA power connection from the PSU.
- Connect the SATA end of the supplied cable to that connection.
The controller now has its required power connection.
Step 3: Connect the Controller to the Motherboard
The controller communicates with the computer through its Micro-USB connection.
- Identify the included Micro-USB to USB pin header cable.
- Locate the Micro-USB port on the controller.
- Insert the Micro-USB connector into the controller.
- Locate the motherboard’s internal USB header.
- Refer to the motherboard’s user manual to identify the correct header location.
- Connect the USB pin header end of the cable to the appropriate motherboard connection.
The controller is now connected to the motherboard.
Step 4: Mount the Controller Inside the PC Chassis
The Razer PWM PC Fan Controller includes a magnetized base for mounting.
- Identify a suitable metal surface inside the PC chassis.
- Position the controller with its magnetic base facing the selected surface.
- Place the controller against the metal surface.
- Check that the magnetic base holds the controller in position.
Important: The magnetic base is intended to adhere to metals with iron or nickel properties, such as steel. It does not attach in the same way to aluminum or lead.
Step 5: Install Razer Synapse
Once the controller has been connected and mounted, Razer Synapse can be used to adjust supported fan settings.
- Use a computer running Windows 10 64-bit or higher.
- Connect the computer to the internet.
- Install Razer Synapse when prompted, or download the installer from https://www.razer.com/synapse.
- Complete the software installation.
- Open Razer Synapse to access the available fan speed customization controls.
The controller’s hardware installation is complete after the fans, power cable, motherboard USB cable, and magnetic mounting have been configured.
Operating Instructions
The Razer PWM PC Fan Controller manages compatible chassis fans through PWM-based fan speed adjustments.
How the PWM Fan Controller Works
Pulse width modulation allows fan operation to be adjusted through a configurable control signal.
The Razer PWM PC Fan Controller uses this approach to provide customizable fan speed curves for up to eight connected fans.
Razer Synapse is used to access the controller’s supported fan settings.
How to Manage Connected Chassis Fans
- Confirm that the chassis fans are connected to the controller.
- Confirm that the SATA power cable and motherboard USB connection are installed.
- Open Razer Synapse.
- Access the available PWM fan adjustment controls.
- Configure the supported fan speed settings.
The fan speed curves allow the operation of connected compatible fans to be customized.
Using 3-Pin Chassis Fans
The controller also accommodates 3-pin chassis fans.
However, the Master Guide distinguishes these fans from compatible 4-pin PWM fans and states that they do not receive the additional fan speed and lighting control benefits.
For PWM speed control, the controller is intended to be used with compatible 4-pin PWM chassis fans.
Razer Synapse Fan Speed Settings
Razer Synapse is the software used to configure the Razer PWM PC Fan Controller.
Custom PWM Fan Curves
The controller supports customizable pulse width modulation curves for up to eight fans.
These settings allow compatible fan operation to be adjusted through Razer Synapse.
The guide describes this as a way to manage airflow and reduce noise compared with traditional DC-powered fan configurations.
Razer Chroma Lighting Customization
Razer Synapse also provides lighting customization options across supported Razer Chroma-enabled devices.
For additional information about the Razer Chroma system, visit:
Razer Chroma: https://www.razer.com/chroma
Razer Synapse Software Download
Razer Synapse can be downloaded from:
The application requires an internet connection for installation and a supported Windows operating system.
Maintenance and Safe Handling
The PWM PC Fan Controller should be handled carefully during component changes, relocation, or connection adjustments.
Before Changing Connections
- Power off the device before making changes.
- Handle the controller and its supplied cables carefully.
- Grip connectors directly when connecting or disconnecting cables.
- Use only the supplied or Razer-approved accessories.
- Avoid disassembling the controller or modifying its internal components.
Operating Temperature
The controller must operate within the temperature range of 0°C to 45°C (32°F to 113°F).
If the temperature exceeds this range, switch off and unplug the device until the temperature stabilizes.
Troubleshooting and Installation Checks
The following table summarizes compatibility conditions, installation checks, and support instructions described in the Razer PWM PC Fan Controller Master Guide.
| Situation | Manual-Based Check | Recommended Action |
| Fan speed customization is required | The controller uses 4-pin PWM fan ports | Connect compatible 4-pin PWM chassis fans and access the available settings through Razer Synapse |
| A 3-pin fan is connected | 3-pin fans do not receive the same additional control benefits | Use a compatible 4-pin PWM fan for the described PWM control functions |
| A fan connector does not align with its port | Connector pins must be aligned correctly | Check the connector alignment before inserting it |
| The motherboard USB connection cannot be identified | The controller requires a motherboard USB connection | Refer to the motherboard user manual to locate the USB header |
| The magnetic base does not adhere to the selected surface | The mounting surface may not have the required iron or nickel properties | Select a compatible metal surface, such as steel |
| Razer Synapse installation is unavailable | Windows 10 64-bit or higher and an internet connection are required | Check the software installation requirements |
| The controller exceeds its operating temperature range | The permitted operating range is 0°C to 45°C | Switch off and unplug the device until its temperature stabilizes |
| An operating issue remains unresolved | Further assistance is required | Unplug the controller and contact Razer Support |
Warning: Do not attempt to open, modify, or repair the controller. If normal operation cannot be restored through supported user checks, disconnect the device and contact Razer Support.
Warranty Information
The Razer PWM PC Fan Controller includes a 2-year limited warranty.
| Warranty Detail | Information |
| Manufacturer | Razer |
| Product | PWM PC Fan Controller |
| Warranty type | Limited warranty |
| Warranty period | 2 years |
| Product registration | https://razerid.razer.com |
| Warranty terms | https://www.razer.com/warranty |
Frequently Asked Questions
How many fans can the Razer PWM PC Fan Controller support?
The Razer PWM PC Fan Controller supports up to eight chassis fans. It has eight 4-pin PWM fan ports arranged along two sides of the controller, allowing compatible fans to be connected and their speed curves customized through Razer Synapse.
How do I install the Razer PWM PC Fan Controller?
Turn off the PC before installation. Connect the chassis fans to the controller’s 4-pin ports, connect the SATA to DC power cable to the PSU, and connect the Micro-USB cable to an internal motherboard USB header. Attach the controller to a compatible metal surface using its magnetic base, then install Razer Synapse for fan configuration.
Can 3-pin fans be connected to the Razer PWM PC Fan Controller?
Yes. The Master Guide states that 3-pin chassis fans can be connected to the controller. However, these fans do not receive the same additional fan speed and lighting control benefits described for compatible fans.
Does the Razer PWM PC Fan Controller require a SATA power connection?
Yes. The controller requires an available SATA power connection from the PC power supply unit. The included SATA to DC cable connects the PSU’s SATA power connection to the controller’s DC power port.
Does the Razer PWM PC Fan Controller need a motherboard USB connection?
Yes. The controller connects to the motherboard through the supplied Micro-USB to USB pin header cable. The motherboard’s user manual should be used to identify the correct USB header location.
Can the Razer PWM PC Fan Controller be mounted on aluminum?
The controller uses a magnetized base designed for metals with iron or nickel properties, such as steel. The Master Guide states that the base does not adhere to aluminum or lead in the same way as compatible magnetic mounting surfaces.
How do I control the fan speed using Razer Synapse?
Install Razer Synapse on a supported Windows computer, then access its available PWM fan settings. The software allows customizable fan speed curves for up to eight compatible connected fans. An internet connection is required for software installation.
What warranty does the Razer PWM PC Fan Controller have?
The Razer PWM PC Fan Controller includes a two-year limited warranty. The product can be registered through Razer ID, and the current warranty terms are available at Razer Warranty.