| Field | Details |
| Document Title | SmartCrisp 8QT Digital Air Fryer Instruction Manual |
| Document Type | Instruction Manual |
| Brand Name | BELLA |
| Product Name | SmartCrisp 8QT Digital Air Fryer |
| Model Number(s) | 90213, 90214, 90223 |
| PDF File Size | 4 MB |
| Number of Pages | 12 |
| Languages | English |
BELLA Pro SmartCrisp 8QT Air Fryer 90213
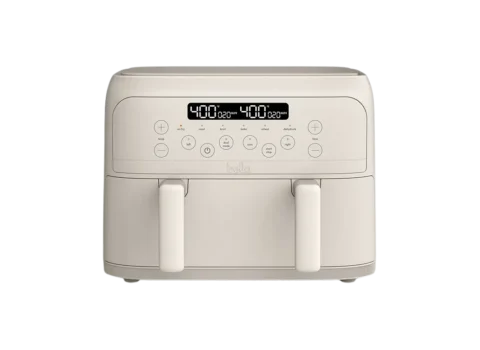
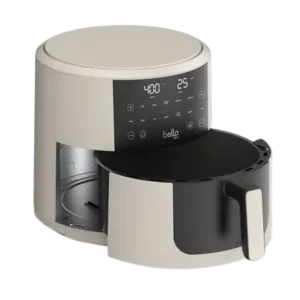
The BELLA Pro SmartCrisp 8QT Digital Air Fryer is a touchscreen-controlled kitchen appliance designed for preparing foods using circulating hot air. It features an 8-quart cooking capacity, an adjustable temperature range of 150°F to 400°F, and 10 preset cooking functions for baking, roasting, air frying, reheating, and keeping food warm.
The air fryer includes a removable frying basket, crisping tray, digital temperature and timer controls, and automatic cooking-cycle completion. Cooking time and temperature can be adjusted to suit different foods, while the touchscreen displays the selected temperature and remaining cooking time.
These instructions cover the SmartCrisp 8QT Air Fryer models identified in the instruction manual, including 90213, 90214, and 90223. They explain the appliance’s components, initial setup, cooking presets, operation, cooking times, safety precautions, cleaning, storage, and warranty service.
Product Overview and Technical Specifications
The BELLA Pro SmartCrisp 8QT Air Fryer is intended for household use. It uses hot-air cooking with an adjustable digital thermostat and timer, allowing food to be prepared through preset programs or manually selected settings.
The frying basket holds food above a removable crisping tray, which should be installed before cooking. The appliance must be operated with the basket fully closed.
| Specification | Details |
| Brand | BELLA Pro |
| Product Name | SmartCrisp 8QT Digital Air Fryer |
| Model Numbers | 90213, 90214, 90223 |
| Appliance Type | Digital air fryer |
| Capacity | 8 quarts |
| Recommended Maximum Food Weight | 6.6 lb |
| Electrical Supply | 120 V AC |
| Temperature Range | 150°F–400°F |
| Temperature Adjustment | 5°F increments |
| Manual Timer Range | 1–60 minutes |
| Timer Adjustment | 1-minute increments |
| Cooking Presets | 10 |
| Control Type | Digital touchscreen |
| Display | Cooking temperature and remaining time |
| Frying Basket | Removable, with cool-touch handle |
| Crisping Tray | Removable, with four rubber tips |
| Basket/Tray Coating | Ceramic nonstick coating |
| Power Plug | Polarized plug |
| Intended Use | Household use only |
| Country of Manufacture | China |
Main Features
The SmartCrisp air fryer provides the following operating features:
- 10 cooking presets: Bake, Roast, French Fries, Chicken, Veggies, Steak, Fish, Bacon, Keep Warm, and Reheat.
- Adjustable temperature: Select temperatures from 150°F to 400°F, subject to the selected preset’s range.
- Digital cooking timer: Adjust cooking time in one-minute increments.
- Touchscreen operation: Select functions and change temperature or cooking time using touch controls.
- Removable frying basket: The basket slides out using its cool-touch handle.
- Crisping tray: A removable tray fits inside the frying basket.
- Automatic completion: Three audible beeps sound and the appliance turns off when the cooking timer reaches zero.
- Cooking interruption: Removing the basket drawer stops the air frying operation, which resumes when the drawer is returned.
Parts and Components
The BELLA Pro SmartCrisp 8QT Air Fryer consists of the main cooking unit, touchscreen controls, removable frying basket, crisping tray, ventilation openings, and power components.
| Part | Function |
| Touchscreen Control Panel | Allows selection of cooking programs, temperature, and time. |
| Air Fryer Body | Houses the appliance’s heating and air circulation system. |
| Frying Basket | Holds food during the air frying process. |
| Cool-Touch Handle | Provides a grip for removing and inserting the frying basket drawer. |
| Crisping Tray | Fits inside the frying basket to support food during cooking. |
| Air Inlets | Allow air to enter the appliance for circulation. |
| Air Outlet | Releases heated air and steam during operation. |
| Power Cord with Polarized Plug | Connects the appliance to a suitable 120 V AC outlet. |
| Non-Skid Feet | Help keep the appliance stable on a work surface. |
| Rubber Tray Tips | Four rubber pieces help the crisping tray fit securely inside the basket. |
Frying Basket and Crisping Tray
The frying basket is removable and is operated using the cool-touch handle.
The crisping tray sits inside the basket and must be correctly installed before food is added.
Four rubber tips are attached around the sides of the crisping tray to help it fit securely. The tips must be checked before first use. If a tip becomes detached, it can be slid back onto its corresponding tray tab.
The frying basket must be completely closed before the air fryer will operate.
Air Inlets and Air Outlet
The air fryer has ventilation openings on its back and sides.
These openings must remain unobstructed during cooking to allow proper air circulation.
The appliance also releases hot steam through its air outlet, so care must be taken when standing near or handling the appliance.
Touchscreen Control Panel and Button Functions
The digital touchscreen provides access to the air fryer’s power functions, cooking presets, temperature adjustment, and timer settings.
When the air fryer is plugged in, an audible tone sounds and the control panel briefly illuminates. The display then goes dark, and the POWER button pulses lightly.
Pressing POWER activates the control panel and displays the available cooking functions.
| Control | Function |
| POWER | Activates the touchscreen or turns the air fryer off during operation. |
| START/STOP | Starts the selected cooking program. |
| Temperature + | Increases cooking temperature by 5°F. |
| Temperature − | Decreases cooking temperature by 5°F. |
| Timer + | Increases cooking time by 1 minute. |
| Timer − | Decreases cooking time by 1 minute. |
| Preset Menu Controls | Select one of the 10 cooking functions. |
| Digital Temperature Display | Shows the cooking temperature. |
| Digital Timer Display | Shows the cooking time remaining. |
Power Button
The POWER button controls activation and shutdown.
When pressed after the unit is plugged in, an audible tone sounds and the cooking presets illuminate.
During operation, pressing POWER turns the appliance off.
Temperature Adjustment Buttons
The temperature controls are located on the left side of the touchscreen panel.
Pressing the + or − button changes the cooking temperature in 5°F increments. Holding either button changes the temperature more rapidly.
The general manual temperature range is 150°F to 400°F. Individual cooking presets may have narrower adjustment ranges.
Timer Adjustment Buttons
The timer controls are located on the right side of the panel.
Pressing + increases the cooking time, while pressing − decreases it.
Each press changes the timer by one minute. Holding the button adjusts the time more rapidly.
START/STOP Button
The START/STOP button begins cooking after the desired preset or manual settings have been selected.
Once cooking begins, the digital display shows the operating temperature and remaining cooking time.
Digital Display and Audible Signals
The touchscreen provides several operating indications:
| Display or Signal | Meaning |
| Brief illumination and tone when plugged in | The air fryer has received power. |
| Pulsing POWER button | The appliance is in its initial standby state. |
| Illuminated cooking presets | Cooking functions are available for selection. |
| Temperature reading | Shows the cooking temperature. |
| Countdown timer | Shows the remaining cooking time. |
| 00:00 and three audible beeps | Cooking has finished, and the air fryer turns off automatically. |
Important Safety Instructions
The BELLA Pro SmartCrisp 8QT Air Fryer generates high temperatures and releases hot steam during operation. Proper precautions are necessary to prevent burns, electric shock, fire, and damage to the appliance.
Electrical Safety
- Connect the air fryer only to a 120 V AC electrical outlet.
- Never immerse the air fryer body, power cord, or plug in water or other liquids.
- Disconnect the appliance from the electrical outlet when it is not in use and before cleaning.
- Do not operate the air fryer if the power cord or plug is damaged.
- Do not use the appliance if it malfunctions or has been damaged.
- Keep the electrical cord away from hot surfaces and prevent it from hanging over the edge of a counter or table.
- Do not place the air fryer on or near a hot gas burner, electric burner, or heated oven.
- Do not use accessory attachments that are not recommended by the manufacturer.
- Any servicing requiring disassembly must be performed by a qualified appliance repair technician.
Warning: If the air fryer malfunctions during operation, pull the frying basket drawer out of the appliance and unplug the power cord. Do not continue operating or attempt to repair a malfunctioning unit.
Hot Surfaces and Burn Prevention
The air fryer becomes hot during cooking and retains heat after it is switched off.
- Always use oven mitts or potholders when handling hot cooking components.
- Use the frying basket handle when opening or removing the drawer.
- Allow the basket and crisping tray to cool before cleaning.
- Do not touch hot surfaces.
- Never move the air fryer while it is hot or contains hot food.
- Place the hot frying basket drawer on a flat, heat-resistant surface.
- Avoid direct contact with hot steam escaping through the air outlet.
- Do not place objects on top of the air fryer while it is operating or remains hot.
Caution: The frying basket, crisping tray, and cooked food can remain extremely hot after the cooking cycle finishes.
Placement and Ventilation Requirements
Place the air fryer on a flat, stable, heat-resistant work surface.
Maintain at least 4 inches of clearance between the appliance and surrounding walls or objects during operation.
Do not block the air inlets or air outlet. These openings are necessary for proper air circulation.
Keep the appliance away from curtains, wall coverings, and other flammable materials.
The air fryer is intended for indoor household use only and must never be left unattended while operating.
Cooking Safety
- Always install the crisping tray before adding food.
- Make sure the frying basket drawer is completely closed during operation.
- Do not exceed the recommended maximum food capacity of 6.6 lb.
- Never use the air fryer to boil water.
- Never use the air fryer for deep frying food.
- Do not insert oversized food or metal utensils into the appliance.
- Do not place paper, cardboard, plastic, or similar materials inside the air fryer.
- Do not cover appliance components with metal foil, as this may cause overheating.
- Use caution when handling hot oil or other heated liquids.
- Do not store anything other than manufacturer-recommended accessories inside the appliance.
Warning: Overfilling the frying basket can damage the air fryer and may cause serious injury.
Plug and Power Cord Instructions
The air fryer has a polarized plug with one blade wider than the other.
This plug is designed to fit into a polarized outlet in only one direction.
If the plug does not fit completely:
- Remove the plug from the outlet.
- Reverse the plug and try again.
- If it still does not fit, contact a qualified electrician.
Never modify the polarized plug.
The short power cord helps reduce the risk of tripping or becoming entangled. If an extension cord is used, its electrical rating must be at least equal to that of the appliance, and it must be arranged so that it cannot be pulled by children or become a tripping hazard.
The air fryer should operate on a separate electrical circuit when possible, as an overloaded circuit may affect its operation.
Countertop Protection
To prevent possible discoloration or damage to finished furniture and countertop surfaces, place non-plastic coasters or place mats between the appliance and the finished surface.
The manual warns that plasticizers may affect some countertop finishes and cause darkening, stains, or permanent marks.
Before First Use
Before operating the BELLA Pro SmartCrisp 8QT Air Fryer for the first time, remove the packaging, clean the removable components, and check the crisping tray assembly.
Preparing the Air Fryer
- Remove all packaging materials and labels from the inside and outside of the appliance.
- Check underneath and around the frying basket for any remaining packaging.
- Grip the frying basket handle firmly and pull the drawer out of the air fryer body.
- Place the basket on a flat, clean work surface.
- Remove the crisping tray.
- Wash the frying basket and crisping tray using hot, soapy water.
- Wipe the air fryer body with a damp cloth.
- Dry all components thoroughly.
- Check that all four rubber tips are attached to the sides of the crisping tray.
- Position the crisping tray correctly inside the frying basket.
Important: Never immerse the air fryer body in water.
Installing the Crisping Tray Rubber Tips
Four rubber tips help hold the crisping tray securely inside the frying basket.
If a rubber tip becomes detached:
- Locate the corresponding tab on the side of the crisping tray.
- Position the rubber tip over the tab.
- Slide it back into place.
- Check that all four tips are correctly fitted before inserting the tray into the frying basket.
Initial Odor During First Use
A slight odor may occur when the air fryer is operated for the first time.
This is normal during initial operation and does not affect the flavor of air-fried food.
Setup and Operating Instructions
The SmartCrisp 8QT Air Fryer can operate using manually selected cooking settings or one of its 10 preset programs.
Setting Up the Air Fryer
- Place the air fryer on a flat, heat-resistant work surface near a suitable electrical outlet.
- Leave at least 4 inches of space around the appliance.
- Keep the ventilation openings unobstructed.
- Pull the frying basket drawer out using its handle.
- Place the crisping tray into the bottom of the frying basket.
- Add the food being prepared, keeping the total quantity within the recommended capacity.
- Insert the frying basket drawer fully into the appliance.
- Connect the power cord to the wall outlet.
- Listen for the audible tone and check that the POWER button appears.
The air fryer is ready for cooking once the control panel has been activated.
How to Turn On the Air Fryer
- Connect the air fryer to the electrical outlet.
- Wait for the initial audible signal.
- Press the POWER button.
- The touchscreen panel will illuminate and display the 10 preset cooking functions.
- Select a cooking program or adjust the time and temperature manually.
- Press START/STOP to begin cooking.
If no cooking controls are selected, the appliance remains in standby mode.
Manual Cooking Operation
Manual operation allows the cooking time and temperature to be adjusted independently.
- Press POWER to activate the touchscreen.
- Use the timer + or − controls on the right side to select the desired cooking time.
- Adjust the timer between 1 and 60 minutes in one-minute increments.
- Use the temperature + or − controls on the left side to select the cooking temperature.
- Set the temperature between 150°F and 400°F in 5°F increments.
- Check that the desired time and temperature appear on the display.
- Press START/STOP to begin cooking.
The digital display shows the temperature and remaining cooking time.
The operating instructions state that the countdown begins after the unit completes its preheating phase. Separate preheating by the user is not required.
Adjusting Cooking Time and Temperature During Operation
Cooking settings can be changed while food is being prepared.
To change the cooking time, press the + or − timer buttons on the right side of the touchscreen. Each press adjusts the time by one minute.
To change the temperature, press the + or − temperature buttons on the left side. Each press adjusts the temperature by 5°F.
Holding an adjustment button changes the selected value more rapidly.
Pausing and Resuming Cooking
The air frying operation can be interrupted by removing the frying basket drawer.
- Pull the drawer out using its handle.
- Place it on a flat, heat-resistant surface.
- Check, turn, or shake the food as required.
- Carefully slide the drawer back into the appliance.
- Make sure the drawer is completely closed.
Cooking resumes when the drawer is returned to its operating position.
Completing a Cooking Cycle
When the remaining cooking time reaches 00:00:
- Three audible beeps sound.
- The air fryer switches off automatically.
- The cooked food can be removed using the appropriate heat precautions.
The food and cooking components may remain hot after the appliance turns off.
How to Turn Off the Air Fryer
Press the POWER button to turn off the air fryer during operation.
When cooking has finished and the appliance is no longer being used, disconnect it from the electrical outlet.
10 Cooking Presets and Settings
The BELLA Pro SmartCrisp 8QT Air Fryer provides 10 preset cooking programs. Each preset has a default cooking time and temperature, along with an adjustment range.
Preset Cooking Time and Temperature Chart
| Cooking Preset | Default Time | Default Temperature | Adjustable Time | Adjustable Temperature |
| Bake | 25 min | 350°F | 1–60 min | 170–400°F |
| Roast | 35 min | 400°F | 1–60 min | 170–400°F |
| French Fries | 22 min | 400°F | 1–60 min | 170–400°F |
| Chicken | 25 min | 360°F | 1–60 min | 170–400°F |
| Veggies | 15 min | 360°F | 1–60 min | 170–400°F |
| Steak | 15 min | 400°F | 1–30 min | 170–400°F |
| Fish | 20 min | 330°F | 1–60 min | 170–400°F |
| Bacon | 10 min | 360°F | 1–30 min | 170–400°F |
| Keep Warm | 60 min | 170°F | 1–60 min | 150–200°F |
| Reheat | 6 min | 250°F | 1–60 min | 170–400°F |
The preset table identifies Ready and Shake functions for Bake, Roast, French Fries, Chicken, Veggies, Steak, Fish, and Bacon. Keep Warm and Reheat are marked as not having those functions.
How to Use a Cooking Preset
- Press POWER to activate the control panel.
- Select the desired food preset.
- Check the default cooking time and temperature displayed.
- Adjust either setting if necessary.
- Press START/STOP to begin the cooking cycle.
- Check the food halfway through cooking.
- Turn or shake the food when required.
- Continue cooking until the food is properly cooked.
Cooking time may vary depending on the food’s quantity, thickness, density, and weight.
For foods that require additional cooking, use short time intervals and check for doneness.
Bake Preset
The Bake preset begins with a default temperature of 350°F and a cooking time of 25 minutes.
The time can be adjusted from 1 to 60 minutes, and the temperature from 170°F to 400°F.
Roast Preset
The Roast preset starts at 400°F for 35 minutes.
Time and temperature can be adjusted within the preset’s supported ranges.
French Fries Preset
The French Fries preset begins at 400°F for 22 minutes.
Cooking results depend on the type, amount, and thickness of the potatoes. The food should be checked halfway through cooking and shaken as necessary.
Chicken Preset
The Chicken preset begins at 360°F for 25 minutes.
Chicken cooking times depend on the size, weight, and type of pieces. Check the internal temperature using a meat thermometer before serving.
Veggies Preset
The Veggies preset begins at 360°F for 15 minutes.
The cooking chart provides separate temperature and time suggestions for vegetables such as broccoli, asparagus, Brussels sprouts, and root vegetables.
Steak Preset
The Steak preset begins at 400°F for 15 minutes.
Its adjustable timer range is 1 to 30 minutes.
Cooking times depend on the thickness and desired doneness of the steak. The manual recommends checking cooking progress with a meat thermometer.
Fish Preset
The Fish preset begins at 330°F for 20 minutes.
The cooking chart also includes a separate suggested setting for battered fish fillets. Cooking progress should be checked before serving.
Bacon Preset
The Bacon preset starts at 360°F for 10 minutes.
Because bacon contains a relatively high amount of fat, accumulated fat may need to be emptied between cooking batches to reduce excess smoke.
Keep Warm Preset
The Keep Warm function begins at 170°F for 60 minutes.
The temperature can be adjusted between 150°F and 200°F, and the time between 1 and 60 minutes.
Reheat Preset
The Reheat preset begins at 250°F for 6 minutes.
The time can be adjusted between 1 and 60 minutes, and the temperature between 170°F and 400°F.
Air Frying Techniques and Cooking Tips
Proper food preparation, basket arrangement, and regular checks during cooking help produce even results.
Preparing Food Before Air Frying
Food should be patted dry before cooking to encourage browning and reduce excess smoke.
Unless a food is already pre-oiled, a light coating of oil can help achieve a browned and crisp texture.
The manual lists the following suitable oils:
- Canola oil
- Olive oil
- Avocado oil
- Coconut oil
- Grapeseed oil
- Peanut oil
- Vegetable oil
Spray oils distribute oil evenly and can reduce the total amount needed.
Shaking and Turning Food
For even browning, food should be checked halfway through the cooking cycle.
- Pull out the frying basket using its handle.
- Place the hot basket drawer on a heat-resistant surface.
- Check the cooking progress.
- Turn or shake the food as required by the cooking instructions.
- Adjust the temperature or time if necessary.
- Reinsert the basket drawer to continue cooking.
Caution: Always use oven mitts when handling the hot basket. The manual also directs users to keep the clear basket lock secured when shaking food.
Cooking Breaded Foods
For crispier results when preparing freshly breaded foods:
- Cut food into smaller pieces when appropriate to increase its exposed surface area.
- Press the breading firmly onto the food.
- Refrigerate breaded food for at least 30 minutes before air frying.
- Arrange the pieces in the frying basket without allowing them to touch.
- Leave space for air circulation around the food.
- Cook using the selected time and temperature.
Smaller cooking batches can produce shorter cooking times and better results.
Cooking High-Fat Foods
Naturally fatty foods, including bacon, chicken wings, and sausages, may release grease into the basket drawer.
To reduce excessive smoke, accumulated fat may need to be emptied between batches.
Hot oil can collect at the bottom of the drawer. The manual warns against turning the drawer upside down with the frying basket attached and directs users to remove the basket before emptying collected oil.
Use the basket-lock and removal precautions described in the operating instructions. Handle accumulated hot oil carefully to avoid burns.
Air Frying Frozen Foods
Prepackaged frozen foods can also be prepared in the air fryer.
Cooking time may need to be reduced depending on the food type and quantity.
The manual recommends:
- Following the food package’s suggested cooking instructions where appropriate.
- Checking the food halfway through the cooking cycle.
- Adjusting the time or temperature as necessary.
- Checking cooking progress again after the selected time finishes.
Air Frying Cooking Time and Temperature Chart
The following cooking suggestions are taken from the instruction manual. Cooking times are estimates based on average food sizes and weights.
Actual cooking time can vary with the amount, thickness, and density of food. Adjust cooking time as necessary and verify doneness before serving.
Vegetable and Potato Cooking Chart
| Food | Temperature | Cooking Time | Preparation and Instructions |
| Root Vegetables, 3–4 cups, fresh | 370°F | 15–20 min | Toss with oil and shake 3 times. |
| Asparagus, 3–4 cups, thin fresh stems | 370°F | 7–9 min | Spray with oil and shake twice. |
| Green Beans or Sugar Snap Peas, 3–4 cups | 370°F | 7–9 min | Spray with oil and shake once. |
| Broccoli, 3–4 cups, fresh | 370°F | 5–7 min | Spray with oil and shake 3 times. |
| Brussels Sprouts, 3–4 cups, halved | 370°F | 8–10 min | Spray with oil and shake twice. |
| Butternut Squash, 3–4 cups, ½-inch chunks | 370°F | 15 min | Remove seeds, spray with oil, and shake 3 times. |
| Fennel, 3–4 cups, chopped | 370°F | 7–9 min | Spray with oil and shake twice. |
| Sweet Potato Fries, fresh, ⅛–¼-inch thick | 400°F | 13–15 min | Spray with oil and shake 3 times. |
| French Fries, fresh Idaho potatoes, ¼–⅓-inch thick | 400°F | 12 min | Spray with oil and shake 3 times. |
| French Fries, frozen, ¼–⅓-inch thick | 400°F | 12 min | Spray with oil and shake 3 times. |
Meat, Chicken, and Seafood Cooking Chart
| Food | Temperature | Cooking Time | Instructions |
| Meat Roasts or Chops | 360°F | 25 min | Rub or spray with oil, season, turn over, and test for doneness. |
| Ribeye Steak, Medium Rare | 400°F | 6 min | Season, turn, check doneness, and allow to rest. |
| Ribeye Steak, Medium | 400°F | 10 min | Season, turn, check doneness, and allow to rest. |
| Ribeye Steak, Well Done | 400°F | 14 min | Season, turn, check at 12 minutes, and allow to rest. |
| Hamburgers, ⅓ lb each, up to 4 | 350°F | 3–6 min | Apply oil and seasoning, turn over, and test for doneness. |
| Chicken Wings, 2–3 lb, fresh or thawed | 360°F | 20 min | Spray with oil, shake twice, and test for doneness. |
| Boneless Chicken Tenders or Fingers | 360°F | 18–20 min | Spray with oil and shake once. |
| Bone-In Chicken Pieces | 360°F | 20–30 min | Spray with oil, turn over, and test for doneness. |
| Fish Fillet, fresh or thawed, battered | 400°F | 10 min | Spray with oil, turn over, and test for doneness. |
| Shrimp, 1–2 lb, thawed and battered | 320°F | 8 min | Spray with oil, turn over, and shake. |
The ribeye steak entries are based on two steaks weighing approximately 1.25 lb each and measuring 1½ inches thick, starting at room temperature. The chart includes a 15-minute resting instruction for steak.
Important: These cooking times are estimates, not guarantees of doneness. The manual requires a meat thermometer to confirm that meat, poultry, and fish are thoroughly cooked before serving.
Food Internal Temperature Guidance
The instruction manual provides the following internal cooking temperatures.
| Food Category | Internal Temperature Listed |
| Beef, Lamb, and Similar Meats | 145°F / 63°C |
| Pork | 160°F / 71°C |
| Poultry | 170–180°F / 77–82°C |
| Reheated Meat and Poultry | 165°F / 74°C |
These are the temperature recommendations printed in the supplied manual. Cooking times and appearance alone should not be used to determine whether food is safe to eat.
Resting Food After Cooking
The air frying instructions recommend allowing cooked food to rest for 5–10 minutes.
After cooking:
- Remove the frying basket drawer from the appliance.
- Place it on a flat, heat-resistant surface.
- Allow the food to rest for the recommended period.
- Remove the cooked food carefully.
- Return the basket to its operating position before preparing another batch.
The steak instructions provide a separate 15-minute resting period.
Cleaning and Maintenance Instructions
The BELLA Pro SmartCrisp 8QT Air Fryer requires routine cleaning of its removable basket, crisping tray, and exterior surfaces.
The appliance contains no user-serviceable internal components.
How to Clean the Frying Basket and Crisping Tray
- Turn off the air fryer and disconnect the power cord.
- Allow the appliance, frying basket, and crisping tray to cool completely.
- Pull the frying basket drawer out of the appliance.
- Use the center hole of the crisping tray to lift it out of the basket.
- Wash the frying basket and crisping tray using hot, soapy water.
- Rinse and dry the cleaned components thoroughly.
- Reassemble the crisping tray and basket before the next use.
Caution: Do not use metal kitchen utensils, abrasive cleansers, or abrasive cleaning products on the frying basket or crisping tray. These materials can damage the ceramic nonstick coating.
How to Clean the Air Fryer Body
- Disconnect the appliance from the electrical outlet.
- Allow the air fryer body to cool completely.
- Wipe the exterior using a soft, non-abrasive damp cloth.
- Keep the electrical components away from water and other liquids.
- Allow the appliance to dry before storing.
Warning: Never immerse the main air fryer body in water.
Routine Maintenance
The air fryer requires little maintenance beyond regular cleaning and proper handling.
| Maintenance Task | Instructions |
| Frying Basket Cleaning | Wash with hot, soapy water after the appliance cools. |
| Crisping Tray Cleaning | Remove the tray and wash using hot, soapy water. |
| Rubber Tip Inspection | Check that all four tray tips remain in position. |
| Exterior Cleaning | Wipe with a soft, non-abrasive damp cloth. |
| Nonstick Coating Care | Avoid metal utensils and abrasive cleaning materials. |
| Power Cord Inspection | Do not operate the appliance if the cord is damaged. |
| Electrical Servicing | Refer repairs requiring disassembly to a qualified technician. |
Protecting the Ceramic Nonstick Coating
The frying basket and crisping tray have ceramic nonstick surfaces that can be damaged by abrasive cleaning methods.
Avoid using:
- Metal kitchen utensils.
- Metal scouring pads.
- Abrasive cleaners.
- Harsh scrubbing tools that can damage the coating.
Metal scouring pads are also prohibited because broken pieces could contact electrical components and create an electric shock hazard.
Storage Instructions
The air fryer should be cleaned, dried, and completely cooled before storage.
How to Store the Air Fryer
- Turn off the appliance and unplug it.
- Allow the air fryer and all removable components to cool.
- Clean the frying basket and crisping tray.
- Make sure all components are completely dry.
- Reassemble the crisping tray and frying basket.
- Lock the frying basket drawer into the air fryer body.
- Store the appliance in its original box or a clean, dry location.
Never store the air fryer while it is hot or wet.
Troubleshooting Guide
The following table summarizes operating conditions and corrective actions supported by the SmartCrisp instruction manual.
| Problem or Situation | Possible Cause or Condition | Recommended Action |
| Air fryer does not begin cooking | Frying basket drawer is not completely closed. | Fully insert and close the basket drawer. |
| Cooking does not start after connecting power | Appliance is in standby mode. | Press POWER, select a cooking function, and press START/STOP. |
| Cooking pauses when the basket is removed | The drawer has been pulled out during operation. | Return the basket drawer to its fully closed position to resume cooking. |
| Appliance does not operate properly | The electrical circuit may be overloaded. | Operate the air fryer on a separate electrical circuit. |
| Food is not fully cooked after the selected time | Food thickness, density, quantity, or weight affects cooking time. | Check doneness and continue cooking in short intervals if necessary. |
| Food cooks unevenly | Food may need turning or shaking during the cycle. | Check the basket halfway through cooking and turn or shake food as instructed. |
| Excess smoke occurs with fatty foods | Fat may accumulate in the basket drawer. | Follow the safe handling instructions and empty accumulated fat between batches when necessary. |
| A slight odor occurs during first use | Initial operation of the appliance. | A slight initial odor is normal and should not affect food flavor. |
| Air fryer malfunctions during use | An appliance fault has occurred. | Pull out the basket drawer, unplug the appliance, and discontinue use. Do not attempt repairs. |
Air Fryer Not Starting
If the air fryer is connected to power but cooking does not begin:
- Check that the appliance is connected to the required 120 V AC outlet.
- Make sure the frying basket drawer is completely closed.
- Press the POWER button.
- Select the desired cooking preset or manually set the time and temperature.
- Press START/STOP.
The air fryer cannot operate with the basket drawer open.
If the appliance is malfunctioning, discontinue use and contact customer service.
Air Fryer Stops When the Basket Is Removed
Removing the frying basket drawer interrupts the air frying process.
After checking or turning food, fully insert the basket drawer into the appliance.
The air frying operation resumes when the drawer is replaced.
Food Is Not Fully Cooked
Cooking times depend on several factors, including:
- Amount of food.
- Food thickness.
- Food density.
- Food weight.
- Selected cooking temperature.
If food requires more cooking, continue using short cooking intervals and check progress.
Use a meat thermometer to verify doneness when preparing meat, poultry, or fish.
Food Is Not Browning Evenly
To promote even cooking and browning:
- Check the food halfway through the cooking cycle.
- Turn or shake food as needed.
- Keep food arranged so hot air can circulate around it.
- Cook smaller batches when appropriate.
- Adjust cooking time or temperature if necessary.
For breaded foods, avoid arranging pieces so closely that they touch.
Excessive Smoke During Cooking
Excess smoke may occur when naturally fatty foods release grease or when food contains excess surface moisture.
To reduce smoke:
- Pat food dry before cooking.
- Use the recommended amount of oil.
- Check fatty foods during cooking.
- Empty accumulated fat between batches when necessary, following the hot-oil safety precautions.
- Keep the appliance and ventilation openings unobstructed.
If the appliance begins to malfunction, pull out the frying basket drawer, unplug the unit, and discontinue use.
Warranty Information
The BELLA Pro SmartCrisp 8QT Air Fryer includes a limited two-year warranty provided by SENSIO Inc.
The warranty applies to the original retail purchaser and begins on the initial purchase date.
Warranty Coverage
| Warranty Detail | Coverage |
| Warranty Provider | SENSIO Inc. |
| Mechanical Defects | 2 years |
| Non-Mechanical Parts | 90 days |
| Warranty Start Date | Original retail purchase date |
| Eligible Purchaser | Original retail purchaser |
| Transferability | Non-transferable |
| Proof of Purchase | Original sales receipt required |
| Warranty Remedy | Repair, replacement, or refund at SENSIO Inc.’s discretion |
The two-year warranty covers mechanical defects in materials and workmanship. Non-mechanical parts are covered for 90 days.
SENSIO Inc. may repair or replace a defective appliance or issue a refund during the applicable warranty period.
Warranty Exclusions
The warranty excludes normal wear and damage resulting from:
- Negligent use.
- Incorrect voltage or electrical current.
- Improper routine maintenance.
- Use contrary to the operating instructions.
- Unauthorized disassembly.
- Repair or modification by anyone other than qualified SENSIO Inc. personnel.
- Natural disasters such as fires, floods, hurricanes, or tornadoes.
The warranty also contains limitations relating to incidental and consequential damages and implied warranties.
Specific warranty rights and limitations may vary by state, province, or jurisdiction.
How to Request Warranty Service
- Contact Customer Service at 1-866-832-4843.
- Describe the product issue to the customer service representative.
- Follow the assistance provided during the call.
- If the issue cannot be resolved by telephone, a case number will be issued and return instructions provided.
- Attach a label to the product with the purchaser’s name, address, daytime contact number, case number, and description of the problem.
- Include a copy of the original sales receipt.
- Carefully package the product and required documentation.
- Return the product according to the customer service instructions, with shipping and insurance prepaid.
SENSIO Inc. does not accept responsibility or liability for the returned appliance while it is in transit to its customer service center.
Customer Support and Contact Information
BELLA Pro customer service can assist with product questions, operating problems, and warranty-related inquiries.
| Contact Information | Details |
| Brand | BELLA Pro |
| Company | SENSIO Inc., doing business as Made by Gather |
| Customer Service Phone | 1-866-832-4843 |
| Customer Service Email | help@bellahousewares.com |
| Website | https://bellakitchenware.com |
| Company Location | New York, NY 10016, USA |
Product Registration
The instruction manual provides a product registration option through the BELLA website.
Product registration is available at https://bellakitchenware.com.
The original purchase receipt should be retained because proof of purchase is required for warranty validation.
Frequently Asked Questions
How do you use the BELLA Pro SmartCrisp 8QT Air Fryer?
Place the air fryer on a flat, heat-resistant surface, install the crisping tray, and insert food into the frying basket. Close the basket, connect the appliance to a 120 V AC outlet, and press POWER. Select a preset or adjust the cooking time and temperature manually, then press START/STOP to begin cooking.
What are the 10 presets on the BELLA Pro SmartCrisp Air Fryer?
The 10 presets are Bake, Roast, French Fries, Chicken, Veggies, Steak, Fish, Bacon, Keep Warm, and Reheat. Each preset has a default temperature and cooking time that can be adjusted within its supported range.
Does the BELLA Pro SmartCrisp 8QT Air Fryer need preheating?
Separate preheating is not necessary according to the instruction manual. The operating instructions state that the cooking timer begins counting down after the appliance completes its preheating phase.
What is the maximum cooking temperature of the SmartCrisp 8QT Air Fryer?
The maximum cooking temperature is 400°F. The manual temperature range is 150°F to 400°F, adjustable in 5°F increments. Individual presets may have different minimum temperatures.
How do you clean the BELLA Pro SmartCrisp 8QT Air Fryer?
Unplug the appliance and allow it to cool completely. Remove the frying basket and crisping tray, then wash them in hot, soapy water. Clean the air fryer body with a soft, non-abrasive damp cloth. Do not immerse the appliance in water or use metal utensils or abrasive cleaners on the ceramic nonstick coating.
Why is the BELLA Pro air fryer not starting?
The air fryer will not operate unless the frying basket drawer is fully closed. Check that the drawer is properly inserted, press POWER, select the cooking settings, and press START/STOP. If the appliance malfunctions, unplug it and contact customer service rather than attempting repairs.
What is the maximum food capacity of the BELLA Pro 8QT Air Fryer?
The SmartCrisp air fryer has an 8-quart capacity. The instruction manual recommends a maximum food weight of 6.6 lb in the frying basket. Overfilling can damage the appliance and create a safety hazard.
What warranty comes with the BELLA Pro SmartCrisp 8QT Air Fryer?
The air fryer includes a limited two-year warranty covering mechanical defects in materials and workmanship and 90 days of coverage for non-mechanical parts. The warranty is valid for the original retail purchaser and requires proof of purchase. For assistance, contact BELLA customer service at 1-866-832-4843 or help@bellahousewares.com.