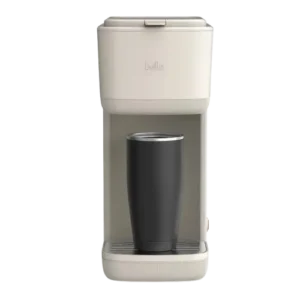
| Document Detail | Information |
| Document Title | Single-Serve Coffee Maker Instruction Manual |
| Document Type | Instruction Manual |
| Brand Name | bella |
| Product Name | Single-Serve Coffee Maker |
| Model Number(s) | 35126, 35183, 35184, 35185 |
| PDF File Size | 3 MB |
| Number of Pages | 12 |
| Languages | English, Spanish |
bella Single-Serve Coffee Maker 35126
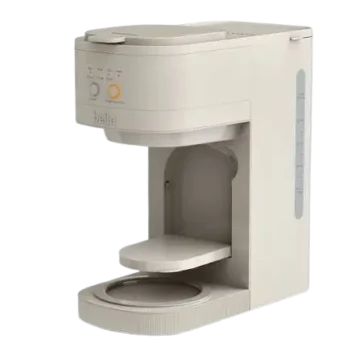
The bella Single-Serve Coffee Maker is a countertop brewing appliance designed to prepare one serving of coffee using standard coffee pods or ground coffee. It features a removable pod adapter, a reusable ground coffee filter, a 14-fluid-ounce water reservoir, and an adjustable-height drip tray for different cup sizes.
The coffee maker uses a single power button to start brewing. Once activated, its indicator light illuminates, and the machine heats the water and dispenses coffee into the cup below. The appliance and indicator light turn off automatically when the brewing cycle finishes.
The reusable coffee filter allows coffee to be prepared using a standard medium grind without disposable pods. For pod brewing, the supplied pod adapter accepts standard-style coffee pods. The machine can also dispense hot water for preparing tea, instant hot chocolate, cider, oatmeal, and soup.
The water reservoir has a maximum capacity of 14 fluid ounces (1¾ cups). Brewing with either coffee pods or ground coffee takes less than five minutes under the operating conditions described in the instructions.
These instructions cover first-time setup, coffee pod brewing, reusable filter operation, hot-water dispensing, cleaning, descaling, troubleshooting, and warranty service.
Product Overview
The bella Single-Serve Coffee Maker combines pod compatibility and reusable-filter brewing in a compact upright appliance.
Water is added to the reservoir before brewing. A pod adapter or reusable coffee filter is installed inside the compartment beneath the lid, and the prepared beverage is dispensed through the coffee nozzle into a heat-safe cup.
The adjustable drip tray can be positioned in the available tray slots to accommodate different cup heights.
Main Features
- Single-serve brewing: Prepares one cup at a time.
- 14 oz maximum water capacity: Holds up to 1¾ cups of water per brewing cycle.
- Standard coffee pod compatibility: Uses the supplied pod adapter.
- Reusable ground coffee filter: Supports brewing with standard medium-ground coffee.
- Single-button operation: Starts brewing using the power button.
- Automatic shutoff: The machine turns off after brewing is complete.
- Power indicator light: Illuminates during the brewing cycle.
- Adjustable-height drip tray: Allows different cup positions.
- Water level indicator: Stepped markings inside the water reservoir.
- Hot-water dispensing: Supports instant beverages and foods prepared in a cup.
- Removable brewing accessories: The pod adapter and reusable coffee filter can be cleaned separately.
- Household operation: Designed for use with a 120V AC electrical outlet.
Parts and Components
The coffee maker includes the following components identified in the product diagram.
| Component | Function |
| Pod Adapter | Holds a standard-style coffee pod during brewing |
| Drip Tray Cover | Provides the surface beneath the dispensing area |
| Adjustable-Height Drip Tray | Supports the cup at the selected height |
| Reusable Ground Coffee Filter | Holds medium-ground coffee for brewing |
| Lid Tab | Releases the lid to access the brewing compartment |
| Lid | Closes the water reservoir and brewing compartment |
| Piercer | Punctures the coffee pod during brewing |
| Water Tank with Stepped Level Indicator | Holds water and shows fill levels |
| Adapter/Filter Compartment | Holds the pod adapter or reusable coffee filter |
| Coffee Nozzle | Dispenses the brewed beverage |
| Drip Tray Slots | Provide positions for adjusting tray height |
| Power Button with Indicator Light | Starts brewing and displays operating status |
| Electrical Cord with Polarized Plug | Connects the appliance to electrical power |
Pod Adapter
The pod adapter holds a standard-style coffee pod inside the brewing compartment.
The adapter must be inserted correctly before closing the lid.
Caution: The pod adapter contains a sharp piercing needle. Never place fingers inside the adapter.
Reusable Ground Coffee Filter
The reusable coffee filter holds ground coffee and can be washed after each brewing cycle.
It is designed for standard medium-ground coffee.
The instructions recommend starting with approximately two heaping tablespoons of coffee grounds, with the amount adjustable according to taste.
Water Tank
The water tank holds the water required for each brewing cycle.
It includes a stepped level indicator and has a maximum capacity of 14 fluid ounces (1¾ cups).
Only fresh, cool water should be used for normal operation.
Lid and Lid Tab
The lid provides access to the water tank and brewing compartment.
The lid tab is used to release and open the cover.
The lid must be correctly closed and locked before brewing.
Piercing Needles
The brewing system has two sharp needles:
- One inside the pod adapter.
- One on the upper underside of the adapter compartment.
These needles puncture the coffee pod during brewing.
Warning: Keep fingers away from both needles, including during cleaning.
Adjustable-Height Drip Tray
The removable drip tray provides a platform for the cup.
Its position can be adjusted using the drip tray slots.
The cup must be centered beneath the coffee nozzle before brewing begins.
Power Button and Indicator Light
The power button starts the brewing cycle.
The indicator light illuminates while the coffee maker operates.
Both the appliance and indicator light turn off automatically at the end of the brewing cycle.
Technical Specifications
| Specification | Details |
| Brand | bella |
| Product Name | Single-Serve Coffee Maker |
| Model Number(s) | 35126, 35183, 35184, 35185 |
| Product Type | Electric Single-Serve Coffee Maker |
| Brewing Capacity | 14 fl oz |
| Maximum Water Capacity | 1¾ Cups |
| Electrical Supply | 120V AC |
| Plug Type | Polarized |
| Compatible Coffee | Standard-Style Coffee Pods |
| Ground Coffee Type | Standard Medium Grind |
| Recommended Ground Coffee Quantity | 2 Heaping Tablespoons |
| Brewing Options | Coffee Pod, Ground Coffee, Hot Water |
| Pod Adapter | Included |
| Reusable Ground Coffee Filter | Included |
| Adjustable Drip Tray | Yes |
| Water Level Indicator | Stepped |
| Brew Control | Power Button |
| Power Indicator Light | Included |
| Automatic Shutoff | After Brewing |
| Coffee Brewing Time | Under 5 Minutes |
| Recommended Cooling Interval | At Least 5 Minutes Between Cycles |
| Dishwasher-Safe Components | None |
| Descaling Solution | Undiluted White Household Vinegar |
| Vinegar Quantity for Descaling | 14 oz |
| Intended Use | Household |
| Mechanical Warranty | 2 Years |
| Non-Mechanical Parts Warranty | 90 Days |
Important Safety Instructions
The bella Single-Serve Coffee Maker produces hot water and steam during operation. Incorrect handling may cause burns, electrical shock, fire, or appliance damage.
Follow all safety instructions before operating, cleaning, or servicing the appliance.
Electrical Safety
- Read all instructions before using the coffee maker.
- Connect the appliance only to a 120V AC electrical outlet.
- Never immerse the coffee maker, electrical cord, or plug in water or another liquid.
- Do not use the appliance with a damaged cord or plug.
- Stop using the machine if it malfunctions or becomes damaged.
- Unplug the coffee maker when it is not in use.
- Disconnect electrical power before cleaning.
- Allow the appliance to cool before installing or removing components.
- Use only accessories and attachments recommended for the appliance.
- Do not operate the coffee maker outdoors.
- Keep the power cord away from hot surfaces.
- Do not allow the cord to hang over a countertop or table edge.
- Do not position the appliance near a hot burner or inside a heated oven.
Warning: Do not attempt to repair the coffee maker yourself. Unauthorized repair may void the warranty.
Hot Water and Steam Safety
The coffee maker generates heat and steam during brewing.
- Do not touch hot surfaces directly.
- Use the designated handles and controls.
- Never open the lid during a brewing cycle.
- Do not move the coffee maker while it contains hot liquids.
- Allow hot liquid to cool before moving the appliance.
- Keep hands away from the brewing compartment during operation.
- Use a cup suitable for hot liquids.
- Do not remove the cup until the coffee maker has completed brewing and turned off.
Warning: Opening the lid during brewing can expose the user to boiling water and steam, causing serious burns.
Piercing Needle Safety
The appliance contains two sharp piercing needles.
One needle is located inside the pod adapter, while the other is located on the upper underside of the adapter compartment.
- Never place fingers inside the pod adapter.
- Keep fingers away from the upper piercing needle.
- Take particular care when removing or cleaning the pod adapter.
- Do not touch the piercing needles directly.
Water Reservoir Safety
- Always fill the water tank before connecting electrical power.
- Use fresh, cool water.
- Never fill the reservoir beyond 14 fluid ounces.
- Do not add warm water for normal brewing.
- Do not add milk, coffee, food products, or other liquids to the reservoir.
- Do not mix anything with the water unless specifically directed for cleaning or descaling.
Important: Water must be added to the tank before the power cord is plugged into the electrical outlet.
Cooling Between Brewing Cycles
Allow the appliance to cool for at least five minutes between brewing cycles.
Wait at least five minutes before refilling the water reservoir.
Adding water while the machine is still hot may expose the user to steam and cause injury.
Placement and Fire Safety
- Place the appliance on a dry, level, heat-resistant surface.
- Keep it away from countertop edges.
- Leave at least 4 inches of clearance between the coffee maker and walls or other objects.
- Do not place objects on top of the machine during operation.
- Do not place the coffee maker inside a cabinet while it is operating.
- Keep it away from hot stovetops, gas burners, and ovens.
- Do not move the appliance while it contains hot liquid.
Child Safety
The coffee maker must not be used by children without appropriate supervision.
Children should be supervised to prevent them from playing with the appliance.
People with reduced physical, sensory, or mental capabilities, or insufficient experience, should use the coffee maker only with appropriate supervision or instruction.
If the Coffee Maker Falls Into Water
If the appliance falls into water or becomes immersed:
- Disconnect it from electrical power.
- Do not attempt to operate the appliance.
- Arrange qualified inspection before any further use.
If the Coffee Maker Malfunctions
If the appliance begins malfunctioning during operation:
- Press the power button to stop brewing.
- Unplug the power cord.
- Stop using the machine.
- Do not attempt repairs.
Contact a qualified technician or Customer Service for assistance.
Polarized Plug and Power Cord
Polarized Plug
The coffee maker has a polarized plug with one blade wider than the other.
It is designed to fit into a polarized electrical outlet in only one direction.
If the plug does not fit completely:
- Remove it from the outlet.
- Reverse its orientation.
- Try inserting it again.
- If it still does not fit, contact a qualified electrician.
Do not modify the electrical plug.
Power Cord Requirements
The appliance includes a short power cord to reduce the risk of entanglement or tripping.
Extension Cord Precautions
A longer detachable power cord or extension cord may be used if appropriate precautions are followed.
- Its marked electrical rating must be at least equal to the coffee maker’s electrical rating.
- If the appliance is grounded, use a grounding-type three-wire extension cord.
- Arrange the cord so it does not hang over the countertop.
- Keep the cord away from children and areas where someone might trip.
Electrical Circuit Requirements
An overloaded electrical circuit may prevent the coffee maker from operating correctly.
The manufacturer recommends operating the appliance on a separate electrical circuit from other appliances.
Countertop Protection
To protect countertop and furniture finishes, place non-plastic coasters or placemats between the appliance and the surface.
This helps prevent possible discoloration, stains, or permanent marks.
Before First Use
Before preparing coffee, the removable brewing components must be cleaned and the machine should be flushed with water.
Step 1: Unpack the Coffee Maker
Carefully remove the appliance from its packaging.
Check all packaging materials before discarding them because accessories may be packed separately inside.
Step 2: Clean the Reusable Filter
Wash the reusable ground coffee filter in warm, soapy water.
Rinse thoroughly and dry.
Step 3: Clean the Pod Adapter
Wash the pod adapter in warm, soapy water.
Rinse thoroughly and dry completely.
Caution: Keep fingers away from the sharp piercing needle inside the adapter.
Step 4: Wipe the Exterior
If necessary, wipe the exterior using a soft, damp cloth.
Important: Do not immerse the coffee maker in water or place any parts in a dishwasher.
Step 5: Run an Initial Water-Only Cycle
The manufacturer recommends running at least one full brewing cycle with water before preparing coffee.
- Place the coffee maker on a dry, level, heat-resistant surface.
- Open the lid.
- Add fresh, cool water to the reservoir without exceeding 14 ounces.
- Make sure the brewing compartment is correctly assembled and the lid is locked.
- Position a heat-safe cup beneath the coffee nozzle.
- Connect the power cord to a 120V AC outlet.
- Press the power button.
- Allow the full cycle to finish.
- Discard the dispensed water.
This initial cycle helps remove manufacturing residue from the internal brewing system.
First-Use Smoke or Odor
A small amount of smoke or a slight odor may occur when the appliance is first heated.
The instructions identify this as a normal result of manufacturing oils being released.
Minor expansion or contraction sounds may also occur as the appliance heats and cools.
How to Use the bella Single-Serve Coffee Maker
The coffee maker supports brewing with a standard coffee pod or the supplied reusable filter.
Step 1: Position the Appliance
Place the machine on a dry, level, heat-resistant surface.
Keep it away from countertop edges and maintain at least four inches of clearance around it.
Step 2: Open the Lid
Push upward on the lid release tab to open the cover.
Step 3: Add Cold Water
Use the cup intended for brewing to measure the desired quantity of fresh, cool water.
Pour the water into the reservoir.
Maximum capacity: 14 fluid ounces (1¾ cups).
Do not exceed this limit because the water reservoir may overflow.
Step 4: Install the Brewing Accessory
Choose one of the following:
- Pod adapter for standard-style coffee pods.
- Reusable ground coffee filter for medium-ground coffee.
Install the selected accessory correctly inside the adapter/filter compartment.
Step 5: Close the Lid
Press the cover downward until it locks.
The lid will not lock properly if the pod adapter or reusable filter is not inserted correctly.
Step 6: Position the Cup
Center a suitable heat-safe cup on the drip tray beneath the coffee nozzle.
Adjust the drip tray height if needed.
Step 7: Connect Power
Plug the electrical cord into a 120V AC wall outlet.
Step 8: Start Brewing
Press the power button.
The indicator light illuminates, and the brewing cycle begins.
Step 9: Wait for Automatic Shutoff
Allow the machine to complete the full cycle.
The appliance and indicator light turn off automatically when brewing finishes.
Important: Do not remove the cup before the coffee maker has turned off.
Step 10: Unplug the Coffee Maker
After brewing is complete:
- Unplug the machine when it is not in use.
- Allow it to cool for at least five minutes before another brewing cycle.
- Remove and clean the used pod adapter or reusable coffee filter after the appliance has cooled.
How to Brew Coffee Using a Pod
The bella Single-Serve Coffee Maker accepts standard-style coffee pods using the supplied pod adapter.
Pod Brewing Instructions
- Place the coffee maker on a dry, heat-resistant surface.
- Open the lid using the lid release tab.
- Insert the pod adapter into the brewing compartment.
- Place a standard-style coffee pod inside the adapter.
- Use the brewing cup to measure the desired amount of cold water.
- Pour the water into the reservoir, keeping it at or below 14 fluid ounces.
- Close the lid and press it down until locked.
- Center a heat-safe cup on the drip tray.
- Plug the coffee maker into a 120V AC outlet.
- Press the power button.
- Wait for the brewing cycle to finish.
Brewing is completed in less than five minutes.
The coffee maker turns off automatically when the cycle finishes.
After Pod Brewing
- Allow the appliance to cool.
- Open the lid.
- Carefully remove the pod adapter.
- Discard the used coffee pod.
- Wash the adapter as instructed.
Warning: The pod adapter and upper brewing compartment contain sharp piercing needles.
How to Brew Coffee Using Ground Coffee
The reusable ground coffee filter allows coffee to be prepared without a disposable pod.
The instructions specify using standard medium-ground coffee.
Recommended Coffee Quantity
Start with approximately two heaping tablespoons of ground coffee.
The amount may be adjusted according to taste.
Ground Coffee Brewing Instructions
- Open the coffee maker’s lid.
- Remove the pod adapter if it is installed.
- Position the reusable ground coffee filter inside the brewing compartment.
- Add two heaping tablespoons of medium-ground coffee to the filter.
- Use the brewing cup to measure fresh, cool water.
- Add the water to the reservoir without exceeding 14 fluid ounces.
- Close and lock the lid.
- Center a heat-safe cup beneath the coffee nozzle.
- Plug the appliance into a 120V AC electrical outlet.
- Press the power button.
- Allow the brewing cycle to finish.
The brewing cycle takes less than five minutes.
Adjusting Coffee Strength
The amount of ground coffee may be adjusted according to personal taste.
The manual recommends two heaping tablespoons as the starting quantity.
After Ground Coffee Brewing
- Allow the machine to turn off automatically.
- Unplug the electrical cord when the appliance is not in use.
- Allow the machine to cool.
- Open the lid.
- Remove the reusable filter.
- Discard the used coffee grounds.
- Wash, rinse, and dry the filter.
Coffee Pod and Ground Coffee Brewing Comparison
| Brewing Detail | Coffee Pod | Ground Coffee |
| Brewing Accessory | Pod Adapter | Reusable Ground Coffee Filter |
| Coffee Type | Standard-Style Pod | Standard Medium Grind |
| Recommended Quantity | One Coffee Pod | Two Heaping Tablespoons |
| Maximum Water Quantity | 14 fl oz | 14 fl oz |
| Brewing Control | Power Button | Power Button |
| Brewing Time | Under 5 Minutes | Under 5 Minutes |
| Automatic Shutoff | Yes | Yes |
| Cleaning | Discard Used Pod and Wash Adapter | Discard Grounds and Wash Filter |
How to Adjust the Drip Tray Height
The coffee maker includes an adjustable-height drip tray and corresponding mounting slots.
The tray can be positioned to support different cup heights.
Drip Tray Adjustment
- Identify the drip tray slots on the front of the appliance.
- Position the adjustable drip tray in the appropriate slots for the cup being used.
- Make sure the tray is securely seated.
- Place the cup on the drip tray cover.
- Center the cup directly beneath the coffee nozzle.
Use a cup suitable for holding hot liquids.
Important: Do not remove the cup during brewing. Wait until the appliance and indicator light have turned off.
How to Dispense Hot Water
The bella Single-Serve Coffee Maker can also dispense hot water without brewing coffee.
This function can be used for preparing instant beverages and foods in a cup.
The instructions mention:
- Tea.
- Instant cider.
- Instant hot chocolate.
- Instant oatmeal.
- Instant soup.
Hot Water Instructions
- Place the coffee maker on a dry, level surface.
- Open the lid.
- Measure the required amount of fresh, cool water using the serving cup.
- Pour the water into the reservoir.
- Do not exceed 14 fluid ounces.
- Make sure the brewing compartment is correctly assembled.
- Close and lock the lid.
- Add the instant beverage or food mixture to a heat-safe cup according to its package instructions.
- Center the cup beneath the coffee nozzle.
- Plug the coffee maker into a 120V AC outlet.
- Press the power button.
- Allow the hot water to dispense into the cup.
- When the cycle finishes, stir the contents.
The hot-water cycle takes approximately five minutes.
Hot Water Safety
Only water should be placed inside the coffee maker’s reservoir.
Tea, hot chocolate powder, instant soup, oatmeal, and other mixtures must be prepared in the cup rather than added directly to the water tank.
Warning: The dispensed water is hot and may cause burns.
Power Button and Indicator Light
The coffee maker uses a power button with an integrated indicator light.
| Control or Indicator | Meaning |
| Power Button | Starts the brewing cycle |
| Indicator Light On | Coffee Maker Is Operating |
| Indicator Light Off After Brewing | Brewing Cycle Has Finished |
| Automatic Shutoff | Appliance Turns Off at the End of Brewing |
Starting a Brew Cycle
Press the power button after adding water, installing the brewing accessory, closing the lid, and positioning the cup.
The indicator light illuminates during brewing.
Automatic Shutoff
When the brewing cycle finishes, both the appliance and indicator light turn off automatically.
Interrupting a Brew Cycle
If brewing must be interrupted:
- Press the power button.
- Unplug the appliance from the electrical outlet.
- Allow the coffee maker to cool before handling the brewing compartment.
Do not open the lid while hot water is moving through the brewing system.
Brewing Tips and Operating Limits
Use Fresh, Cool Water
Always use fresh, cool water for brewing.
Warm water or other liquids may damage the coffee maker.
Do Not Exceed 14 Ounces
The water reservoir must never be filled beyond 14 fluid ounces.
Adding more water may cause the reservoir to overflow.
Use the Correct Brewing Accessory
Use the pod adapter for standard-style coffee pods.
Use the reusable ground coffee filter for medium-ground coffee.
The lid will not lock correctly if the brewing accessory is not installed properly.
Use a Heat-Safe Cup
The cup must be suitable for hot beverages.
Position it directly beneath the dispensing nozzle.
Wait for Automatic Shutoff
Do not remove the cup before the coffee maker has completed brewing and turned off.
Allow Cooling Between Cycles
Wait at least five minutes between brewing cycles.
Do not refill the reservoir until the machine has cooled for at least five minutes.
Never Open the Lid During Brewing
The brewing compartment contains hot water and sharp needles.
Opening the lid while brewing may cause scalding injuries.
Keep the Coffee Maker Outside Cabinets During Use
Do not operate the coffee maker inside a cabinet.
Maintain at least four inches of clearance between the appliance and nearby walls or objects.
Cleaning Instructions
The coffee maker should be cleaned regularly to prevent coffee residue from accumulating inside the brewing accessories.
Always allow the brewing cycle to finish, unplug the appliance, and let it cool before cleaning.
Before Cleaning
- Allow the coffee maker to turn off automatically.
- Unplug the electrical cord.
- Wait until the appliance has cooled.
- Open the lid using the release tab.
- Remove the used coffee pod or ground coffee.
Cleaning the Pod Adapter
- Remove the pod adapter carefully.
- Discard the used coffee pod.
- Wash the adapter in hot, soapy water.
- Rinse thoroughly.
- Dry completely.
Caution: The piercing needle inside the pod adapter is sharp. Never touch it directly.
Cleaning the Reusable Ground Coffee Filter
- Remove the reusable filter after the machine has cooled.
- Empty the used coffee grounds.
- Wash the filter in hot, soapy water.
- Rinse thoroughly.
- Allow the filter to dry completely.
Cleaning the Pod Adapter Nozzle
Coffee grounds may accumulate inside the pod adapter nozzle.
The manufacturer recommends periodically cleaning the nozzle to remove blockages.
- Unplug the appliance and allow it to cool.
- Remove the pod adapter.
- Locate the nozzle opening.
- Carefully use a toothpick or bent paperclip to dislodge trapped coffee grounds.
- Wash, rinse, and dry the adapter.
Warning: Keep fingers and cleaning tools away from the sharp piercing needle except as required for the specified nozzle cleaning procedure.
Cleaning the Exterior
- Disconnect electrical power.
- Make sure the appliance has cooled.
- Wipe the outside of the coffee maker with a soft, damp cloth.
Never immerse the appliance in water or another liquid.
Cleaning the Water Reservoir
The manual recommends rinsing the water reservoir periodically with cold water.
Important: Do not wipe the inside of the reservoir with a cloth or paper towel.
Fibers or particles from these materials may remain inside the water system and clog small openings.
Dishwasher Safety
The coffee maker and its removable parts must not be washed in a dishwasher.
| Component | Cleaning Method |
| Pod Adapter | Handwash with Hot, Soapy Water |
| Reusable Ground Coffee Filter | Handwash with Hot, Soapy Water |
| Water Reservoir | Rinse Periodically with Cold Water |
| Exterior Housing | Wipe with Damp Cloth |
| Electrical Components | Must Not Be Immersed in Water |
Warning: Dishwasher cleaning or immersion may permanently damage the appliance and void the warranty.
How to Descale the bella Single-Serve Coffee Maker
Mineral deposits can accumulate inside the coffee maker over time.
Regular descaling removes mineral buildup and helps maintain normal water flow and brewing performance.
The required descaling frequency depends on water hardness and how often the appliance is used.
Signs That Descaling Is Needed
The manufacturer identifies the following symptoms:
- Increased noise during brewing.
- Excessive steam.
- Longer brewing times.
- Pumping stops before all the water has been removed from the reservoir.
These conditions may indicate mineral deposits inside the water system.
Recommended Descaling Frequency
| Water Hardness | Recommended Descaling Frequency |
| Soft Water | Once Every Month |
| Medium-Hardness Water | Every 2 Weeks |
| Hard Water | Every Week |
The schedule applies to regular use.
Descaling Solution
Use 14 fluid ounces of fresh, cool, undiluted white household vinegar.
Important: Do not dilute the vinegar with water for the descaling cycle.
Do not add coffee grounds during descaling.
Step 1: Prepare the Appliance
- Make sure the coffee maker is ready for cleaning.
- Remove any used coffee pod or grounds.
- Position the appliance on a dry, heat-resistant surface.
Step 2: Add Vinegar
Pour 14 ounces of undiluted white household vinegar into the water reservoir.
Do not mix the vinegar with water.
Step 3: Position a Cup
Place a cup large enough to collect the dispensed vinegar on the drip tray.
The cup must be suitable for hot liquids.
Step 4: Start the Descaling Cycle
Press the power button.
Allow the full cycle to finish.
Step 5: Allow the Machine to Cool
When the cycle is complete:
- Allow the appliance to cool.
- Dispose of the collected vinegar.
Step 6: Run the First Fresh-Water Rinse
- Fill the reservoir with fresh, cool water.
- Position a suitable cup beneath the nozzle.
- Run a complete brewing cycle.
- Discard the dispensed water.
Step 7: Run the Second Fresh-Water Rinse
Repeat the full brewing cycle using fresh, cool water.
Discard the rinse water.
Two fresh-water cycles are required after descaling to remove remaining vinegar from the brewing system.
Maintenance Instructions
The coffee maker requires routine cleaning of its brewing accessories and periodic descaling of the internal water system.
Maintenance Guide
| Maintenance Task | Instructions |
| Empty Used Coffee Pods | After Brewing |
| Remove Used Coffee Grounds | After Brewing |
| Clean Pod Adapter | Wash with Hot, Soapy Water |
| Clean Reusable Filter | Wash with Hot, Soapy Water |
| Clear Pod Adapter Nozzle | Use Toothpick or Bent Paperclip Periodically |
| Rinse Water Reservoir | Use Cold Water Periodically |
| Wipe Exterior | Use Soft, Damp Cloth |
| Descale with Soft Water | Monthly |
| Descale with Medium-Hardness Water | Every 2 Weeks |
| Descale with Hard Water | Weekly |
| Cool Between Brews | At Least 5 Minutes |
Protecting the Piercing Needles
The pod adapter and brewing compartment contain sharp needles.
Do not touch these components directly.
Use caution when removing the adapter and performing routine cleaning.
Maintaining Water Flow
Mineral deposits may affect water flow, brewing time, and pump operation.
Descale the appliance according to the recommended schedule.
Appliance Servicing
The coffee maker contains no user-serviceable internal parts.
Do not attempt to disassemble or repair the electrical system.
Any repair requiring internal servicing must be performed by a qualified technician.
Troubleshooting Guide
The following troubleshooting table covers symptoms and corrective actions supported by the instruction manual.
| Problem or Condition | Possible Cause | Recommended Action |
| Lid Will Not Lock | Pod Adapter or Reusable Filter Is Not Installed Correctly | Remove and Reinstall the Brewing Accessory |
| Water Reservoir Overflows | More Than 14 oz of Water Was Added | Keep Water at or Below the Maximum Capacity |
| Brewing Takes Longer Than Usual | Mineral Deposits May Have Accumulated | Descale the Coffee Maker |
| Coffee Maker Makes More Noise | Mineral Buildup May Be Affecting Operation | Perform Descaling |
| Excessive Steam During Brewing | Mineral Deposits May Be Present | Descale the Appliance |
| Pump Stops Before Reservoir Empties | Internal Mineral Buildup May Be Present | Perform the Descaling Procedure |
| Pod Adapter Nozzle Is Blocked | Coffee Grounds Are Trapped in the Opening | Carefully Clear the Nozzle with a Toothpick or Bent Paperclip |
| Slight Odor During Initial Use | Manufacturing Oils Are Being Released | A Small Initial Odor Is Described as Normal |
| Minor Sounds During Heating or Cooling | Normal Expansion and Contraction | No Repair Is Indicated for These Normal Sounds |
| Coffee Maker Turns Off After Brewing | Automatic Shutoff Has Activated | This Is Normal Operation |
| Appliance Does Not Operate Properly | Electrical Circuit May Be Overloaded | Use a Separate Electrical Circuit |
| Appliance Malfunctions | Appliance May Require Service | Stop, Unplug, and Contact Qualified Service Personnel |
Coffee Maker Lid Will Not Close
The lid cannot lock properly if the pod adapter or reusable filter is positioned incorrectly.
- Make sure the appliance is unplugged and cool.
- Open the lid.
- Check the installed brewing accessory.
- Remove and reinstall it correctly.
- Close the lid.
Do not force the lid closed.
Coffee Maker Takes Too Long to Brew
Longer brewing times are a symptom of mineral buildup identified in the instructions.
Descale the coffee maker using 14 ounces of undiluted white household vinegar, followed by two complete fresh-water rinse cycles.
Coffee Maker Makes More Noise Than Usual
Increased noise can indicate that the appliance needs descaling.
Follow the descaling procedure and the maintenance schedule appropriate for the water hardness.
Excessive Steam During Brewing
Excessive steaming is another sign that mineral deposits may be affecting normal operation.
Descale the appliance.
Never open the lid during brewing because hot water and steam may cause injury.
Coffee Maker Stops Pumping Before Water Is Used
Mineral buildup may cause pumping to stop before all the water has been removed from the reservoir.
Perform the descaling procedure described above.
Coffee Pod Adapter Is Clogged
Coffee grounds may become stuck in the pod adapter nozzle.
After unplugging and cooling the machine, remove the adapter and carefully clear the nozzle using a toothpick or bent paperclip.
Avoid contact with the piercing needle.
Water Overflows from the Reservoir
The maximum water capacity is 14 fluid ounces.
Do not add more than this amount.
Coffee Maker Turns Off Automatically
The machine is designed to turn off at the end of a brewing cycle.
The power indicator light also turns off when brewing finishes.
Coffee Maker Malfunctions During Use
If the machine develops a malfunction:
- Press the power button to stop brewing.
- Unplug the power cord.
- Stop using the appliance.
- Contact Customer Service or a qualified technician.
Do not attempt internal repairs.
Warranty Information
The bella Single-Serve Coffee Maker includes a limited warranty provided by SENSIO Inc.
The warranty covers qualifying mechanical defects in materials and workmanship for two years from the original retail purchase date.
Non-mechanical parts are covered for 90 days.
Warranty Coverage
| Warranty Detail | Information |
| Warranty Provider | SENSIO Inc. |
| Mechanical Warranty | 2 Years |
| Non-Mechanical Parts Coverage | 90 Days |
| Warranty Start | Original Retail Purchase Date |
| Eligible Purchaser | Original Retail Purchaser |
| Transferability | Non-Transferable |
| Required Proof | Original Sales Receipt |
| Available Remedy | Repair, Replacement, or Refund at Provider’s Discretion |
| Customer Service | 1-866-832-4843 |
What the Warranty Covers
During the applicable warranty period, SENSIO Inc. may repair or replace a product found to have a qualifying defect or issue a refund.
The remedy is determined by SENSIO Inc.
Warranty Exclusions
The warranty does not cover normal wear or damage resulting from:
- Negligent use.
- Incorrect voltage or electrical current.
- Improper routine maintenance.
- Use contrary to the operating instructions.
- Unauthorized disassembly.
- Repairs or modifications performed by anyone other than qualified SENSIO Inc. personnel.
- Natural events such as fires, floods, hurricanes, or tornadoes.
The warranty also contains limitations on incidental and consequential damages. Applicable consumer rights and restrictions may vary by jurisdiction.
How to Request Warranty Service
- Contact Customer Service at 1-866-832-4843.
- Explain the problem to the service representative.
- Follow the telephone troubleshooting instructions.
- If the issue cannot be resolved, obtain a case number.
- Follow the product return instructions supplied by SENSIO Inc.
Returning the Product for Warranty Service
If a return is required, attach a tag containing:
- Customer name.
- Customer address.
- Daytime telephone number.
- Case number.
- Description of the problem.
Include a copy of the original sales receipt.
Carefully package the product and send it to the address provided by SENSIO Inc., with shipping and insurance prepaid.
SENSIO Inc. does not accept responsibility for the returned product while it is in transit to its Customer Service Center.
Customer Support Information
Customer support for the bella Single-Serve Coffee Maker is provided by SENSIO Inc., doing business as Made by Gather.
| Contact Detail | Information |
| Brand | bella |
| Company | SENSIO Inc. dba Made by Gather |
| Customer Service Phone | 1-866-832-4843 |
| Customer Service Email | help@bellahousewares.com |
| Brand Website | https://bellakitchenware.com |
| Company Location | New York, NY 10016, USA |
Product Registration
Product registration is available through https://bellakitchenware.com.
When to Contact Customer Service
Contact Customer Service if the coffee maker has a damaged power cord or plug, becomes damaged, develops a malfunction, requires professional servicing, or needs warranty assistance.
Frequently Asked Questions
How do I use the bella Single-Serve Coffee Maker?
Fill the reservoir with up to 14 ounces of fresh, cool water. Install the pod adapter with a standard coffee pod or the reusable filter with medium-ground coffee. Close and lock the lid, center a heat-safe cup beneath the nozzle, and plug the machine into a 120V AC outlet. Press the power button to start brewing. The machine turns off automatically when the brewing cycle finishes.
Can I use K-Cup-style pods in the bella Single-Serve Coffee Maker?
The instructions state that the supplied pod adapter works with standard-style coffee pods. Insert the pod into the adapter, install it in the brewing compartment, and lock the lid before starting. Do not touch the sharp needles inside the pod adapter or brewing compartment.
How much ground coffee should I use in the bella coffee maker?
The manual recommends two heaping tablespoons of standard medium-ground coffee in the reusable filter. The amount can be adjusted according to taste. The maximum water quantity for each brewing cycle is 14 fluid ounces.
How long does the bella Single-Serve Coffee Maker take to brew coffee?
Brewing with either a standard coffee pod or medium-ground coffee takes less than five minutes. The appliance turns off automatically when brewing finishes. Allow at least five minutes of cooling before starting another cycle or refilling the reservoir.
Can the bella Single-Serve Coffee Maker dispense hot water?
Yes. The machine can dispense hot water for tea, instant cider, hot chocolate, oatmeal, and soup. Add only fresh, cool water to the reservoir, then place the instant mixture inside a heat-safe cup. Run a brewing cycle and stir the contents after the hot water has been dispensed.
Why is my bella coffee maker brewing slowly or making more noise?
The manual identifies longer brewing times and increased noise as possible signs of mineral deposits inside the appliance. Excessive steaming or pumping that stops before the reservoir empties can indicate the same maintenance need. Descale the coffee maker using the specified vinegar procedure.
How do I descale the bella Single-Serve Coffee Maker?
Pour 14 ounces of undiluted white household vinegar into the reservoir without coffee grounds. Place a heat-safe cup beneath the nozzle and run a complete brewing cycle. Allow the machine to cool, then run two additional full cycles using fresh, cool water to rinse away remaining vinegar. Do not dilute the vinegar for the descaling cycle.
Are the bella coffee maker filter and pod adapter dishwasher-safe?
No. The instructions state that no parts should be washed in a dishwasher. Wash the reusable ground coffee filter and pod adapter by hand using hot, soapy water, then rinse and dry thoroughly. The appliance exterior should be wiped with a damp cloth, and the main unit must never be immersed in water.