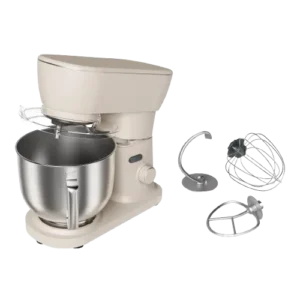
| Document Detail | Information |
| Document Title | STIR 5.3qt Tilt-Head Stand Mixer Instruction Manual |
| Document Type | Instruction Manual |
| Brand Name | bella |
| Product Name | STIR 5.3qt Tilt-Head Stand Mixer |
| Model Number(s) | 35459, 35460, 35483, 35484, 35513 |
| PDF File Size | 5 MB |
| Number of Pages | 24 |
| Languages | English, Spanish |
bella STIR 5.3qt Mixer 35459
The bella STIR 5.3qt Tilt-Head Stand Mixer is an electric kitchen appliance designed for mixing cake batters, whipping cream and eggs, kneading dough, and preparing everyday baking mixtures. It features a 5.3-quart stainless steel mixing bowl, 12 adjustable speeds, a tilt-head design, and three interchangeable mixing attachments.
The stand mixer includes a beater, balloon whisk, and dough hook. Each attachment serves a different purpose, from combining cake ingredients and preparing frosting to whipping egg whites and kneading bread or pizza dough.
The mixer head tilts upward for easier access to the bowl and attachment shaft. A splash shield with a filler opening allows small ingredients or liquids to be added while mixing, and non-skid feet help keep the appliance stable on the countertop.
Product Overview
The bella STIR 5.3qt Stand Mixer is intended for household food preparation and baking.
Its stainless steel bowl locks into the mixing bowl base, while the selected attachment connects to the shaft underneath the motorized mixer head.
The speed control dial offers settings from 1 to 12, allowing users to choose lower speeds for stirring and kneading or higher speeds for whipping and incorporating air.
Main Features
- 5.3-quart stainless steel bowl: Includes a handle for easier handling.
- Tilt-head design: Allows the mixer head to be raised for installing attachments and accessing the bowl.
- 12 adjustable speeds: Provides mixing speeds from 1 to 12.
- Beater attachment: Handles normal to heavy mixtures, including cakes, cookies, frosting, and mashed potatoes.
- Balloon whisk: Incorporates air into eggs, whipped cream, and other light mixtures.
- Dough hook: Mixes and kneads bread, pizza, pastry, and pasta dough.
- Splash shield: Helps reduce ingredient splattering.
- Filler opening: Allows small ingredients and liquids to be added during operation.
- Head tilt button: Releases the mixer head for raising or lowering.
- Non-skid feet: Help reduce appliance movement on a clean countertop.
- Thermal motor protection: Provides a reset procedure when the motor shuts down.
- Dishwasher-safe components: The bowl, splash shield, and three mixing attachments can be cleaned on the top dishwasher rack.
What’s Included
The bella STIR 5.3qt Stand Mixer includes the main appliance and three mixing attachments.
| Item | Description |
| Stand Mixer | Main appliance with motor base and tilt-head design |
| Stainless Steel Mixing Bowl | 5.3-quart bowl with handle |
| Splash Shield | Protective shield with filler opening |
| Beater | Attachment for regular and heavy mixing |
| Balloon Whisk | Attachment for whipping and incorporating air |
| Dough Hook | Attachment for mixing and kneading dough |
Parts and Components
The stand mixer contains a motorized head, adjustable speed control, bowl support, splash shield, and removable attachments.
| Component | Function |
| Stand Mixer Head | Holds and drives the selected mixing attachment |
| Splash Shield with Filler Hole | Helps contain ingredients and allows additions during mixing |
| 5.3qt Stainless Steel Mixing Bowl | Holds ingredients during preparation |
| Mixing Bowl Base | Secures the bowl to the appliance |
| Motor Base | Houses the motor and supports the mixer |
| Non-Skid Feet | Help stabilize the appliance |
| Speed Control Dial | Selects speeds 1–12 or (0) OFF |
| Head Tilt Button | Releases the mixer head for raising or lowering |
| Polarized Plug | Connects the mixer to an electrical outlet |
| Beater | Mixes batters and other normal to heavy mixtures |
| Balloon Whisk | Whips eggs, cream, and other light mixtures |
| Dough Hook | Kneads bread and other dough |
Tilt-Head Mechanism
The tilt-head mechanism allows the mixer head to move upward, providing access to the bowl and attachment shaft.
Press the head tilt button firmly to release the mixer head and lift it.
When lowering the head, press the button while moving the mixer head down until it locks securely into its working position.
Caution: Keep fingers away from the hinge area to prevent injury.
Stainless Steel Mixing Bowl
The 5.3-quart stainless steel bowl fits into the mixing bowl base.
To secure the bowl:
- Position it over the bowl rest.
- Insert the bottom of the bowl into the base.
- Turn the bowl clockwise until it locks.
Important: The safety instructions state that the bowl must not be filled more than halfway and give a maximum of 10 cups. Follow these operating limits rather than filling the bowl to its advertised volume.
Splash Shield
The splash shield fits around the attachment area beneath the mixer head.
Its filler opening allows liquids and small ingredients to be added while mixing.
The shield must be properly installed before starting the appliance.
Non-Skid Feet
The non-skid feet help the stand mixer grip the countertop.
For proper stability, the countertop should be clean and the mixer should be placed on a stable surface.
Speed Control Dial
The bella STIR stand mixer uses a rotary speed control dial.
| Dial Position | Function |
| 0 | OFF |
| 1–3 | Lower-Speed Mixing and Dough Kneading |
| 4–6 | Mixing and Stirring |
| 7–8 | Higher-Speed Mixing and Folding |
| 9–12 | Higher-Speed Beating and Whipping |
The appropriate speed depends on the attachment and the food being prepared. Use the attachment-specific ranges in the mixing guide.
How to Change Speed
- Begin with the dial at (0) OFF.
- Turn it clockwise to Speed 1.
- Allow the ingredients to begin mixing.
- Increase the speed gradually as needed.
- Turn the dial counterclockwise to (0) OFF when finished.
The manual recommends beginning at a low speed before moving to higher settings.
Technical Specifications
| Specification | Details |
| Brand | bella |
| Product Name | STIR 5.3qt Tilt-Head Stand Mixer |
| Product Identifiers | 35459, 35460, 35483, 35484, 35513 |
| Product Type | Electric Tilt-Head Stand Mixer |
| Advertised Bowl Capacity | 5.3 qt |
| Mixing Bowl Material | Stainless Steel |
| Bowl Filling Limit | No More Than Half Full |
| Maximum Bowl Capacity Stated in Safety Instructions | 10 Cups |
| Electrical Supply | 120V AC |
| Power Plug | Polarized |
| Speed Settings | 12 |
| OFF Position | 0 |
| Beater Speed Range | 1–12, Depending on Mixing Task |
| Balloon Whisk Speed Range | 8–12 |
| Dough Hook Speed Range | 1–3 |
| Maximum Flour for Bread or Pizza Dough | 5 Cups |
| Motor Protection | Manual Resettable Thermal Protector |
| Thermal Protector Rest Period | Approximately 30 Minutes |
| Mixing Bowl Cleaning | Top-Rack Dishwasher-Safe |
| Splash Shield Cleaning | Top-Rack Dishwasher-Safe |
| Mixing Attachment Cleaning | Top-Rack Dishwasher-Safe |
| Intended Use | Household |
| Mechanical Warranty | 2 Years |
| Non-Mechanical Parts Warranty | 90 Days |
Important Safety Instructions
The bella STIR 5.3qt Stand Mixer contains electrical components and moving mixing attachments. Follow these precautions to reduce the risk of fire, electric shock, injury, or appliance damage.
Electrical Safety
- Read all instructions before operating the stand mixer.
- Connect the appliance only to a 120V AC electrical outlet.
- Never immerse the motor body, plug, or power cord in water or another liquid.
- Make sure the speed dial is at (0) OFF before connecting the power cord.
- Always turn the mixer off before installing or removing attachments.
- Unplug the appliance before cleaning.
- Disconnect the mixer when it is not in use.
- Hold the plug when disconnecting power. Never pull the power cord.
- Do not use the appliance if the cord or plug is damaged.
- Do not operate a mixer that has malfunctioned or been damaged.
- Contact Consumer Service if the appliance requires professional attention.
Warning: Do not attempt to repair the stand mixer yourself. Unauthorized repair may void the warranty.
Moving Parts Safety
- Keep hands away from moving attachments.
- Keep hair and loose clothing clear of the mixing area.
- Do not allow spatulas or other utensils to contact moving attachments.
- Never attempt to bypass the appliance’s safety interlock mechanisms.
- Remove attachments before cleaning.
- Switch off and unplug the mixer before changing attachments.
- Keep fingers away from the tilt-head hinge.
Mixing Bowl Safety
- Use only the mixing bowl supplied with this stand mixer.
- Make sure the bowl is securely locked into the base.
- Center the splash shield over the bowl.
- Do not overfill the bowl.
- Do not fill the bowl more than halfway.
- Follow the stated maximum of 10 cups.
An incorrectly fitted bowl may cause spills or damage to the appliance or surrounding property.
Child Safety
The stand mixer must not be operated by children.
Keep the appliance and its power cord out of children’s reach.
Close supervision is required when the mixer is used near children, and children must not be allowed to play with the appliance.
People with reduced physical, sensory, or mental capabilities, or insufficient experience, must receive close supervision and appropriate instructions from a responsible person.
Placement and Heat Safety
- Place the mixer on a stable countertop.
- Never operate it in an unstable position.
- Do not use the appliance outdoors.
- Keep the cord away from hot surfaces.
- Do not allow the cord to hang over the edge of a counter or table.
- Do not place the mixer near a hot gas or electric burner.
- Do not put the appliance inside a heated oven.
- Use the mixer only for its intended household purpose.
A heat-resistant trivet or cutting board beneath the appliance is recommended to help prevent heat damage to the countertop.
If the Mixer Falls Into Water
If the appliance falls or accidentally becomes immersed in water:
- Unplug it immediately.
- Do not reach into the water.
- Do not use the appliance after it has fallen into or been immersed in water.
Polarized Plug and Power Cord Instructions
Polarized Plug
The stand mixer has a polarized plug with one blade wider than the other.
It is designed to fit a polarized electrical outlet in only one direction.
If the plug does not fit completely:
- Remove it from the outlet.
- Reverse the plug.
- Try inserting it again.
- If it still does not fit, contact a qualified electrician.
Do not modify the plug.
Extension Cord Precautions
The mixer includes a short power cord to reduce entanglement and tripping risks.
If a longer detachable cord or extension cord is used:
- Its marked electrical rating must be at least equal to the appliance rating.
- If the appliance is grounded, the extension cord must be a grounding-type three-wire cord.
- The longer cord must not hang over a counter or table where children could pull it or someone could trip.
Electrical Circuit Requirements
An overloaded electrical circuit may prevent the stand mixer from operating correctly.
The manual recommends using an electrical circuit separate from other appliances.
Before First Use
The mixing bowl and attachments must be washed before using the mixer for the first time.
Initial Preparation
- Make sure the speed control dial is set to (0) OFF.
- Unplug the stand mixer.
- Remove the mixing bowl and attachments.
- Wash them in warm, soapy water.
- Rinse thoroughly.
- Dry the cleaned components.
- Place the stand mixer on a stable countertop.
- Select the appropriate attachment for the ingredients being prepared.
After cleaning, assemble the mixer before connecting power.
How to Assemble the Stand Mixer
The stand mixer must have its bowl, splash shield, and selected mixing attachment securely installed before operation.
Step 1: Raise the Mixer Head
- Make sure the appliance is switched off and unplugged.
- Press the head tilt button firmly.
- Lift the mixer head into its raised position.
Caution: Keep fingers away from the hinge area.
Step 2: Install the Mixing Bowl
- Position the stainless steel bowl over the mixing bowl base.
- Insert the bottom of the bowl into the bowl rest.
- Turn the bowl clockwise.
- Continue until it locks securely into place.
Step 3: Add Ingredients
Place the required ingredients in the mixing bowl.
Do not exceed the bowl filling limits.
Step 4: Attach the Splash Shield
- Hold the splash shield using its filler opening.
- Position the shield around the attachment area.
- Fit the opening over the locking pin on the mixer head.
- Turn the shield clockwise.
- Continue until it locks securely.
Step 5: Install the Mixing Attachment
- Select the beater, balloon whisk, or dough hook.
- Position the attachment beneath the attachment shaft.
- Push the attachment upward onto the shaft.
- Turn it counterclockwise.
- Continue until securely locked.
Step 6: Lower the Mixer Head
- Press the head tilt button.
- Carefully lower the mixer head toward the bowl.
- Continue until the head locks into its working position.
The stand mixer is now ready for operation.
How to Use the bella STIR Stand Mixer
The mixer provides 12 speed settings for stirring, beating, whipping, and kneading.
Step 1: Check the Assembly
Before connecting power, confirm that:
- The speed control dial is at (0) OFF.
- The stainless steel bowl is locked into the base.
- The selected attachment is properly installed.
- The splash shield is secured.
- The mixer head is locked in its working position.
Step 2: Connect Power
Plug the power cord into a 120V AC electrical outlet.
Step 3: Start Mixing
Turn the speed control dial from (0) OFF to Speed 1.
Begin mixing at a low speed and gradually increase the setting as needed.
Step 4: Adjust Mixing Speed
Use the mixing guide to select the appropriate speed for the installed attachment and food.
Mixtures containing a large amount of liquid should be mixed at lower speeds initially to reduce splattering.
Step 5: Stop Mixing
When mixing is complete:
- Turn the speed dial to (0) OFF.
- Unplug the appliance.
- Press the head tilt button.
- Raise the mixer head.
Step 6: Remove the Attachment
- Push the attachment upward into the mixer head.
- Turn it clockwise to unlock it.
- Pull the attachment straight downward from the shaft.
Step 7: Remove the Splash Shield
Grasp the splash shield firmly and turn it counterclockwise.
Remove it from the mixer head.
Mixing Speed Guide
The appropriate speed depends on the installed attachment and the consistency of the mixture.
| Attachment | Speed | Mixing Task | Food Examples |
| Beater | 1–6 | Stir | Instant Pudding, Mousse |
| Beater | 1–8 | Fold | Boxed or Homemade Cakes |
| Beater | 1–12 | Mix | Medium-Weight Dough, Pancake Batter |
| Balloon Whisk | 8–12 | Cream | Frosting |
| Balloon Whisk | 8–12 | Beat | Whipped Cream, Whole Eggs, Egg Yolks, Egg Whites |
| Balloon Whisk | 8–12 | Whip | Egg Whites |
| Dough Hook | 1–3 | Knead | Bread, Shortcrust Pastry, Pasta |
General Speed Selection
Begin mixing at Speed 1.
Increase speed gradually until the desired consistency is achieved.
For thin mixtures and liquid-heavy batters, start at lower speeds to reduce splashing.
Beater Attachment Instructions
The beater is designed for normal to heavy mixtures.
Suitable Foods
- Cakes.
- Cookies.
- Biscuits.
- Creamed frostings.
- Mashed potatoes.
- Pie pastry.
- Instant pudding.
- Mousse.
- Pancake batter.
Recommended Speeds
| Mixing Task | Speed |
| Stirring | 1–6 |
| Folding | 1–8 |
| Mixing | 1–12 |
Beater Mixing Tips
- Use room-temperature butter or margarine when preparing thick batters.
- Add ingredients one at a time.
- Mix thoroughly after each addition.
- Add flour one cup at a time.
- Adjust the speed if resistance occurs during operation.
Balloon Whisk Instructions
The balloon whisk is designed to incorporate air into lighter mixtures.
Suitable Foods
- Sponge cakes.
- Egg whites.
- Whole eggs.
- Egg yolks.
- Mayonnaise.
- Heavy cream.
- Whipped cream.
- Boiled frostings.
Recommended Speed
Use Speeds 8–12 for creaming, beating, and whipping.
Egg Whipping Quantities
| Ingredient | Stated Quantity |
| Whole Large Eggs | Minimum 3, Maximum 15 |
| Large Egg Whites or Yolks | Minimum 6, Maximum 15 |
Balloon Whisk Precautions
Do not use the balloon whisk for thick mixtures such as:
- Bread dough.
- Fudge.
- Mashed potatoes.
Use the beater or dough hook for the appropriate heavier mixing tasks.
Dough Hook Instructions
The dough hook is intended for mixing and kneading yeast dough.
Suitable Foods
- Bread.
- Bread rolls.
- Pizza dough.
- Pastry.
- Pasta.
Recommended Speed
Use Speeds 1–3 when kneading with the dough hook.
Maximum Flour Quantity
For bread or pizza dough, use a maximum of five cups of flour.
How to Knead Dough
- Install the dough hook.
- Secure the mixing bowl.
- Add the required ingredients.
- Begin kneading at Speed 1.
- Increase the speed gradually within the recommended 1–3 range as needed.
- Add flour one cup at a time.
- Stop the mixer periodically to scrape down the bowl.
- Continue until the desired dough consistency is achieved.
Always stop and unplug the mixer before placing a spatula or other utensil inside the mixing area.
General Mixing Tips
The manual provides recommendations for preparing cake batter, cookie dough, and other mixtures.
Adding Dry and Liquid Ingredients
For many batters, especially cakes and cookies, add ingredients in the following order:
- One-third of the dry ingredients.
- One-half of the liquid ingredients.
- One-third of the dry ingredients.
- The remaining half of the liquid ingredients.
- The final one-third of the dry ingredients.
Begin mixing slowly.
Increase the speed gradually after the ingredients have been combined.
Adding Chocolate Chips, Nuts, and Raisins
Fold additional ingredients into the mixture during the final stages of mixing.
Examples include:
- Chocolate chips.
- Chocolate chunks.
- Nuts.
- Raisins.
- Fruit pieces.
The batter should be thick enough to help prevent fruit or nuts from sinking to the bottom of the baking pan.
Mixing Sticky or Fresh Fruit
Coating sticky or fresh fruit with flour or confectioners’ sugar may help distribute it more evenly through the batter.
Mixing Thin Batters
Use medium speeds for thin batters.
Mixtures with large amounts of liquid should initially be mixed at lower speeds to avoid splashing.
Increase speed after the mixture becomes thicker.
Adding Ingredients During Mixing
Use the filler opening in the splash shield to add liquids and small ingredients while the mixer is running.
Keep hands, hair, clothing, spatulas, and other utensils away from moving attachments.
Scraping the Mixing Bowl
Stop the stand mixer periodically to scrape mixture from the sides of the bowl.
Turn the speed control dial to (0) OFF and unplug the appliance before placing a spatula or other utensil inside the mixing area.
Manual Thermal Protector
The bella STIR stand mixer has a manual-reset thermal protector designed to protect the motor.
If the protection system activates, the motor shuts down.
How to Reset the Thermal Protector
- Turn the speed control dial to (0) OFF.
- Unplug the appliance.
- Allow the stand mixer to rest for approximately 30 minutes.
- After the resting period, reconnect the power cord.
- Turn the speed dial to the desired setting to resume mixing.
This procedure is different from the five-minute cooling period specified for a stalled motor or an attachment obstruction.
Cleaning Instructions
The mixing bowl, splash shield, and attachments can be cleaned separately from the motorized body.
Before Cleaning
- Turn the speed control dial to (0) OFF.
- Unplug the stand mixer.
- Remove the mixing attachments.
- Remove the splash shield.
- Remove the mixing bowl.
Dishwasher-Safe Components
The following components are safe for cleaning on the top dishwasher rack.
| Component | Cleaning Method |
| Stainless Steel Mixing Bowl | Top-Rack Dishwasher-Safe |
| Splash Shield | Top-Rack Dishwasher-Safe |
| Beater | Top-Rack Dishwasher-Safe |
| Balloon Whisk | Top-Rack Dishwasher-Safe |
| Dough Hook | Top-Rack Dishwasher-Safe |
Cleaning the Mixer Body
- Disconnect the power cord.
- Wipe the mixer head with a damp cloth or sponge.
- Wipe the motor base and exterior body.
- Dry all cleaned surfaces thoroughly.
Warning: Never immerse the motor base, plug, or power cord in water or any other liquid.
Cleaning Precautions
Do not use:
- Rough scouring pads.
- Abrasive cleansers.
These may damage the plastic or metal surfaces of the appliance.
Maintenance Instructions
The bella STIR stand mixer requires limited routine maintenance.
Its removable components should be cleaned after use, and the motorized body should be kept dry.
Maintenance Guide
| Maintenance Task | Instructions |
| Clean Mixing Bowl | Clean after use; top-rack dishwasher-safe |
| Clean Mixing Attachments | Remove and clean after use |
| Clean Splash Shield | Clean after use |
| Clean Motor Body | Wipe with a damp cloth or sponge and dry thoroughly |
| Check Power Cord | Do not operate if damaged |
| Reset Thermal Protection | Allow approximately 30 minutes when activated |
| Store Appliance | Keep unplugged in a clean, dry place |
Appliance Repairs
The stand mixer contains no user-serviceable internal parts.
Do not attempt to repair it yourself.
If the appliance requires professional servicing, contact a qualified appliance repair technician or Consumer Service.
Storage Instructions
Store the stand mixer after it has been switched off, unplugged, and cleaned.
How to Store the Mixer
- Turn the speed control dial to (0) OFF.
- Unplug the appliance.
- Clean the mixing bowl, shield, and attachments.
- Clean and dry the mixer body.
- Store the appliance in its original box or in a clean, dry place.
Power Cord Storage
- Do not store the mixer while it is hot.
- Never store the appliance while plugged in.
- Do not wrap the cord tightly around the mixer.
- Avoid putting stress on the cord where it enters the motor base.
Excessive pressure on the power cord may cause fraying or breakage.
Troubleshooting Guide
The following troubleshooting information covers the operating problems and corrective actions described in the instruction manual.
| Problem | Possible Condition | Recommended Solution |
| Utensil Becomes Caught in an Attachment | Obstruction in the Moving Attachment | Turn OFF, Unplug, Clear Obstruction, and Cool for 5 Minutes |
| Motor Stalls During Mixing | Mixing Load May Be Too Large | Turn OFF, Unplug, Reduce Mixture, and Cool for 5 Minutes |
| Ingredients Are Not Mixing Properly | Mixing Sequence or Speed Requires Adjustment | Add Liquids Before Dry Ingredients, Scrape Bowl, and Increase Speed |
| Ingredients Splatter | Mixture Is Too Liquid or Mixing Speed Is Too High | Use Lower Speed Until Mixture Thickens |
| Ingredients Splatter | Splash Shield Is Not Installed | Install the Splash Shield Correctly |
| Mixer Moves Across Countertop | Speed or Ingredient Load Is Too High | Reduce Speed and Mixture Quantity |
| Mixer Moves Across Countertop | Non-Skid Feet Cannot Grip Properly | Clean the Countertop |
| Mixer Stops Working During Mixing | Thermal Motor Protection May Have Activated | Turn OFF, Unplug, Rest Approximately 30 Minutes, and Restart |
Utensil Caught in the Mixing Attachment
If a utensil becomes caught in a moving attachment:
- Immediately turn the speed control dial to (0) OFF.
- Unplug the appliance.
- Clear the obstruction.
- Allow the motor to cool for five minutes before continuing.
Warning: Never attempt to remove an obstruction while the mixer is running or connected to power.
Stand Mixer Motor Stalls
If the motor stalls during mixing:
- Turn the speed control dial to (0) OFF immediately.
- Unplug the appliance.
- Reduce the amount of mixture in the bowl.
- Allow the motor to cool for five minutes.
- Resume mixing.
Do not exceed the stated bowl filling limits.
Ingredients Are Not Mixing Properly
If the ingredients remain unevenly mixed:
- Add liquid ingredients before dry ingredients.
- Stop the mixer periodically to scrape down the bowl.
- Increase the mixing speed as needed.
Use the attachment and speed appropriate for the food being prepared.
Food Splattering During Mixing
Splattering may occur when mixing thin or liquid-heavy ingredients at high speeds.
To reduce splashing:
- Begin mixing at a low speed.
- Allow the mixture to thicken.
- Increase speed gradually.
- Make sure the splash shield is properly attached.
Stand Mixer Moving on the Countertop
If the mixer moves across the countertop:
- Reduce the mixing speed.
- Reduce the quantity of ingredients.
- Check that the countertop is clean.
- Allow the non-skid feet to grip the surface.
Always operate the stand mixer in a stable position.
Stand Mixer Stops Working During Mixing
If the appliance stops unexpectedly, the thermal protection system may have activated.
Reset Procedure
- Turn the speed control dial to (0) OFF.
- Unplug the stand mixer.
- Allow it to rest for approximately 30 minutes.
- Reconnect the power cord.
- Turn the speed control dial to the desired setting.
If the appliance continues to malfunction, stop using it and contact Consumer Service.
Warranty Information
The bella STIR 5.3qt Stand Mixer includes a limited warranty provided by Sensio Inc., doing business as Made by Gather.
The warranty covers qualifying mechanical defects in materials and workmanship for two years from the date of delivery.
Non-mechanical parts are covered for 90 days.
Warranty Coverage
| Warranty Detail | Information |
| Warranty Provider | Sensio Inc. dba Made by Gather |
| Mechanical Warranty | 2 Years |
| Non-Mechanical Parts Warranty | 90 Days |
| Warranty Start | Date of Initial Delivery |
| Eligible Purchaser | Original Retail Purchaser |
| Transferability | Non-Transferable |
| Required Proof | Original Sales Receipt |
| Warranty Remedy | Repair, Replacement, or Refund at Provider’s Discretion |
| Customer Service | 1-866-832-4843 |
What the Warranty Covers
During the applicable warranty period, Sensio may repair or replace a qualifying defective product or issue a refund.
The remedy is determined by Sensio.
Warranty Exclusions
The warranty does not cover normal wear or damage caused by:
- Negligent use.
- Incorrect voltage or electrical current.
- Improper routine maintenance.
- Use contrary to the operating instructions.
- Unauthorized disassembly.
- Unauthorized repairs or modifications.
- Natural events such as fires, floods, hurricanes, or tornadoes.
The warranty also contains limitations on incidental and consequential damages. Applicable consumer rights and restrictions may vary by jurisdiction.
How to Request Warranty Service
- Contact Customer Service at 1-866-832-4843.
- Explain the product problem.
- Follow the instructions provided by the service representative.
- If the issue cannot be resolved by telephone, obtain a case number.
- Follow the product return instructions.
Returning the Product for Warranty Service
If a return is required, attach a tag containing:
- Customer name.
- Customer address.
- Daytime contact telephone number.
- Case number.
- Description of the problem.
Include a copy of the original sales receipt.
Package the product carefully and send it to the address provided by Sensio, with shipping and insurance prepaid.
Sensio does not accept responsibility for the returned product while it is in transit to its Customer Service Center.
Customer Support Information
Customer service for the bella STIR stand mixer is provided by Sensio Inc. dba Made by Gather.
| Contact Detail | Information |
| Brand | bella |
| Company | Sensio Inc. dba Made by Gather |
| Customer Service Phone | 1-866-832-4843 |
| Customer Service Email | help@bellakitchenware.com |
| Brand Website | https://bellakitchenware.com |
| Company Location | New York, NY 10016, USA |
Product Registration
Product registration is available through https://bellakitchenware.com.
When to Contact Customer Service
Contact Consumer Service if the mixer has a damaged cord or plug, develops a malfunction, requires professional repair, or needs warranty assistance.
Frequently Asked Questions
How do I use the bella STIR 5.3qt Stand Mixer?
Lock the stainless steel bowl into the base, add ingredients, install the splash shield, and secure the selected mixing attachment. Lower and lock the mixer head, plug it into a 120V AC outlet, and start at Speed 1. Increase speed gradually as needed. Turn the dial to (0) OFF and unplug the appliance when finished.
How many speeds does the bella STIR stand mixer have?
The bella STIR stand mixer has 12 adjustable speeds, plus a (0) OFF position. The manual recommends Speeds 1–3 for kneading, Speeds 1–6 for stirring, and Speeds 8–12 for whipping with the balloon whisk.
What attachments come with the bella STIR 5.3qt Stand Mixer?
The mixer includes three attachments: a beater, balloon whisk, and dough hook. The beater is used for batters and heavier mixtures, the balloon whisk incorporates air into eggs and cream, and the dough hook is used for kneading bread and other dough.
How do I attach and remove the mixing attachments?
To install an attachment, raise the mixer head, push the attachment onto the shaft, and turn it counterclockwise until locked. To remove it, turn off and unplug the mixer, raise the head, push the attachment upward, turn it clockwise, and pull it down from the shaft.
Can the bella STIR 5.3qt Stand Mixer make bread dough?
Yes. The dough hook is designed for kneading bread, rolls, pizza dough, pastry, and pasta. Use Speeds 1–3 for kneading. For bread or pizza dough, the manual specifies a maximum of five cups of flour.
Why did my bella stand mixer stop working?
The thermal protection system may have activated. Turn the speed dial to (0) OFF, unplug the appliance, and allow it to rest for approximately 30 minutes. Reconnect power and select the required speed. If the mixer continues to malfunction, contact Consumer Service.
Are the bella STIR 5.3qt Stand Mixer attachments dishwasher-safe?
Yes. The stainless steel mixing bowl, splash shield, beater, balloon whisk, and dough hook are top-rack dishwasher-safe. The motor base and mixer body should only be wiped with a damp cloth or sponge and dried thoroughly.
What is the warranty on the bella STIR 5.3qt Stand Mixer?
The mixer includes a two-year limited warranty for qualifying mechanical defects and 90-day coverage for non-mechanical parts. Coverage applies to the original retail purchaser and requires proof of purchase. For warranty assistance, call 1-866-832-4843 or email help@bellakitchenware.com.