| Document Detail | Information |
| Document Title | 7 Egg Cooker Instruction Manual |
| Document Type | Instruction Manual |
| Brand Name | bella |
| Product Name | 7 Egg Cooker |
| Model Number(s) | 35108, 35127, 35156, 35157, 35224 |
| PDF File Size | 2 MB |
| Number of Pages | 20 |
| Languages | English, Spanish |
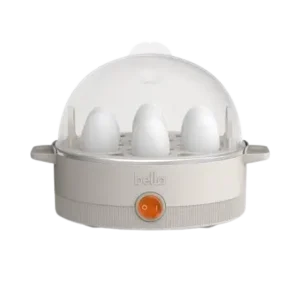
bella 7 Egg Cooker 35108
The bella 7 Egg Cooker is a countertop electric appliance designed to prepare up to seven boiled eggs at a time. It also includes separate trays for preparing poached eggs and omelettes. The cooker uses a measured amount of water to generate steam and cook eggs to the desired consistency.
The appliance features a removable boiling tray, poaching tray, omelette tray, transparent lid with steam vents, and a water measuring cup with an egg-piercing pin. A front-mounted ON/OFF switch controls operation, while an indicator light shows when the appliance is switched on.
The amount of water added to the reservoir determines the cooking duration. For boiled eggs, the supplied measuring cup includes markings for soft, medium, and hard-boiled results. Once the water has evaporated, the egg cooker sounds a beep to indicate that the cooking cycle has finished.
The cooker is designed to work best with large eggs taken directly from the refrigerator. It can also accommodate other egg sizes, although the water quantity and cooking time may need adjustment.
These instructions cover the appliance components, initial setup, water measurements, boiling, poaching, omelette preparation, cooking times, food safety, cleaning, maintenance, and warranty information.
Product Overview
The bella 7 Egg Cooker prepares eggs using steam generated from water placed inside the base reservoir.
The removable boiling tray holds up to seven whole eggs in an upright position. The poaching and omelette trays provide additional preparation options using cracked eggs.
Unlike an appliance that uses a manually adjustable timer, the egg cooker relies on the measured water quantity and a thermal sensor to determine when a cooking cycle is complete.
Main Features
- Seven-egg capacity: Boils up to seven eggs in their shells.
- Three boiled-egg consistencies: Soft, medium, and hard-boiled.
- Poaching tray: Used for preparing poached eggs.
- Omelette tray: Used for preparing omelettes with selected ingredients.
- Water measuring cup: Includes markings for different cooking methods.
- Egg-piercing pin: Located beneath the measuring cup.
- Thermal sensor: Detects when the reservoir water has evaporated.
- Audible completion alert: Beeps when the cooking cycle finishes.
- ON/OFF switch: Controls the appliance.
- Indicator light: Integrated into the power switch.
- Transparent lid: Includes steam vents and a handle.
- Removable cooking accessories: Can be cleaned separately from the electrical base.
- Top-rack dishwasher-safe components: All removable parts can be washed on the dishwasher’s top rack.
- Compact countertop design: Intended for household use.
Parts and Components
The egg cooker has nine components identified in the product diagram.
| Component | Function |
| Lid Handle | Used to lift the lid |
| Lid with Steam Vents | Covers the cooking trays and allows steam to escape |
| Poaching Tray with Handles | Holds eggs during poaching |
| Omelette Tray | Holds egg mixtures for omelette preparation |
| Boiling Tray with Handle | Holds up to seven eggs in their shells |
| Base with Water Reservoir | Contains the heating area and holds water for steaming |
| ON/OFF (O/I) Switch | Turns the cooker on or off |
| Indicator Light | Shows the power switch status |
| Polarized Plug | Connects the appliance to electrical power |
| Water Measuring Cup with Piercing Pin | Measures water and allows eggshells to be pierced |
Lid with Steam Vents
The transparent lid covers the cooking trays while the water in the base is heated.
Steam escapes through the lid vents during operation.
Warning: Keep hands and face away from the steam vents. Hot steam can cause serious burns.
Boiling Tray
The boiling tray has seven openings designed to hold whole eggs upright.
Its handle allows the tray to be lifted from the base after cooking.
The tray is used for preparing soft, medium, and hard-boiled eggs.
Poaching Tray
The poaching tray holds cracked eggs during cooking.
Its handles allow removal after the cycle finishes.
The English instructions describe preparing up to two poached eggs using the poaching sections.
Omelette Tray
The omelette tray is used to prepare egg mixtures with additional ingredients.
Suitable additions described in the instructions include cheese, tomatoes, cooked vegetables, sausage crumbles, and bacon pieces.
Water Reservoir
The water reservoir is located in the electrical base.
Cold water must be added before starting a cooking cycle.
The appliance must never operate without water in the reservoir.
ON/OFF Switch
The front control uses an ON/OFF switch marked O/I.
- O: OFF.
- I: ON.
The switch includes an indicator light.
Water Measuring Cup
The measuring cup is used to add the correct amount of water according to the selected cooking method.
Its markings cover:
- Soft-boiled eggs.
- Medium-boiled eggs.
- Hard-boiled eggs.
- Poached eggs.
- Omelettes.
Egg-Piercing Pin
A sharp piercing pin is located beneath the water measuring cup.
It can be used to pierce the shell of a whole egg before boiling.
Caution: The piercing pin is extremely sharp. Handle the measuring cup carefully to prevent injury.
Technical Specifications
| Specification | Details |
| Brand | bella |
| Product Name | 7 Egg Cooker |
| Model Number(s) | 35108, 35127, 35156, 35157, 35224 |
| Product Type | Electric Egg Cooker |
| Electrical Supply | 120V AC |
| Electrical Plug | Polarized |
| Maximum Boiled Egg Capacity | 7 Eggs |
| Recommended Egg Size | Large |
| Cooking Methods | Boiling, Poaching, Omelette |
| Boiled Egg Options | Soft, Medium, Hard |
| Cooking Method | Water-Based Steam Cooking |
| Water Measurement | Supplied Measuring Cup |
| Egg-Piercing Pin | Included |
| Power Control | ON/OFF (O/I) Switch |
| Power Indicator | Integrated Indicator Light |
| Cooking Completion Alert | Audible Beep |
| Thermal Sensor | Detects Water Evaporation |
| Soft-Boiled Cooking Time | Approximately 9–11 Minutes |
| Medium-Boiled Cooking Time | Approximately 11–14 Minutes |
| Hard-Boiled Cooking Time | Approximately 17–20 Minutes |
| Removable Parts Cleaning | Top-Rack Dishwasher-Safe |
| Base Cleaning | Damp Cloth or Sponge |
| Intended Use | Household |
| Mechanical Warranty | 2 Years |
| Non-Mechanical Parts Warranty | 90 Days |
Important Safety Instructions
The bella 7 Egg Cooker generates heat and steam during operation. Its water reservoir and removable cooking components can become extremely hot.
Follow all safety precautions to reduce the risk of burns, electrical shock, fire, or personal injury.
Electrical Safety
- Read all instructions before using the appliance.
- Connect the power cord to a 120V AC electrical wall outlet.
- Never immerse the electrical base, power cord, or plug in water or another liquid.
- Unplug the cooker when it is not in use.
- Disconnect the power cord before cleaning.
- Allow the appliance to cool before installing or removing parts.
- Do not use the cooker with a damaged cord or plug.
- Stop using the appliance if it malfunctions or becomes damaged.
- Do not attempt to repair the electrical components yourself.
- Do not use accessories that are not recommended by the manufacturer.
- Keep the power cord away from hot surfaces.
- Do not allow the cord to hang over a countertop or table edge.
- Do not place the appliance near a hot gas burner, electric burner, or heated oven.
Warning: Never immerse the base unit or power cord in water. Doing so can cause electrical shock.
Hot Surface and Steam Safety
The appliance generates hot steam during cooking.
- Do not touch hot surfaces with bare hands.
- Use the designated handles.
- Wear protective oven mitts or potholders when handling hot trays.
- Keep the face away from the lid’s steam vents.
- Lift the lid carefully to avoid escaping steam.
- Allow hot condensation to drip back into the water reservoir.
- Take extreme care when handling hot water or other heated components.
- Allow the electrical base to cool completely before cleaning.
Warning: Escaping steam can cause serious scalding injuries.
Cooking Safety
- Never operate the egg cooker without water in the reservoir.
- Use only water as the cooking liquid.
- Never place food directly on the heating surface.
- Cook whole eggs using the supplied boiling tray.
- Use the appropriate removable trays for poached eggs and omelettes.
- Never place the poaching or omelette tray directly on the heating plate.
- Do not leave the egg cooker unattended during operation.
- Do not operate it in an unstable position.
- Use the appliance indoors only.
- Do not use it for purposes other than those described in the instructions.
Piercing Pin Safety
The measuring cup includes a sharp egg-piercing pin.
- Handle the measuring cup carefully.
- Keep fingers away from the pin.
- Use caution when piercing eggshells.
- Be careful when washing or storing the measuring cup.
Caution: The piercing pin can cause injury if handled incorrectly.
Child Safety
The egg cooker should not be used by children without appropriate supervision.
People with reduced physical, sensory, or mental capabilities, or limited experience, should only use the appliance with suitable supervision or instruction from a responsible person.
Food Safety Instructions
The manual includes food safety guidance attributed to the FDA.
- Eating raw or undercooked eggs may increase the risk of foodborne illness.
- Cook eggs thoroughly until both the yolk and white are firm.
- Scrambled eggs should not remain runny.
- Foods containing eggs should reach an internal temperature of 160°F (72°C).
- Use a food thermometer to check the internal temperature of egg-containing foods.
- For recipes involving raw or undercooked eggs, the manual recommends pasteurized or fresh organic eggs.
Warning: Soft-boiled and undercooked eggs can carry food safety risks. Follow the food safety precautions when choosing the desired consistency.
If the Egg Cooker Falls Into Water
If the appliance falls or becomes immersed in water:
- Unplug it immediately.
- Do not reach into the water.
- Do not continue using the appliance.
If the Egg Cooker Malfunctions
If the appliance begins operating incorrectly:
- Unplug the power cord immediately.
- Stop using the cooker.
- Do not attempt repairs.
- Contact a qualified appliance technician for inspection or service.
Polarized Plug and Power Cord
Polarized Plug
The egg cooker has a polarized electrical plug with one blade wider than the other.
It is designed to fit into a polarized outlet in only one direction.
If the plug does not fit:
- Remove the plug.
- Reverse its orientation.
- Try inserting it again.
- If it still does not fit, contact a qualified electrician.
Do not modify the electrical plug.
Power Cord Requirements
The appliance includes a short power cord to reduce the risk of entanglement or tripping.
Extension Cord Precautions
A longer detachable power cord or extension cord may be used if appropriate precautions are followed.
- The electrical rating of the longer cord must be at least equal to the rating of the appliance.
- If the appliance is grounded, the extension cord must be a grounding-type three-wire cord.
- Arrange the cord so it cannot be pulled by children.
- Do not allow the cord to hang over the edge of a table or countertop.
- Position the cord to prevent accidental tripping.
Electrical Circuit Requirements
An overloaded electrical circuit may prevent the egg cooker from operating correctly.
The manufacturer recommends operating it on a separate electrical circuit from other appliances.
Countertop Protection
To protect countertop and furniture finishes, place non-plastic coasters or placemats beneath the appliance.
This can help prevent darkening, stains, or permanent marks on the surface.
Before First Use
Clean the removable cooking accessories before preparing eggs for the first time.
Step 1: Unpack the Egg Cooker
Carefully remove all components from the packaging.
Set the electrical base aside.
Step 2: Wash the Lid
Wash the lid in warm, soapy water.
Rinse thoroughly and dry completely.
Step 3: Clean the Boiling Tray
Wash the removable boiling tray in warm, soapy water.
Rinse and dry.
Step 4: Clean the Poaching Tray
Wash the poaching tray in warm, soapy water.
Rinse thoroughly.
Step 5: Clean the Omelette Tray
Wash the omelette tray using warm, soapy water.
Rinse and dry completely.
Step 6: Clean the Measuring Cup
Wash the supplied water measuring cup.
Caution: The piercing pin underneath the cup is extremely sharp.
Step 7: Wipe the Water Reservoir
Use a damp, non-abrasive cloth to wipe the water reservoir inside the base.
Do not immerse the electrical base in water.
The egg cooker is ready for use after the cleaned components have dried.
Before Cooking Eggs
The egg cooker works best when large eggs are taken directly from the refrigerator.
Use Cold Eggs
Use eggs that have been kept refrigerated until cooking.
The manual warns that eggs may become overcooked if they are not cold when the cooking cycle begins.
Store Eggs in Their Carton
Keep eggs in their original carton to maintain freshness and help keep the yolks centered.
Use Large Eggs for the Cooking Chart
The specified water quantities and cooking times are intended primarily for large eggs.
Other egg sizes may require water adjustments.
Use Cold Water
Always use cold water in the reservoir.
Distilled or filtered water is preferred because it helps reduce mineral deposits.
Follow the Measuring Cup Markings
Select the water measurement corresponding to the desired cooking result.
The amount of water affects cooking time because the egg cooker operates until the water has evaporated.
How to Use the bella 7 Egg Cooker
The egg cooker uses the amount of water added to the reservoir to determine the cooking cycle.
Step 1: Position the Egg Cooker
Place the base on a flat, clean, stable countertop.
Step 2: Measure Cold Water
Use the supplied measuring cup.
Select the appropriate water level for the desired type of egg preparation.
Step 3: Add Water to the Reservoir
Pour the measured cold water into the base reservoir.
Important: Never operate the egg cooker with an empty reservoir.
Step 4: Install the Cooking Tray
Position the boiling tray on the base.
For poached eggs or omelettes, place the appropriate cooking tray above the boiling tray.
Step 5: Add Eggs
Arrange the eggs according to the selected cooking method.
For boiled eggs, use whole eggs.
For poached eggs or omelettes, use the corresponding removable tray.
Step 6: Install the Lid
Place the lid securely over the cooking assembly.
Keep the steam vents directed away from the face and hands.
Step 7: Connect Power
Plug the appliance into a 120V AC electrical wall outlet.
Step 8: Turn On the Cooker
Press the ON/OFF switch to the ON position.
The water begins heating and boiling.
Step 9: Wait for the Completion Beep
The thermal sensor detects when the cooking water has evaporated.
The cooker sounds a beep when the cooking process finishes.
Step 10: Turn Off and Unplug
When the cycle finishes:
- Press the ON/OFF switch to OFF.
- Unplug the electrical cord.
Important: The thermal sensor’s automatic response does not replace the instruction to turn the switch OFF and unplug the appliance.
Step 11: Remove the Lid Carefully
Lift the lid with caution.
Keep hands and face away from escaping steam.
Allow condensation to drip back into the reservoir.
Step 12: Remove the Cooking Tray
Use protective oven mitts or potholders to remove the hot tray.
Take care because the base and removable components may still be extremely hot.
How to Make Soft, Medium, and Hard-Boiled Eggs
The boiling tray can hold up to seven eggs.
The required water quantity depends on both the number of eggs and the desired doneness.
Step 1: Place the Cooker on a Flat Surface
Position the egg cooker on a flat, clean countertop.
Step 2: Measure the Water
Use the supplied water measuring cup.
Choose the appropriate marking for:
- SOFT.
- MEDIUM.
- HARD.
Fill the measuring cup with cold water, preferably distilled or filtered.
Step 3: Add Water to the Base
Pour the measured water into the reservoir.
Step 4: Install the Boiling Tray
Center the boiling tray over the base.
Step 5: Prepare the Eggs
Wash the eggs before placing them into the cooker.
The supplied piercing pin can be used to pierce the shell to help prevent breakage during boiling.
How to Pierce an Egg
- Hold the egg carefully.
- Locate the piercing pin beneath the measuring cup.
- Carefully pierce the eggshell using the pin.
- Keep fingers away from the sharp point.
Note: The instructions state that eggs can cook successfully with or without piercing.
Step 6: Position the Eggs
Place up to seven eggs into the boiling tray.
If the eggs have been pierced, position them with the pierced side facing upward.
Step 7: Install the Lid
Cover the eggs with the lid.
Step 8: Turn On the Egg Cooker
- Plug the appliance into a 120V AC outlet.
- Press the ON/OFF switch to ON.
- Allow the water to heat and boil.
Step 9: Wait for Cooking Completion
The egg cooker sounds a beep when the water has evaporated and the cooking cycle has finished.
Step 10: Switch Off the Appliance
Press the ON/OFF switch to OFF.
Unplug the cooker from the electrical outlet.
Step 11: Remove the Eggs
- Carefully lift the lid.
- Allow condensed water to drip into the reservoir.
- Wear protective oven mitts.
- Lift the boiling tray using its side handles.
- Remove the eggs from the appliance.
Step 12: Cool the Eggs
Rinse the boiled eggs under cold water or place them in an ice bath.
This stops the cooking process.
Peel the eggs once they are cool enough to handle.
Step 13: Cook Another Batch
For additional eggs, repeat the water measurement, loading, cooking, and removal steps.
Boiled Egg Cooking Time and Water Chart
The cooking chart gives approximate times and water quantities for medium to large eggs.
| Doneness | Number of Eggs | Approximate Cooking Time | Water Quantity |
| Soft-Boiled | 1–4 | 9 Minutes | 30 ml |
| Soft-Boiled | 5–7 | 11 Minutes | 20 ml |
| Medium-Boiled | 1–4 | 11 Minutes | 40 ml |
| Medium-Boiled | 5–7 | 14 Minutes | 30 ml |
| Hard-Boiled | 1–4 | 17 Minutes | 75 ml |
| Hard-Boiled | 5–7 | 20 Minutes | 70 ml |
These times are guidelines. Cooking results can vary with egg size and other operating conditions.
Soft-Boiled Eggs
Soft-boiled eggs require:
- 1–4 eggs: 30 ml of water, approximately 9 minutes.
- 5–7 eggs: 20 ml of water, approximately 11 minutes.
Soft-boiled eggs are prepared for a softer yolk consistency.
Medium-Boiled Eggs
Medium-boiled eggs require:
- 1–4 eggs: 40 ml of water, approximately 11 minutes.
- 5–7 eggs: 30 ml of water, approximately 14 minutes.
For firmer medium-boiled eggs, leave them covered inside the cooker for an additional 2–3 minutes before removal.
Hard-Boiled Eggs
Hard-boiled eggs require:
- 1–4 eggs: 75 ml of water, approximately 17 minutes.
- 5–7 eggs: 70 ml of water, approximately 20 minutes.
For extra-firm hard-boiled eggs, leave them covered for a few additional minutes after the completion beep.
Cooking Jumbo or Extra-Large Eggs
Jumbo and extra-large eggs may require additional water and cooking time to reach the desired consistency.
Importance of Egg Temperature
For the cooking results described in the instructions, use large eggs directly from the refrigerator.
Eggs that are not cold may become overcooked.
How to Make Poached Eggs
The egg cooker includes a poaching tray for preparing eggs without their shells.
The English operating instructions describe preparing up to two poached eggs.
Step 1: Measure Water
Use the water measuring cup and fill it with cold water to the POACHED/OMELETTE marking.
The corresponding measuring cup illustration identifies 70 ml for this setting.
Step 2: Fill the Water Reservoir
Pour the measured water into the base.
Step 3: Install the Boiling Tray
Center the boiling tray over the base.
Step 4: Position the Poaching Tray
Place the poaching tray on top of the boiling tray.
Caution: Never place the poaching or omelette tray directly on the heating plate.
Step 5: Prepare the Poaching Sections
For easier food removal, the tray may be lightly coated with butter or cooking oil spray.
Step 6: Add the Eggs
Crack the eggs individually into the poaching sections.
Avoid overfilling.
Step 7: Install the Lid
Cover the cooking assembly with the lid.
Step 8: Start Cooking
- Plug the egg cooker into a 120V AC outlet.
- Press the ON/OFF switch to ON.
- Allow the water to heat and boil.
Step 9: Wait for the Completion Beep
When the water evaporates, the egg cooker beeps to indicate that the cooking cycle is finished.
Step 10: Turn Off the Cooker
Press the ON/OFF switch to OFF.
Unplug the power cord.
Step 11: Remove the Poached Eggs
- Carefully remove the lid.
- Allow condensation to drip back into the reservoir.
- Wear protective oven mitts.
- Lift the poaching tray using its handle.
- Remove the cooked eggs.
Serve the poached eggs immediately.
How to Make an Omelette
The omelette tray allows an egg mixture to be cooked using steam.
The manual describes preparing omelettes with selected ingredients, including cheese, vegetables, and cooked meat additions.
Step 1: Measure the Water
Fill the measuring cup with cold water to the POACHED/OMELETTE marking.
The measuring cup illustration identifies 70 ml for this setting.
Step 2: Add Water to the Reservoir
Pour the measured cold water into the electrical base reservoir.
Step 3: Install the Cooking Trays
- Position the boiling tray over the base.
- Place the omelette tray above the boiling tray.
Do not place the omelette tray directly on the heating plate.
Step 4: Prepare the Egg Mixture
Whisk the eggs together with the desired additional ingredients.
The instructions give examples including:
- Grated or shredded cheese.
- Small diced tomatoes.
- Sausage crumbles.
- Bacon bits.
- Small diced cooked vegetables.
- Suitable leftover ingredients.
Step 5: Prepare the Tray
For easier removal, the cooking tray may be lightly coated with butter or cooking oil spray.
Step 6: Add the Egg Mixture
Carefully pour the prepared mixture into the omelette tray.
Important: Do not overfill the tray.
Step 7: Install the Lid
Position the lid over the cooking assembly.
Step 8: Start Cooking
- Connect the appliance to a 120V AC outlet.
- Press the ON/OFF switch to ON.
- Allow the water to heat and produce steam.
Step 9: Wait for Cooking Completion
The egg cooker sounds a beep when the water has evaporated and the cooking cycle finishes.
Step 10: Turn Off and Unplug
Press the ON/OFF switch to OFF.
Disconnect the power cord.
Step 11: Remove the Omelette
- Carefully lift the lid away from the face.
- Allow condensation to drip into the water reservoir.
- Use protective oven mitts to remove the hot cooking tray.
- Remove the omelette.
Serve immediately.
Egg Cooking Tips
Use Fresh, Refrigerated Eggs
Keep eggs refrigerated until they are ready to cook.
The manual recommends using cold eggs to obtain the intended cooking results.
Use the Correct Water Quantity
Water quantity determines the duration of the heating cycle.
Follow the cooking chart or the measuring cup markings.
Use Distilled or Filtered Water
Distilled or filtered water is recommended to reduce mineral deposits in the reservoir.
Adjust for Different Egg Sizes
The cooking chart is intended for medium to large eggs, with large refrigerated eggs recommended for the most consistent results.
Jumbo or extra-large eggs require additional water and cooking time.
Pierce Eggs Carefully
The egg-piercing pin can help reduce cracking during boiling.
However, the instructions also state that eggs can cook correctly without piercing.
For Firmer Medium-Boiled Eggs
After the completion beep, leave medium-boiled eggs covered for another two to three minutes before removal.
For Extra-Firm Hard-Boiled Eggs
Leave the eggs covered in the cooker for a few additional minutes after the beep.
Cool Boiled Eggs After Cooking
Rinse eggs with cold water or transfer them to an ice bath to stop the cooking process.
Refrigerating Boiled Eggs
The manual states that unused boiled eggs kept in their shells may be refrigerated for up to five days.
Serving Soft or Medium-Boiled Eggs
For eggs served from their shells:
- Use a knife to break the top of the shell.
- Open the upper portion carefully.
- Use a small teaspoon to remove the egg.
Toast strips may also be used with soft yolks.
Audible Alerts and Operating Indicators
The egg cooker uses a power indicator, audible beep, and thermal sensor to communicate its operating status.
| Indicator or Condition | Meaning | Required Action |
| ON/OFF Switch at I | Cooker Is Switched On | Allow Cooking Cycle to Continue |
| Indicator Light | Indicates Power Switch Status | Check Operating Position |
| Completion Beep | Cooking Water Has Evaporated | Switch OFF and Unplug |
| Thermal Sensor Detects No Water | Heating Cycle Has Reached Its End | Follow Shutdown Instructions |
| ON/OFF Cycling After Water Evaporates | Appliance Has Not Been Manually Turned Off and Unplugged | Turn Switch OFF and Disconnect Power |
Cooking Completion Beep
The cooker sounds a beep when the water in the reservoir has evaporated.
The beep signals that the selected cooking cycle has finished.
Thermal Sensor Operation
The appliance includes a thermal sensor that responds when no water remains in the reservoir.
The manual explains that if the cooker is unplugged during cooking and later plugged in again while the switch remains ON, the sensor can detect the empty reservoir and shut the heating cycle off within approximately 30 seconds.
Important Shutdown Instructions
Once the cooking cycle finishes:
- Press the ON/OFF switch to OFF.
- Unplug the electrical cord.
- Carefully remove the cooked eggs.
Important: Do not leave the appliance connected and switched on after cooking. The instructions warn that it may continue an ON/OFF cycle if not unplugged.
Cleaning Instructions
The egg cooker must be unplugged and completely cooled before cleaning.
The electrical base may become extremely hot after cooking.
Before Cleaning
- Press the ON/OFF switch to OFF.
- Unplug the electrical cord.
- Allow the appliance to cool completely.
- Remove the lid.
- Remove the cooking trays.
Warning: Never immerse the base unit or power cord in water or another liquid.
Cleaning the Boiling Tray
The boiling tray may be cleaned in the top rack of a dishwasher.
For handwashing:
- Wash the tray in warm, soapy water.
- Rinse thoroughly.
- Dry completely.
Cleaning the Poaching Tray
- Remove the tray from the cooker.
- Wash it in warm, soapy water or place it on the dishwasher’s top rack.
- Rinse if washing by hand.
- Dry completely.
Cleaning the Omelette Tray
- Remove any remaining food.
- Wash the tray in warm, soapy water.
- Rinse thoroughly.
- Dry completely.
The omelette tray may also be cleaned on the dishwasher’s top rack.
Cleaning the Lid
Wash the lid in warm, soapy water or place it on the top rack of a dishwasher.
Dry completely before storage.
Cleaning the Measuring Cup
Wash the water measuring cup in warm, soapy water.
Caution: Handle the measuring cup carefully because the piercing pin underneath is very sharp.
Cleaning the Base Unit
- Make sure the egg cooker is unplugged.
- Allow it to cool completely.
- Wipe the exterior using a soft, slightly damp cloth or sponge.
- Dry the cleaned surfaces.
Do not use abrasive cleaners or scouring pads because they may damage the surface.
How to Remove Mineral Deposits
Mineral deposits may develop inside the water reservoir after repeated use.
The manufacturer recommends distilled white vinegar for removing these deposits.
Mineral Deposit Cleaning Instructions
- Turn off and unplug the egg cooker.
- Allow the base to cool completely.
- Moisten a paper towel with 1 tablespoon of distilled white vinegar.
- Wipe the water reservoir to remove mineral deposits.
- Rinse the reservoir area carefully.
- Dry thoroughly.
Do not immerse the electrical base in water.
Reducing Mineral Buildup
Use cold distilled or filtered water when preparing eggs.
This helps reduce the buildup of mineral deposits in the reservoir.
Dishwasher-Safe Components
All removable egg cooker components can be cleaned in the top rack of a dishwasher.
| Component | Cleaning Method |
| Lid | Top-Rack Dishwasher-Safe |
| Boiling Tray | Top-Rack Dishwasher-Safe |
| Poaching Tray | Top-Rack Dishwasher-Safe |
| Omelette Tray | Top-Rack Dishwasher-Safe |
| Water Measuring Cup | Top-Rack Dishwasher-Safe |
| Electrical Base | Wipe with Soft, Slightly Damp Cloth |
Important: The electrical base must never be placed in a dishwasher or immersed in water.
Maintenance Instructions
The bella 7 Egg Cooker requires limited routine maintenance.
Regular cleaning and careful handling of its electrical base and removable components are the primary maintenance requirements.
Maintenance Guide
| Maintenance Task | Instructions |
| Clean Boiling Tray | Wash After Use |
| Clean Poaching Tray | Wash After Use |
| Clean Omelette Tray | Wash After Use |
| Clean Lid | Wash After Use |
| Clean Measuring Cup | Wash Carefully, Avoiding the Sharp Pin |
| Clean Water Reservoir | Wipe After Cooling |
| Remove Mineral Deposits | Use Paper Towel Moistened with 1 Tablespoon White Vinegar |
| Clean Electrical Base | Wipe with a Soft, Slightly Damp Cloth |
| Store Appliance | Keep Clean and Dry |
| Repairs | Use a Qualified Appliance Repair Technician |
Protecting the Base Unit
The electrical base must remain dry.
Never immerse it in water or use abrasive cleaning materials.
Caring for the Piercing Pin
The sharp piercing pin underneath the measuring cup should be handled carefully during cleaning and storage.
Appliance Servicing
The egg cooker contains no user-serviceable internal parts.
Any repair requiring disassembly beyond normal cleaning must be performed by a qualified appliance repair technician.
Do not attempt internal electrical repairs.
Storage Instructions
Store the egg cooker only after it has cooled completely and all components have been cleaned and dried.
How to Store the Egg Cooker
- Turn the ON/OFF switch to OFF.
- Unplug the power cord.
- Allow the appliance to cool completely.
- Wash the removable cooking trays, lid, and measuring cup.
- Clean and dry the water reservoir.
- Place the removable components in their proper positions.
- Fit the lid securely on top.
- Store the cooker in its original box or another clean, dry location.
Important: Never store the egg cooker while it is hot or wet.
Troubleshooting and Operating Problems
The following guidance covers operating conditions and corrective actions supported by the instruction manual.
| Problem or Condition | Possible Cause | Recommended Action |
| Egg Cooker Does Not Operate Properly | Electrical Circuit May Be Overloaded | Operate on a Separate Electrical Circuit |
| Eggs Are Overcooked | Eggs Were Not Cold Before Cooking | Use Refrigerated Eggs |
| Eggs Are Not at Desired Consistency | Egg Size or Water Quantity May Differ | Follow the Water Chart and Adjust for Egg Size |
| Jumbo or XL Eggs Need More Cooking | Larger Eggs Require Additional Water and Time | Adjust Water and Cooking Time |
| Medium-Boiled Eggs Are Not Firm Enough | Additional Covered Resting Time May Be Needed | Leave Covered for Another 2–3 Minutes |
| Hard-Boiled Eggs Need Extra Firmness | Additional Covered Resting Time May Be Needed | Leave Covered for a Few More Minutes |
| Mineral Deposits Form in Reservoir | Minerals in Cooking Water | Clean with Distilled White Vinegar |
| Cooker Beeps | Water Has Evaporated and Cooking Cycle Is Finished | Turn OFF and Unplug |
| Cooker Continues Cycling ON/OFF | Switch Was Not Turned OFF and Appliance Was Not Unplugged | Turn OFF and Disconnect Power |
| Appliance Malfunctions | Appliance Requires Inspection | Unplug and Contact Qualified Service Personnel |
Egg Cooker Is Not Working Properly
An overloaded electrical circuit may prevent normal operation.
The manufacturer recommends using a circuit separate from other electrical appliances.
If the cooker malfunctions, unplug it and stop using it.
Eggs Are Overcooked
The instructions recommend using cold eggs directly from the refrigerator.
Eggs that are not refrigerated until cooking may become overcooked.
Eggs Are Too Soft
Cooking results vary depending on egg size and water quantity.
Use the prescribed water measurements for the selected number of eggs and desired consistency.
For firmer medium-boiled eggs, the manual recommends leaving the eggs covered for another two to three minutes.
Jumbo or Extra-Large Eggs Are Not Fully Cooked
Larger eggs may require more water and additional cooking time.
The cooking chart is intended for medium to large eggs.
Water Reservoir Has Mineral Deposits
Wipe the cooled reservoir with a paper towel moistened with one tablespoon of distilled white vinegar.
Rinse and dry thoroughly.
Egg Cooker Beeps During Operation
The completion beep indicates that the water has evaporated and the cooking cycle has finished.
Turn the appliance OFF and unplug it.
Egg Cooker Repeatedly Turns On and Off
The manual warns that the cooker can enter an ON/OFF cycle if it remains connected and switched on after cooking.
Press the ON/OFF switch to OFF and unplug the appliance when the cycle is complete.
Egg Cooker Malfunctions
If the appliance becomes damaged or begins malfunctioning:
- Disconnect it from electrical power.
- Stop using it.
- Do not attempt to repair it yourself.
- Arrange inspection or servicing by a qualified technician.
Warranty Information
The bella 7 Egg Cooker includes a limited warranty provided by SENSIO Inc.
The warranty covers qualifying mechanical defects in materials and workmanship for two years from the original retail purchase date.
Non-mechanical parts are covered for 90 days.
Warranty Coverage
| Warranty Detail | Information |
| Warranty Provider | SENSIO Inc. |
| Mechanical Warranty | 2 Years |
| Non-Mechanical Parts Warranty | 90 Days |
| Warranty Start | Original Retail Purchase Date |
| Eligible Purchaser | Original Retail Purchaser |
| Transferability | Non-Transferable |
| Proof of Purchase | Original Sales Receipt |
| Available Remedy | Repair, Replacement, or Refund at Provider’s Discretion |
| Customer Service | 1-866-832-4843 |
What the Warranty Covers
During the applicable warranty period, SENSIO Inc. may repair or replace a qualifying defective product or issue a refund.
The remedy is determined by SENSIO Inc.
Warranty Exclusions
The warranty does not cover normal wear or damage caused by:
- Negligent use.
- Incorrect voltage or electrical current.
- Improper routine maintenance.
- Use contrary to the operating instructions.
- Unauthorized disassembly.
- Repairs or modifications performed by anyone other than qualified SENSIO Inc. personnel.
- Natural events such as fires, floods, hurricanes, or tornadoes.
The warranty also contains limitations on incidental and consequential damages. Applicable consumer rights and restrictions may vary by jurisdiction.
How to Request Warranty Service
- Contact Customer Service at 1-866-832-4843.
- Explain the product problem.
- Follow the troubleshooting instructions provided by the representative.
- If the issue cannot be resolved by telephone, obtain a case number.
- Follow the product return instructions supplied by SENSIO Inc.
Returning the Product for Warranty Service
If a return is required, attach a tag containing:
- Customer name.
- Customer address.
- Daytime telephone number.
- Case number.
- Description of the problem.
Include a copy of the original sales receipt.
Carefully package the product and send it to the address provided by SENSIO Inc., with shipping and insurance prepaid.
SENSIO Inc. does not accept responsibility for the returned product while it is in transit to its Customer Service Center.
Customer Support Information
Customer support for the bella 7 Egg Cooker is provided by SENSIO Inc., doing business as Made by Gather.
| Contact Detail | Information |
| Brand | bella |
| Company | SENSIO Inc. dba Made by Gather |
| Customer Service Phone | 1-866-832-4843 |
| Customer Service Email | help@bellahousewares.com |
| Brand Website | https://bellakitchenware.com |
| Company Location | New York, NY 10016, USA |
| Country of Manufacture | China |
Product Registration
Product registration is available through https://bellakitchenware.com.
When to Contact Customer Service
Contact Customer Service if the egg cooker has a damaged power cord or plug, becomes damaged, develops a malfunction, requires professional servicing, or needs warranty assistance.
Frequently Asked Questions
How do I use the bella 7 Egg Cooker?
Place the cooker on a flat surface and use the measuring cup to add the correct amount of cold water to the reservoir. Install the boiling tray, add up to seven eggs, and cover with the lid. Plug the cooker into a 120V AC outlet and press the ON/OFF switch to ON. When the water evaporates, the appliance beeps. Turn the switch OFF, unplug the cooker, and carefully remove the eggs.
How much water do I put in the bella 7 Egg Cooker?
Water quantity depends on the number of eggs and desired consistency. For 1–4 eggs, use 30 ml for soft-boiled, 40 ml for medium-boiled, or 75 ml for hard-boiled. For 5–7 eggs, use 20 ml for soft-boiled, 30 ml for medium-boiled, or 70 ml for hard-boiled. The supplied measuring cup includes the corresponding markings.
How long does the bella 7 Egg Cooker take to boil eggs?
The cooking chart gives approximate times of 9–11 minutes for soft-boiled eggs, 11–14 minutes for medium-boiled eggs, and 17–20 minutes for hard-boiled eggs. The duration varies according to egg quantity, water measurement, and egg size.
Can I cook poached eggs and omelettes in the bella 7 Egg Cooker?
Yes. The cooker includes separate trays for poached eggs and omelettes. Use the POACHED/OMELETTE water marking, which is shown as 70 ml in the measuring cup illustration. Place the appropriate tray above the boiling tray, add the eggs or prepared mixture, and start cooking. Never place the poaching or omelette tray directly on the heating plate.
Do I need to pierce eggs before using the bella Egg Cooker?
The measuring cup includes a sharp piercing pin that can be used to pierce an eggshell before boiling. The instructions recommend piercing to help prevent broken eggs, but also state that eggs can cook correctly without being pierced. Handle the pin carefully.
Does the bella 7 Egg Cooker turn off automatically?
The egg cooker has a thermal sensor that responds when the cooking water has evaporated, and it sounds a completion beep. Users must still press the ON/OFF switch to OFF and unplug the appliance when cooking finishes. The manual warns against leaving it connected in a repeated ON/OFF cycle.
How do I clean the bella 7 Egg Cooker?
Turn the appliance OFF, unplug it, and allow it to cool completely. The removable lid, boiling tray, poaching tray, omelette tray, and measuring cup can be cleaned in the top rack of a dishwasher or washed in warm, soapy water. Clean the electrical base with a soft, slightly damp cloth. Never immerse the base in water.
How do I remove mineral deposits from the bella Egg Cooker?
After the base has cooled, wipe the water reservoir with a paper towel moistened with one tablespoon of distilled white vinegar. Rinse and dry thoroughly. Using cold distilled or filtered water during cooking helps reduce mineral buildup.