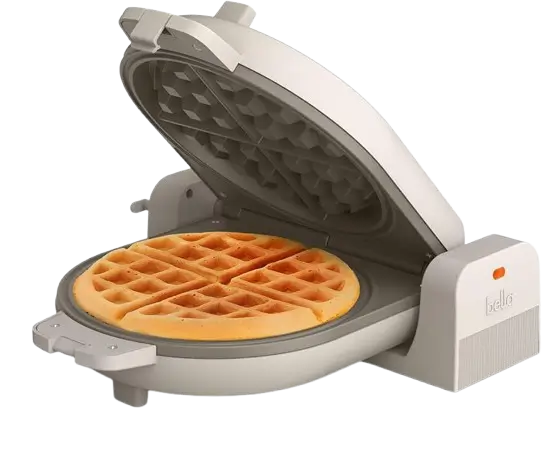
Bella Flip & Store Waffle Maker
The Bella Flip & Store Waffle Maker is a household appliance for baking waffles on ceramic non-stick plates. You pour batter onto the lower plate, close the lid, and flip the whole unit over to cook. A soft-glow indicator light shows the stage: orange when the appliance is powered and preheating, and white when it reaches cooking temperature. It turns white again when a waffle is ready.
The cool-touch handle has a locking latch, and a push-and-lock button secures the unit. The same button locks the waffle maker upright for compact storage. A cord storage area on the unit holds the cord when you put it away. The appliance plugs into a 120 V AC wall outlet and is intended for indoor household use only. It is not for commercial use or for any purpose other than making waffles.
The sections below cover safety, the parts of the waffle maker, first use, cooking, care of the ceramic surface, storage, and warranty service.
Important Safeguards
SAVE THESE INSTRUCTIONS. FOR HOUSEHOLD USE ONLY. Basic safety precautions should always be followed when using electrical appliances, including the following. All users must read and understand the instruction manual before operating or cleaning the appliance.
Electric Shock and Cord Safety
- Read all instructions before using the appliance.
- Do not immerse or partially immerse the cord, plug, or the entire unit in water or any other liquid.
- Never yank the cord to disconnect the appliance. Grasp the plug and pull it out of the outlet.
- Do not operate the appliance with a damaged cord or plug, after it malfunctions, or after it has been dropped or damaged in any way. Take it to a qualified service agent for examination, repair, or electrical or mechanical adjustment.
- Plug the cord into a 120 V AC electrical outlet only, and use a wall receptacle only.
- Do not let the cord hang over the edge of a table or counter, or touch hot surfaces.
- A short power-supply cord is provided to reduce the risk of entanglement or tripping over a longer cord.
- Unplug the appliance when it is not in use and before cleaning. To disconnect, remove the plug from the outlet.
- Always unplug the appliance after use. It remains ON unless it is unplugged.
Heat, Fire, and Placement
- CAUTION, HOT SURFACES: The appliance generates heat during use. Take proper precautions to prevent burns, fire, or other damage to people or property.
- Do not touch hot surfaces. Use the handles or knobs.
- The appliance is hot during operation and retains heat for some time after it is turned off. Always use oven mitts when handling hot materials, and let metal parts cool before cleaning.
- Do not place anything on top of the appliance while it is operating or hot.
- Use the appliance on a heat-resistant, flat, level surface only.
- Do not place it on or near a hot gas or electric burner, or in a heated oven.
- Provide adequate ventilation above and on all sides for air circulation.
- Do not let the appliance touch curtains, wall coverings, clothing, dish towels, walls, or other flammable materials during use.
- Use extreme caution when moving an appliance that contains hot food, hot water, hot oil, or other hot liquids.
- Allow the appliance to cool before cleaning or storing it.
Users, Supervision, and Intended Use
- The appliance is not intended for use by persons (including children) with reduced physical, sensory, or mental capabilities, or a lack of experience and knowledge. An exception applies when a person responsible for their safety supervises them or has instructed them in its use.
- Close supervision is necessary when the appliance is used by or near children.
- Do not leave the appliance unattended during use.
- Do not use accessory attachments that the manufacturer does not recommend. They may cause fire, electric shock, or injury.
- Do not use the appliance outdoors or for commercial purposes.
- Do not use the appliance for anything other than its intended use.
Plug, Cord, Countertop, and Power Notes
Polarized Plug
The plug is polarized, meaning one blade is wider than the other. It fits a polarized outlet only one way. If the plug does not fit fully into the outlet, reverse it. If it still does not fit, contact a qualified electrician. Do not modify the plug in any way.
Extension Cords and Longer Power Cords
A short power-supply cord is provided to reduce the risk of tripping or entanglement. Longer detachable power-supply cords or extension cords are available and may be used if care is exercised. If you use one:
- The marked electrical rating of the cord set or extension cord should be at least as great as the electrical rating of the appliance.
- If the appliance is of the grounded type, the extension cord should be a grounding-type 3-wire cord.
- Arrange the longer cord so that it does not drape over the countertop or tabletop, where children could pull on it or anyone could trip over it.
Protecting Countertop and Table Finishes
CAUTION: Place non-plastic coasters or place mats between the appliance and the finish of the countertop, tabletop, or other furniture. This prevents plasticizers from migrating to the finish. Without this protection, the finish may darken, permanent blemishes may occur, or stains can appear.
Electrical Circuit
An overloaded electrical circuit may keep the appliance from operating properly. Operate it on a separate electrical circuit from other appliances.
Parts and Controls
The product may vary slightly from the manual’s illustration.
| Part | Description | Notes |
| Cool-Touch Handle with Locking Latch | Handle used to open the lid and flip the unit | Do not lock the handle while flipping the unit to cook |
| Ceramic non-stick waffle plates | Upper and lower cooking plates | Use the lower plate when pouring batter |
| Clutter-Free Cord Storage | Area on the unit for winding the cord | Unroll the cord completely before plugging in |
| Push and Lock Button | Button on the back of the unit | Unlocks the unit for use and locks it upright for storage |
| Soft Glow “Ready” Indicator Light | Light on the side housing | Orange while preheating, white when ready |
Indicator Light Behavior
| Light color | Meaning |
| Orange | The appliance is plugged in and heating up for preheating |
| White | The waffle maker has reached proper cooking temperature |
| Turns white again during cooking | The waffle is cooked (see timing in the cooking steps) |
Before Using for the First Time
- Remove all parts included in the box.
- Clean all parts thoroughly. See the cleaning section below.
NOTE: The waffle maker may emit a small amount of smoke or odor the first time you use it. This is normal and harmless. Do not eat the first waffle you make with it.
Using Your Waffle Maker
Unlocking and Preheating
- Press the button on the back of the unit and turn it counter-clockwise to unlock the waffle maker (Figure 1 in the manual). Unlock the clasp of the handle.
- Plug the cord into a 120 V AC wall outlet. The orange power light comes on to show the appliance is ready for preheating.
- Wait for the indicator light to change from orange to white. This means the waffle maker has reached proper cooking temperature. Preheating takes approximately 3 to 5 minutes. Once the unit is heated, ready times are faster.
Adding Batter
- Open the waffle maker and apply a light layer of vegetable oil, olive oil, or canola oil to the cooking plates.
- Add 3/4 to 1 cup of batter to the center of the cooking plate.
- Spread the batter evenly over the lower plate so the peak areas of the plate are covered.
CAUTION: DO NOT USE COOKING SPRAYS. They can cause a build-up on the cooking plates and may affect the ceramic non-stick performance of the product.
Flipping and Cooking
- Close the lid. Using the handle, flip the waffle plates to the other side (Figure 2 in the manual).
- NOTE: Do not lock the handle.
- Cook for about 2½ minutes, or until the indicator light turns back to white. Lift the handle to open.
- NOTE: Do not open the waffle maker for at least 1 minute 30 seconds. Opening it sooner can cause under-cooked waffles to break, and they can be difficult to remove from the plates.
Adjusting Doneness
If the waffles are not dark enough, close the waffle maker and continue cooking. Check every minute for doneness.
Removing Waffles
- When you are satisfied with the waffles, remove them from the heating plates with a non-metallic utensil.
- Repeat for as many waffles as you want.
- NOTE: Repeat waffles cook faster because extra heat has been retained.
- After the unit has cooled sufficiently, wipe the heating plates clean.
Tips for Perfectly Baked Waffles
- Mixing: Stir the batter only until large chunks of dry ingredients dissolve. Over-mixing can make waffles hard.
- Batter amount: The exact amount for a full-sized waffle depends on the type and consistency of the batter. Use the same ladle or measuring cup each time to find the amount that fills the lower plate and covers the peaks.
- Soft waffles: Softer waffle varieties break easily. After baking, cut them into halves or quarters and support them from underneath with a spatula to lift them out of the plates.
- Keeping batches warm: To serve a large batch at once, keep the waffles fresh and crisp in a preheated oven at 200°F. Remove them with oven mitts when you are ready to serve.
- Avoiding a moist base: Rest the waffles on a wire cooling rack to keep them crisp.
- Reheating in the waffle maker: Preheat the unit. Place the waffles on the lower plate so they fit the grooves correctly, close the unit, and heat for 1 to 2 minutes. Check every 30 seconds to avoid burning.
- Freezing: Let freshly baked waffles cool completely. Pack them in a covered container or plastic freezer bag, separating each waffle with a sheet of wax paper. Reheat frozen waffles in a preheated oven, toaster oven, or toaster until hot.
Cleaning and Maintenance
- Turn off the appliance, unplug it, and let it cool down before cleaning.
- Remove excess oil or crumbs without disassembling the appliance.
- NOTE: NEVER SUBMERGE THE APPLIANCE IN WATER OR PLACE IT IN THE DISHWASHER.
- Use nylon, plastic, wooden, or rubber utensils. This gives the best results and preserves the ceramic non-stick coating longer.
- Clean the heating plates with a soft cloth. You may occasionally use a metal polish made for stainless steel on the outer housing. Never use abrasive scouring pads or steel wool.
- If batter has hardened on the plates, pour on a little oil and let it sit for about 5 to 7 minutes. Then wipe it clean with a paper towel.
- Do not use the waffle maker for anything other than making waffles.
The appliance requires little maintenance and has no user-serviceable parts. Do not try to repair it yourself. Any servicing that requires disassembly beyond cleaning must be performed by a qualified appliance repair technician.
Caring for the Ceramic Non-Stick Surface
- Do not stack objects on the waffle cooking plates, to avoid scratching the surface.
- Use only nylon, plastic, or wooden utensils, and use them with care so the non-stick surface is not scratched. Never cut food on the plates.
- Remove stubborn stains with a plastic scouring pad and mild dish washing liquid. Do not use steel wool, which damages the non-stick surface of the cooking plates.
Removing Stains from the Ceramic Coating
- Identify the stained areas on the cooking surface and sprinkle some baking soda on the stains.
- Add some water to moisten the baking soda until it forms a paste.
- Let the paste stand on the stains for a few minutes, and not more than an hour.
- Rub with a soft damp cloth, or lightly scrub with a plastic scouring pad. Wipe clean and dry thoroughly.
- Repeat the cycle once more if necessary.
NOTE: Do not rub vigorously with a plastic scouring pad, and never use a metal scouring pad. A metal pad may damage the non-stick coating. Stains do not affect the performance or non-stick property of the ceramic coating.
Storing the Waffle Maker
- Unplug the unit and clean it.
- WARNING: Never store the unit while it is hot or plugged in.
- Close the waffle maker with the clasp.
- Press the button and turn it to the right to lock the waffle maker upright (Figure 3 in the manual). To unlock it, press the button and turn it to the left.
- Wrap the cord around the cord storage.
- WARNING: Never wrap the cord tightly around the unit. Never place any stress on the cord, especially where it enters the unit, because this could cause the cord to fray and break.
- WARNING: Unroll the cord from the cord storage before plugging it into the outlet.
- Store the unit in a clean, dry place.
Warranty and Customer Service
Limited Two-Year Warranty
SENSIO Inc. warrants that the product will be free from mechanical defects in material and workmanship for two years from the date of purchase. Non-mechanical parts are covered for 90 days. During the warranty period, SENSIO Inc. will, at its sole discretion, repair or replace a defective product or issue a refund.
The warranty is valid only for the original retail purchaser from the date of initial retail purchase, and it is not transferable. Keep the original sales receipt, because proof of purchase is required for warranty validation. Retail stores that sell the product cannot alter or revise the warranty terms.
Exclusions: The warranty does not cover normal wear of parts. It also does not cover damage resulting from any of the following:
- negligent use of the product
- use of improper voltage or current
- improper routine maintenance
- use contrary to the operating instructions
- disassembly, repair, or alteration by anyone other than qualified SENSIO Inc. personnel
- Acts of God such as fire, floods, hurricanes, or tornadoes
SENSIO Inc. is not liable for incidental or consequential damages caused by breach of any express or implied warranty. Except where applicable law prohibits it, any implied warranty of merchantability or fitness for a particular purpose is limited to the duration of the warranty. Some states, provinces, or jurisdictions do not allow these exclusions or limits, so they may not apply to you. The warranty gives specific legal rights that may vary by state, province, or jurisdiction.
How to Obtain Warranty Service
- Contact Customer Service at the toll-free number 1-866-832-4843. A representative will try to resolve the issue by phone.
- If the representative cannot resolve it, you will receive a case number and be asked to return the product to SENSIO Inc.
- Attach a tag to the product with your name, address, daytime contact telephone number, case number, and a description of the problem.
- Include a copy of the original sales receipt.
- Package the tagged product and receipt carefully, and send it to SENSIO Inc.’s address with shipping and insurance prepaid.
SENSIO Inc. bears no responsibility or liability for the returned product while it is in transit to its Customer Service Center.
Customer Service Contact
For customer service questions or comments, call 1-866-832-4843 or email help@bellahousewares.com. The manual’s cover also invites owners to scan a code to register the product at bellakitchenware.com. The manufacturer is Sensio Inc., doing business as Made by Gather, New York, NY 10016, USA.
Frequently Asked Questions
How do I know when the waffle maker is ready to use?
Wait for the indicator light to change from orange to white. After you unlock the unit and plug it into a 120 V AC outlet, the orange power light comes on to show it is preheating. The light turns white once the waffle maker reaches proper cooking temperature. This takes approximately 3 to 5 minutes, and it is faster once the unit is already warm.
How much batter should I use?
Start with 3/4 to 1 cup of batter poured in the center of the lower plate, then spread it evenly so the peak areas of the plate are covered. The exact amount depends on the type and consistency of your batter. Use the same ladle or measuring cup every time so you learn how much fills the lower plate.
How long do waffles take to cook, and can I open the unit early?
After you close the lid and flip the unit, cook for about 2½ minutes, or until the indicator light turns back to white. Do not open the waffle maker for at least 1 minute 30 seconds. Opening it sooner can make under-cooked waffles break and stick to the plates. If a waffle is not dark enough, close the unit and keep cooking, checking every minute. Repeat waffles cook faster because the unit has retained extra heat.
Can I use cooking spray on the plates?
No. Cooking sprays can build up on the cooking plates and may reduce the ceramic non-stick performance. Instead, apply a light layer of vegetable oil, olive oil, or canola oil to the plates before adding batter.
How do I clean batter or stains off the ceramic plates?
First unplug the unit and let it cool. For hardened batter, pour on a little oil, let it sit for about 5 to 7 minutes, and wipe it away with a paper towel. For stains, sprinkle baking soda on them and add water to make a paste. Leave the paste for a few minutes, never more than an hour. Then rub with a soft damp cloth or lightly scrub with a plastic scouring pad, wipe clean, and dry thoroughly. Do not use steel wool or metal scouring pads, and never put the unit in water or the dishwasher.
How do I store the waffle maker?
Unplug and clean the unit, and make sure it has cooled and is not plugged in. Close it with the clasp, then press the button and turn it to the right to lock it upright. Wrap the cord around the cord storage without winding it tightly around the unit or putting stress on it where it enters the unit. Store the waffle maker in a clean, dry place. Before the next use, unroll the cord fully from the cord storage before plugging it in.
How can I keep waffles warm or reheat them later?
For a large batch, keep waffles warm and crisp in a preheated 200°F oven, and rest them on a wire rack to avoid a moist base. To reheat in the waffle maker, preheat the unit, place the waffles on the lower plate so they fit the grooves, close it, and heat for 1 to 2 minutes, checking every 30 seconds. Frozen waffles should be reheated in a preheated oven, toaster oven, or toaster until hot.
How do I get warranty service?
Call Customer Service at 1-866-832-4843. A representative will try to solve the problem by phone, and if that fails you will receive a case number and instructions to return the product. Keep your original sales receipt, because proof of purchase is required. The two-year warranty applies only to the original retail purchaser and is not transferable.