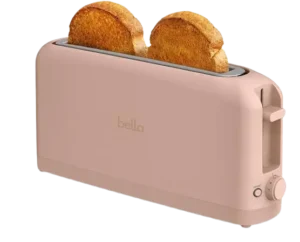
| Field | Details |
| Document Title | 2-Slice Slim Toaster Instruction Manual |
| Document Type | Instruction Manual |
| Brand Name | BELLA |
| Product Name | 2-Slice Slim Toaster |
| Model Number(s) | 35117, 35163, 35164, 35165, 35226 |
| PDF File Size | 325 KB |
| Number of Pages | 20 |
| Languages | English, Spanish |
BELLA 2-Slice Slim Toaster
The BELLA 2-Slice Slim Toaster is an electric household toaster designed to toast one or two regular bread slices. Its long toasting slot measures 9.9 inches in length and 1.2 inches in width, providing space for two slices within a slim design.
The toaster features six browning settings, a high-lift lever, a CANCEL button, a removable crumb tray, and a power cord wrap underneath the appliance. The browning control adjusts the toasting time, allowing users to choose light, medium, or dark toast.
The following instructions cover the toaster’s parts, first-time preparation, daily operation, browning controls, electrical safety, cleaning, storage, troubleshooting, and limited warranty.
Product Overview and Specifications
The BELLA 2-Slice Slim Toaster is intended exclusively for private household use. It operates from a 120 V AC wall outlet and uses a polarized plug.
The toaster begins heating automatically when the bread-loading lever is pressed down until it latches. At the end of the toasting cycle, the lever rises automatically, allowing the toast to be removed.
| Specification | Details |
| Brand | BELLA |
| Product | 2-Slice Slim Toaster |
| Product Type | Electric bread toaster |
| Bread Capacity | 1–2 regular bread slices |
| Toasting Slot Length | 9.9 inches |
| Toasting Slot Width | 1.2 inches |
| Power Supply | 120 V AC |
| Plug Type | Polarized plug |
| Browning Settings | 6 levels |
| Browning Control | Rotary dial |
| Cancel Function | Dedicated CANCEL button |
| Bread Lever | High-lift lever |
| Crumb Collection | Removable crumb tray |
| Cord Storage | Power cord wrap underneath |
| Intended Use | Indoor household use only |
| Country of Manufacture | China |
Parts and Components
The toaster has six main components used for preparing bread, adjusting browning, stopping operation, and cleaning.
| Part | Description and Function |
| Toasting Slot | Long opening measuring 9.9 × 1.2 inches, designed for regular bread slices. |
| High-Lift Lever | Lowers the bread into the toaster and starts the toasting cycle when pressed down until it latches. |
| CANCEL Button | Stops the toasting cycle at any time. |
| Browning Control Dial | Adjusts the toasting duration using settings 1 through 6. |
| Removable Crumb Tray | Located at the bottom of the toaster and collects bread crumbs for cleaning. |
| Power Cord Wrap | Located underneath the toaster for organizing the power cord during storage. |
High-Lift Lever
The high-lift lever controls the bread-loading mechanism.
When the lever is pushed down until it locks into position, the toaster begins heating. Once the selected toasting cycle finishes, the lever rises automatically.
CANCEL Button
The CANCEL button stops the current toasting cycle before it finishes.
It can be pressed at any point during operation, including when bread begins to smoke.
Browning Control Dial
The rotary dial adjusts how long the bread remains in the toasting cycle.
The six settings are divided into three browning ranges: light, medium, and dark.
Removable Crumb Tray
The crumb tray collects crumbs that fall during toasting. It can be pulled out from the bottom of the toaster, emptied, and inserted again.
The tray must be fully closed and correctly positioned before the toaster is used.
Important Safety Instructions
The BELLA 2-Slice Slim Toaster generates heat during operation. Its metal parts can become very hot and may remain hot after the toaster has been switched off.
Following the electrical, fire prevention, and operating precautions is important for avoiding burns, electric shock, and damage to the appliance.
Electrical Safety
- Connect the toaster directly to a 120 V AC electrical wall outlet.
- Do not immerse the toaster, power cord, or plug in water or any other liquid.
- Never operate the toaster with wet or damp hands.
- Do not use the appliance if its power cord, plug, or body is damaged.
- Unplug the toaster whenever it is not in use or before cleaning.
- Always disconnect the appliance by holding the plug rather than pulling the cord.
- Keep the power cord away from hot surfaces, moisture, sharp edges, and direct sunlight.
- Do not attempt to repair the toaster or its electrical components.
- If the power cord becomes damaged, it must be replaced by the manufacturer, an authorized service agent, or another suitably qualified person.
- If the toaster falls into water, immediately disconnect it from the wall outlet without reaching into the water.
Warning: Never attempt to remove food trapped inside the toaster while it is connected to electricity. Doing so creates a risk of electric shock or fire.
Fire and Burn Prevention
The toaster must be operated under supervision because bread can burn, especially when it is very dry.
Important fire and heat precautions include:
- Never leave the toaster running unattended.
- Keep sufficient open space above and around the appliance for air circulation.
- Do not operate the toaster near curtains, wall coverings, clothing, kitchen towels, wood, or other combustible materials.
- Never cover the toaster while it is operating.
- Do not place anything on top of the toaster while it is operating or remains hot.
- Avoid touching hot metal parts. Use the designated handles and controls.
- Use oven mitts or suitable heat protection when handling hot materials.
- Allow heated surfaces and metal components to cool before cleaning.
- Do not place the toaster on or near a hot gas burner, electric burner, or inside a heated oven.
Caution: The toaster can remain hot after the toasting cycle finishes. Allow sufficient cooling time before handling areas that are not intended as grip surfaces.
Food and Toasting Restrictions
The bread slot is intended for regular bread slices.
The following foods and items must not be placed in the toaster:
- Oversized food that does not fit properly.
- Torn or broken bread slices.
- Buttered bread.
- Food wrapped in foil or other packaging.
- Pastries containing runny fillings or frosting.
- Foods containing runny ingredients.
- Small breads, mini-baguettes, or breadsticks.
- Round or irregularly shaped bread.
The safety instructions also specify the lightest browning setting when heating toaster pastries. However, the operating precautions restrict the slot to regular bread slices and prohibit pastries with runny fillings or frosting.
Never insert forks, knives, or other metal utensils into the toasting slot.
Safe Placement and Handling
Place the toaster on a hard, level, stable surface before connecting it to power.
Do not operate the appliance on soft materials such as carpets or in a location where it could tip over.
The manual also recommends placing non-plastic coasters or place mats between the toaster and finished countertops or furniture surfaces. This helps prevent plasticizers from affecting the finish, which could otherwise result in darkening, stains, or permanent marks.
Keep the toaster stable and maintain adequate ventilation during operation.
Child Safety and Supervision
Children must be supervised to prevent them from playing with the toaster.
Keep the appliance and its electrical cord out of children’s reach. The cord should not hang over the edge of a table or countertop.
Individuals with reduced physical, sensory, or mental capabilities, or those who lack experience using the appliance, require appropriate supervision or instruction from a person responsible for their safety.
Plug and Power Cord Safety
The BELLA toaster uses a polarized electrical plug with one blade wider than the other.
This design allows the plug to fit into a polarized wall outlet in only one direction.
If the plug does not fit:
- Remove the plug from the outlet.
- Reverse its orientation.
- Try inserting it again.
- If it still does not fit, contact a qualified electrician.
Do not modify the polarized plug.
The toaster is supplied with a short power cord to reduce the possibility of entanglement or tripping.
If a longer detachable cord or extension cord is used, its electrical rating must be at least equal to the toaster’s rating. The cord must also be arranged so that children cannot pull it and people cannot trip over it. For grounded appliances, the manual specifies a grounding-type three-wire extension cord.
The operating instructions call for connecting the toaster directly to a wall outlet.
Electrical Circuit Requirements
The toaster may not operate properly when the electrical circuit is overloaded by other appliances.
It should be operated on a separate electrical circuit from other appliances.
The toaster must not be operated through an external timer or separate remote-control system.
Before First Use
During initial operation, the toaster may produce an odor caused by manufacturing residue or oil remaining inside the appliance or on its heating elements.
This is considered normal during the first few uses.
The manual recommends operating the toaster without bread before preparing the first slice.
First-Time Preparation
- Remove all protective packaging and wrapping from the toaster.
- Place the appliance on a hard, flat, stable surface.
- Allow sufficient space around and above the toaster for ventilation.
- Check that the power cord and appliance are not damaged.
- Connect the plug to a suitable 120 V AC wall outlet.
- Operate the toaster without bread using the normal toasting controls.
- Allow the toaster to cool completely before preparing the first slices of bread.
An initial odor may occur during the empty toasting cycle. The manual indicates that this odor should disappear after several uses.
How to Use the BELLA 2-Slice Slim Toaster
The toaster starts automatically when the high-lift lever is lowered into its locked position.
The browning control determines how long the toaster operates, while the CANCEL button allows the process to be stopped early.
How to Toast Bread
- Connect the power. Make sure the toaster is plugged into the appropriate electrical wall outlet.
- Insert the bread. Place one or two regular bread slices into the toasting slot.
- Lower the lever. Push the high-lift lever downward until it latches into position.
- Start toasting. The toaster begins heating automatically after the lever is engaged.
- Adjust browning. Turn the browning control dial to the desired setting.
- Allow the cycle to finish. The toaster operates according to the selected browning setting.
- Remove the toast. Once the cycle finishes, the loading lever rises automatically so the toast can be removed.
The toaster and its metal components may remain hot after operation. Avoid touching heated surfaces while removing the toast.
How to Stop Toasting Early
The CANCEL button can stop the heating cycle at any time.
- Locate the CANCEL button on the front of the toaster.
- Press the button while the toaster is operating.
- Allow the cycle to stop.
- Remove the toast carefully.
Important: If bread begins to smoke during operation, immediately press CANCEL to stop toasting.
How to Make Toast Darker
If the toast is lighter than desired, the bread can be toasted again.
- Adjust the browning control to a higher setting.
- Place the bread back into the toasting slot.
- Lower the lever until it latches.
- Monitor the bread carefully while it is being toasted again.
- Stop the cycle if necessary to prevent burning.
The manual specifically cautions against allowing bread to burn during a second toasting cycle.
Browning Control and Toast Settings
The BELLA 2-Slice Slim Toaster provides six browning levels through its rotary control dial.
The dial adjusts toasting time and determines whether the resulting toast is light, medium, or dark.
| Browning Setting | Toast Level | Description |
| 1–2 | Light | Shorter toasting time for lightly browned bread. |
| 3–4 | Medium | Intermediate toasting time for medium-browned bread. |
| 5–6 | Dark | Longer toasting time for darker toast. |
Light Toast Settings: 1–2
Settings 1 and 2 are intended for light browning.
These settings provide a shorter toasting time than the higher numbers.
Medium Toast Settings: 3–4
Settings 3 and 4 produce a medium level of browning.
The toaster runs for an intermediate amount of time.
Dark Toast Settings: 5–6
Settings 5 and 6 are designed for darker toast.
These settings provide longer toasting times and require attention to prevent bread from burning.
Adjusting Browning During Use
The browning control can be adjusted to the desired setting as described in the operating instructions.
If the bread is not dark enough after the cycle finishes, a higher setting can be selected before toasting it again.
The CANCEL button remains available throughout the toasting cycle.
Cleaning and Maintenance
Regular cleaning helps remove accumulated bread crumbs and keeps the toaster ready for its next use.
The toaster must always be disconnected from electricity and allowed to cool before cleaning.
How to Clean the Exterior
- Disconnect the toaster from the wall outlet.
- Allow the appliance and its metal components to cool.
- Use a soft, dry cloth to wipe the outside surfaces.
- Avoid using metal polish.
- Keep the toaster and its electrical components away from water and other liquids.
Warning: Never immerse the toaster, its plug, or its power cord in water.
How to Remove and Clean the Crumb Tray
The removable crumb tray is located at the bottom of the toaster.
It collects bread crumbs that fall during use.
To empty the crumb tray:
- Unplug the toaster from the electrical outlet.
- Wait until the toaster has cooled.
- Pull out the removable crumb tray from the bottom.
- Empty the accumulated bread crumbs.
- Reinsert the tray into its original position.
- Check that the crumb tray is completely closed before operating the toaster again.
How Often Should the Crumb Tray Be Cleaned?
If the toaster is used frequently, accumulated bread crumbs should be removed at least once a week.
The tray must be correctly installed and fully closed before the next toasting cycle.
Routine Maintenance
The toaster requires periodic inspection and basic care.
| Maintenance Task | Instructions |
| Remove bread crumbs | Empty the crumb tray at least weekly when the toaster is used frequently. |
| Clean exterior | Wipe with a soft, dry cloth after the appliance cools. |
| Inspect power cord | Check regularly for signs of wear or damage. |
| Inspect toaster body | Do not operate the appliance if it is damaged. |
| Check crumb tray | Make sure it is inserted correctly and fully closed before use. |
| Store power cord | Use the cord clips underneath the toaster when storing. |
Do not attempt to repair the toaster yourself. Electrical repairs and damaged power cord replacement must be handled by appropriately qualified personnel.
Only original parts should be used.
Storage Instructions
The BELLA 2-Slice Slim Toaster should be stored only after it has been disconnected, cleaned, and allowed to cool.
How to Store the Toaster
- Remove the plug from the wall outlet.
- Allow the appliance to cool.
- Clean the toaster and empty the crumb tray as needed.
- Wind the power cord around the cord clips underneath the toaster.
- Place the appliance in its original box.
- Store the toaster in a clean, dry location.
Power Cord Storage Precautions
The toaster includes built-in cord storage underneath its base.
When organizing the power cord:
- Use the designated cord clips.
- Do not wrap the cord tightly around the appliance.
- Avoid pulling, bending, or placing tension on the cord where it enters the toaster.
- Keep the cord away from sharp edges, moisture, and heat.
Excessive stress at the connection point can cause the power cord to fray or break.
Never store the toaster while it is still hot or connected to an electrical outlet.
Troubleshooting Guide
The following table covers common operating situations and corrective actions described in the BELLA 2-Slice Slim Toaster instructions.
| Problem or Situation | Recommended Action |
| Toast is not dark enough | Select a higher browning setting and toast the bread again. Watch carefully to prevent burning. |
| Bread begins to smoke | Press CANCEL immediately to stop the toasting cycle. |
| Bread becomes jammed | Unplug the toaster before attempting to remove the bread. Avoid damaging the internal mechanism or heating elements, and do not insert metal utensils. |
| The toaster produces an odor during first use | Manufacturing residue or oil may cause an initial odor. The manual recommends operating the toaster without bread before first use and allowing it to cool. |
| The toaster does not operate properly when other appliances share the circuit | Use the toaster on a separate electrical circuit, as an overloaded circuit may affect operation. |
| The toaster malfunctions during operation | Press CANCEL immediately, unplug the toaster, and discontinue use. Do not attempt to repair it. |
| The power cord or appliance is damaged | Do not operate the toaster. Consult an authorized professional for the necessary service. |
What to Do if Bread Gets Stuck
Bread can become lodged inside the toasting slot.
Warning: Never attempt to dislodge bread while the appliance is plugged in. There is a risk of electric shock or fire.
If bread becomes stuck:
- Stop the toasting operation.
- Disconnect the toaster from the electrical outlet.
- Allow the hot metal components to cool before handling.
- Avoid using forks, knives, or similar metal utensils in the toasting slot.
- Avoid damaging the heating elements or internal toasting mechanism.
If the bread cannot be removed without damaging the appliance, do not attempt to dismantle or repair the toaster.
What to Do if the Toaster Starts Smoking
If bread begins to smoke while toasting:
- Press the CANCEL button immediately.
- Stop the toasting cycle.
- Do not leave the toaster unattended.
- Follow the appliance’s safety instructions before handling hot components.
Very dry bread can catch fire during toasting. The toaster should always be supervised while operating.
What to Do if the Toaster Malfunctions
If the toaster stops operating correctly or displays signs of malfunction:
- Press the CANCEL button.
- Disconnect the power cord from the outlet.
- Do not continue operating the appliance.
- Do not attempt to repair its internal components.
- Contact customer service or consult an authorized professional.
Damaged electrical components and power cords must not be repaired by unqualified individuals.
Warranty Information
The BELLA 2-Slice Slim Toaster is covered by a limited warranty provided by SENSIO Inc.
The warranty begins on the original retail purchase date and applies only to the original purchaser.
Limited Warranty Coverage
| Warranty Detail | Coverage |
| Warranty Provider | SENSIO Inc. |
| Mechanical Defects | 2 years from the purchase date |
| Non-Mechanical Parts | 90 days |
| Eligible Purchaser | Original retail purchaser |
| Transferability | Non-transferable |
| Proof of Purchase | Original sales receipt required |
| Available Remedies | Repair, replacement, or refund at SENSIO Inc.’s discretion |
The two-year warranty covers mechanical defects in materials and workmanship.
Non-mechanical parts have a separate 90-day warranty period.
During the applicable warranty period, SENSIO Inc. may choose to repair or replace a defective product or provide a refund.
Warranty Exclusions
The limited warranty does not cover normal wear or damage caused by:
- Negligent product use.
- Incorrect electrical voltage or current.
- Improper routine maintenance.
- Operation contrary to the supplied instructions.
- Disassembly, repair, or modification by anyone other than qualified SENSIO Inc. personnel.
- Natural disasters, including fires, floods, hurricanes, and tornadoes.
The warranty also contains limitations concerning incidental and consequential damages and implied warranties. These limitations may vary depending on applicable state, provincial, or local laws.
How to Request Warranty Service
To request assistance under the limited warranty:
- Contact SENSIO Inc. Customer Service at 1-866-832-4843.
- Describe the product issue to the customer service representative.
- Follow the troubleshooting or warranty assistance provided by the representative.
- If the issue cannot be resolved over the phone, customer service will issue a case number and provide return instructions.
- Prepare a label with the purchaser’s name, address, daytime telephone number, case number, and description of the problem.
- Include a copy of the original sales receipt.
- Carefully package the product with the required label and receipt.
- Send the product according to the return instructions, with shipping and insurance prepaid.
SENSIO Inc. does not accept responsibility or liability for the product while it is in transit to its customer service center.
Customer Support and Contact Information
For product questions, operating problems, and warranty-related assistance, BELLA provides the following contact details.
| Contact Type | Details |
| Brand | BELLA |
| Warranty Provider | SENSIO Inc. |
| Customer Service Phone | 1-866-832-4843 |
| Customer Service Email | help@bellahousewares.com |
| Website | https://bellakitchenware.com |
| Company | SENSIO Inc., doing business as Made by Gather |
| Company Location | New York, NY 10016, USA |
Product Registration
The instruction manual provides a product registration option through the BELLA website.
Product owners can visit https://bellakitchenware.com for registration.
The original sales receipt should be retained because proof of purchase is required for warranty validation.
Frequently Asked Questions
How do you use the BELLA 2-Slice Slim Toaster?
Connect the toaster to a 120 V AC wall outlet, insert one or two regular bread slices, and lower the high-lift lever until it latches. Adjust the browning control dial to the desired level. The lever rises automatically when the toasting cycle finishes.
What are the browning settings on the BELLA 2-Slice Slim Toaster?
The toaster has six browning settings. Levels 1–2 provide light toasting, levels 3–4 provide medium toasting, and levels 5–6 provide dark toasting. Higher settings increase the toasting duration.
How do you cancel a toasting cycle?
Press the CANCEL button on the front of the toaster. The button can stop the cycle at any time, including when bread begins to smoke.
Why does the BELLA toaster smell during first use?
Manufacturing residue or oil remaining on the toaster or its heating elements may produce an odor during initial use. The manual recommends operating the toaster without bread before first use and allowing it to cool afterward. The initial odor normally disappears after several uses.
What should be done if bread gets stuck in the BELLA toaster?
Disconnect the toaster from the electrical outlet before attempting to remove trapped bread. Allow hot components to cool, avoid inserting forks or knives, and do not damage the heating elements or internal mechanism. Never try to remove jammed bread while the toaster is plugged in.
How often should the BELLA toaster crumb tray be cleaned?
When the toaster is used frequently, accumulated bread crumbs should be removed at least once a week. Unplug and cool the appliance before pulling out the crumb tray. Empty it and reinsert it completely before using the toaster again.
What power outlet does the BELLA 2-Slice Slim Toaster require?
The toaster is designed to connect directly to a 120 V AC wall outlet. It includes a polarized plug and should be operated on a separate electrical circuit from other appliances to avoid problems caused by overloading.
What is the warranty on the BELLA 2-Slice Slim Toaster?
SENSIO Inc. provides a limited two-year warranty for mechanical defects in materials and workmanship and 90 days of coverage for non-mechanical parts. The warranty applies to the original retail purchaser and requires proof of purchase. For warranty assistance, contact customer service at 1-866-832-4843 or help@bellahousewares.com.