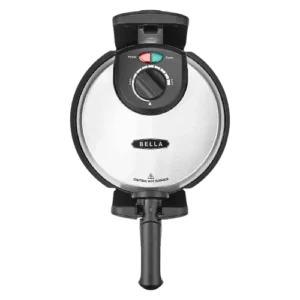
| Brand Name | BELLA |
| Product Name | Non-Stick Rotating Belgian Waffle Maker |
| Model / Item Number | 17174 |
| File Size | 2.81 MiB |
| Number of Pages | 20 |
| Languages Covered | English and Spanish |
BELLA 17174 Non-Stick Rotating Belgian
The BELLA 17174 Non-Stick Rotating Belgian Waffle Maker is a household electric waffle maker designed with non-stick cooking plates, a 180-degree rotating mechanism, power and ready indicator lights, and a removable drip tray for collecting excess batter and crumbs.
The basic cooking process is simple: the waffle maker is preheated, batter is spread over the lower cooking plate, the appliance is closed and rotated 180 degrees into its locked cooking position, and the waffle is checked when the green Ready Light comes back on.
The manual also includes instructions for preserving the non-stick coating, storing the appliance, reheating or freezing waffles, three waffle recipes, and a two-year limited warranty.
Product Overview
The rotating design helps distribute waffle batter across the cooking plates after the unit is closed. During operation, the handle is rotated 180 degrees clockwise to lock the waffle maker for cooking and then turned 180 degrees counter-clockwise before opening.
The appliance operates from a 120V AC household outlet and is intended only for household use. The manual states that it should not be used commercially.
Parts and Controls
The product diagram on page 6 identifies the main user-facing components.
| Part | Purpose |
| Red Power Light | Indicates that the waffle maker is connected to power |
| Green Ready Lights | Indicate preheating and when proper cooking temperature has been reached |
| Handle | Used to open, close, rotate, lock and unlock the waffle maker |
| Drip Tray | Collects excess batter and crumbs |
| Non-Stick Cooking Plates | Hold and cook the waffle batter |
The manual diagram shows green Ready Lights on the rotating appliance and a red Power Light near the upper housing. A drip tray sits beneath the cooking area to catch overflow.
Indicator Light Guide
Red Power Light
The Red Power Light turns on after the waffle maker is plugged into a 120V AC outlet.
Its illumination indicates that the appliance has power and is beginning the preheating process.
Green Ready Light
The Green Ready Light turns off while the waffle maker is heating.
It turns on once the appliance reaches the correct cooking temperature. Initial preheating takes approximately 3 to 5 minutes. After the appliance has already heated, subsequent ready times are shorter.
During cooking, the Green Ready Light comes on again as an indication that the waffle can be checked.
What Is Included
The manual specifically identifies a drip tray as an included accessory.
Its purpose is to collect:
- Batter that overflows the cooking plates
- Crumbs produced during cooking
Important Safety Instructions
The waffle maker becomes hot during use and remains hot for a period after cooking.
Important precautions from the manual include:
- Read all instructions before using the appliance.
- Do not touch hot surfaces; use the handle or knobs.
- Do not immerse the appliance, power cord or plug in water or other liquid.
- Keep children supervised around the appliance.
- Unplug the unit whenever it is not being used and before cleaning.
- Allow it to cool before cleaning or storage.
- Disconnect the appliance by grasping the plug rather than pulling the cord.
- Do not operate it with a damaged cord or plug.
- Do not use accessories that are not recommended by the manufacturer.
- Do not use the waffle maker outdoors.
- Do not use it for commercial purposes.
- Keep the cord away from hot surfaces and countertop edges.
- Keep the appliance away from curtains and other flammable materials.
- Do not place it on or near a hot burner or inside a heated oven.
- Use it only on a flat, heat-resistant surface.
- Take care when moving the appliance around hot food, oil or other hot substances.
- Plug it only into a 120V AC outlet.
- Always unplug it after use because it remains powered until disconnected from the outlet.
Hot Surface Warning
The waffle maker produces substantial heat during operation.
The manual recommends using oven mitts when handling hot materials and waiting for metal components to cool before cleaning. Nothing should be placed on top of the appliance while it is operating or still hot.
Polarized Plug
The appliance uses a polarized plug, with one blade wider than the other.
If the plug does not fit completely into the outlet:
- Reverse it.
- Try inserting it again.
- If it still does not fit, contact a qualified electrician.
The plug should not be modified.
Extension Cord Instructions
The waffle maker has a short power cord to reduce entanglement and tripping risks.
If a longer detachable cord or extension cord is used:
- Its electrical rating must be at least equal to the appliance’s rating.
- A grounded appliance requires a three-wire grounding extension cord.
- The longer cord should be arranged so that it does not hang over a countertop or table where children can pull it or someone can trip over it.
Countertop Protection
The manual includes a plasticizer warning for finished countertops and furniture.
A non-plastic coaster or placemat should be placed between the waffle maker and the countertop or table surface. Without this barrier, certain finishes may darken, stain or develop permanent marks.
Electrical Power
If other appliances overload the same electrical circuit, the waffle maker may not operate correctly.
BELLA recommends using it on a separate electrical circuit from other appliances.
Before First Use
Before making the first waffle:
- Remove all included parts from the box.
- Wash the parts thoroughly according to the cleaning instructions.
- Place the appliance on a flat, heat-resistant surface.
- Position the drip tray beneath the waffle maker.
- Connect it to a suitable 120V AC outlet when ready to begin preheating.
Smoke or Odor During First Use
A small amount of smoke or odor may appear the first time the appliance is heated.
The manual states that this is normal and harmless. However, it recommends not eating the first waffle made in the appliance.
How to Use the BELLA Rotating Belgian Waffle Maker
Step 1: Plug In the Waffle Maker
Connect the power cord to a 120V AC wall outlet.
The Red Power Light turns on to show that the appliance is powered.
Step 2: Preheat
The Green Ready Light turns off as the appliance starts heating.
Wait until the Green Ready Light comes back on.
Initial preheating normally takes approximately 3 to 5 minutes.
Step 3: Lightly Oil the Cooking Plates
When the Green Ready Light comes on:
- Open the waffle maker.
- Apply a light layer of:
- Vegetable oil
- Olive oil
- Canola oil
- Make sure the cooking surfaces are lightly coated.
Do Not Use Cooking Spray
The manual specifically warns against aerosol cooking sprays.
They can leave buildup on the cooking plates and reduce the performance of the non-stick coating.
Step 4: Add Waffle Batter
Pour batter onto the lower cooking plate.
Spread it evenly until:
- The lower plate is filled.
- The raised peak areas of the waffle grid are covered.
The exact amount varies with the thickness and consistency of the batter, so the manual recommends using the same ladle or measuring cup each time once the correct quantity has been determined.
Step 5: Close and Rotate 180 Degrees
Close the waffle maker.
Rotate the handle 180 degrees clockwise, toward the right, until the appliance locks in the cooking position.
Step 6: Wait for the Green Ready Light
When the Green Ready Light turns on again:
- Rotate the handle 180 degrees counter-clockwise, toward the left.
- Return the waffle maker to the unlocked position.
- Open it carefully.
Do Not Open Too Early
The manual instructs users not to open the waffle maker during at least the first 1 minute 30 seconds of cooking.
Opening too soon may cause an undercooked waffle to break and stick to the cooking plates.
Step 7: Cook Longer for a Darker Waffle
If the waffle is not dark enough:
- Close the appliance.
- Rotate it back to the locked position.
- Wait another 30 seconds.
- Check again.
- Repeat if necessary.
Step 8: Remove the Waffle
Once the waffle has reached the preferred color, remove it using a non-metallic utensil.
Suitable utensils help protect the non-stick coating.
Step 9: Make Additional Waffles
To make another waffle:
- Close the waffle maker.
- Wait for the Green Ready Light.
- Add batter and repeat the cooking process.
Step 10: Unplug After Cooking
When finished:
- Remove the plug from the wall outlet.
- Let the appliance cool completely.
- Clean the cooking plates after they have cooled.
How to Lock and Unlock the Waffle Maker
The appliance can only be opened in its unlocked position.
According to the manual:
- It is unlocked when the side containing the two indicator lights faces upward.
- It is locked when those two indicator lights face downward.
This orientation is useful when checking whether the rotating mechanism has been returned to the correct opening position.
Waffle Cooking Time
The main operating instructions use the Ready Light rather than specifying one fixed total cooking time for every recipe.
The appliance should remain closed for at least 1 minute 30 seconds before the first check.
The recipes later in the manual give approximate times of:
- 2 to 4 minutes for classic buttermilk waffles.
- 2 to 4 minutes for chocolate chip waffles.
- 3 to 4 minutes for blueberry waffles.
Actual cooking time can vary depending on the batter and preferred browning.
Tips for Better Waffles
The manual provides several practical cooking tips.
Do Not Overmix the Batter
Mix only until large dry clumps disappear.
Overmixing can make waffles hard.
Measure Batter Consistently
Different batters require different quantities.
Use the same ladle or measuring cup each time after determining the amount needed to fill the lower plate and cover its raised peaks.
Removing Softer Waffles
Soft waffles may break easily.
The manual recommends:
- Cutting them into halves or quarters.
- Supporting each section underneath with a spatula.
- Lifting gently from the cooking plate.
Keeping Waffles Crisp
For large batches, finished waffles can be kept warm in a preheated oven at 200°F.
Use oven mitts when removing them.
Placing cooked waffles on a wire cooling rack also helps prevent moisture from softening the bottom surface.
How to Reheat Waffles in the Waffle Maker
The manual allows cooked waffles to be reheated in the appliance.
- Preheat the waffle maker.
- Place the waffle on the lower plate so it fits the grooves.
- Close the appliance.
- Heat for approximately 1 to 2 minutes.
- Check every 30 seconds to prevent burning.
Freezing Waffles
Fresh waffles can also be frozen.
- Allow them to cool completely.
- Put them in a covered container or freezer bag.
- Separate individual waffles with wax paper.
- Freeze for later use.
Frozen waffles can be reheated in a preheated oven, toaster oven or toaster.
Cleaning and Maintenance
Always unplug the waffle maker and allow it to cool before cleaning.
Cleaning the Cooking Plates
Excess oil and crumbs can normally be removed without taking the appliance apart.
Use:
- A soft cloth
- Nylon utensils
- Plastic utensils
- Wooden utensils
- Rubber utensils
These materials help preserve the non-stick coating.
Do Not Immerse the Waffle Maker
The appliance must never be submerged in water or placed in a dishwasher.
Cleaning the Exterior
Use a soft cloth on the appliance.
The manual permits occasional use of a metal polish intended for stainless steel on the outer housing.
Do not use:
- Abrasive scouring pads
- Steel wool
Removing Hardened Batter
If batter has hardened onto the cooking plates:
- Apply a small amount of oil.
- Leave it in place for approximately 5 to 7 minutes.
- Wipe away the softened residue with a paper towel.
Removing Stains From the Non-Stick Coating
For stains on the cooking surface:
- Sprinkle baking soda over the stained area.
- Add enough water to make a paste.
- Leave the paste on the stain for several minutes, but no longer than one hour.
- Wipe with a soft, damp cloth or lightly scrub with a plastic scouring pad.
- Wipe the surface clean.
- Dry it thoroughly.
- Repeat if necessary.
Protecting the Non-Stick Surface
Never use a metal scouring pad.
When using a plastic scouring pad, do not scrub aggressively because this can damage the non-stick coating.
The manual notes that normal staining does not by itself reduce the performance or non-stick properties of the coating.
Maintenance and Repair
The appliance requires little regular maintenance and contains no user-serviceable parts.
Users should not attempt to repair it themselves. Any service requiring disassembly beyond routine cleaning should be handled by a qualified appliance repair technician.
Storage Instructions
Before storage:
- Unplug the waffle maker.
- Let it cool completely.
- Clean it.
- Store it in its original box or another clean, dry location.
Never store the waffle maker while it is hot or still connected to power.
Recipe Guide
The official manual contains a waffle base mix plus three example recipes.
Waffle Base Mix
The dry base uses:
| Ingredient | Amount |
| All-purpose flour | 3 cups |
| Baking powder | 2 tbsp |
| Salt | 1 tsp |
| Sugar | 1/2 cup |
Combine the ingredients and store the mixture in an airtight container until needed.
Classic Buttermilk Waffles
Makes: 4 waffles
Ingredients:
- 1 1/2 cups Waffle Base Mix
- 2 eggs
- 4 tbsp melted butter
- 1/2 cup buttermilk
Combine the ingredients until smooth and free from lumps. The recipe directs approximately 1/3 cup of batter per waffle and gives a cooking time of about 2 to 4 minutes, until golden brown.
The manual also suggests adding 1/4 cup of jam to the batter or serving the waffles with fruit, toasted nuts, honey, flavored syrup or yogurt.
Chocolate Chip Waffles
Makes: 4 waffles
Ingredients:
- 1 1/2 cups Waffle Base Mix
- 4 tbsp melted butter
- 2 eggs
- 1/2 cup buttermilk
- 1/4 cup chocolate chips
Mix until smooth and cook approximately 1/3 cup of batter per waffle for about 2 to 4 minutes, until golden brown.
Blueberry Waffles
Makes: 4 waffles
Ingredients:
- 1 1/2 cups Waffle Base Mix
- 4 tbsp melted butter
- 2 eggs
- 1/2 cup buttermilk
- 1/4 cup blueberries
Cook approximately 1/3 cup of batter per waffle for about 3 to 4 minutes or until golden brown.
The manual suggests serving them with sliced strawberries.
Two-Year Limited Warranty
SENSIO Inc. provides a two-year warranty from the original purchase date against qualifying mechanical defects in materials and workmanship.
Non-mechanical parts are covered for 90 days.
During the warranty period, SENSIO may choose to:
- Repair the product.
- Replace the product.
- Issue a refund. Bella-Non-Stick-Belgian-Waffle-…
The warranty applies only to the original retail purchaser and is not transferable. Proof of purchase is required.
Warranty Exclusions
The warranty does not cover damage caused by:
- Normal wear
- Negligent use
- Incorrect voltage or current
- Improper maintenance
- Use contrary to the operating instructions
- Unauthorized disassembly
- Unauthorized repair or alteration
- Fire
- Flood
- Hurricane
- Tornado or similar events
How to Obtain Warranty Service
The manual instructs owners to contact BELLA/SENSIO Customer Service first.
Toll-Free Phone: 1-866-832-4843
A representative will first attempt to resolve the issue by phone. If the problem cannot be resolved, the customer may receive a case number and return instructions. Proof of purchase is required for a warranty claim.
Customer Support
The final page provides these contact details:
SENSIO Inc.
New York, NY 10016, USA
Customer Service Phone: 1-866-832-4843
Email: help@bellahousewares.com
Website: bellahousewares.com
Frequently Asked Questions
How do you use the BELLA rotating Belgian waffle maker?
Plug the waffle maker into a 120V outlet and wait approximately 3 to 5 minutes for the Green Ready Light. Lightly oil the cooking plates, add batter to the lower plate, close the unit and rotate it 180 degrees clockwise to lock it. When the Green Ready Light returns, rotate it counter-clockwise to unlock and check the waffle.
How long does the BELLA waffle maker take to preheat?
Initial preheating takes approximately 3 to 5 minutes. Once the appliance is already hot, subsequent ready times are shorter.
What does the green light mean on a BELLA waffle maker?
The Green Ready Light means the waffle maker has reached the proper cooking temperature. During cooking, it turns on again when the waffle can be checked.
How long should a waffle cook in the BELLA rotating waffle maker?
Do not open the appliance during at least the first 1 minute 30 seconds. Recipe examples in the manual generally cook for about 2 to 4 minutes, with the exact time depending on the batter and desired browning.
Why should cooking spray not be used on the BELLA waffle maker?
The manual warns that aerosol cooking sprays can build up on the cooking plates and reduce the performance of the non-stick coating. A light coating of vegetable, olive or canola oil is recommended instead.
How do you clean stuck batter from the waffle maker?
Apply a small amount of oil to the hardened batter and leave it for approximately 5 to 7 minutes. Then wipe the softened residue away with a paper towel.
Can the BELLA waffle maker go in the dishwasher?
No. The official manual states that the waffle maker must never be submerged in water or placed in a dishwasher.
How do you know whether the BELLA rotating waffle maker is locked or unlocked?
It is unlocked when the side with the two indicator lights faces upward. It is locked when those lights face downward. The waffle maker can only be opened from the unlocked position.