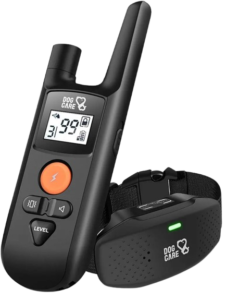
| Brand Name | DOG CARE |
| Product Name | Dog Training Collar |
| Model Number | TC01-C1 |
| File Size | 515 KB |
| Number of Pages | 1 page |
| Languages Covered | English |
DOG CARE TC01-C1 Dog Training Collar
The DOG CARE TC01-C1 is a remote-controlled dog training collar with sound, vibration, and adjustable static stimulation modes. The remote includes a digital display for the selected channel, static level, keypad lock, signal, and battery status for both the remote and receiver.
The TC01-C1 can work with multiple matched receivers, with channels numbered from 1 to 9. Static stimulation can be adjusted from 01 to 99, and the receiver includes a built-in four-second cutoff designed to stop prolonged static output if the Static button remains pressed.
Product Overview
The TC01-C1 system consists of a handheld remote control and a receiver worn on the dog’s collar.
Remote Control Parts
The product diagram identifies the following remote controls:
| Control / Part | Purpose |
| ON/OFF Switch / Static Level Regulator | Turns the remote on or off and adjusts static strength |
| Keypad Lock | Prevents accidental button operation |
| Static Level Regulator Activation Button | Used while adjusting static strength |
| Vibrate Button | Activates receiver vibration |
| Static Button | Activates static stimulation |
| Channel Switch / Match Button | Changes receiver channels and pairs receivers |
| Beep Button | Activates the receiver sound |
| Antenna | Sends commands to the receiver |
| Display Screen | Shows status and settings |
| Micro USB Charging Port | Charges the remote |
| Lanyard Holder | Attachment point for the supplied lanyard |
Remote Display Icons
The screen can show:
- Training mode
- Keypad lock status
- Remote signal
- Remote battery status
- Receiver battery status
- Selected channel from 1–9
- Static stimulation level from 01–99
Receiver Collar Parts
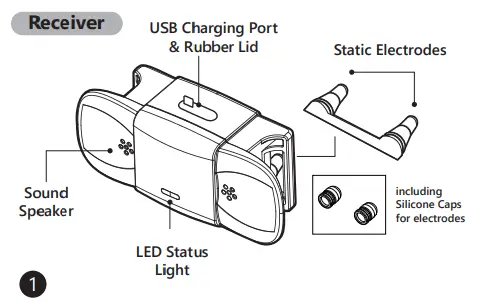
The receiver diagram identifies:
- Static electrodes
- Sound speaker
- LED status light
- USB charging port
- Rubber charging-port cover
- Silicone electrode caps
The rubber charging-port cover should be fitted securely when the receiver is exposed to water.
Package Contents
The package diagram shows the following items:
- Remote control
- Receiver
- Collar
- Silicone caps for the electrodes
- USB charging cable
- Lanyard
- User manual
Technical Specifications
| Specification | TC01-C1 |
| Model | TC01-C1 |
| Package dimensions | 8.6 × 3 × 3 in. |
| Collar dimensions | 27.6 × 0.95 in. |
| Receiver casing | IP65 waterproof, rain resistant, swimming approved |
| Remote casing | Non-waterproof; keep away from water |
| Remote / receiver battery | 450 mAh |
| Charging voltage | DC 5V / 300mA |
| Full charging time | 2–3 hours |
| Charging port | Micro USB |
| Operating environment | 32°F–104°F, under 95% RH |
| Remote standby time | 60 days |
| Receiver standby time | 40 days |
| Remote-to-receiver signal range | 656 ft |
| Receiver battery-status sync distance | 164 ft |
| Channel range | 1–9 |
| Static level range | 01–99 |
| Static safety cutoff | 4 seconds |
The specifications table in the manual lists the receiver as IP65 waterproof, rain resistant, and approved for swimming, while the handheld remote is specifically identified as non-waterproof.
Charging the Remote and Receiver
Both devices should be charged before setup.
Charging the Remote Control
- Connect the remote to a suitable USB power source.
- Charge it for at least two hours during initial setup.
- Watch the battery icon on the remote display.
- Charging is complete when the battery icon shows full bars.
Charging the Receiver
- Open the receiver charging-port cover.
- Connect the USB charging cable.
- Charge the receiver.
- The receiver’s LED is red while charging.
- Charging is complete when the LED changes from red to green.
- The receiver battery indicator on the remote should also show full bars.
The specification table gives a full charging time of approximately 2–3 hours.
If water is present around the receiver’s charging port, it should be dried before charging.
How to Pair the Remote and Receiver
The remote and receiver are already paired at the factory, so pairing can normally be skipped during first use.
If pairing is required:
- Connect the receiver to a USB power source.
- Keep it connected while pairing because matching mode can only be activated during charging.
- Press and hold the Channel Switch / Match button on the remote for approximately 5 seconds.
- The receiver will vibrate and beep.
- Check the remote’s Channel Display.
- A 1 on the display indicates that the first receiver has been matched successfully.
Adding Additional Receivers
The TC01-C1 can be configured for multiple receivers.
To add another receiver:
- Connect only the additional receiver to a power source.
- Press and hold the Channel Switch / Match button for about 5 seconds.
- Wait for the pairing confirmation.
- The next channel number appears on the remote.
Only one receiver should be connected for pairing at a time. Connecting multiple receivers simultaneously can cause them to be assigned to the same channel.
Switching Between Receivers
Press the Channel Switch button to select the receiver that should respond to the remote.
This is necessary when more than one receiver has been paired.
Removing All Paired Receivers
To clear matched receivers:
- Make sure the receivers have power and are within operating range.
- Press and hold the Static Level Regulator Activation button and Beep button together.
- Hold both controls for approximately 8 seconds.
- The Channel Display returns to 0.
Receivers need to be powered and within effective range so they can receive the removal command.
Training Modes
The TC01-C1 provides three training modes:
- Vibration
- Sound / Beep
- Static stimulation
Vibration Mode
Press the Vibrate button once to make the receiver vibrate once.
Holding the button causes the vibration to continue.
Sound / Beep Mode
Press the Beep button once to make the receiver produce a beep.
Holding the button causes the beep to continue.
Static Stimulation Mode
Pressing the Static button sends static stimulation through the receiver electrodes.
The manual advises against holding the Static button down. The TC01-C1 includes an anti-misoperation design that automatically cuts off static stimulation after approximately 4 seconds to prevent an unintentionally prolonged activation.
How to Adjust the Static Level
The static setting ranges from 01 to 99.
To adjust it:
- Press and hold the Static Level Regulator Activation button.
- While holding it, slowly rotate the Static Level Regulator.
- Watch the static-level number on the display.
- Stop at the desired level.
The manufacturer recommends beginning at level 10 and using the dog’s response to determine the appropriate setting.
Sensitivity can differ depending on factors such as the dog’s size, weight, coat, and individual response.
The guide repeatedly advises using the least stimulation needed rather than overcorrecting the dog.
How to Fit the Receiver Collar
Correct fit helps the electrodes make contact with the dog’s skin.
Step 1: Install the Collar
Thread the collar through the receiver unit.
Step 2: Separate Thick Fur
If the dog has a thick coat, use a comb to separate the fur where the electrodes sit so the contact points can reach the skin.
Step 3: Adjust the Collar
The manual describes the appropriate fit as tight enough that one finger can be inserted underneath the collar.
Step 4: Choose Whether to Use the Silicone Caps
Silicone electrode caps can reduce the sensation from static stimulation.
They also create a softer barrier between the dog’s skin and the metal electrodes, which may be more comfortable for dogs that react to direct metal contact.
Training Guidelines
DOG CARE provides several recommendations for using the TC01-C1 as a training aid.
Use Positive Rewards
Rewarding desired behavior with food can help reinforce training.
The manual also emphasizes praising and encouraging the dog for good behavior rather than treating punishment as the main training method.
Start With Verbal Commands
The recommended sequence is:
- Give a clear verbal command.
- Use consistent wording each time.
- Work on one behavior at a time.
- Add corrective stimulation only when needed.
- Use the lowest practical level.
- Avoid repeated or excessive correction.
Use the Beep as a Warning
The guide suggests using the Beep mode before corrective stimulation.
With repetition, a dog may learn to associate the beep with the verbal command and the correction that could follow.
Dogs That Should Not Use the Collar
The manual advises against using this device on dogs that are:
- Younger than 6 months
- Pregnant
- Easily frightened
- Aggressive
- In heat
- Elderly
- In poor health
If a dog shows growling, snarling, biting, or other aggressive behavior while the collar is being used, the guide instructs the owner to stop using it immediately and seek advice from a professional trainer.
Important Usage Precautions
Do Not Open the Receiver
The receiver should not be opened.
Opening its housing can compromise its waterproof protection and can also void the product warranty.
Use the Matching DOG CARE Components
The manual advises using the remote and receiver from the same complete system rather than trying to match the receiver with unrelated products.
Do Not Test Static Stimulation With a Hand
A suitable testing device should be used when checking the static function.
The guide specifically warns against testing static stimulation by touching the electrodes with a hand.
Keep the Charging Port Dry
Water around the charging connection should be wiped away before the receiver is charged.
Protect Against Signal Interference
Performance can be affected around:
- High-voltage equipment
- Communication towers
- Thunderstorms
- Large buildings
- Strong electromagnetic interference
Automatic Sleep Mode
The remote and receiver automatically enter a power-saving sleep mode after approximately 5 minutes of inactivity.
Using a Replacement Collar Strap
The supplied collar strap can be replaced with another soft collar provided it is:
- No wider than 24 mm
- No thicker than 5 mm
This allows a different strap to be used when the included collar is not suitable for a particular dog.
Receiver Collar Wearing Time
The receiver collar is not intended to replace the dog’s normal walking collar.
A leash should not be connected to the receiver collar because pulling against the protruding electrodes can hurt the dog.
The manufacturer also advises against leaving the training collar on for more than 12 hours, because prolonged wear can cause skin irritation, rashes, or discomfort.
Children and people without dog-training experience should not handle the training system.
Water Resistance
The specification table describes the receiver as:
- IP65 waterproof
- Rain resistant
- Swimming approved
The handheld remote is not waterproof and should be kept away from water.
The receiver’s rubber charging-port cover should be secured before exposure to water.
The manual specifically warns against using the remote during snowfall because moisture could enter and damage the controller.
Operating Environment
The TC01-C1 should be used within the operating conditions listed in the manual.
Avoid:
- Temperatures of 104°F or higher
- Strong electromagnetic interference
- Dropping the remote or receiver onto hard surfaces
- Excessive physical force
- Environments containing corrosive chemicals
High temperature can reduce battery performance, while corrosive environments can discolor, deform, or crack device housings.
The specification table gives the operating range as 32°F to 104°F with relative humidity below 95%.
Cleaning and Maintenance
When the system is not being used:
- Wipe the remote and receiver clean using mild detergent.
- Turn the remote off.
- Lock its keypad.
- Make sure the receiver charging-port rubber cover is installed.
- Store the set in a cool, dry location.
For routine cleaning, use a soft cloth and mild detergent.
Do not use hard brushes because they can scratch the housings.
Troubleshooting
Remote or Receiver Loses Power Quickly or Will Not Charge
Check that:
- The charger is connected securely.
- The USB cable is firmly connected to the remote or receiver.
The manual also suggests trying another compatible Android-style USB cable if charging does not work.
Static Stimulation Is Weak or Does Not Work
Check the following:
- Make sure the receiver has sufficient battery power. Static stimulation may stop working at low battery level.
- Both electrodes must simultaneously touch the dog’s skin.
- If the dog has long fur, separate the hair around the contact points.
- The troubleshooting chart suggests testing a level above 45 when the output appears too weak.
During normal training, however, the setup instructions advise beginning at level 10 and using the minimum level appropriate for the dog’s response.
Remote or Receiver Does Not Respond
- Recharge the remote and receiver.
- Make sure both have sufficient power.
- Check the keypad lock on the left side of the remote.
- Unlock the remote if the lock symbol appears on the display.
- If the system still does not respond, remove the receiver pairing and pair the devices again.
Receiver Is Charged but Remote Shows an Empty Receiver Battery
Turn the remote off and then turn it back on.
Receiver Will Not Pair With the Remote
Check that:
- The receiver is connected to a power source.
- It remains in charging mode while pairing.
- The Channel Switch / Match button is held for at least 5 seconds.
If matching still fails, the manual advises contacting DOG CARE support to check whether the remote and receiver may be different hardware versions.
Training Commands Do Not Sync at Short Range
Check for strong radio or electromagnetic interference in the surrounding area.
Environmental interference can reduce remote performance even when the receiver is physically close.
Terms of Use
The manual describes the TC01-C1 as a professional dog-training device.
It recommends professional advice if the owner is unsure whether the product is appropriate for a particular dog, and it states that the device should be used for dog training rather than unrelated purposes.
Users are also instructed to follow applicable local laws when using the product.
FCC Compliance
The TC01-C1 manual states that the device complies with Part 15 of the FCC Rules.
Operation is subject to two conditions:
- The device may not cause harmful interference.
- The device must accept received interference, including interference that could cause undesired operation.
Unapproved changes or modifications can affect authorization to operate the equipment.
If radio or television interference occurs, the manual recommends measures such as:
- Reorienting or relocating the receiving antenna.
- Increasing separation between the equipment and receiver.
- Using an outlet on a different circuit.
- Consulting a dealer or qualified radio/TV technician.
Customer Support
For product problems, setup questions, or compatibility concerns, the manual provides the following contact:
DOG CARE Support:
support@dogcareglobal.com
Frequently Asked Questions
How do you pair a DOG CARE TC01-C1 receiver with the remote?
Connect the receiver to USB power, then press and hold the remote’s Channel Switch / Match button for approximately 5 seconds. The receiver should vibrate and beep. A channel number on the remote confirms pairing. The set is already paired at the factory, so this process is normally needed only when re-pairing or adding another receiver.
How long does the DOG CARE TC01-C1 take to charge?
The specification table states that a full charge takes approximately 2–3 hours. The remote is fully charged when the battery icon shows full bars, while the receiver’s LED changes from red to green.
What static level should be used on the DOG CARE collar?
The TC01-C1 provides levels from 01 to 99. DOG CARE recommends starting at 10 and adjusting according to the individual dog’s response, using as little stimulation as necessary.
Why is the static function not working?
Make sure the receiver has sufficient battery power and both electrodes are touching the dog’s skin. For thick or long fur, separate the hair around the contact points. The troubleshooting guide also recommends checking the selected static level.
How tight should the DOG CARE receiver collar be?
The manual recommends a fit that allows approximately one finger to be inserted underneath the collar. For dogs with thick fur, separate the coat around the contact points so the electrodes can reach the skin.
How long can a dog wear the TC01-C1 collar?
DOG CARE advises against leaving the receiver collar on for more than 12 hours, because extended contact can cause skin discomfort or a rash.
Is the DOG CARE TC01-C1 waterproof?
The receiver is described in the specification table as IP65 waterproof, rain resistant, and swimming approved. The remote is not waterproof and should be kept away from water. The receiver’s rubber charging-port cover should be closed securely before water exposure.
How far does the DOG CARE TC01-C1 remote work?
The manual lists a maximum remote-to-receiver signal range of 656 feet. Receiver battery-status synchronization is listed separately at 164 feet. Actual performance can be reduced by electromagnetic or environmental interference.