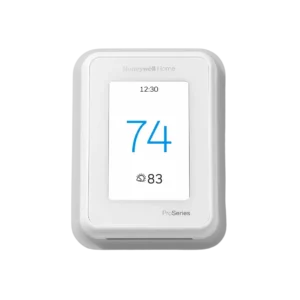
| Field | Details |
| Document Title | T10 or T10+ Pro Smart Thermostat with RedLINK 3.0 — Getting Started |
| Document Type | Getting Started Guide |
| Brand Name | Honeywell Home |
| Product Name | T10 / T10+ Pro Smart Thermostat with RedLINK 3.0 |
| Model Number(s) | THX321WFS2001W, THX321WF2003W, THX321WFS3001W, THX321WF3003W, YTHM1004R3000, YTHM1004R3001 |
| PDF File Size | 269.6 KB |
| Total Number of Pages | 18 |
| Languages Covered | English, French, Spanish |
Honeywell Home T10 / T10+ Pro Smart Thermostat
The Honeywell Home T10 and T10+ Pro Smart Thermostats with RedLINK 3.0 are connected thermostats designed to control compatible residential heating and cooling systems. They feature a touchscreen display, WiFi connectivity, Apple HomeKit support, and compatibility with wireless room sensors for temperature monitoring and room prioritization.
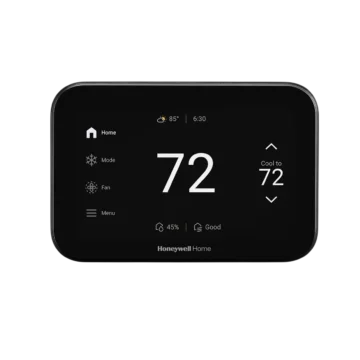
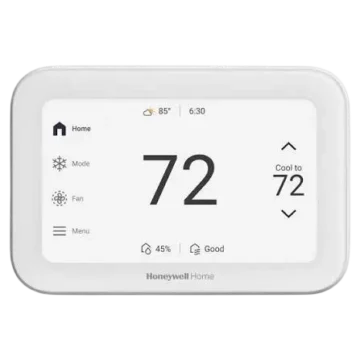
The thermostat displays the current indoor temperature, desired temperature setpoint, indoor humidity, and the number of rooms being prioritized. Its touchscreen provides access to system mode, fan settings, scheduling, room priority, and other thermostat settings.
The T10 and T10+ Pro can connect to the First Alert by Resideo app for connected thermostat management. The thermostat can also be paired with Apple HomeKit through the Apple Home app.
Compatible wireless room sensors allow the thermostat to calculate an average temperature using selected rooms rather than treating every room equally. Room priority can be based on manually selected rooms or automatically determined by detected activity.
The thermostat uses RedLINK 3.0 technology and includes a touchscreen menu for adding compatible devices and sensors.
Supported Thermostat Models
The T10 or T10+ Pro Smart Thermostat with RedLINK 3.0 Getting Started Guide covers the following model numbers.
| Model Number | Product Family |
| THX321WFS2001W | T10 / T10+ Pro Smart Thermostat |
| THX321WF2003W | T10 / T10+ Pro Smart Thermostat |
| THX321WFS3001W | T10 / T10+ Pro Smart Thermostat |
| THX321WF3003W | T10 / T10+ Pro Smart Thermostat |
| YTHM1004R3000 | T10 / T10+ Pro Smart Thermostat |
| YTHM1004R3001 | T10 / T10+ Pro Smart Thermostat |
The instructions apply to the T10 and T10+ Pro models identified in the guide.
Product Features and Functions
The thermostat provides touchscreen temperature controls and connected features for managing home comfort.
| Feature | Description |
| Touchscreen Display | Shows temperature, humidity, room priority, and thermostat settings. |
| Temperature Adjustment | Uses on-screen Up and Down arrows to change the desired temperature. |
| System Mode Menu | Provides access to the thermostat’s operating mode. |
| Fan Settings | Available through the thermostat menu. |
| Schedule Settings | Available through the thermostat menu. |
| Room Priority | Uses selected rooms to calculate an average temperature. |
| Activity-Based Priority | Automatically selects rooms where motion is detected. |
| Wireless Room Sensors | Compatible sensors can be added through the Devices & Sensors menu. |
| WiFi Connection | Connects the thermostat to a selected wireless network. |
| First Alert by Resideo App | Provides mobile app connectivity. |
| Apple HomeKit | Allows pairing with the Apple Home app. |
| RedLINK 3.0 | Wireless technology identified for the T10 and T10+ Pro thermostat family. |
| Indoor Humidity Display | Shows the current indoor humidity. |
Thermostat Touchscreen and Display Guide
The T10 and T10+ Pro use a touchscreen interface to display indoor conditions and provide access to thermostat settings.
Home Screen Components
| Display Item | Function |
| Indoor Temperature | Displays the current indoor temperature. |
| Current Priority | Shows the active priority type and the number of rooms being prioritized. |
| Indoor Humidity | Displays the current indoor humidity level. |
| Adjust Temperature | Uses Up and Down arrows to change the selected temperature. |
| Menu | Opens thermostat features and settings. |
| Desired Temperature | Displays the currently selected temperature setpoint. |
Indoor Temperature
The main temperature reading on the touchscreen shows the current indoor temperature.
This value represents the temperature information currently displayed by the thermostat.
Desired Temperature
The desired temperature represents the temperature setpoint selected for the heating or cooling system.
The setpoint can be changed using the on-screen temperature adjustment arrows.
Indoor Humidity
The thermostat displays the current indoor humidity percentage.
The humidity value appears on the Home screen alongside the temperature and priority information.
Current Priority
The Current Priority area displays the type of room priority being used and the number of rooms included.
For example, the Home screen illustration shows two rooms being prioritized.
Room priority allows temperature control to focus on selected areas of the home.
Menu
The Menu provides access to additional thermostat functions.
The user guide identifies the following menu features:
- Mode
- Fan
- Schedule
- Priority
- WiFi
- Devices & Sensors
- Connect App
- Connect HomeKit
The available menus provide access to thermostat operation, connectivity, and compatible wireless sensor functions.
How to Wake Up the Thermostat Screen
The thermostat display can be activated by touching the center of the displayed temperature.
Steps to Wake the Screen
- Locate the temperature reading in the center of the display.
- Touch the center area of the displayed temperature.
- The thermostat screen will wake up.
- Use the available touchscreen controls.
The touchscreen can then be used to change the temperature or open thermostat menus.
How to Adjust the Temperature
The thermostat uses on-screen arrows to adjust the desired indoor temperature.
Step-by-Step Temperature Adjustment
- Wake the thermostat screen by touching the center of the displayed temperature.
- Locate the desired temperature setting.
- Touch the Up arrow to increase the desired temperature.
- Touch the Down arrow to decrease the desired temperature.
- Check the desired temperature displayed on the screen.
The selected temperature is displayed separately from the current indoor temperature.
Current Temperature vs. Desired Temperature
| Display | Meaning |
| Indoor Temperature | The current temperature reading. |
| Desired Temperature | The temperature selected using the adjustment arrows. |
The thermostat Home screen displays both values to distinguish current conditions from the desired setting.
Accessing Thermostat Settings
The Menu contains the thermostat’s operating settings and additional features.
How to Open the Menu
- Wake the thermostat screen if necessary.
- Touch the Menu icon.
- Select the required feature from the available menu options.
Settings Available Through the Menu
| Menu Option | Purpose |
| Mode | Accesses system operating mode settings. |
| Fan | Accesses fan settings. |
| Schedule | Accesses scheduling settings. |
| Priority | Provides access to room priority features. |
| WiFi | Starts the wireless network connection process. |
| Devices & Sensors | Allows compatible devices and sensors to be added. |
| Connect App | Starts the mobile app connection process. |
| Connect HomeKit | Starts Apple HomeKit pairing. |
How to Connect the T10 / T10+ Pro Thermostat to WiFi
The thermostat can be connected to a wireless network through its touchscreen menu.
Step 1: Open the Menu
Touch the Menu icon on the thermostat Home screen.
Step 2: Select WiFi
Scroll through the menu options until WiFi appears.
Touch Wi-Fi.
Step 3: Choose a Network
Touch Choose Network.
The thermostat will display the network selection interface.
Step 4: Select the Wireless Network
Select the desired wireless network.
WiFi Setup Summary
| Step | Action |
| 1 | Open Menu. |
| 2 | Scroll to WiFi and select it. |
| 3 | Touch Choose Network. |
| 4 | Select a network. |
The thermostat’s touchscreen provides the connection interface for selecting the wireless network.
Downloading the First Alert by Resideo App
The T10 and T10+ Pro can be connected to the First Alert by Resideo app.
The app is available through the Apple App Store and Google Play.
Step 1: Download the App
Open the App Store or Google Play on a compatible mobile device.
Search for First Alert by Resideo and download the app.
Step 2: Create an Account or Sign In
If a First Alert account has not been created:
- Open the app.
- Follow the instructions to create an account.
If an account already exists, sign in using the app.
First Alert App Setup Requirements
| Requirement | Instruction |
| Mobile App | First Alert by Resideo |
| Download Source | Apple App Store or Google Play |
| Account | Create an account if necessary. |
| Existing Account | Sign in through the app. |
How to Connect the Thermostat to the First Alert App
After downloading the First Alert by Resideo app, the thermostat can be connected using its touchscreen.
Step 1: Open the Thermostat Menu
Touch the Menu icon on the thermostat Home screen.
Step 2: Select Connect App
Scroll through the thermostat menu.
Touch Connect App.
Step 3: Follow the On-Screen Instructions
Follow the instructions displayed on the thermostat screen to continue the app connection process.
The First Alert app should be installed on the mobile device, and the required account should be ready for use.
App Connection Summary
| Step | Action |
| 1 | Download First Alert by Resideo. |
| 2 | Create an account or sign in. |
| 3 | Open the thermostat Menu. |
| 4 | Select Connect App. |
| 5 | Follow the on-screen instructions. |
How to Connect the Thermostat to Apple HomeKit
The T10 and T10+ Pro support Apple HomeKit setup through the Apple Home app.
Step 1: Open the Thermostat Menu
Touch the Menu icon at the bottom of the thermostat Home screen.
Step 2: Select Connect HomeKit
Scroll down through the menu.
Select Connect HomeKit.
Step 3: Open Apple Home
Open the Apple Home app on the mobile device.
Select Add Accessory.
Step 4: Scan the Thermostat Code
Use the phone to scan the code displayed on the thermostat screen.
Step 5: Complete the Setup
Follow the instructions displayed on the phone.
The pairing process is completed through the Apple Home app.
Apple HomeKit Setup Summary
| Step | Action |
| 1 | Touch Menu on the thermostat. |
| 2 | Select Connect HomeKit. |
| 3 | Open Apple Home and select Add Accessory. |
| 4 | Scan the code displayed on the thermostat. |
| 5 | Follow the instructions on the phone. |
Installing Wireless Room Sensors
Compatible wireless room sensors can be added to the T10 or T10+ Pro through the thermostat’s Devices & Sensors menu.
These sensors support room-based temperature prioritization.
Step 1: Open the Menu
Touch the Menu icon on the thermostat.
Step 2: Select Devices & Sensors
Scroll through the menu and touch Devices & Sensors.
Step 3: Select Add
Touch Add.
Step 4: Follow the Instructions
Follow the instructions displayed on the thermostat screen to complete the sensor installation process.
Wireless Sensor Installation Summary
| Step | Action |
| 1 | Open Menu. |
| 2 | Select Devices & Sensors. |
| 3 | Touch Add. |
| 4 | Follow the on-screen instructions. |
Wireless Room Sensor Placement Instructions
Correct sensor placement is important for obtaining useful room temperature readings and supporting the priority feature.
Recommended Placement Height
Room sensors should be positioned approximately 5 feet (1.5 meters) above the floor.
Recommended Wall Location
Sensors should be installed on interior walls.
Locations to Avoid
The manufacturer identifies several unsuitable sensor locations.
| Placement | Recommendation |
| Approximately 5 ft (1.5 m) Above the Floor | Recommended |
| Interior Wall | Recommended |
| Behind Furniture | Avoid |
| Behind Doors | Avoid |
| Direct Sunlight | Avoid |
| Above Air Vents | Avoid |
Why Sensor Placement Matters
The room sensors provide temperature information used by the thermostat’s Priority function.
Selected rooms contribute to the average temperature used for room-based comfort.
The manufacturer recommends avoiding locations where furniture, doors, direct sunlight, or air vents could interfere with the sensor’s intended operation.
How to Use Room Priority
The Priority feature calculates an average temperature using selected rooms.
This allows the thermostat to prioritize comfort in areas chosen by the user or identified through detected activity.
Two priority methods are described:
- Selected Rooms
- Active Rooms
Understanding Room Priority
The thermostat can use temperature readings from compatible wireless room sensors to calculate an average temperature.
Not every room must contribute to the average.
The priority method determines which rooms are included.
Room Priority Methods
| Priority Method | How It Works |
| Selected Rooms | Uses rooms manually selected by the user. |
| Active Rooms | Automatically selects rooms where activity is detected. |
Selected Rooms Priority
Selected Rooms allows specific rooms to be included in the temperature average.
How Selected Rooms Works
Rooms that are manually selected contribute to the average temperature.
Rooms that are not selected do not contribute.
Selected Room Behavior
| Room Status | Effect on Average Temperature |
| Selected Room | Contributes to the average. |
| Unselected Room | Does not contribute. |
Selected Rooms Example
If several wireless room sensors are installed throughout the home, only the rooms selected for priority are included in the average temperature calculation.
This allows the thermostat to focus on the chosen rooms rather than using every available room sensor.
Active Rooms Priority
Active Rooms uses motion detection to select rooms automatically.
Rooms where activity is detected contribute to the average temperature.
Rooms without detected activity are excluded.
How Active Rooms Works
When a compatible room sensor detects motion, its room can be selected automatically for temperature averaging.
If no motion is detected in a room, that room does not contribute to the average.
Active Room Behavior
| Room Status | Effect on Average Temperature |
| Room With Detected Activity | Contributes to the average. |
| Room Without Detected Activity | Does not contribute. |
Active Rooms Example
When activity is detected in a room, that room contributes to the temperature average.
A room without detected activity is excluded from that average.
The active-room selection changes according to the activity detected by compatible wireless room sensors.
Selected Rooms vs. Active Rooms
The two priority methods differ in how rooms are chosen for temperature averaging.
| Feature | Selected Rooms | Active Rooms |
| Room Selection | Manual | Automatic |
| Selection Basis | User-Selected Rooms | Detected Motion |
| Selected Room Contribution | Included in Average | Included When Activity Is Detected |
| Unselected or Inactive Rooms | Excluded | Excluded |
| Purpose | Prioritize Chosen Rooms | Prioritize Rooms With Detected Activity |
Choosing the Priority Method
Selected Rooms is intended for situations where specific rooms should contribute to the average temperature.
Active Rooms uses detected activity to determine which rooms contribute.
Both methods support room-based temperature averaging using compatible wireless sensors.
Understanding the Current Priority Display
The Home screen shows the current priority status.
The display includes:
- Priority type
- Number of rooms currently prioritized
This information allows the current room priority status to be checked directly from the thermostat.
For example, the illustrated Home screen shows a priority count of two rooms.
Technical Support and Customer Assistance
For technical problems, the manufacturer directs users to their service provider or installer.
The guide provides a section for recording the servicing company’s contact information.
Service Provider Information
| Information | Details |
| Company | Servicing company or installer |
| Name | Service contact name |
| Number | Service contact telephone number |
The servicing company should be contacted when technical assistance is needed.
Honeywell Home Customer Support
| Contact Type | Details |
| Brand | Honeywell Home |
| Manufacturer | Resideo Technologies, Inc. |
| Customer Support Telephone | 1-800-633-3991 |
| Honeywell Home Website | https://www.honeywellhome.com |
| Manufacturer Website | https://www.resideo.com |
Manufacturer Address
Resideo Technologies, Inc.
Scottsdale, AZ 85254
United States
Apple HomeKit Certification Information
The T10 or T10+ Pro Smart Thermostat supports Apple HomeKit pairing.
The Works with Apple badge indicates that an accessory has been designed for the technology identified by the badge and has been certified by its developer to meet Apple’s performance standards.
Apple is not responsible for the operation of the device or its compliance with applicable safety and regulatory standards.
Electronic Waste Disposal
The thermostat must not be discarded with ordinary household waste.
At the end of its service life, it should be taken to an authorized collection center or appropriate electronic equipment recycler.
Correct disposal of electronic equipment helps reduce potential negative effects on the environment and human health.
Frequently Asked Questions
1. How do I connect the Honeywell Home T10 or T10+ Pro thermostat to WiFi?
Touch Menu on the thermostat Home screen, then scroll to WiFi and select it. Touch Choose Network and select the desired wireless network. The thermostat displays the network connection interface for completing the connection.
2. How do I connect the T10 Pro Smart Thermostat to the First Alert by Resideo app?
Download the First Alert by Resideo app from the Apple App Store or Google Play. Create an account if necessary or sign in to an existing account. On the thermostat, open Menu and select Connect App. Follow the on-screen instructions to complete the connection process.
3. How do I pair the Honeywell T10 or T10+ Pro thermostat with Apple HomeKit?
Touch Menu at the bottom of the thermostat Home screen and select Connect HomeKit. Open the Apple Home app, select Add Accessory, and scan the code displayed on the thermostat using the phone. Follow the instructions in Apple Home to complete pairing.
4. How do I add wireless room sensors to the Honeywell T10 Pro?
Touch Menu on the thermostat, select Devices & Sensors, and then touch Add. Follow the instructions displayed on the thermostat screen. The manufacturer recommends placing compatible room sensors approximately 5 feet above the floor on interior walls, away from direct sunlight, air vents, furniture, and doors.
5. What is the difference between Selected Rooms and Active Rooms on the T10 thermostat?
Selected Rooms uses the temperature readings from rooms manually selected by the user. Rooms that are not selected do not contribute to the average temperature. Active Rooms automatically includes rooms where motion is detected and excludes rooms without detected activity. Both methods use room temperature averaging to prioritize comfort.
6. How do I adjust the temperature on the Honeywell T10 or T10+ Pro thermostat?
Touch the center of the displayed temperature to wake the thermostat screen. Use the Up and Down arrows to select the desired temperature. The Home screen displays the current indoor temperature separately from the desired temperature setpoint.
7. Where should Honeywell T10 wireless room sensors be installed?
The manufacturer recommends placing wireless room sensors approximately 5 feet (1.5 meters) above the floor on interior walls. Sensors must not be placed behind furniture or doors, in direct sunlight, or above air vents. These placement guidelines help support the room temperature measurements used by the Priority function.
8. Where can I get support for the Honeywell T10 or T10+ Pro Smart Thermostat?
For technical problems, contact the servicing company or thermostat installer. Additional assistance is available through Honeywell Home at honeywellhome.com or by calling 1-800-633-3991. The thermostat is manufactured by Resideo Technologies, Inc., which uses the Honeywell Home trademark under license from Honeywell International, Inc.