| Field | Details |
| Document Title | Oster 5Q Air Fryer / 5Q Freidora de Aire |
| Document Type | User Manual / Manual de Instrucciones |
| Brand Name | Oster |
| Product Name | 5Q Air Fryer |
| Model Number | CKSTAFLC-DM |
| PDF File Size | 6.11 MB |
| Number of Pages | 12 |
| Languages | English and Spanish |
Oster 5Q Air Fryer CKSTAFLC-DM
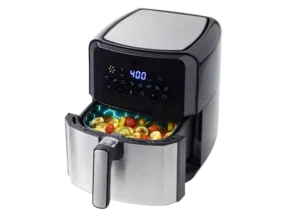
The Oster 5Q Air Fryer CKSTAFLC-DM is a household electric air fryer designed for cooking food using circulating hot air. It features a 5-quart cooking basket, a digital control panel, adjustable cooking temperatures, an electronic timer, and eight preset cooking programs.
The appliance operates at 1700 watts on a 120V, 50/60Hz electrical supply. Its preset cooking programs include fries, bacon, fish, shrimp, chicken, steak, baked goods, and dehydration. Cooking temperatures and times can also be adjusted manually according to the type and quantity of food being prepared.
The air fryer includes a removable cooking basket, a cooking pot, a basket release button, and a basket handle. Its digital control panel provides cooking status indicators, temperature and timer adjustments, and a Power Key for starting, pausing, resuming, and stopping operation.
The following instructions explain the product’s components, initial preparation, cooking procedures, control panel operation, preset settings, cleaning, maintenance, and warranty support.
Technical Specifications
| Specification | Details |
| Brand | Oster |
| Model Number | CKSTAFLC-DM |
| Product Type | Electric Air Fryer |
| Basket Capacity | 5 Quarts |
| Rated Voltage | 120V AC |
| Frequency | 50/60Hz |
| Power Consumption | 1700 Watts |
| General Temperature Specification | 80–400°F (25–200°C as printed in the manual) |
| Standard Cooking Temperature Controls | 175–400°F |
| Temperature Adjustment | 10°F Increments |
| Standard Cooking Timer | 0–60 Minutes |
| Time Adjustment | 1-Minute Increments |
| Dehydrate Mode Temperature Range | 80–160°F |
| Dehydrate Mode Duration | 2–24 Hours |
| Cooking Presets | 8 |
| Default Cooking Temperature | 400°F |
| Default Cooking Time | 15 Minutes |
| Cooking Basket | Removable |
| Control Panel | Digital |
| Power Plug | Polarized |
| Intended Use | Household Countertop Use |
| Warranty | 1-Year Limited Warranty |
The general technical specifications identify a temperature range of 80–400°F, while the standard manual temperature controls are described as 175–400°F. The preset settings also include a lower temperature range specifically for dehydration.
Important Safety Instructions
The Oster CKSTAFLC-DM air fryer generates high temperatures during cooking. The following safety precautions must be followed to reduce the risk of burns, fire, electric shock, and personal injury.
General Safety Precautions
- All operating and safety instructions must be read before the appliance is used.
- Hot surfaces must not be touched during or immediately after cooking. The handle must be used when removing the cooking pot.
- The fryer housing, electrical cord, and plug must never be immersed in water or other liquids.
- The appliance is not intended for use by children or individuals with reduced physical, sensory, or mental capabilities or insufficient experience and knowledge.
- Children must be supervised around the appliance and must not be allowed to play with it.
- The appliance and power cord must remain out of children’s reach.
- The fryer must be unplugged when not in use, before cleaning, and before installing or removing components.
- The appliance must cool before cleaning or handling its components.
- An appliance with a damaged cord, damaged plug, operating malfunction, or other damage must not be used.
- Damaged electrical cords must not be spliced or replaced by the user. The manufacturer must be contacted for examination or repair.
- Accessories not recommended by the manufacturer must not be used.
- The air fryer must not be operated outdoors or for commercial purposes.
- The appliance must be used only for its intended purpose.
- External timers and separate remote-control systems must not be used to operate the fryer.
Safe Placement and Ventilation
The air fryer must be positioned on a dry, stable, level, and heat-resistant countertop.
For proper ventilation:
- Maintain at least 6 inches (152 mm) of clearance from walls and on all sides.
- Do not place objects on top of the appliance.
- Keep the air outlet unobstructed.
- Do not place the appliance on wet surfaces.
- Do not position it near hot gas burners, electric burners, or heated ovens.
- Avoid placing the heated appliance directly on finished wooden tables or surfaces that cannot withstand prolonged heat.
Blocking airflow can affect cooking performance and create unsafe operating conditions.
Hot Surfaces and Steam
The heating base, cooking pot, basket, and food can become very hot during operation.
- The cooking pot must be handled by its handle.
- The heating base must be allowed to cool before it is touched.
- Care is required when removing the pot because hot steam may escape.
- The appliance must be handled carefully if it contains hot oil or other hot liquids.
- The cooking pot must be placed on a heat-resistant surface when removed.
Warning: Hot food and escaping steam can cause burns. Care must be taken whenever the cooking pot is removed.
Power Cord and Electrical Safety
The air fryer is supplied with a short electrical cord to reduce the risk of entanglement or tripping.
If a longer detachable cord or extension cord is used, the following conditions apply:
- Its marked electrical rating must be at least equal to the rating of the appliance.
- The cord must not hang over the edge of a table or countertop where children could pull it or where someone could trip over it.
- If the appliance requires a grounded connection, the extension cord must be a grounding-type three-wire cord.
- The cord must not be pulled, twisted, or otherwise damaged.
The appliance must be disconnected by switching the control off and removing the plug from the electrical outlet. The electrical cord itself must not be pulled to disconnect the appliance.
Polarized Plug Instructions
The Oster air fryer has a polarized plug with one blade wider than the other.
This plug is designed to fit into a polarized electrical outlet in only one orientation.
If the plug does not fit:
- Remove the plug from the outlet.
- Reverse its orientation.
- Attempt to insert it again.
- If it still does not fit, contact a qualified electrician.
The plug must not be modified.
An electrical outlet must not be used if the plug fits loosely or the outlet becomes warm.
Initial Operation Notice
During the first few uses, the appliance may produce a slight amount of smoke or odor.
The manufacturer identifies this as normal during initial operation and states that it should disappear after a few uses.
Parts and Components
The Oster 5Q Air Fryer includes a removable cooking assembly, a digital control panel, and an air outlet.
| Part | Component | Function |
| 1 | Control Panel | Provides access to temperature, time, preset cooking programs, and power controls. |
| 2 | Basket | Holds the ingredients during hot-air cooking. |
| 3 | Basket Release Button | Releases the cooking basket from the pot. |
| 4 | Basket Handle | Used to remove and handle the cooking pot and basket assembly. |
| 5 | Main Housing | Contains the appliance’s primary cooking and electrical components. |
| 6 | Pot | Removable outer cooking container that holds the basket. |
| 7 | Air Outlet | Allows air to pass out of the appliance during operation. |
| 8 | Main Cord | Supplies electrical power to the air fryer. |
Cooking Basket and Pot Assembly
The cooking basket fits inside the removable pot.
The pot slides into the main housing along its guides. Both components must be correctly positioned before cooking.
The cooking pot must never be used without the basket installed inside it.
Basket Handle and Release Button
The basket handle is used to remove the cooking assembly from the fryer.
The Basket Release Button separates the inner basket from the outer cooking pot.
The release button must not be pressed when the cooking assembly is being shaken during cooking.
Air Outlet
The air outlet supports the movement of heated air through the appliance.
The outlet must remain unobstructed, and the required clearance around the fryer must be maintained during operation.
Control Panel and Buttons Guide
The Oster CKSTAFLC-DM includes a digital control panel with touch-sensitive controls for power, temperature, cooking time, preset programs, and the booking countdown feature.
The control panel icons become visible after the appliance is switched on.
Power Key
The Power Key is used to activate, start, pause, resume, and turn off the fryer.
| Power Key Action | Function |
| First press | Activates the default cooking settings of 400°F and 15 minutes. |
| Second press | Starts the cooking process. |
| Press once during cooking | Pauses the cooking cycle. |
| Press twice to resume | Resumes cooking according to the operating instructions. |
| Press and hold for 3 seconds | Turns off the appliance. |
After the appliance is switched off, the control panel lights turn off.
The fan may continue running until the appliance has cooled sufficiently.
Preset Key
The Preset Key allows selection among eight cooking programs.
Pressing the Preset Key cycles through the available food choices.
Each program has a predefined cooking temperature and duration.
The available presets are:
- Fries
- Bacon
- Fish
- Shrimp
- Chicken
- Steak
- Baked Goods
- Dehydrate
Temperature Control Buttons
The temperature control uses the thermometer symbol together with the Plus (+) and Minus (−) buttons.
To adjust the cooking temperature:
- Select the temperature control symbol.
- Press Plus (+) to increase the temperature.
- Press Minus (−) to decrease the temperature.
- Continue pressing until the required temperature is displayed.
Each press adjusts the temperature by 10°F.
Holding the Plus or Minus button changes the temperature more rapidly.
The standard temperature controls are described with a range of 175–400°F.
Timer Control Buttons
The timer control uses the clock symbol and the Plus (+) and Minus (−) buttons.
To adjust the cooking time:
- Select the timer control symbol.
- Press Plus (+) to increase the cooking time.
- Press Minus (−) to decrease the cooking time.
- Continue until the required time is displayed.
The time changes in 1-minute increments.
Holding a button changes the time more rapidly.
The maximum standard cooking duration is 60 minutes.
Booking Key
The control panel includes a Booking Key identified by a timer-style symbol.
The Booking function is associated with a programmable countdown of up to 24 hours. The manual describes selecting the Booking Key and using the preset or time and temperature controls for the scheduled countdown.
Control Panel Indicator Lights
| Indicator | Meaning |
| Fan Indicator | Shows fan operation. |
| Red Light in the Center of the Fan Icon | Indicates that a cooking cycle is in progress. |
| Fan Icon Without the Center Red Light | Indicates that the fan is operating to cool the appliance. |
| Temperature Light | Identifies the temperature adjustment function. |
| Timer Light | Identifies the timer adjustment function. |
| °F Indicator | Shows that temperature is displayed in Fahrenheit. |
| MIN Indicator | Shows that time is displayed in minutes. |
| Recipe Indicators | Identify the selected food preset. |
The fan can continue operating after the heating cycle ends. This is part of the appliance’s cooling behavior.
Before First Use
The air fryer must be cleaned and prepared before its first cooking cycle.
Unpacking the Air Fryer
- Remove the appliance from its packaging.
- Remove all packaging materials.
- Remove promotional materials and stickers.
- Take out the printed documents and other loose materials.
- Confirm that the appliance is unplugged.
- Allow all components to cool before any assembly or disassembly.
Cleaning Before First Use
- Remove the inner cooking basket.
- Wash the basket using hot, soapy water.
- Rinse the basket thoroughly.
- Dry all washable components.
- Wipe the main housing with a damp cloth.
- Allow all cleaned surfaces to dry.
Important: The appliance body, power cord, and plug must never be immersed in water or any other liquid.
Preparing the Air Fryer for Use
Before cooking, the air fryer must be positioned correctly and its basket assembly must be installed.
Step 1: Position the Appliance
Place the air fryer on a stable, horizontal, level, and heat-resistant countertop.
Maintain at least 6 inches (152 mm) of clearance on all sides.
Step 2: Install the Cooking Basket
Insert the removable cooking basket into the cooking pot.
The basket must fit correctly inside the pot.
Step 3: Check the Cooking Assembly
Make sure the basket and pot are correctly assembled.
The pot must never be used without the inner basket.
Step 4: Keep the Cooking Area Clear
Do not place objects on top of the air fryer.
The appliance requires unobstructed airflow for proper cooking performance.
Step 5: Prepare the Ingredients
Food should be prepared according to the intended recipe or selected cooking program.
The pot must not be filled with cooking oil or any other liquid.
How to Use the Oster 5Q Air Fryer
The air fryer cooks ingredients using heated air circulated inside the appliance.
The cooking process is controlled through the digital panel.
Step 1: Connect the Air Fryer
Insert the electrical plug into a suitable wall outlet.
Make sure the removable basket and pot assembly is correctly installed.
Step 2: Remove the Cooking Pot
Carefully pull the cooking pot outward using its handle.
Step 3: Add Ingredients
Place the prepared ingredients inside the cooking basket.
The basket must remain installed in the outer pot.
Step 4: Return the Pot to the Fryer
Slide the cooking pot back into the main housing.
Carefully align the pot with the guides inside the appliance.
Caution: The cooking pot becomes very hot during and after cooking. It must be handled only by its handle.
Step 5: Select the Cooking Settings
Select the required temperature and cooking duration or choose an appropriate preset program.
Pressing the Power Key for the first time activates the default settings:
- Temperature: 400°F
- Cooking Time: 15 minutes
These settings may be adjusted using the control panel.
Step 6: Start Cooking
Press the Power Key a second time to begin the cooking cycle.
The fan indicator displays a red light in its center while cooking is in progress.
Step 7: Shake Ingredients When Required
Some ingredients require shaking halfway through the cooking period to improve even cooking.
To shake food:
- Pull the cooking pot out using the handle.
- Shake the pot carefully to redistribute the ingredients.
- Return the pot to the fryer.
Caution: The Basket Release Button must not be pressed while shaking the cooking assembly.
For a midpoint reminder, the timer may be set for half of the total cooking duration. When the timer sounds, the ingredients can be shaken and the remaining cooking time must be entered again.
Step 8: Check the Food
When the timer buzzer sounds, the selected cooking period has elapsed.
- Remove the cooking pot using the handle.
- Check whether the ingredients are fully cooked.
- If additional cooking is required, return the pot to the appliance.
- Set the timer for several more minutes.
Food must be thoroughly cooked to a food-safe internal temperature before consumption.
Step 9: Remove the Cooked Food
When cooking is complete:
- Pull the cooking pot out of the fryer.
- Place it on a heat-resistant surface.
- Slide the basket release shield forward.
- Press the Basket Release Button.
- Lift the inner basket out of the pot.
- Empty the cooked ingredients into a bowl or onto a plate.
Important: The basket must not be turned upside down while the outer pot is still attached. Excess oil collected at the bottom of the pot may spill onto the cooked food.
The basket, pot, and ingredients can remain hot after cooking, and steam may escape when the assembly is removed.
Step 10: Cook Another Batch
The air fryer can be used to prepare another batch of ingredients immediately after a cooking cycle.
The required ingredients, cooking temperature, and cooking duration can be selected for the next batch.
Step 11: Turn Off the Air Fryer
Press and hold the Power Key for approximately 3 seconds.
The display lights will switch off.
The cooling fan may continue operating until the appliance has cooled sufficiently.
Unplug the air fryer when it is no longer in use.
Cooking Presets and Temperature Settings
The Oster CKSTAFLC-DM includes eight preset cooking programs with predefined temperatures and cooking times.
The presets provide starting settings for common foods. Actual cooking time may vary with the ingredients’ thickness, size, and quantity.
Preset Cooking Chart
| Cooking Preset | Default Temperature | Default Time | Adjustable Temperature Range |
| Fries | 400°F | 21 minutes | 160–400°F |
| Bacon | 375°F | 10 minutes | 160–400°F |
| Fish | 375°F | 18 minutes | 160–400°F |
| Shrimp | 375°F | 12 minutes | 160–400°F |
| Chicken | 400°F | 25 minutes | 160–400°F |
| Steak | 375°F | 16 minutes | 160–400°F |
| Baked Goods | 350°F | 17 minutes | 160–400°F |
| Dehydrate | 160°F | 4 hours | 80–160°F |
The temperature ranges above are taken from the preset cooking chart. The separate manual temperature control instructions specify 175–400°F for standard temperature adjustment.
Fries Preset
The Fries preset uses a default temperature of 400°F and a cooking time of 21 minutes.
For crispy french fries, the manufacturer recommends preparing approximately 1 pound of fries per batch.
Fresh potatoes may be coated with a small amount of oil to improve crispness.
Shaking the basket halfway through cooking can help prevent uneven results.
Bacon Preset
The Bacon preset uses a default temperature of 375°F and a cooking time of 10 minutes.
The cooking duration may need adjustment depending on the thickness and quantity of bacon.
Fish Preset
The Fish preset uses a default temperature of 375°F and a cooking time of 18 minutes.
Fish must be checked for complete cooking before serving.
Shrimp Preset
The Shrimp preset uses a default temperature of 375°F and a cooking time of 12 minutes.
The required time may vary depending on shrimp size and quantity.
Chicken Preset
The Chicken preset uses a default temperature of 400°F and a cooking time of 25 minutes.
The manufacturer’s cooking chart provides a starting point. Chicken must be thoroughly cooked to a food-safe internal temperature before consumption.
Steak Preset
The Steak preset uses a default temperature of 375°F and a cooking time of 16 minutes.
Cooking time may be adjusted according to the thickness and size of the steak.
Baked Goods Preset
The Baked Goods preset uses a default temperature of 350°F and a cooking time of 17 minutes.
A baking tin or oven-safe dish may be placed inside the air fryer basket when preparing cakes, quiches, delicate foods, or filled ingredients.
Dehydrate Preset
The Dehydrate preset uses a default temperature of 160°F and a duration of 4 hours.
The dehydrating temperature can be adjusted within the preset’s specified range of 80–160°F.
Dehydrating time can be selected between 2 and 24 hours.
Additional Cooking Functions
Manual Temperature Adjustment
The appliance supports manual adjustment of cooking temperature.
- Select the thermometer symbol.
- Use the Plus (+) button to increase the temperature.
- Use the Minus (−) button to decrease the temperature.
- Hold either button to change the temperature more quickly.
Each adjustment changes the selected temperature by 10°F.
Manual Cooking Time Adjustment
Standard cooking duration may be adjusted up to 60 minutes.
- Select the clock symbol.
- Press Plus (+) to increase the duration.
- Press Minus (−) to decrease the duration.
- Hold either button for faster adjustment.
Each press changes the cooking duration by one minute.
Reheating Food
The air fryer can also be used to reheat previously cooked ingredients.
The manufacturer recommends:
| Setting | Value |
| Temperature | 300°F |
| Reheating Duration | Up to 10 minutes |
The actual reheating duration depends on the type and quantity of food.
Baking with the Air Fryer
A baking tin or oven-safe dish can be placed inside the basket when preparing foods such as:
- Cakes
- Quiches
- Filled snacks
- Delicate ingredients
The selected cooking vessel must fit inside the basket without preventing the cooking assembly from being installed correctly.
Using Premade Dough
Premade dough can be used to prepare filled snacks.
The manufacturer notes that premade dough generally requires less preparation time than homemade dough.
Cooking Tips for Better Results
Adjust Cooking Time for Food Size
Smaller ingredients generally require a shorter cooking time than larger ingredients.
The correct duration depends on the food’s thickness, size, and quantity.
The cooking presets should be treated as starting settings rather than fixed requirements for every batch.
Shake Small Ingredients During Cooking
Smaller ingredients can benefit from being shaken halfway through the cooking time.
This helps redistribute the food and can reduce uneven cooking.
The Basket Release Button must not be pressed during shaking.
Add a Small Amount of Oil to Fresh Potatoes
The manufacturer recommends adding a little oil to fresh potatoes when preparing french fries.
This can improve their crispness.
Use an Appropriate Portion Size for Fries
Approximately 1 pound of fries is identified as the preferred quantity for achieving crispy results.
Check Food Before Serving
Food must be cooked thoroughly before consumption.
If ingredients are not fully cooked when the timer sounds, the cooking pot may be returned to the appliance and additional cooking time selected.
Care and Cleaning Instructions
The air fryer must be unplugged and allowed to cool completely before cleaning.
The main housing, electrical cord, and plug must never be immersed in water or another liquid.
Harsh abrasive cleaning products and abrasive cleaning tools must not be used.
How to Clean the Oster 5Q Air Fryer
- Turn off the air fryer.
- Unplug the electrical cord from the outlet.
- Allow the appliance and all removable components to cool completely.
- Remove the cooking pot and basket assembly.
- Separate the cooking basket from the pot using the Basket Release Button.
- Wash the removable cooking basket, cooking pot, and handle using warm, soapy water.
- Use a soft cloth, sponge, or non-abrasive brush to remove food residue.
- Rinse the cleaned components thoroughly.
- Wipe the outside of the main housing with a clean, slightly damp cloth.
- Dry all cleaned components completely before reassembly or storage.
The removable cooking basket, cooking pot, and handle may also be cleaned in a dishwasher, according to the manufacturer’s instructions.
Cleaning the Heating Fan Cover
The heating fan cover may collect small amounts of oil splatter during cooking.
After the appliance has been unplugged and cooled:
- Carefully wipe oil splatter from the heating fan cover using kitchen paper.
- Remove visible residue without using abrasive cleaning tools.
- Wipe the external housing with a clean, slightly damp cloth.
- Dry the exterior.
The main housing must not be immersed in water.
Removing the Basket from the Cooking Pot
The basket is secured to the pot through a locking mechanism.
To separate the components:
- Place the cooled cooking assembly on a suitable surface.
- Slide the basket release shield forward.
- Press the Basket Release Button.
- Lift the inner basket away from the cooking pot.
Reattaching the Cooking Basket
To reinstall the basket:
- Position the basket above the cooking pot.
- Align the basket with its fitting position.
- Pivot the basket downward into place.
- Continue until the locking mechanism clicks.
The basket must be securely attached before the cooking assembly is returned to the air fryer.
Cleaning Precautions
| Component | Cleaning Method |
| Cooking Basket | Warm, soapy water with a cloth, sponge, or non-abrasive brush; dishwasher cleaning is also permitted. |
| Cooking Pot | Warm, soapy water or dishwasher cleaning. |
| Basket Handle | Warm, soapy water or dishwasher cleaning as described in the manual. |
| Main Housing | Wipe with a slightly damp cloth and dry. |
| Heating Fan Cover | Carefully wipe oil splatter using kitchen paper after cooling. |
| Electrical Cord and Plug | Must never be immersed in water or other liquids. |
All cleaned components must be fully dry before the appliance is used or stored.
Maintenance and Storage
Proper maintenance helps keep the cooking basket, pot, and controls in suitable operating condition.
Routine Maintenance
The following tasks are part of normal appliance care:
- Clean the removable cooking components after use.
- Remove food residue and visible grease from washable parts.
- Wipe oil splatter from the heating fan cover when necessary.
- Dry the basket, pot, and handle thoroughly after washing.
- Check that the basket locking mechanism engages correctly when reassembled.
- Keep the air outlet and surrounding ventilation area unobstructed.
- Allow the appliance to cool before handling or cleaning.
Storing the Air Fryer
Before storage:
- Switch the appliance off.
- Disconnect the electrical plug.
- Allow the air fryer to cool completely.
- Clean the removable cooking components.
- Dry the basket, pot, handle, and exterior surfaces.
- Reattach the cooking basket to the pot.
- Keep the power cord free from twisting or damage.
Troubleshooting Guide
The following guidance addresses operating conditions and corrective actions supported by the manufacturer’s instructions.
| Problem or Symptom | Possible Cause or Operating Condition | Recommended Action |
| Power indicator does not illuminate as expected | Cooking basket or pot may not be correctly positioned. | Check that the basket and pot are properly installed in the main housing. |
| Fan continues running after the air fryer is switched off | The appliance is cooling down. | Allow the fan to continue its cooling operation. |
| Fan icon is illuminated without the red center light | Cooling fan is operating without an active cooking cycle. | This indicates the appliance’s cooling operation. |
| Food is not fully cooked when the timer sounds | Cooking time may be insufficient for the food’s size or thickness. | Return the pot to the fryer and set the timer for several additional minutes. |
| Small ingredients cook unevenly | Ingredients may need redistribution during cooking. | Shake the cooking pot halfway through the preparation time. |
| Fresh french fries are not sufficiently crisp | Preparation may benefit from a little cooking oil or a smaller batch. | Add a small amount of oil to fresh potatoes and use approximately 1 pound of fries per batch. |
| Cooking results vary from the preset chart | Food quantities, thicknesses, and sizes can differ. | Adjust the cooking time and temperature as needed, and check food for complete cooking. |
| Appliance has a damaged electrical cord or plug | Electrical component damage | Stop using the appliance and contact the manufacturer for authorized service. |
Why Does the Fan Keep Running After Shutdown?
The appliance uses a cooling fan that may continue operating after the heating cycle has ended.
When the Power Key is held for 3 seconds, the display lights switch off, but the fan may remain active until the fryer has cooled sufficiently.
A fan icon without its red center light indicates cooling operation rather than active cooking.
What to Do If Food Is Not Fully Cooked
If food requires additional cooking time:
- Remove the cooking pot carefully.
- Check the ingredients.
- Return the cooking pot to the fryer.
- Select several additional minutes.
- Continue cooking until the food is thoroughly cooked.
Electrical Malfunction or Damaged Components
The appliance contains no user-serviceable internal parts.
If the electrical cord or plug is damaged, or the appliance malfunctions, it must not be repaired or modified by the user.
Service beyond the cleaning and owner-maintenance instructions must be performed by an authorized service representative.
Warranty Information
The Oster CKSTAFLC-DM 5Q Air Fryer is covered by a 1-year limited warranty provided by Sunbeam Products, Inc.
Warranty Coverage
The manufacturer warrants that the appliance will be free from defects in materials and workmanship for one year from the original purchase date.
During the warranty period, Sunbeam may:
- Repair the defective product or component.
- Replace it with a new or remanufactured product or component.
- Provide a comparable product of equal or greater value if the original product is no longer available.
The manufacturer determines whether a defective product will be repaired or replaced.
Warranty Eligibility
The warranty applies to the original retail purchaser.
It begins on the date of the initial retail purchase and is not transferable.
The original sales receipt must be retained because proof of purchase is required when requesting warranty service.
Warranty Exclusions
The limited warranty does not cover normal wear of parts or damage resulting from:
- Negligent operation or misuse
- Incorrect voltage or electrical current
- Operation that does not follow the manufacturer’s instructions
- Unauthorized disassembly
- Repairs or alterations performed by anyone other than Sunbeam or an authorized Sunbeam service center
- Events such as fires, floods, hurricanes, or tornadoes
Attempting to repair or adjust electrical or mechanical components may void the warranty.
Warranty Limitations
The manufacturer’s warranty contains limitations relating to incidental and consequential damages, implied warranties, and other liabilities.
Some limitations may not apply in every state, province, or jurisdiction.
The warranty provides specific legal rights, and additional rights may vary according to the applicable jurisdiction.
Customer Support Information
For product questions, servicing, or warranty assistance, the manufacturer’s manual provides the following contact information.
| Contact Type | Details |
| Brand | Oster |
| Manufacturer | Sunbeam Products, Inc. |
| Customer Service Phone | 1-800-334-0759 |
| Official Website | www.oster.com |
| Country | United States |
Manufacturer Address
Sunbeam Products, Inc.
Boca Raton, Florida 33431
United States
How to Obtain Warranty Service
Customers requesting warranty assistance should contact Sunbeam Consumer Service at 1-800-334-0759.
The manufacturer will provide information about a convenient service center.
The product must not be mailed directly to the manufacturer’s corporate address or returned to the place of purchase for warranty service under the instructions provided.
Frequently Asked Questions
1. How do I use the Oster CKSTAFLC-DM 5Q Air Fryer?
The cooking basket must be installed inside the pot, and the ingredients must be placed in the basket. After the pot is inserted into the fryer and the appliance is plugged in, the Power Key is pressed to activate the default settings of 400°F and 15 minutes.
A cooking preset or manual temperature and time may be selected. Pressing the Power Key a second time starts cooking.
2. What is the temperature range of the Oster 5Q Air Fryer?
The general technical specifications identify a range of 80–400°F. The standard temperature controls are described as adjustable from 175–400°F in 10°F increments. The preset cooking chart lists temperatures of 160–400°F for regular food programs and 80–160°F for dehydration.
3. How do I set the cooking timer on the Oster CKSTAFLC-DM?
The clock symbol is selected on the control panel, followed by the Plus (+) or Minus (−) button to adjust the cooking time. Each press changes the duration by one minute. Holding either button changes the time more rapidly. Standard cooking programs support up to 60 minutes.
4. How do I use the Dehydrate mode?
The Dehydrate preset is selected using the Preset Key. Its default temperature is 160°F, and its default duration is 4 hours. The dehydrate temperature range is 80–160°F, and the duration can be adjusted from 2 to 24 hours.
5. Why does the Oster air fryer fan keep running after it is turned off?
The cooling fan may continue running after the appliance is switched off. This allows the unit to cool sufficiently. When the fan icon is illuminated without the red center light, the fan is operating in its cooling state rather than indicating an active cooking cycle.
6. Can the Oster CKSTAFLC-DM basket go in the dishwasher?
Yes. The manufacturer’s cleaning instructions permit the removable cooking basket, cooking pot, and handle to be washed in a dishwasher.
These components may also be cleaned using warm, soapy water and a non-abrasive cloth, sponge, or brush. All components must be dried completely before use or storage.
7. How do I remove the cooking basket from the pot?
The basket release shield must first be slid forward. The Basket Release Button can then be pressed to separate the inner basket from the cooking pot.
To reinstall the basket, it is positioned over the pot and pivoted downward until the locking mechanism clicks into place. The basket release mechanism must not be operated while shaking hot ingredients.
8. What should I do if food is not fully cooked when the timer ends?
If the ingredients require additional cooking, the cooking pot may be returned to the air fryer and the timer set for several more minutes. Cooking times can vary according to the size, thickness, and quantity of food. Ingredients must be thoroughly cooked to a food-safe internal temperature before serving.