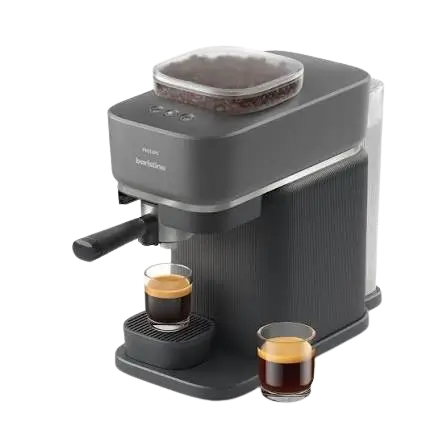
| Field | Details |
| Document Title | Philips Baristina Espresso Machine User Manual |
| Document Type | User Manual |
| Brand Name | Philips |
| Product Name | Baristina Espresso Machine |
| Model Number(s) | BAR300, BAR301, BAR302, BAR303, BAR311 |
| PDF File Size | 2 MB |
| Number of Pages | 70 |
| Languages | English, Spanish, French |
Philips Baristina Espresso Machine BAR300
The Philips Baristina Espresso Machine is designed to prepare espresso and lungo coffee using freshly ground coffee beans. It combines automatic grinding and brewing with a removable portafilter, allowing coffee preparation using a simple drink selection and handle movement.
The machine uses a Direct Start function instead of a conventional power button. After selecting Espresso or Lungo, moving the portafilter handle to the right starts the grinding and brewing process. The portafilter automatically returns to its starting position after grinding.
The Philips Baristina also includes an Intensity Boost function for stronger coffee, programmable drink volumes, a coffee puck ejection mechanism, and automatic maintenance indicators.
Models BAR303 and BAR311 additionally include instructions for a separate milk frother that can heat and froth milk or prepare cold milk froth.
Product Overview and Features
The Baristina Espresso Machine simplifies espresso preparation by combining coffee grinding, dosing, and brewing in one machine.
Once a beverage is selected, the machine grinds coffee beans into the portafilter and automatically prepares the selected drink.
Main Features
| Feature | Description |
| Direct Start | Starts the machine by selecting Espresso or Lungo without a separate power button. |
| Automatic coffee grinding | Grinds coffee beans directly into the portafilter. |
| Espresso brewing | Prepares espresso using a preset drink volume. |
| Lungo brewing | Prepares a larger coffee using a preset drink volume. |
| Intensity Boost | Grinds more coffee to prepare a stronger espresso or lungo. |
| Automatic portafilter movement | Returns the portafilter to its starting position after grinding. |
| Coffee puck ejection | Removes used coffee grounds by pressing the portafilter’s ejection button. |
| Programmable drink volumes | Saves a preferred coffee quantity for Espresso and Lungo. |
| Pre-ground decaf preparation | Allows decaffeinated coffee to be prepared using ground coffee. |
| Removable drip tray | Creates additional space for taller cups and glasses. |
| Descaling reminder | Uses flashing Espresso and Lungo buttons to indicate when descaling is required. |
| Milk frother | Supports hot and cold milk frothing on BAR303 and BAR311. |
Compatible Models
The Baristina user manual covers five model numbers:
- BAR300
- BAR301
- BAR302
- BAR303
- BAR311
The coffee machine operating instructions apply to the models covered by the document.
The separate milk frother instructions apply specifically to BAR303 and BAR311.
Parts and Components
The Baristina Espresso Machine includes a compact brewing assembly with dedicated drink buttons, a bean container, a removable water tank, and a portafilter.
Coffee Machine Components
| Part No. | Component | Function |
| 1 | Espresso button | Selects espresso brewing. |
| 2 | Lungo button | Selects lungo brewing. |
| 3 | Intensity Boost button | Activates stronger coffee preparation and controls rinsing and pre-ground decaf brewing functions. |
| 4 | Water tank lid | Covers the removable water tank. |
| 5 | Water tank | Stores water for brewing and rinsing. |
| 6 | Bean container | Holds coffee beans for automatic grinding. |
| 7 | Bean container lid | Covers the coffee bean container. |
| 8 | Portafilter | Holds ground coffee during brewing. |
| 9 | Portafilter holder | Holds the portafilter inside the machine. |
| 10 | Drip tray | Collects liquid beneath the dispensing area. |
| 11 | Cup platform | Supports the cup during brewing. |
| 12 | Lower drip tray | Collects liquid beneath the removable drip tray assembly. |
Portafilter Ejection Button
The portafilter includes an ejection button for removing used coffee grounds after each brewing cycle.
To remove a used coffee puck:
- Wait until the machine has finished brewing and all button lights are off.
- Remove the portafilter.
- Hold it upside down over a waste bin.
- Press the ejection button.
- Allow the coffee puck to fall out.
Important: The portafilter must be emptied after every coffee preparation.
The machine’s safety mechanism prevents a new brewing cycle when an old coffee puck remains inside the portafilter.
Control Buttons and Indicator Lights
The Baristina uses three main buttons for drink preparation and maintenance functions.
| Button | Main Function | Additional Function |
| Espresso | Selects espresso brewing. | Programs espresso volume and starts descaling when combined with Lungo. |
| Lungo | Selects lungo brewing. | Programs lungo volume and controls the descaling rinse cycle. |
| Intensity Boost | Increases coffee intensity. | Starts machine rinsing and pre-ground decaf brewing when held for five seconds. |
Direct Start Function
The machine does not have a separate On/Off button.
To start brewing:
- Press Espresso or Lungo.
- Wait for the selected button to begin flashing slowly.
- Move the portafilter handle to the right until it clicks.
The machine starts grinding and continues with the selected brewing cycle.
There is no need to wait for the machine to finish heating before moving the portafilter handle.
Intensity Boost Function
Intensity Boost increases the quantity of ground coffee used for brewing.
To activate it:
- Select Espresso or Lungo.
- Press Intensity Boost.
- Check that the Intensity Boost indicator remains continuously illuminated.
- Move the portafilter handle to the right to begin brewing.
Press Intensity Boost again to disable the function before brewing.
The Intensity Boost button can only be selected after a beverage button has been activated.
Technical Specifications
Coffee Preparation Specifications
| Specification | Details |
| Brand | Philips |
| Product | Baristina Espresso Machine |
| Model numbers | BAR300, BAR301, BAR302, BAR303, BAR311 |
| Beverage options | Espresso, Lungo |
| Standard espresso volume | 1.35 oz |
| Standard lungo volume | 4 oz |
| Programmable espresso volume | 1–2.4 oz |
| Programmable lungo volume | 2.4–6.75 oz |
| Maximum pre-ground decaf quantity | 10 g or one full tablespoon |
| Maximum cup height with drip tray | 3.7 inches |
| Maximum cup height without drip tray | 5.3 inches |
| Minimum rinsing cup capacity | 4 oz |
| Descaling solution | Philips CA6700 |
| Descaler quantity per cycle | 4.2 oz (half a bottle) |
| Minimum descaling container capacity | 40.6 oz |
| Descaling solution dispensing time | Up to 30 minutes |
| Milk frother models | BAR303, BAR311 |
Programmable Drink Volume Ranges
| Drink | Minimum Volume | Maximum Volume |
| Espresso | 1 oz | 2.4 oz |
| Lungo | 2.4 oz | 6.75 oz |
These ranges apply when programming the saved Espresso and Lungo drink quantities.
Important Safety and Operating Instructions
The Baristina must be operated and cleaned according to its brewing, portafilter, and maintenance instructions.
Coffee Bean Precautions
- Do not use caramelized coffee beans.
- Do not use flavored coffee beans.
- Always begin a new automatic brewing cycle with an empty portafilter.
- Remove the used coffee puck after each brewing cycle.
Portafilter Precautions
- Do not remove the portafilter while the machine is grinding, brewing, rinsing, or returning to its starting position.
- Wait until all indicator lights are off before removing the portafilter.
- Do not use sharp objects to remove coffee grounds or clean the portafilter.
- Do not place the portafilter in a dishwasher.
- Avoid damaging the portafilter’s sealing surfaces during cleaning.
Water Tank and Bean Container Precautions
- Fill the water tank with fresh water.
- Make sure the water tank is correctly inserted before brewing.
- Do not pour water into the coffee bean container.
- Prevent excessive water droplets from entering the bean container during cleaning.
Cleaning Precautions
- Use mild, odorless detergent when cleaning removable parts.
- Only the plastic drip tray lid is dishwasher-safe.
- The metal drip tray lid must not be cleaned in the dishwasher.
- A portafilter with a wooden handle must not have its handle soaked in water.
Before First Use
Before preparing coffee for the first time, remove all packaging materials and complete the machine rinsing procedure.
The same rinsing procedure is required if the machine has not been used for one week or longer.
How to Rinse the Baristina Espresso Machine
- Remove all packaging materials.
- Rinse the portafilter under running water.
- Insert the clean, empty portafilter into the machine until it clicks into place.
- Remove the water tank.
- Rinse the tank.
- Fill the tank with fresh water.
- Reinsert the water tank.
- Place a cup or mug with a capacity of at least 4 oz beneath the coffee spout.
- Press and hold the Intensity Boost button for five seconds.
- Release the button when it begins flashing slowly.
- Allow the machine to heat up and dispense rinse water into the cup.
- Wait until the Intensity Boost indicator stops flashing.
- Remove the portafilter.
- Rinse the portafilter with fresh, lukewarm water.
- Turn it while rinsing to clean both sides.
- Press the coffee puck ejection button several times during rinsing.
The machine is now ready for coffee preparation.
The Intensity Boost indicator flashes slowly throughout the rinsing process and stops when rinsing finishes.
Operating Instructions
Preparing Espresso or Lungo
The Baristina prepares espresso and lungo using a similar operating process.
- Remove the lid from the coffee bean container.
- Fill the container with coffee beans.
- Replace the bean container lid.
- Insert the clean, empty portafilter into the machine until it clicks.
- Remove the water tank.
- Fill it with fresh water.
- Reinsert the tank correctly.
- Place a cup beneath the portafilter’s coffee spout.
- Press Espresso or Lungo.
- Wait for the selected button to flash slowly.
- Select Intensity Boost if a stronger beverage is preferred.
- Move the portafilter handle firmly to the right until a click is heard.
- Allow the machine to grind the coffee beans.
- Wait while the portafilter automatically returns to its starting position.
- Allow the machine to brew the selected beverage.
- Wait until the selected drink light stops flashing.
When the light stops flashing, the coffee is ready.
Wait until all button lights are off before removing the portafilter.
Automatic Grinding and Brewing Sequence
The machine performs three main operations after the portafilter handle is moved to the right.
Grinding: Coffee beans are automatically ground into the portafilter. The selected beverage light continues flashing slowly.
Portafilter movement: After grinding finishes, the portafilter automatically returns to its starting position.
Brewing: The machine dispenses water through the ground coffee and into the cup.
The brewing process finishes when the selected beverage indicator stops flashing.
Preparing Stronger Coffee with Intensity Boost
Intensity Boost increases coffee intensity by grinding more coffee beans for the selected drink.
- Insert an empty portafilter.
- Fill the water tank and bean container.
- Place a cup beneath the coffee spout.
- Press Espresso or Lungo.
- Press Intensity Boost.
- Confirm that the Intensity Boost indicator stays illuminated.
- Move the portafilter handle to the right until it clicks.
- Allow the machine to complete brewing.
To deactivate Intensity Boost before brewing, press the button again.
Using Larger Cups and Glasses
The removable drip tray allows different cup heights.
| Drip Tray Position | Maximum Cup Height |
| Drip tray installed | 3.7 inches |
| Drip tray removed | 5.3 inches |
To use a taller cup:
- Remove the drip tray from the cup platform.
- Place the larger cup or glass beneath the coffee spout.
- Make sure the cup is positioned correctly before starting the brewing cycle.
Removing the Used Coffee Puck
After brewing:
- Wait until all indicator lights are off.
- Remove the portafilter.
- Turn it upside down over a waste bin.
- Press the ejection button.
- Remove the used coffee puck completely.
The portafilter should be emptied after every drink.
Preparing Decaffeinated Coffee
The Baristina can prepare decaffeinated coffee using pre-ground decaf coffee instead of whole beans.
This process uses the Intensity Boost button to dispense water through the pre-ground coffee.
How to Brew Decaf Coffee
- Add decaffeinated ground coffee to the portafilter.
- Use no more than 10 g, or one full tablespoon.
- Insert the portafilter into the machine.
- Make sure the water tank contains water.
- Place a cup beneath the coffee spout.
- Press and hold Intensity Boost for five seconds.
- Release the button when it begins flashing slowly.
- Allow the machine to heat up and dispense water through the ground coffee.
- When the desired coffee volume has been reached, press Intensity Boost again.
The machine stops dispensing, and the decaffeinated coffee is ready.
Programming Espresso and Lungo Volumes
The Espresso and Lungo buttons have preset drink volumes. Each volume can be changed and saved according to the preferred coffee quantity.
Only the drink volumes can be programmed.
Important: Intensity Boost cannot be programmed or selected while drink-volume programming mode is active.
How to Program a Coffee Volume
- Fill the water tank with fresh water.
- Place a cup on the drip tray.
- Insert the clean, empty portafilter until it clicks into place.
- Press and hold the Espresso or Lungo button for five seconds.
- Wait until the selected button begins flashing intermittently.
- Move the portafilter handle firmly to the right until it clicks.
- Allow the machine to grind the coffee beans.
- Wait while the portafilter returns automatically to its brewing position.
- Allow the machine to begin brewing.
- When the cup contains the preferred amount of coffee, press the flashing drink button again.
- Wait for the short burst of flashing that confirms the new volume has been saved.
- Wait until the indicator stops flashing.
- Remove the cup.
- When all lights are off, remove the portafilter and empty the coffee puck.
The machine will use the newly saved drink volume whenever that beverage is selected.
How to Reset Drink Volumes to Factory Settings
To restore the original Espresso and Lungo quantities:
- Press and hold Espresso, Lungo, and Intensity Boost simultaneously.
- Continue holding all three buttons for five seconds.
- Release the buttons when all indicators begin flashing rapidly.
The rapid flashing confirms that the factory drink-volume settings have been restored.
Cleaning and Maintenance
Regular cleaning removes used coffee residues, keeps the portafilter clean, and supports consistent operation.
Cleaning Schedule
| Component or Task | When to Clean | Method |
| Used coffee puck | After every coffee | Remove using the portafilter ejection button. |
| Portafilter | At the end of the day or between drinks if preferred | Rinse with hot water and mild detergent if needed. |
| Portafilter head | When thorough cleaning is required | Soak the head in warm water with mild washing-up liquid for approximately 10 minutes. |
| Machine rinsing | Before first use or after one week or longer without use | Run the Intensity Boost rinsing procedure. |
| Removable components | As needed | Clean with hot water and mild, odorless washing-up liquid. |
| Bean container | As needed | Wipe with a damp cloth and dry thoroughly. |
| Machine exterior | As needed | Wipe with a damp cloth and dry. |
| Descaling | When the Espresso and Lungo buttons flash together after brewing | Run the Philips CA6700 descaling procedure. |
Cleaning the Portafilter
The portafilter should be cleaned at the end of the day. It can also be rinsed between beverages if preferred.
- Remove the portafilter after the brewing cycle has finished.
- Empty the used coffee puck.
- Rinse the portafilter under hot running water.
- Use a small amount of mild, odorless detergent if necessary.
- Rotate the portafilter to rinse all sides.
- Press the ejection button several times during rinsing.
- Dry the portafilter with a clean, dry cloth.
Warning: Do not use sharp objects to empty or clean the portafilter. Sharp objects can damage its sealing surfaces.
Important: Do not place the portafilter in a dishwasher. Dishwasher cleaning can discolor and damage its materials.
Deep Cleaning the Portafilter Head
For more thorough cleaning:
- Empty the portafilter.
- Prepare warm water with a small amount of mild washing-up liquid.
- Soak the portafilter head for approximately 10 minutes.
- Rinse the head under running water.
- Rotate it to clean all sides.
- Press the ejection button several times.
- Dry the portafilter with a clean, dry cloth.
If the portafilter has a wooden handle, do not soak the wooden handle in water.
Cleaning Removable Parts
Removable components can be cleaned using hot water and mild, odorless washing-up liquid.
Dry the cleaned parts with a clean, dry cloth.
Dishwasher compatibility:
| Component | Dishwasher Guidance |
| Plastic drip tray lid | Dishwasher-safe |
| Metal drip tray lid | Not dishwasher-safe |
| Portafilter | Not dishwasher-safe |
Cleaning the Coffee Bean Container
- Open the bean container lid.
- Wipe the inside of the container with a damp cloth.
- Dry the container with a dry cloth.
- Close the lid.
Do not pour water into the coffee bean container.
Prevent excessive water droplets from entering the container while cleaning.
Cleaning the Outside of the Coffee Machine
- Wipe the exterior surfaces with a damp cloth.
- Dry the surfaces with a clean, dry cloth.
Descaling the Baristina Espresso Machine
The machine requires descaling when the Espresso and Lungo buttons flash simultaneously several times after a coffee has been prepared.
Philips specifies CA6700 liquid descaler for this procedure.
The descaling process consists of a descaling-solution stage followed by a freshwater flushing stage.
Descaling Requirements
| Requirement | Details |
| Descaling product | Philips CA6700 |
| Descaling solution quantity | 4.2 oz, half a bottle |
| Collection container | At least 40.6 oz |
| Descaling solution dispensing | Up to 30 minutes |
| Filter holder condition | Empty, with no used coffee puck |
| Final stage | Freshwater flushing |
How to Descale the Baristina Espresso Machine
- Remove the drip tray from the cup platform.
- Place a container with a capacity of at least 40.6 oz beneath the coffee spout.
- Pour half a bottle of Philips CA6700 liquid descaler, approximately 4.2 oz, into the water tank.
- Fill the tank with fresh tap water.
- Insert the empty portafilter into the machine.
- Make sure there is no coffee puck inside the portafilter.
- Press and hold Espresso and Lungo together for five seconds.
- Wait until Espresso flashes slowly and Lungo stays continuously illuminated.
- Allow the machine to dispense the descaling solution at regular intervals.
- Wait until the first phase finishes. This can take up to 30 minutes.
- When Lungo begins flashing rapidly and Espresso stays illuminated, remove and empty the collection container.
- Place the container back beneath the coffee spout.
- Remove the water tank.
- Rinse the tank under running water.
- Fill the tank with cold tap water.
- Reinsert it into the machine.
- Press the flashing Lungo button to start the flushing cycle.
- Allow the machine to empty the water tank during the flushing process.
- Wait until the button lights switch off.
- Remove the portafilter.
- Rinse the portafilter thoroughly with fresh water.
- Rotate it while rinsing and press the ejection button several times.
- Dry the portafilter using a clean, dry cloth.
The descaling procedure is complete when all button lights switch off.
What to Do if Descaling Is Interrupted
The recovery procedure depends on which stage was interrupted.
If the descaling-solution stage was interrupted:
- Unplug the machine.
- Plug it back in.
- Restart the descaling procedure from the beginning.
If the freshwater flushing stage was interrupted:
- Remove the water tank.
- Rinse the tank with water.
- Refill it with fresh water.
- Reinsert the tank.
- Rinse the machine several times.
Meaning of Indicator Lights
The Baristina uses different blinking patterns to communicate brewing, rinsing, descaling, and operating conditions.
Espresso and Lungo Light Signals
| Light Pattern | Meaning | Required Action |
| Espresso or Lungo flashes slowly | A drink has been selected and Direct Start is active. | Move the portafilter handle to the right to begin grinding. |
| Espresso or Lungo flashes rapidly during brewing | Water tank is empty. | Refill and correctly insert the tank, then press the rapidly flashing drink button. |
| Drink button flashes rapidly after refilling water | Water tank is not correctly inserted or brewing needs confirmation. | Secure the tank and press the flashing drink button. |
| Drink button flashes rapidly after the portafilter returns | Portafilter is not correctly positioned. | Push the portafilter fully into the machine. |
| Drink button flashes rapidly during or after grinding | Water tank has been removed or is incorrectly inserted. | Reinsert the tank firmly. The process continues automatically. |
| Espresso or Lungo flashes intermittently | Drink-volume programming mode is active. | Continue the programming procedure. |
| Espresso and Lungo flash together after brewing | Descaling is required. | Run the descaling procedure. |
Descaling Indicator Lights
| Indicator Pattern | Meaning |
| Espresso flashes slowly; Lungo stays on | The descaling-solution stage is running. |
| Espresso stays on; Lungo flashes slowly | The freshwater flushing stage is running. |
| Espresso flashes rapidly; Lungo stays on | The portafilter or water tank is missing or incorrectly positioned during descaling. |
| Espresso stays on; Lungo flashes rapidly | The water tank is empty during descaling and requires attention. |
If the portafilter is missing during descaling, insert it correctly.
If the tank is missing or incorrectly positioned, reinsert it and press the rapidly flashing Espresso button.
If the water tank empties during descaling, refill it and press the flashing Lungo button to continue.
Intensity Boost Indicator Lights
| Light Pattern | Meaning |
| Continuously illuminated while a selected drink flashes slowly | Intensity Boost is active. |
| Flashing slowly | The machine is performing its rinsing procedure. |
| Flashing rapidly | The portafilter is missing, the water tank is empty, or the tank is incorrectly inserted during rinsing or decaf preparation. |
For a rapidly flashing Intensity Boost indicator, check that the portafilter and filled water tank are correctly installed. Press Intensity Boost again when required to continue rinsing.
All Three Buttons Flash Slowly
When all three buttons flash slowly, the machine is returning the portafilter to its starting position.
The portafilter cannot be removed during this movement.
Wait until all lights stop flashing before removing it.
Troubleshooting Guide
Portafilter Cannot Move to the Right
| Possible Cause | Recommended Solution |
| A used coffee puck is still inside the portafilter. | Remove and empty the portafilter. Rinse it if necessary, then reinstall it. |
The machine has a safety mechanism that prevents a new brewing cycle when the portafilter still contains a used coffee puck.
Portafilter Is Stuck in the Grinding Position
If the power plug was removed while the portafilter was in the grinding position on the right, the portafilter may remain there.
Move the portafilter manually back to its starting position.
Espresso or Lungo Button Keeps Flashing Slowly
A slowly flashing drink indicator normally means that the selected drink is ready for the Direct Start process.
The machine does not need to finish heating before grinding starts.
Move the portafilter handle to the right until it clicks to begin grinding and brewing.
Machine Does Not Start Grinding Coffee Beans
| Possible Cause | Recommended Solution |
| Portafilter was not fully inserted before moving it right. | Push the portafilter handle slightly to seat it correctly. |
| Portafilter moved out of position. | Make sure the portafilter is fully inserted until a click is heard. |
Machine Grinds Beans but Does Not Brew Coffee
Possible causes include an incorrectly positioned portafilter or a water tank that was removed during grinding.
- Check that the portafilter has returned to its brewing position.
- Push the portafilter handle slightly to seat it correctly.
- Check the water tank.
- Reinsert the water tank until it clicks.
The machine continues the brewing process when the required parts are correctly positioned.
Portafilter Cannot Be Removed
The portafilter remains locked while brewing or another machine operation is active.
If the selected drink indicator is still flashing slowly, wait for brewing to finish.
If brewing, rinsing, programming, or descaling was interrupted, the machine needs time to return to its starting position.
Do not remove the portafilter until all indicator lights are off.
Portafilter Is Stuck and All Three Lights Continue Flashing
The machine may be unable to return to its neutral position.
- Unplug the machine.
- Wait 15 seconds.
- Plug it back in.
- Allow the machine to attempt recovery.
If the problem continues:
- Unplug the machine again.
- Wait another 15 seconds.
- Reconnect the power.
If the portafilter still cannot be removed, the machine requires service. Contact the Consumer Care Center in the relevant country.
Coffee Is Too Weak
| Possible Cause | Recommended Solution |
| Intensity Boost is not selected. | Select Espresso or Lungo, then activate Intensity Boost. |
| Coffee bean variety or roast is too mild. | Try a different coffee bean type or roast. |
| Dosing system is adjusting after first use or a bean change. | Prepare one or two additional coffees to allow the dosing system to adjust. |
Coffee Machine Is Not Brewing and Leaks Around the Portafilter
A used coffee puck or leftover ground coffee may still be inside the portafilter.
- Remove the portafilter when the machine is ready.
- Empty it completely.
- Check for remaining ground coffee.
- Rinse if necessary.
- Reinsert the empty portafilter.
Always begin a new grinding and brewing cycle with an empty portafilter.
Ground Coffee Falls onto the Drip Tray
This can happen when a new brewing cycle starts with coffee grounds left inside the portafilter.
- Remove the portafilter.
- Empty and rinse it.
- If it is stuck, move the portafilter back toward the left.
- Remove and empty the portafilter.
- Wipe fallen ground coffee from the machine and drip tray using a dry cloth.
- Begin a new brewing cycle with an empty portafilter.
Clear Water Appears Under the Machine
The water tank may have been overfilled, causing water to spill when the tank was reinserted.
When filling and replacing the water tank, make sure water does not spill.
Portafilter Drips Coffee or Water
A few drops may remain inside the portafilter after brewing, emptying, or rinsing.
Some dripping is normal.
After rinsing, shake off excess water before using the portafilter again.
Milk Frother Instructions — BAR303 and BAR311
The Baristina BAR303 and BAR311 manual includes instructions for a separate milk frother.
The milk frother can prepare heated milk froth and cold milk froth using its whisk assembly.
Milk Frother Components
The milk frother includes:
- Milk frother jug
- Milk frother lid
- Whisk
- Whisk holder
- Operating button
- Power plug
How to Heat and Froth Milk
- Insert the milk frother plug into a wall socket.
- Remove the milk frother lid.
- Fill the milk frother with the desired amount of milk.
- Do not exceed the maximum fill indication.
- Close the lid.
- Make sure the whisk holder shaft fits correctly into the lid.
- Press the operating button for one second.
The milk frother heats and froths the milk.
Remove the whisk for cleaning after use.
How to Froth Cold Milk
- Connect the milk frother to the electrical supply.
- Remove the lid.
- Fill the jug with milk without exceeding the maximum mark.
- Close the lid and check that the whisk assembly is correctly positioned.
- Press and hold the operating button for three seconds.
The appliance froths the milk without the hot frothing function.
Milk Frother Operating Modes
| Button Action | Function |
| Press for 1 second | Heat and froth milk |
| Press for 3 seconds | Froth cold milk |
Cleaning the Milk Frother
The BAR303 and BAR311 milk frother components should be cleaned after use.
Cleaning Procedure
- Rinse the inside of the milk frother under hot running water.
- Remove the lid.
- Remove the whisk holder from the jug.
- Remove the whisk from its holder.
- Rinse the whisk and holder under hot running water.
- Reattach the whisk to the whisk holder.
- Place the assembled whisk and holder inside the milk frother.
- Unplug the milk frother.
- Wipe the exterior with a damp cloth.
Milk Frother Troubleshooting
Milk Frother Light Blinks but the Appliance Does Not Operate
| Possible Cause | Recommended Solution |
| The milk frother is still hot after preparing hot milk or hot froth. | Allow the jug to cool for a few minutes before using it again. |
| The temperature limiter is preventing operation. | Wait until the appliance cools. |
| Milk temperature is too high. | Replace the warm milk with cold milk or allow the appliance to cool. |
The inside of the milk jug can be rinsed with cold water to help it cool faster.
Milk Frother Does Not Produce Foam
| Possible Cause | Recommended Solution |
| Lid is not properly installed. | Refit the lid correctly. |
| Frothing coil is not attached to its holder. | Attach the frothing coil to the holder. |
| Milk type does not produce suitable foam. | Try another milk type or brand. |
| Milk residues prevent whisk movement. | Clean the whisk holder and the inside of the milk jug. |
For optimal frothing results, use semi-skimmed cow’s milk directly from the refrigerator.
Milk Leaks from Beneath the Lid
The milk jug may have been overfilled.
Do not fill the milk frother beyond the MAX indication.
Milk Is Not Very Hot
The milk frother heats milk to approximately 165.2°F.
This temperature is normal for the appliance. Excessive heating can break down or burn milk proteins and affect the quality of the froth.
Not All Milk Is Frothed
The milk frother does not convert all the milk into foam.
This is normal. It creates a combination of liquid milk and foam, allowing the milk to mix with coffee while the froth remains on top.
Customer Support Information
If the Baristina Espresso Machine continues to malfunction after following the troubleshooting instructions, contact the Philips Consumer Care Center in the relevant country.
The manufacturer provides a dedicated Baristina website: https://www.baristina.com
For a portafilter that remains stuck after the specified recovery attempts, the machine requires service.
Frequently Asked Questions
How do I use the Philips Baristina Espresso Machine?
Fill the bean container with coffee beans and the water tank with fresh water. Insert an empty portafilter, place a cup beneath the coffee spout, and select Espresso or Lungo. Move the portafilter handle to the right until it clicks. The machine automatically grinds and brews the selected coffee.
Does the Philips Baristina have a power button?
No. The Baristina uses Direct Start. Press Espresso or Lungo and move the portafilter handle to the right to start grinding and brewing without using a separate On/Off button.
How do I make stronger espresso with the Philips Baristina?
Select Espresso or Lungo, then press Intensity Boost before moving the portafilter handle to the right. The machine grinds more coffee to prepare a stronger beverage. Press Intensity Boost again to deactivate it.
How do I clean the Baristina portafilter?
Empty the coffee puck, rinse the portafilter under hot running water, and press the ejection button several times while rinsing. Mild, odorless detergent may be used. Dry it with a clean cloth. Do not put the portafilter in a dishwasher or use sharp cleaning tools.
Why is my Philips Baristina not grinding coffee beans?
The portafilter may be incorrectly inserted or may still contain a used coffee puck. Empty the portafilter and insert it fully until it clicks. Select the beverage and move the handle to the right. If grinding does not start, check that the portafilter is correctly seated.
How do I descale the Philips Baristina Espresso Machine?
Use Philips CA6700 liquid descaler. Pour half a bottle, approximately 4.2 oz, into the water tank and fill it with fresh water. Insert an empty portafilter, place a container of at least 40.6 oz beneath the coffee spout, and hold Espresso and Lungo together for five seconds. Follow the descaling and freshwater flushing stages until all lights switch off.
How do I reset the Baristina coffee volumes?
Press and hold Espresso, Lungo, and Intensity Boost together for five seconds. When all three buttons flash rapidly, the saved drink volumes have been restored to their factory settings.
Can the Philips Baristina make decaffeinated coffee?
Yes. Add up to 10 g, or one full tablespoon, of pre-ground decaffeinated coffee to the portafilter. Insert it, place a cup beneath the spout, and hold Intensity Boost for five seconds. Press Intensity Boost again when the desired coffee volume has been dispensed.