| Field | Details |
| Document Title | Philips Café Aromis 8000 Series User Manual |
| Document Type | User Manual |
| Brand Name | Philips |
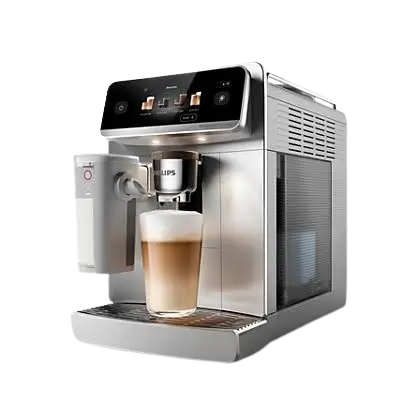
| Product Name | Café Aromis Fully Automatic Coffee Machine |
| Model Number(s) | 8000 Series |
| PDF File Size | 3 MB |
| Number of Pages | 116 |
| Languages | English, Spanish, French, Portuguese |
Philips Café Aromis 8000 Series
The Philips Café Aromis 8000 Series is a fully automatic coffee machine designed to prepare coffee, milk-based beverages, cold coffee, iced drinks, and hot water. It combines a built-in coffee grinder, customizable drink settings, LatteGo Pro milk systems, and a digital control panel.
The machine supports coffee beans and pre-ground coffee. Users can adjust drink strength, volume, and temperature where available, create personal drink profiles, and use the Barista Assistant to adjust brewing settings according to their coffee beans.
The Café Aromis 8000 Series also connects to the Philips HomeID app through a 2.4 GHz Wi-Fi network. The app provides drink customization, remote brewing controls, machine updates, coffee recipes, and additional support functions.
Regular cleaning, AquaClean water filter replacement, and descaling are required to maintain the machine’s operation.
Product Overview and Features
The Café Aromis 8000 Series prepares coffee automatically after the user selects a drink from the display. It grinds coffee beans, adjusts the quantity of ground coffee, and dispenses the selected beverage through the adjustable coffee spout.
The machine also supports different milk preparations through the LatteGo Pro hot and cold milk systems.
| Feature | Description |
| Fully automatic coffee brewing | Grinds coffee beans and prepares selected coffee drinks. |
| Built-in grinder | Offers 12 grind settings to adjust coffee extraction. |
| Digital control panel | Provides access to drink categories, settings, profiles, and maintenance functions. |
| LatteGo Pro | Separate hot and cold milk systems for milk-based beverages. |
| Cold and iced coffee | Supports cold brewing without heat and iced drinks prepared at lower temperatures. |
| Pre-ground coffee | Allows one drink to be prepared using pre-ground coffee instead of beans. |
| ExtraShot | Adds an additional ristretto shot to supported drinks. |
| Barista Assistant | Adjusts machine settings based on selected coffee bean characteristics. |
| Personal profiles | Stores up to eight favorite drinks per profile. |
| HomeID connectivity | Connects the machine to the Philips HomeID app through Wi-Fi. |
| AquaClean filtration | Helps reduce limescale buildup in the water circuit. |
| Automatic standby | Switches off automatically after the configured standby period. |
During initial operation, the coffee machine automatically adjusts the amount of ground coffee used for brewing. It requires approximately five coffees to complete this initial adjustment.
The default automatic switch-off time is 15 minutes.
Parts and Components
The coffee machine includes removable components for filling, brewing, cleaning, and maintenance.
Main Machine Components
| Part No. | Component | Function |
| A1 | Control panel | Operates the machine and provides access to beverage and machine settings. |
| A2 | Cup holder | Holds cups on the machine. |
| A3 | Pre-ground coffee compartment | Receives pre-ground coffee for individual drinks. |
| A4 | Bean hopper lid | Covers the coffee bean hopper. |
| A5 | Adjustable coffee spout | Dispenses coffee and can be adjusted to different cup heights. |
| A6 | Power cord socket | Connects the power cord to the machine. |
| A7 | Grind setting knob | Adjusts the coffee grinder setting. |
| A8 | Coffee bean hopper | Stores coffee beans for automatic grinding. |
| A9 | Brew group | Handles coffee brewing and can be removed for cleaning. |
| A10 | Service door | Provides access to the brew group and internal service area. |
| A11 | Data label | Displays the machine’s type number and electrical information. |
| A12 | Water tank | Stores the water used for brewing and rinsing. |
| A13 | Hot water spout | Dispenses hot water. |
| A14 | Coffee grounds container | Collects used coffee grounds. |
| A15 | Grounds container front panel | Forms the front section of the grounds container assembly. |
| A16 | Drip tray cover | Covers the drip tray. |
| A17 | Drip tray | Collects water discharged during rinsing and operation. |
| A18 | Drip tray full indicator | Indicates when the drip tray needs emptying. |
Accessories
The following accessories are identified in the product documentation.
| Part No. | Accessory | Purpose |
| A19 | Power cord | Connects the machine to the electrical supply. |
| A20 | AquaClean water filter | Filters water and reduces limescale buildup. |
| A21 | Measuring scoop | Measures pre-ground coffee. |
| A22 | Water hardness test strip | Measures the hardness of the local water supply. |
| A23 | LatteGo Pro hot milk system | Prepares hot milk for milk-based drinks. |
| A24 | LatteGo Pro cold milk system | Prepares cold milk froth for cold beverages. |
Control Panel and Display Guide
The Café Aromis 8000 Series uses a digital display with touch controls and dedicated buttons.
| Control | Function |
| C1 — On/off | Switches the coffee machine on or off. |
| C2 — Menu | Opens machine settings, maintenance options, and related functions. |
| C3 — Drink categories | Displays available beverage categories and drinks. |
| C4 — Wi-Fi icon | Shows the wireless connection status. |
| C5 — Barista Assistant | Opens the coffee customization assistant. |
| Customize icon | Adjusts available drink settings, including volume, strength, and temperature. |
| Play icon | Starts the selected operation or brewing cycle. |
| Stop icon | Stops dispensing before the selected operation finishes. |
| Skip icon | Stops the current milk-dispensing stage where supported. |
| Profile + | Creates a personalized drink profile. |
The display also shows maintenance reminders, warning messages, and error codes when attention is required.
Technical Specifications
| Specification | Details |
| Brand | Philips |
| Product series | Café Aromis 8000 Series |
| Product type | Fully automatic coffee machine |
| Dimensions (W × H × D) | 251 × 389 × 452 mm |
| Weight | 8.5–9 kg |
| Power cord length | 800–1200 mm |
| Water tank capacity | 1.9 liters |
| Coffee bean hopper capacity | 275 g |
| Coffee grounds container capacity | Up to 12 coffee pucks |
| LatteGo Pro capacity | 250 ml |
| Adjustable coffee spout height | 88–145 mm |
| Grinder settings | 12 levels |
| Default standby time | 15 minutes |
| Selectable standby times | 15, 30, 60, or 180 minutes |
| Wi-Fi network | 2.4 GHz |
| Water hardness settings | 5 levels |
| AquaClean filter replacement | After 95 liters of water, when prompted, or at least every 3 months |
| Nominal voltage, power rating, and power supply | Refer to the data label inside the service door |
Preset quantities are approximate, and the manufacturer may change technical specifications.
Important Safety and Operating Instructions
Before operating the Café Aromis 8000 Series, read the separate safety booklet supplied with the machine.
The machine must be used according to its operating, cleaning, and maintenance instructions.
Coffee Bean and Grinder Precautions
- Do not use caramelized or flavored coffee beans because they may damage the machine.
- Adjust the grinder only while the machine is grinding coffee beans.
- Do not turn the grinder adjustment knob more than one notch at a time.
- The manufacturer recommends waiting until approximately 100–150 cups have been prepared before changing the initial grind setting.
Water and Filter Precautions
- Use fresh water in the water tank.
- Do not fill the tank with demineralized, distilled, or mineral water.
- Use the water within one to two days.
- If the machine has not been used for three days or longer, empty and thoroughly rinse the water tank before refilling it with fresh drinking water.
- Prepare the AquaClean filter according to the on-screen instructions before activating it.
- Do not use Brita filters in place of Philips AquaClean filters.
Cleaning and Descaling Precautions
Only suitable cleaning and descaling products should be used.
Warning: Do not use descalers based on sulfuric acid, hydrochloric acid, sulfamic acid, or acetic acid (vinegar).
These substances may damage the water circuit and may not remove limescale correctly.
Failure to descale the machine can also void the warranty.
The LatteGo Pro cleaning program dispenses small jets of hot water. The machine’s displayed instructions must be followed during this operation.
Before First Use
Setting Up the Coffee Machine
Before preparing the first drink, the machine must be assembled and configured.
- Connect the power cord to the socket at the back of the machine and to the electrical supply.
- Remove the water tank.
- Fill the tank with fresh cold water.
- Reinsert the water tank correctly.
- Fill the bean hopper with fresh coffee beans.
- Press the on/off button.
- Follow the setup instructions displayed on the control panel.
- Set the water hardness level when prompted.
- Complete the initial setup steps shown on the screen.
All removable accessories that come into contact with water or milk should be rinsed with hot water before first use.
The machine may contain small coffee residues because it was tested with coffee during manufacturing. This is normal for a new machine.
The machine also performs an initial self-adjustment process. Prepare approximately five coffees to allow this process to finish.
Setting the Water Hardness
The correct water hardness setting helps the machine determine when descaling is necessary.
The default setting corresponds to four red squares, indicating hard water.
To measure water hardness:
- Take the supplied water hardness test strip.
- Immerse it in tap water or hold it under running tap water for one second.
- Wait one minute.
- Count the red squares displayed on the strip.
- Select the corresponding water hardness level on the machine.
- Confirm the selection.
The number of red squares selected on the display should match the test strip.
To change the setting later, open:
Menu > Machine Settings > Water Hardness
Select the required level and confirm.
Assembling LatteGo Pro
The LatteGo Pro hot and cold milk systems consist of a milk container, a frame, and a storage lid.
The milk container and frame must be assembled properly to prevent leakage.
- Take the LatteGo Pro milk container and frame.
- Insert the top of the milk container under the hook at the top of the frame.
- Press the bottom of the milk container into the frame.
- Continue pressing until a clicking sound confirms that the parts are locked together.
- Check that both parts are correctly assembled and clean.
- Slightly tilt LatteGo Pro and position it on the machine’s hot water spout.
- Push it into place until it locks securely.
The LatteGo Pro system is ready for filling after it has been attached correctly.
Connecting the Machine to HomeID
The Philips HomeID app allows the Café Aromis 8000 Series to access connected features, beverage settings, and additional support.
Wi-Fi requirement: The coffee machine must connect to a 2.4 GHz home Wi-Fi network. A 5 GHz-only network is not supported.
How to Connect the Coffee Machine to Wi-Fi
- Download the Philips HomeID app from Google Play or the Apple App Store.
- Open the app on a smartphone.
- Follow the introductory instructions until the option Add Appliance appears.
- Select the coffee machine.
- Make sure Wi-Fi is enabled on the smartphone.
- Follow the app instructions to connect the coffee machine to the home Wi-Fi network.
- Complete the pairing process.
After successful pairing, the connected app account becomes the machine owner.
The machine owner can invite other users to share access through the HomeID app.
HomeID App Features
Once connected, HomeID provides access to:
- Barista Assistant recommendations.
- Coffee bean and drink customization guidance.
- Remote drink customization and brewing.
- A timer to wake up the machine.
- More than 75 coffee-based recipes.
- Additional personal profile settings.
- Customer support.
- Firmware updates.
- Alexa voice functions, where available in the user’s country.
The app also provides help with coffee bean selection and different brewing preferences.
Understanding the Wi-Fi Indicator
| Indicator Status | Meaning |
| Off | The machine is not connected to Wi-Fi. |
| Blinking slowly | The machine is pairing with the router. |
| On continuously | The machine is connected to Wi-Fi. |
| Blinking rapidly | A Wi-Fi connection error has occurred. |
AquaClean Water Filter
The Café Aromis 8000 Series supports Philips AquaClean water filters.
The AquaClean filter helps maintain the taste of coffee and reduces limescale buildup inside the machine, reducing the need for descaling.
How to Install and Activate AquaClean
The machine does not automatically recognize a newly installed AquaClean filter. Each filter must be activated through the maintenance menu.
Before installation, the machine must be free of limescale.
- Open the Menu.
- Select Maintenance.
- Open Remove Limescale.
- Select AquaClean.
- Tap Install.
- Follow the displayed instructions to prepare the filter.
- Soak the filter in water as directed.
- Complete the installation and activation steps shown on the screen.
Proper preparation is important. If the filter is not soaked correctly, air may enter the machine instead of water.
This can produce excessive noise and prevent coffee from being brewed.
If the filter activation reminder has expired, the machine must be descaled before a new AquaClean filter can be activated.
When to Replace the AquaClean Filter
The AquaClean filter stops working after approximately 95 liters of water have passed through it.
The machine displays a reminder when replacement is necessary.
Philips also recommends replacing the filter at least every three months, even when the replacement reminder has not appeared.
To replace the filter:
- Remove the old AquaClean filter from the water tank.
- Prepare the replacement filter according to the displayed instructions.
- Install the new filter.
- Activate it through the maintenance menu.
If the filter was not replaced in time, the machine may require descaling before the replacement can be activated.
Brewing Coffee and Other Drinks
Basic Coffee Preparation
Before brewing, make sure the water tank contains fresh cold water and the bean hopper contains suitable coffee beans.
- Press the on/off button.
- Follow any instructions shown on the screen.
- Fill the water tank with fresh cold water if necessary.
- Fill the coffee bean hopper with fresh coffee beans.
- Place a cup beneath the adjustable coffee spout.
- Select a drink category on the display.
- Choose the desired drink.
- Adjust available drink settings using the Customize icon.
- Tap the Play icon to begin brewing.
The machine grinds the required coffee and prepares the selected beverage.
To stop dispensing before the brewing cycle finishes, tap the Stop icon.
Brewing Coffee with Pre-Ground Coffee
Pre-ground coffee can be used when a different coffee variety or decaffeinated coffee is preferred.
Only one coffee can be prepared at a time using the pre-ground coffee function.
- Open the lid of the pre-ground coffee compartment.
- Add one level measuring scoop of pre-ground coffee.
- Close the compartment lid.
- Select the desired drink on the display.
- Tap the Customize icon.
- Select the pre-ground coffee icon.
- Tap Play to start brewing.
Fine-ground coffee suitable for espresso is recommended.
Important: Never add more than one level measuring scoop of pre-ground coffee to the compartment.
The Stop icon can be used to end dispensing before the machine finishes.
Brewing Milk-Based Drinks with LatteGo Pro
The machine supports hot and cold milk preparations through the LatteGo Pro systems.
Before preparing a milk-based drink, make sure the milk container is attached correctly to its frame.
- Assemble the appropriate LatteGo Pro milk system.
- Check that the milk container and frame are clean.
- Attach the LatteGo Pro assembly to the hot water spout.
- Fill the milk container with refrigerated milk.
- Do not fill beyond the maximum level indicator.
- Place a cup on the drip tray beneath LatteGo Pro and the adjustable coffee spout.
- Select a milk-based drink.
- Adjust the drink using the Customize icon if required.
- Tap Play to begin preparation.
If the milk dispensing stage needs to be stopped before the programmed quantity is reached, tap the Skip icon.
To stop the entire drink preparation, tap the Stop icon.
For optimal results, milk should be used directly from the refrigerator.
The cold LatteGo Pro system is recommended for cold milk drinks, particularly with skimmed milk.
Brewing Cold Coffee
Cold coffee is brewed slowly without applying heat during the brewing process.
The process can take several minutes.
Before preparing a cold drink:
- Fill the water tank with fresh cold water.
- Place a cup beneath the coffee spout.
- Select the desired cold coffee drink from the available categories.
- Adjust the available settings if required.
- Tap Play.
Cold brewing produces coffee with a different flavor profile from conventional hot brewing.
Brewing Iced Coffee
Iced drinks are brewed at a lower temperature and slower speed.
To prepare an iced drink:
- Select an iced coffee option from the drink categories.
- Adjust the available settings.
- Place the cup beneath the adjustable coffee spout.
- Add ice cubes for a colder drink.
- Start brewing with the Play icon.
Cold milk froth can also be used with iced coffee drinks.
Using the ExtraShot Function
ExtraShot adds another ristretto shot to a selected coffee or milk-based drink.
Only one coffee can be brewed at a time when ExtraShot is selected.
- Place a cup beneath the coffee spout.
- Select the desired beverage.
- Tap Customize.
- Select the ExtraShot icon.
- Tap Play to begin brewing.
To stop the drink before dispensing is complete, tap Stop.
Dispensing Hot Water
Hot water is dispensed through the dedicated hot water spout.
Hot water cannot be dispensed through the HomeID app.
- Remove LatteGo Pro if it is attached.
- Place a cup beneath the hot water spout.
- Select Hot Water on the machine.
- Use Customize to adjust the available quantity and temperature settings.
- Tap Play.
The machine dispenses hot water through the hot water spout.
Tap Stop if dispensing needs to end before the programmed quantity has been delivered.
Personalizing Coffee Drinks
The Café Aromis 8000 Series allows drink settings to be adjusted according to individual preferences.
Depending on the selected beverage, the available settings may include:
- Coffee volume.
- Coffee strength.
- Beverage temperature.
To customize a drink:
- Browse the available drinks on the display.
- Select the desired beverage.
- Tap the Customize icon.
- Adjust the available settings.
- Start brewing.
Not every adjustment is available for every beverage.
Creating a Personal Coffee Profile
Personal profiles allow preferred coffee recipes to be stored.
A profile can contain up to eight favorite drinks.
- Open the home screen.
- Tap Profile +.
- Scroll through the available profile colors.
- Choose a preferred color.
- Tap the continue icon.
- Browse the available drinks.
- Select up to eight favorite drinks.
- Continue through the remaining setup steps to finish creating the profile.
Profiles can be edited later.
Drinks can also be customized without selecting a profile, but those recipes will not be stored in a profile.
Using Barista Assistant
Barista Assistant provides guidance for adjusting coffee settings and selecting beans.
For access to the full range of features, the machine should be connected to the HomeID app.
The assistant supports:
- Adjusting settings to match coffee beans.
- Bean selection suggestions.
- Coffee grinding guidance.
- Drink ratings and reviews.
- Coffee preparation tips.
- Special recipes.
Adjusting Brewing Settings with Barista Assistant
- Press the Barista Assistant button on the coffee machine.
- Select Start Now.
- Follow the displayed questions.
- Choose the coffee bean type.
- Select either 100% Arabica or an Arabica/Robusta blend.
- Choose the roast level: light, medium, or dark.
- Tap Adjust Now.
The machine automatically adjusts the brewing settings according to the selected bean type and roast level.
The Barista Assistant can be used again when changing to a different coffee bean variety.
The assistant is also accessible through the HomeID app.
Adjusting Grinder Settings
The Café Aromis 8000 Series has 12 grinder settings.
The grind setting affects the flavor and extraction of the coffee.
| Grinder Level | Grind Type | Coffee Characteristics |
| 1–6 | Finer | Stronger, more bitter coffee; suitable for shorter drinks such as espresso and ristretto. |
| 7–12 | Coarser | Weaker, more sour coffee; suitable for longer drinks such as coffee, iced coffee, and cold brew. |
Philips recommends keeping the factory grinder setting until approximately 100–150 cups have been prepared.
How to Change the Grind Setting
The grinder must be operating when its setting is adjusted.
- Place a cup beneath the adjustable coffee spout.
- Open the bean hopper lid.
- Select a coffee drink on the control panel.
- Tap Play to begin brewing.
- Wait until the grinder starts operating.
- Press down the grind setting knob.
- Turn the knob one notch to the left or right.
Do not turn the grinder adjustment knob more than one notch at a time.
After changing the setting, prepare two to three drinks before evaluating the full difference in coffee taste.
Machine Settings and Preferences
The machine provides additional settings through the control panel.
| Setting | Available Options |
| Water hardness | Five levels |
| Standby time | 15, 30, 60, or 180 minutes |
| Display brightness | Low, medium, high |
| Display backlight | Always on or dim after 3 minutes |
| Cup light | Always off, always on, always dimmed, or on while brewing |
| Language | Select the preferred display language |
| Sound | Enable or disable beeping |
| Measurement units | Milliliters or ounces |
| Automatic rinsing | Enable or disable rinsing when switching on |
| Home screen | Drinks overview or last used profile |
| Eco mode | Enable or disable automatic energy-efficient setting adjustments |
| Factory settings | Restore default machine settings |
Restoring Factory Settings
The machine can be returned to its original settings through the control panel.
- Open Menu.
- Select Machine Settings.
- Tap Factory Settings.
- Select Reset.
- Confirm the reset.
The machine restores the default values for water hardness, standby time, display settings, cup light, language, sound, measurement units, rinsing, home screen, and Eco mode.
Machine statistics are retained.
Important: A factory reset also removes saved Wi-Fi credentials and the pairing with the HomeID account.
The coffee machine must be connected again through HomeID afterward.
Removing and Reinstalling the Brew Group
The brew group can be removed for cleaning and maintenance.
How to Remove the Brew Group
- Remove the water tank.
- Open the service door.
- Locate the yellow locking handle.
- Move the yellow handle to the right to unlock the brew group.
- Slide the brew group out of the machine.
How to Reinstall the Brew Group
- Slide the brew group back into the machine.
- Continue until it clicks into position.
- Move the yellow locking handle to the left.
- Close the service door.
- Reinsert the water tank.
The brew group must be correctly positioned and locked before the machine is used.
Cleaning and Maintenance
Regular cleaning prevents coffee residue from building up in removable components and internal coffee passages.
Recommended Cleaning Schedule
| Component | Cleaning Frequency | Cleaning Method |
| Brew group | Weekly | Remove and rinse thoroughly under running water. |
| Brew group — coffee oils | Monthly | Run the coffee oil removal program using Philips coffee oil remover tablets. |
| Pre-ground coffee compartment | Check weekly | Remove accumulated coffee if the compartment becomes clogged. |
| Coffee grounds container | When prompted; clean weekly | Empty while the machine is switched on. Rinse with water and washing-up liquid or use a dishwasher. |
| Drip tray | Empty daily or when full; clean weekly | Rinse with water and washing-up liquid or clean in a dishwasher. |
| LatteGo Pro | After every use | Run the cleaning program, then rinse or wash the removable parts. |
| Water tank | Before every refill | Rinse under running water. |
| Machine front | Weekly | Wipe using a non-abrasive cloth. |
Cleaning the Brew Group Under Running Water
- Remove the water tank and open the service door.
- Unlock and remove the brew group.
- Rinse the brew group thoroughly under running water.
- Remove coffee residue from the brew group flap.
- Allow the brew group to drain and dry appropriately.
- Reinsert it into the machine.
- Lock the yellow handle and close the service door.
Do not dry the brew group with a dry cloth because loose fibers may collect inside the mechanism.
Cleaning the Brew Group with Coffee Oil Remover Tablets
Philips recommends using its coffee oil remover tablets, where available.
- Open Menu.
- Tap Maintenance.
- Select Remove Coffee Oil.
- Follow the instructions displayed on the screen.
- Tap Play when prompted.
The maintenance program removes accumulated coffee oils from the brewing system.
Cleaning the Pre-Ground Coffee Compartment
The pre-ground coffee compartment should be checked every week for blockages.
If coffee becomes trapped:
- Switch off and unplug the machine.
- Remove the brew group.
- Open the pre-ground coffee compartment lid.
- Insert the handle of the measuring scoop into the compartment.
- Move the handle up and down until the trapped ground coffee falls through.
- Reinstall the brew group.
Cleaning LatteGo Pro After Each Use
The LatteGo Pro cleaning program provides a quick cleaning cycle while the system remains attached to the machine.
- Check that LatteGo Pro is attached correctly.
- Place a cup beneath the hot water spout.
- Open Menu.
- Select Maintenance.
- Tap Clean LatteGo Pro.
- Select Start.
- Follow the displayed instructions.
Small jets of hot water are dispensed during this process.
LatteGo Pro containing remaining milk can be stored in the refrigerator after quick cleaning.
Thoroughly Cleaning LatteGo Pro
The hot and cold LatteGo Pro systems can be disassembled for cleaning.
- Remove LatteGo Pro from the coffee machine.
- Pour out any remaining milk.
- Press the release button.
- Remove the milk container from the frame.
- Clean the parts under running lukewarm water with washing-up liquid, or place them in the dishwasher.
- Reassemble the clean components.
Cleaning the Coffee Grounds Container
The coffee grounds container must be emptied when the machine displays the appropriate message.
The machine must be switched on when the grounds container is emptied so the internal counter resets correctly.
- Remove the coffee grounds container.
- Empty the used coffee.
- Wait at least five seconds before reinserting the container.
- Clean the container with water and washing-up liquid or in the dishwasher.
- Reinsert the container.
The front panel of the coffee grounds container is not dishwasher-safe.
Cleaning the Drip Tray
The drip tray collects water from coffee preparation and automatic rinsing.
- Remove the drip tray.
- Empty the accumulated water.
- Rinse it under running water with washing-up liquid or clean it in the dishwasher.
- Reinstall the drip tray.
The tray should be emptied daily or as soon as the red full indicator becomes visible above the drip tray cover.
Descaling the Coffee Machine
Limescale can accumulate inside the water circuit during regular use.
The machine displays a reminder when descaling is required.
Philips recommends using its own descaling solution where available.
Warning: Never use vinegar or descaling products containing sulfuric, hydrochloric, sulfamic, or acetic acid. These products can damage the machine’s water circuit.
How to Start the Descaling Program
- Open Menu.
- Tap Maintenance.
- Select Remove Limescale.
- Tap Descale.
- Follow the instructions displayed on the machine.
Using the AquaClean water filter reduces the frequency of descaling.
What to Do if Descaling Is Interrupted
The descaling procedure can be interrupted by pressing and holding the on/off button.
If the procedure stops before completion:
- Empty the water tank.
- Rinse the tank thoroughly.
- Refill the tank with fresh water up to the Calc/Clean level.
- Switch on the coffee machine.
- Run a manual rinsing cycle before preparing drinks.
- Dispense half a water tank of hot water by repeatedly selecting the hot water function.
- Prepare several pre-ground coffee cycles without adding any ground coffee.
If descaling has not been completed, the machine will require another descaling cycle as soon as possible.
Error Codes and Warning Messages
The machine displays error codes and warning messages to identify specific operating problems.
Error Code Troubleshooting
| Error Code | Meaning | Recommended Action |
| 01 | Coffee funnel is clogged. | Switch off and unplug the machine. Remove the brew group and clear trapped coffee through the pre-ground coffee compartment using the spoon handle. |
| 03 | Brew group is dirty. | Remove and rinse the brew group under running water. Allow it to air-dry or use a soft, damp cloth as directed. |
| 04 | Brew group is incorrectly positioned. | Remove and reinsert the brew group, making sure it is positioned and locked correctly. |
| 05 | Air is present in the water circuit. | Restart the machine. If operation resumes, dispense two to three cups of hot water. Descale if it has not been done for a long period. |
| 05 | AquaClean filter is incorrectly installed or clogged. | Remove the filter and try brewing. If successful, reinstall it correctly. Replace the filter if it remains clogged. |
| 11 | Machine needs to adjust to room temperature. | Switch off for 30 minutes, then restart. Contact Philips support if the problem remains. |
| 14 | Machine is overheated. | Switch off and restart after 30 minutes. |
| 19 | Power cord is not connected properly. | Check that the small power cord plug is correctly connected to the rear socket. Contact Philips support if the problem continues. |
If an error code appears that is not listed above, contact Philips Consumer Care.
Warning Messages
| Warning Message | Meaning or Cause | Action |
| Add water | The water tank is nearly empty or is not correctly installed. | Fill with fresh water to the maximum mark and check the tank position. |
| Add beans | The bean hopper needs coffee beans. | Refill the hopper. |
| Empty coffee grounds container | The grounds container is full. | Remove and empty it while the machine is switched on. Wait five seconds before replacing it. |
| Insert brew group | The brew group is missing or incorrectly positioned. | Reinstall the brew group and lock it correctly. |
Troubleshooting Guide
Coffee Brewing Problems
| Problem | Possible Cause | Solution |
| Coffee is watery | Brew group is dirty. | Remove and rinse the brew group. |
| Coffee is watery | Initial self-adjustment is not complete. | Brew approximately five coffees to allow the machine to adjust. |
| Coffee is watery | Grinder setting is too coarse. | Select a finer setting, changing only one notch while grinding. |
| Coffee is not hot enough | Beverage temperature setting is too low. | Increase the temperature through Customize if available. |
| Coffee is not hot enough | Automatic rinsing is disabled. | Enable automatic rinsing in Machine Settings. |
| Coffee is not hot enough | Cup is cold. | Preheat the cup by rinsing it with hot water. |
| Coffee is not hot enough | Milk has reduced the drink temperature. | Preheat the cup before brewing. |
| Coffee dispenses slowly or not at all | AquaClean filter is incorrectly prepared or clogged. | Reprepare, reinstall, activate, or replace the filter as appropriate. |
| Coffee dispenses slowly | Grinder setting is too fine. | Select a coarser setting during grinding. |
| Coffee dispenses slowly | Brew group or coffee spout is dirty. | Rinse the brew group and clean the dispensing spout and its holes. |
| Coffee does not dispense | Pre-ground coffee compartment is blocked. | Remove trapped coffee using the scoop handle as described in the cleaning instructions. |
| Coffee flow is restricted | Limescale has blocked the water circuit. | Run the descaling program when prompted. |
Coffee Grounds Container Problems
The Empty Coffee Grounds Container message remains visible
This can happen when the container was emptied while the coffee machine was switched off or returned too quickly.
To reset the counter:
- Make sure the machine is switched on.
- Remove the grounds container.
- Empty the grounds.
- Wait at least five seconds.
- Reinsert the container.
The machine requests emptying even when the container is not full
The grounds counter may not have been reset properly during the previous emptying cycle.
Remove the container while the machine is switched on, wait five seconds, and reinsert it.
The grounds container overfills without a warning
This can happen when the drip tray is removed without emptying the coffee grounds container.
Whenever the drip tray is removed, the grounds container should also be emptied, even when it contains only a few coffee pucks.
Brew Group Problems
Brew Group Cannot Be Removed
The brew group may not be in its correct operating position.
- Close the service door.
- Reinsert the water tank.
- Switch the machine off.
- Switch the machine on again.
- Try removing the brew group again.
Brew Group Cannot Be Reinserted
- Leave the brew group outside the machine.
- Close the service door and reinstall the water tank.
- Switch off the machine and unplug it.
- Wait 30 seconds.
- Reconnect the power cord and switch on the machine.
- Try inserting the brew group again.
Make sure the brew group slides fully into place and locks with the yellow handle.
LatteGo Pro Milk Problems
| Problem | Possible Cause | Solution |
| Milk does not froth | LatteGo Pro is incorrectly assembled. | Reassemble the milk container and frame until they click together. |
| Milk does not froth | Milk container or frame is dirty. | Disassemble and clean both components. |
| Milk froth is weak | The selected milk type is unsuitable for the desired froth. | Use a suitable barista-style milk. Skimmed milk is recommended for cold froth and semi-skimmed milk for hot froth. |
| Milk leaks from LatteGo Pro | Milk container is not locked into the frame. | Insert the upper section beneath the frame hook and press the lower section until it clicks. |
| Milk leaks from LatteGo Pro | Milk container or frame is dirty. | Clean both parts thoroughly. |
Water Leaks and Drip Tray Problems
| Problem | Possible Cause | Solution |
| Drip tray fills quickly | Water from normal internal rinsing enters the tray. | Empty the tray daily or when the red full indicator appears. |
| Water appears inside the drip tray after use | Normal rinsing of the internal circuit and brew group. | Empty the collected water as part of regular maintenance. |
| Water leaks from the machine | Drip tray has overflowed. | Empty and clean the drip tray. |
| Water leaks near the tank | Water tank is not fully inserted. | Remove and correctly reinstall the tank. |
| Water appears to leak | Brew group is dirty or clogged. | Remove and rinse the brew group. |
| Drip tray overflows | Machine is not placed on a horizontal surface. | Place the machine on a level surface. |
AquaClean Filter Problems
AquaClean cannot be activated
If the filter was not replaced when the machine displayed the replacement reminder, the machine may require descaling.
Complete the descaling program before installing and activating a new filter.
The new water filter does not fit
Check that a Philips AquaClean filter is being used.
The rubber ring must also be correctly positioned on the filter.
Brita filters are not compatible with the machine.
Loud Noise During Operation
Some operating noise is normal.
If the machine begins making a different or unusually loud noise, possible causes include:
- A dirty brew group.
- An AquaClean filter that was not prepared correctly.
- Air entering through an incorrectly installed filter.
- A water tank that is not fully inserted.
Clean the brew group, check the AquaClean filter installation, and make sure the water tank is correctly seated.
Wi-Fi Connection Problems
| Problem | Possible Cause | Solution |
| Machine cannot connect during setup | Router and machine are too far apart. | Move the devices within Wi-Fi range or use a Wi-Fi repeater. |
| Initial connection fails | Router is not connected to the internet. | Check the router and internet connection. |
| Machine cannot connect to Wi-Fi | Router uses a 5 GHz-only network. | Enable a 2.4 GHz Wi-Fi network. |
| Wi-Fi connection is interrupted | Electromagnetic or other interference. | Move interfering devices away or switch them off. |
| Machine cannot connect after changing routers | Old Wi-Fi settings are stored. | Forget the previous network and reconnect through HomeID. |
| Another user cannot control the machine | Sharing invitation was not received or accepted. | The machine owner must send an invitation, and the user must accept it. |
| Previously connected users lose access | The owner removed the machine from HomeID. | Pair the machine again and send new sharing invitations. |
| HomeID app stops working | Temporary app or smartphone issue. | Restart the app or phone, update HomeID, clear the app cache, or reinstall the app. |
Resetting the Wi-Fi Connection
If the machine cannot connect after a network change:
- Open Machine Settings.
- Select Connected Settings.
- Open Wi-Fi.
- Tap Forget Network.
- Open the HomeID app on the smartphone.
- Follow the connection procedure again.
The new network must support 2.4 GHz Wi-Fi.
Replacement Parts and Accessories
Philips maintenance products and replacement components can be obtained through authorized service centers, local retailers, or the official parts website.
| Accessory | Purpose |
| Philips AquaClean water filter | Reduces limescale buildup and filters brewing water. |
| Philips descaling solution | Removes mineral deposits from the water circuit. |
| Philips coffee oil remover tablets | Cleans accumulated coffee oils from the brewing system. |
| LatteGo Pro components | Used for the hot and cold milk preparation systems. |
For the available spare parts and accessories, visit:
Enter the machine’s exact model number to locate compatible replacement parts.
The model number is printed on the data label inside the service door.
Customer Support Information
Philips provides product support, troubleshooting information, instructional videos, and maintenance guidance through HomeID.
| Support Service | Contact |
| Product support | https://www.home.id/support |
| HomeID website and product registration | https://www.home.id |
| Spare parts and accessories | https://www.home-appliances.philips/parts-accessories |
| Philips contact website | https://www.philips.com/contact |
| Mexico customer support number | 0800 837 0900 |
For unresolved error codes or problems that cannot be corrected using the listed troubleshooting steps, contact the Consumer Care Center in the relevant country.
Country-specific warranty contact details are provided in the separate warranty leaflet.
Frequently Asked Questions
How do I set up the Philips Café Aromis 8000 Series for the first time?
Connect the power cord, fill the water tank with fresh cold water, add suitable coffee beans, and switch on the machine. Follow the display instructions, set the water hardness using the supplied test strip, and complete the initial setup. The machine requires approximately five coffees to finish its initial self-adjustment.
How do I connect the Philips Café Aromis 8000 Series to Wi-Fi?
Install the Philips HomeID app, select Add Appliance, choose the coffee machine, and follow the pairing instructions. The machine requires a 2.4 GHz Wi-Fi network; 5 GHz-only connections are not supported.
How often should the AquaClean filter be replaced?
The AquaClean filter should be replaced after approximately 95 liters of water have passed through it, when the machine displays a replacement reminder, or at least every three months. Each new filter must be activated through the maintenance menu.
How do I clean LatteGo Pro?
Run the Clean LatteGo Pro program after each use. For thorough cleaning, remove the milk system, empty the remaining milk, separate the container from its frame, and wash the components under lukewarm running water with washing-up liquid or in a dishwasher.
Why is my Philips Café Aromis 8000 Series not brewing coffee?
Possible causes include an incorrectly prepared AquaClean filter, a blocked coffee funnel, a dirty brew group, an unsuitable grind setting, or limescale buildup. Check the machine’s warning messages or error codes and follow the corresponding troubleshooting instructions.
How do I descale the Philips Café Aromis 8000 Series?
Open Menu, select Maintenance, choose Remove Limescale, and tap Descale. Follow the instructions displayed on the machine. Philips recommends using its descaling solution. Vinegar and descalers containing sulfuric, hydrochloric, sulfamic, or acetic acid must not be used.
What does error code 05 mean on the Philips Café Aromis 8000 Series?
Error code 05 can indicate air in the water circuit or an incorrectly installed or clogged AquaClean filter. Restart the machine, check the filter installation, and follow the appropriate on-screen troubleshooting steps. If the water circuit recovers, dispense two to three cups of hot water as instructed.
How do I reset the Philips Café Aromis 8000 Series to factory settings?
Open Menu, select Machine Settings, then Factory Settings, and tap Reset. Confirm the operation. The machine restores its default settings while retaining statistics. Stored Wi-Fi credentials and HomeID account pairing are deleted, so the machine must be paired again.