
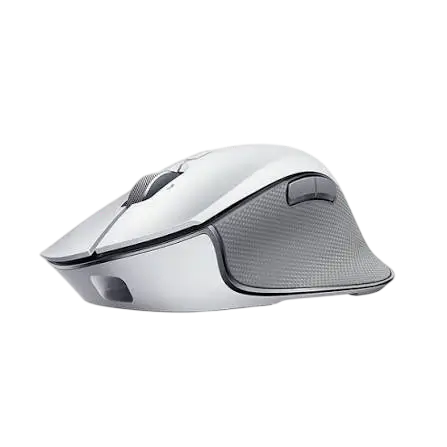
Razer Pro Click Wireless Mouse
The Razer Pro Click is a productivity-focused mouse with a mechanical switch rated for 50 million button life cycles, a tilt-click scroll wheel and eight independently programmable buttons. It connects three ways: through the included 2.4 GHz wireless USB dongle, over Bluetooth with up to three paired Bluetooth devices, or by USB cable, which also charges the battery. A 5G advanced optical sensor delivers up to 16,000 DPI, and five onboard DPI stages can be changed from the mouse or customized in Razer Synapse 3. The ergonomic shape was co-designed with Humanscale.
Controls and Parts
Parts Identification
| Label | Part |
|---|---|
| A | Left mouse button |
| B | Right mouse button |
| C | Scroll wheel |
| D | Left tilt-click |
| E | Right tilt-click |
| F | Cycle DPI stage up button |
| G | Status indicator |
| H | Mouse button 5 |
| I | Mouse button 4 |
| J | Micro-USB port |
| K | Ultraslick mouse feet |
| L | 5G optical sensor |
| M | USB dongle compartment |
| N | Slider switch |
| O | Pairing indicator |
| P | Pair/switch button |
| Q | 2.4GHz Wireless USB dongle |
| R | USB cable |
Slider Switch Positions
The slider switch (N) on the underside has three positions: Bluetooth mode, Power off mode and 2.4GHz mode. Moving the slider is how you turn the mouse on and off and choose its wireless mode.
DPI Stages
The mouse has five DPI stages: 800, 1800 (default), 3200, 5000 and 10000. Press the Cycle DPI stage up button (F) to move through the stages. You can customize the stages using Razer Synapse 3.
Key Specifications
| Specification | Detail |
|---|---|
| Sensor | Razer 5G Advanced Optical Sensor with true 16,000 DPI |
| Tracking | Up to 450 inches per second (IPS) / 40 G acceleration |
| Polling rate | 1000 Hz |
| Switches | Mechanical switch with 50 million button life cycle |
| Scroll wheel | Tilt-click |
| Programmable buttons | 8 independently programmable buttons |
| DPI storage | Onboard, up to 5 DPI stages |
| Multi-host | Connection for up to 4 devices |
| Battery life | Up to 350 hours (Bluetooth); up to 200 hours (2.4 GHz) |
| Connectivity | Wired and wireless |
| Software | Razer Synapse 3 enabled |
| Length | 126.7 mm / 4.68 in |
| Width | 79.7 mm / 2.95 in |
| Height | 45.7 mm / 1.69 in |
| Weight | 106 g / 0.30 lbs (excluding cable) |
What You Need
You need a PC or Mac with a free USB port. The package includes the 2.4GHz wireless USB dongle (stored in the mouse’s dongle compartment) and a USB cable.
Charging and Battery Indicators
Charging the Mouse
Plug the USB cable from your computer’s USB port into the Razer Pro Click. This connection also acts as the wired mode for the mouse.
For best results, fully charge the mouse before using it for the first time. A depleted battery takes approximately 4 hours to charge fully. If the mouse has not been used for an extended period, you may need to recharge it before use.
The mouse needs a USB connection that can supply enough power to charge the battery. Charging can be affected if you connect it to a non-powered USB hub or to the non-powered USB ports found on some keyboards and other peripherals. When in doubt, connect the mouse directly to a USB port on your computer.
Charging Indicator
While the mouse is plugged in, the status indicator shows the current battery level:
| Battery level | Color | Effect |
|---|---|---|
| Below 25% | Red | Breathing |
| 26–50% | Orange | Breathing |
| 51–75% | Yellow | Breathing |
| 76–99% | Green | Breathing |
| 100% | Green | Static |
Low Power Indicator
When battery power falls below 5%, the status indicator blinks red twice in repeated intervals. The sequence repeats until the battery is drained or you connect the mouse to the PC with the charging cable.
Checking Battery Level Without Charging
Move the slider switch from Power off to either Bluetooth or 2.4GHz mode. The status indicator lights up in the color matching the current battery level:
| Battery level | Color |
|---|---|
| Below 25% | Red |
| 26–50% | Orange |
| 51–75% | Yellow |
| 76–100% | Green |
Connecting the Mouse
Connecting in 2.4 GHz Mode
- Remove the compartment cover on the underside of the mouse and pull out the wireless USB dongle.
- Close the compartment cover, then plug the dongle into a USB port on your computer.
- Switch the slider to 2.4 GHz mode. The pairing indicator starts blinking rapidly.
- Wait for the mouse to pair with the dongle automatically. When paired, the pairing indicator turns static white for 3 seconds and then turns off.
Keep the mouse and dongle close together for a faster, more stable connection. After step 4, the mouse is ready to use in 2.4 GHz mode.
Connecting in Bluetooth Mode
- Switch the slider to Bluetooth mode.
- Choose a Bluetooth slot by tapping the pair/switch button. You can pair up to 3 Bluetooth devices.
- Press and hold the pair/switch button for 3 seconds. The pairing indicator blinks twice in repeated intervals to show the mouse is in pairing mode.
- Turn on Bluetooth on your device and select “Razer Pro Click” from the list of devices found. Make sure the device is in pairing mode before you pair.
- Wait for the devices to pair. When paired, the pairing indicator turns static for 3 seconds and then turns off.
The slots are identified by color:
| Slot | Color |
|---|---|
| 1 (default) | Blue |
| 2 | Green |
| 3 | Yellow |
Keep the devices close together for a faster, more stable connection. Once paired, the mouse automatically reconnects to that device whenever it is in Bluetooth mode and the device is within range.
Using Wired Mode
Connect the USB cable between the mouse’s Micro-USB port and your computer’s USB port. This connection charges the mouse and acts as wired mode.
Safety, Care and Comfort
Safety Guidelines
- If you have trouble operating the mouse and troubleshooting does not work, unplug it and contact the Razer hotline or go to support.razer.com.
- Do not take the device apart. Doing so voids your warranty. Do not attempt to operate it under abnormal current loads.
- Keep the device away from liquid, humidity and moisture.
- Operate the device only within 0°C (32°F) to 40°C (104°F). If the temperature goes outside this range, unplug and/or switch off the device and let the temperature stabilize.
Cleaning and Surface Care
The mouse needs minimal maintenance. Once a month, unplug it from the computer and clean it with a soft cloth or cotton swab with a little warm water to prevent dirt buildup. Do not use soap or harsh cleaning agents.
For the best movement and control, Razer recommends a premium Razer mouse mat. The sensor is tuned and optimized for Razer mouse mats, and Razer states it has been tested to track best on them. Some surfaces cause undue wear on the mouse feet, which then need constant care and eventual replacement.
Comfort Guidelines
Long periods of repetitive motion, poor peripheral positioning, incorrect body position and poor habits may be associated with physical discomfort and injury to nerves, tendons and muscles. To reduce the risk:
- Position your keyboard and monitor directly in front of you with the mouse next to the keyboard. Keep your elbows at your sides, not too far away, and the keyboard within easy reach.
- Adjust your chair and table height so the keyboard and mouse are at or below elbow height.
- Keep your feet well supported, your posture straight and your shoulders relaxed.
- During gameplay, relax your wrist and keep it straight. For repeated tasks, avoid bending, extending or twisting your hands for long periods.
- Do not rest your wrists on hard surfaces for long periods. Use a wrist rest to support your wrist while gaming.
- Customize the keys on your keyboard to suit your style of gaming and minimize repetitive or awkward motions.
- Do not sit in one position all day. Get up, step away from your desk and stretch your arms, shoulders, neck and legs.
If you feel pain, numbness or tingling in your hands, wrists, elbows, shoulders, neck or back, consult a qualified medical doctor immediately.
Warranty, Registration and Support
The Razer Pro Click comes with a 2-year limited warranty. Registering at razerid.razer.com unlocks exclusive Razer benefits. The serial number is on the underside of the mouse, in the location marked in the guide’s illustration. For questions, contact the Razer Support Team at support.razer.com. The current Limited Product Warranty terms are at razer.com/warranty.
Frequently Asked Questions
How do I connect the Razer Pro Click with the 2.4 GHz dongle?
Open the compartment cover on the underside, take out the wireless USB dongle, close the cover, and plug the dongle into a USB port on your computer. Then slide the switch to 2.4 GHz mode. The pairing indicator blinks rapidly while the mouse pairs with the dongle automatically, then turns static white for 3 seconds and goes out. Keeping the mouse close to the dongle helps the connection be faster and more stable.
How do I pair the Razer Pro Click over Bluetooth?
Move the slider to Bluetooth mode, tap the pair/switch button to choose a slot, then press and hold that button for 3 seconds. When the pairing indicator blinks twice in repeated intervals, the mouse is in pairing mode. Turn on Bluetooth on your computer or other device, make sure it is searching, and choose “Razer Pro Click” from the list. The pairing indicator turns static for 3 seconds when pairing succeeds. After that, the mouse reconnects on its own whenever it is in Bluetooth mode and the device is in range.
How many devices can the Razer Pro Click connect to?
The mouse supports multi-host connection for up to 4 devices. You can pair up to 3 Bluetooth devices, one in each of three Bluetooth slots (slot 1 blue, slot 2 green, slot 3 yellow). Tap the pair/switch button while in Bluetooth mode to select a slot. The 2.4 GHz dongle connects separately through the slider’s 2.4GHz position.
How do I check the Razer Pro Click battery level?
Move the slider from Power off to Bluetooth or 2.4GHz mode and look at the status indicator. Red means below 25%, orange 26–50%, yellow 51–75% and green 76–100%. While the mouse is plugged in, the status indicator shows the level continuously: breathing red, orange, yellow or green as the charge rises, and a static green at 100%.
What does it mean when the Razer Pro Click blinks red twice?
The battery is below 5%. The status indicator blinks red twice at repeated intervals until the battery is fully drained or you connect the mouse to the PC with the charging cable. Plug it into your computer’s USB port to charge it.
How long does the Razer Pro Click take to charge?
A depleted battery fully charges in approximately 4 hours. Fully charge the mouse before first use for best results, and recharge it before use if it has been idle for an extended period. Connect it directly to a USB port on your computer, because a non-powered USB hub or the non-powered USB ports on some keyboards and other peripherals can affect charging.
Can I use the Razer Pro Click while it is plugged in?
Yes. Connecting the USB cable between the Micro-USB port and your computer charges the mouse and also acts as its wired mode, so you can keep working while it charges.
How do I change the DPI on the Razer Pro Click?
Press the Cycle DPI stage up button (F), located near the scroll wheel, to move through the DPI stages: 800, 1800 (default), 3200, 5000 and 10000. The stages can also be customized in Razer Synapse 3, and the mouse stores up to 5 DPI stages onboard.
Where is the wireless dongle stored on the Razer Pro Click?
The dongle is kept in the USB dongle compartment on the underside of the mouse. Remove the compartment cover to pull it out, and close the cover again once the dongle is plugged into your computer.
How do I clean the Razer Pro Click?
Once a month, unplug the mouse from the computer and wipe it with a soft cloth or cotton swab with a little warm water to prevent dirt buildup. Do not use soap or harsh cleaning agents. Also keep the mouse away from liquid, humidity and moisture.
What temperature range can the Razer Pro Click be used in?
Use it only between 0°C (32°F) and 40°C (104°F). If the temperature goes beyond that range, unplug and/or switch off the mouse and let the temperature stabilize before using it again.