| Field | Details |
| Document Title | Make & Take Electric Skillet Instruction Manual and Recipe Guide |
| Document Type | Instruction Manual and Recipe Guide |
| Brand Name | BELLA |
| Product Name | Make & Take Electric Skillet |
| Model Number(s) | 35256, 35257, 35258, 35259, 35260 |
| PDF File Size | 4 MB |
| Number of Pages | 20 |
| Languages | English, Spanish |
BELLA Make & Take Electric Skillet 35256
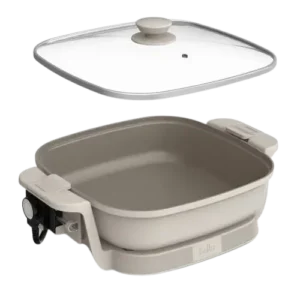
The BELLA Make & Take Electric Skillet is a countertop cooking appliance designed for frying, sautéing, pan-broiling, braising, simmering, steaming, and keeping prepared food warm. It features a ceramic nonstick cooking surface, adjustable temperature control, a tempered glass lid, and cool-touch side handles.
The electric skillet includes a removable temperature control probe with an indicator light that shows when the selected cooking temperature has been reached. The lid has locking clamps, allowing the appliance to be stored horizontally or vertically when clean and cool.
Cooking temperatures can be adjusted up to 400°F for preparing foods such as bacon, eggs, chicken, fish, steaks, vegetables, pancakes, and grilled sandwiches.
These instructions cover the skillet’s parts, first-time setup, temperature control, cooking methods, recommended cooking times, ceramic nonstick cleaning, storage, safety precautions, troubleshooting, and warranty information.
Product Overview and Technical Specifications
The BELLA Make & Take Electric Skillet is intended for indoor household use. It operates from a standard 120 V AC electrical outlet and uses a detachable temperature control probe to regulate cooking heat.
The skillet has a ceramic nonstick cooking surface and a removable tempered glass lid. Its side handles include locking clamps for securing the lid during storage.
| Specification | Details |
| Brand | BELLA |
| Product Name | Make & Take Electric Skillet |
| Product Type | Electric skillet |
| Electrical Supply | 120 V AC |
| Power Plug | Polarized plug |
| Temperature Control | Adjustable rotary dial |
| Maximum Listed Cooking Temperature | 400°F |
| Warming Function | WARMING setting |
| Temperature Indicator | Indicator light on the temperature control probe |
| Cooking Surface | Ceramic nonstick coating |
| Lid | Tempered glass |
| Handles | Cool-touch side handles |
| Lid Locking Mechanism | Integrated side clamps |
| Temperature Probe | Removable |
| Cord Storage | Built-in cord storage |
| Probe Storage | Integrated temperature probe storage |
| Storage Position | Horizontal or vertical |
| Maximum Oil Quantity | 1 cup |
| Intended Use | Household use only |
Main Features
The electric skillet includes the following functions and components:
- Adjustable temperature control: Selects the cooking temperature required for different foods.
- Ceramic nonstick cooking surface: Helps reduce food sticking during cooking and supports easier cleaning.
- Removable temperature probe: Controls heating and can be detached after the appliance cools.
- Temperature indicator light: Shows when the skillet is heating and when the selected temperature has been reached.
- Tempered glass lid: Covers food during braising, simmering, steaming, and other suitable cooking methods.
- Cool-touch handles: Provide designated gripping points when handling the skillet.
- Lid locking clamps: Secure the glass lid during storage.
- Compact storage design: Allows the skillet to be stored horizontally or vertically.
- Warming function: Keeps prepared food warm after cooking.
Parts and Components
The BELLA Make & Take Electric Skillet includes seven main components identified in the product diagram.
| Part | Description and Function |
| Tempered Glass Lid | Covers the skillet during cooking and helps retain heat and moisture. |
| Cool-Touch Handles | Side handles used for handling and moving the appliance. |
| Removable Temperature Probe | Controls cooking temperature and contains the heating indicator light. |
| Lid Locking Clamps | Secure the glass lid when preparing the skillet for storage. |
| Temperature Probe Socket | Connection point for the removable temperature control probe. |
| Cord Storage | Provides space to wrap the power cord during storage. |
| Temperature Probe Storage | Holds the removable temperature probe when the skillet is stored. |
Tempered Glass Lid
The tempered glass lid covers the cooking surface and helps retain heat and moisture.
It is especially useful when braising, simmering, or steaming food.
Hot water condensation may collect underneath the lid during cooking.
Warning: Always use oven mitts or hot pads when lifting the lid. Tilt it away from the hands and face to prevent burns from escaping steam or hot condensation.
The glass lid is also used as part of the skillet’s compact storage arrangement.
Cool-Touch Side Handles
The skillet has side handles designed for handling the appliance.
These handles are also used when moving or storing the skillet.
Important: Never lift or move the electric skillet using the glass lid handle. Always use the handles on the skillet base.
Lid Locking Clamps
The locking clamps are located on both sides of the cool-touch handles.
They secure the glass lid in place during storage.
The clamps must be held in the OPEN position when installing or removing the glass lid.
Temperature Probe Socket
The temperature probe socket provides the connection between the removable control probe and the electric skillet.
The probe must be securely attached before the power cord is connected to the wall outlet.
Cord and Probe Storage
The electric skillet includes built-in storage for the power cord and removable temperature probe.
These components allow the appliance to be stored in a compact position after cleaning and cooling.
Temperature Control Probe and Indicator Light
The removable temperature control probe regulates the skillet’s cooking temperature.
It has a rotary control dial and an indicator light.
How the Temperature Control Works
- Turn the temperature control dial to the temperature required by the recipe.
- The indicator light illuminates when the dial is moved from OFF to a cooking temperature.
- The electric skillet begins heating.
- When the selected temperature is reached, the indicator light turns off.
- During cooking, the light may turn on and off as the skillet maintains the selected temperature.
The repeated illumination and switching off of the indicator light is normal during operation.
Temperature Control Guide
| Control or Indicator | Function |
| Temperature Control Dial | Selects the required cooking temperature. |
| OFF | Turns off the heating function. |
| WARMING | Maintains food at a warming setting after cooking. |
| Indicator Light ON | The skillet is heating toward the selected temperature. |
| Indicator Light OFF | The selected temperature has been reached. |
| Indicator Light Cycling | The skillet is maintaining the selected cooking temperature. |
Temperature Probe Handling
The temperature control probe must be handled carefully.
Dropping or striking the probe may affect its calibration and cause inaccurate temperature settings.
- Use only the temperature probe supplied with the skillet.
- Allow the skillet to cool before removing the probe.
- Do not immerse the probe in water.
- Clean it using a soft, damp cloth.
- Dry it thoroughly before reconnecting.
Warning: Using a different temperature control probe may cause fire, electrical shock, or personal injury.
Important Safety Instructions
The BELLA Make & Take Electric Skillet generates high temperatures and escaping steam during operation. The cooking surface and metal components can remain hot after the appliance has been turned off.
Proper precautions are necessary to prevent burns, electrical shock, fire, and damage to the appliance.
Electrical Safety
- Connect the electric skillet only to a 120 V AC electrical wall outlet.
- Never immerse the power cord, plug, or temperature control probe in water or another liquid.
- Do not operate the appliance with a damaged cord or plug.
- Do not use the skillet if it malfunctions, falls, or becomes damaged.
- Turn the temperature control dial to OFF before disconnecting the appliance.
- Always unplug the skillet when it is not in use.
- Disconnect the appliance before cleaning.
- Allow the skillet to cool before removing or installing parts.
- Keep the power cord away from hot surfaces.
- Do not allow the cord to hang over the edge of a table or countertop.
- Do not place the appliance on or near a hot gas burner, electric burner, or inside a heated oven.
- Do not use accessories that are not recommended by the manufacturer.
Correct Power Connection
The temperature control probe must always be connected to the electric skillet before the power cord is plugged into the wall outlet.
To connect the appliance:
- Turn the temperature control dial to OFF.
- Insert the temperature control probe securely into its socket.
- Connect the power cord to a 120 V AC electrical outlet.
To disconnect:
- Turn the temperature control dial to OFF.
- Remove the plug from the electrical outlet.
- Allow the skillet to cool.
- Remove the temperature control probe.
Never pull or yank the power cord to disconnect the appliance.
Hot Surface and Steam Safety
Warning: The electric skillet becomes hot during cooking and retains heat after being turned off.
- Avoid touching hot cooking surfaces.
- Use the designated handles and temperature control knob.
- Use oven mitts when handling hot materials.
- Allow metal components to cool before cleaning.
- Do not place objects on top of the appliance while it is operating or remains hot.
- Use extreme caution when moving an appliance containing hot oil or other hot liquids.
- Never leave the skillet operating unattended.
Safe Lid Handling
Hot steam and condensation may collect beneath the glass lid during cooking.
To remove the lid safely:
- Use oven mitts or hot pads.
- Hold the lid handle securely.
- Carefully lift the lid.
- Tilt it away from the hands and face.
- Allow hot condensation to drip away from the body and back toward the skillet.
Keep the lid locking clamps in the OPEN position when placing or removing the lid.
Never use the lid handle to lift the entire skillet.
Cooking Oil Safety
The electric skillet is intended for shallow frying and other cooking methods, not deep frying.
Important: Never use more than 1 cup of oil.
When heating oil:
- Keep the lid removed.
- Do not use aerosol cooking sprays.
- Avoid leaving hot oil unattended.
- If the oil begins smoking, immediately turn the temperature control to OFF and allow the skillet to cool.
Vegetable oil or peanut oil is recommended for pan-frying.
Butter and olive oil should be used only for sautéing at lower temperatures.
Safe Placement and Ventilation
Place the electric skillet on a stable, level surface.
Keep the sides and back of the appliance at least 4 inches away from surrounding walls, cabinets, and objects.
Some countertop materials may be damaged by prolonged heat exposure.
A suitable hot pad, trivet, or nonplastic protective mat should be placed underneath the skillet.
Countertop Protection
The manual warns that plasticizers may affect certain finished countertop or furniture surfaces.
Using nonplastic coasters or place mats between the appliance and the countertop can help prevent:
- Darkening of the surface finish.
- Permanent marks.
- Stains or blemishes.
Child Safety
Children must be supervised to prevent them from playing with the appliance.
Close supervision is required when the electric skillet is used near children.
Persons with reduced physical, sensory, or mental capabilities, or insufficient experience, require suitable supervision or instruction from a responsible person.
Polarized Plug
The electric skillet has a polarized electrical plug with one blade wider than the other.
This plug fits into a polarized outlet in only one direction.
If the plug does not fit:
- Remove it from the outlet.
- Reverse its orientation.
- Try inserting it again.
- If it still does not fit, contact a qualified electrician.
Never modify the polarized plug.
Extension Cord Safety
The appliance is supplied with a short power cord to reduce the risk of entanglement and tripping.
If a longer cord or extension cord is used:
- Its electrical rating must be at least equal to the appliance’s rating.
- If a grounded appliance is involved, the extension cord must be a grounding-type three-wire cord.
- The cord must be arranged so children cannot pull it and people cannot trip over it.
The skillet should be operated on a separate electrical circuit when possible because an overloaded circuit may affect performance.
Emergency Shutdown
If the electric skillet begins malfunctioning:
- Turn the temperature control dial to OFF.
- Immediately unplug the power cord.
- Allow the appliance and probe to cool before handling.
- Remove the temperature control probe.
- Stop using the appliance.
Do not attempt to repair a malfunctioning electric skillet.
Repairs requiring disassembly must be performed by a qualified appliance repair technician.
Before First Use
The BELLA Make & Take Electric Skillet requires cleaning and an initial heating cycle before food is prepared.
First-Time Preparation
- Carefully remove the electric skillet from its packaging.
- Remove all packaging materials.
- Wash the skillet using mild dishwashing soap.
- Wipe the cleaned surfaces.
- Allow the appliance to dry thoroughly.
- Keep the lid locking clamps in the OPEN position when removing or installing the glass lid.
The electric skillet is not dishwasher-safe.
Initial Heating Procedure
Before cooking for the first time:
- Place the clean, dry skillet on a stable, heat-resistant surface.
- Connect the temperature control probe to the skillet.
- Plug the cord into a 120 V AC wall outlet.
- Turn the temperature control dial to 400°F.
- Heat the empty skillet without its lid for approximately 5 minutes.
- Turn the temperature control dial to OFF.
- Allow the skillet to cool for approximately 15 minutes.
This initial heating process prepares the ceramic nonstick coating for use.
A slight odor may occur during the first heating cycle. The manual describes this as normal and indicates that it should disappear quickly.
How to Use the BELLA Make & Take Electric Skillet
The electric skillet is operated using the removable temperature control probe.
The cooking temperature can be adjusted according to the food being prepared.
Step-by-Step Operating Instructions
- Position the skillet. Place it on a level, heat-resistant countertop or table.
- Allow clearance. Keep the back and sides at least 4 inches from surrounding objects.
- Set the control to OFF. Make sure the temperature control dial is in the OFF position.
- Attach the temperature probe. Insert the supplied probe securely into the skillet’s probe socket.
- Connect the power. Plug the cord into a 120 V AC wall outlet.
- Select the temperature. Turn the dial to the cooking temperature required by the recipe.
- Preheat the skillet. Allow approximately 5 minutes for the appliance to heat.
- Check the indicator light. The light turns off when the selected temperature is reached.
- Add the food. Place ingredients into the skillet.
- Cook as directed. Adjust the temperature when required.
- Turn off the skillet. When cooking is finished, turn the control dial to OFF.
- Disconnect the power. Remove the plug from the wall outlet.
- Allow cooling. Wait until the skillet has cooled completely.
- Remove the probe. Disconnect the temperature control probe before cleaning.
How to Preheat the Skillet
The manual recommends preheating the electric skillet for approximately 5 minutes before cooking.
- Connect the temperature control probe.
- Select the desired cooking temperature.
- Wait while the indicator light is illuminated.
- Begin cooking when the light turns off.
During operation, the indicator light may repeatedly turn on and off as the appliance maintains the selected temperature.
Adjusting the Cooking Temperature
The temperature can be changed using the rotary dial.
The cooking temperature should be selected according to the food and cooking method.
The temperature timetable provides recommendations for different foods.
Adding Liquids During Cooking
Liquids such as water or broth may be added during cooking when required by the recipe.
When preparing braised, simmered, or steamed foods, check the liquid level regularly.
Important: Never allow the skillet to boil dry.
How to Turn Off the Skillet
- Turn the temperature control dial to OFF.
- Check that the indicator light is off.
- Unplug the power cord.
- Allow the skillet to cool completely.
- Remove the temperature control probe.
Electric Skillet Cooking Methods
The BELLA Make & Take Electric Skillet supports several cooking techniques.
These include frying, sautéing, pan-broiling, braising, simmering, steaming, and warming.
Frying and Sautéing Instructions
The electric skillet can pan-fry or sauté food using a small quantity of cooking fat.
How to Fry or Sauté
- Add a suitable quantity of oil, shortening, butter, or margarine to the skillet.
- Preheat the appliance to approximately 350°F.
- Leave the glass lid off while heating oil.
- Add the prepared food.
- Cook according to the recipe.
- Turn or stir the food as required.
- Adjust the cooking temperature when necessary.
- Turn the dial to OFF when cooking is finished.
The amount of cooking fat depends on the food and recipe.
Frying Oil Requirements
For pan-frying:
- Use vegetable oil or peanut oil.
- Do not use more than 1 cup of oil.
- Do not use aerosol cooking sprays.
- Keep the lid removed while heating oil.
Butter and olive oil should be used only for sautéing at lower temperatures.
Warning: If the oil begins smoking, immediately turn the temperature control to OFF and allow the skillet to cool.
Pan-Broiling Instructions
Pan-broiling uses high heat to brown suitable cuts of meat in an uncovered skillet.
The manual recommends tender cuts of beef that are not excessively thick, such as filet mignon or top sirloin steak.
How to Pan-Broil Meat
- Select a suitable tender cut of beef.
- Preheat the electric skillet to 400°F.
- Leave the skillet uncovered.
- Do not add oil unless required by the recipe.
- If fat is needed, use only a small quantity of oil or shortening.
- Place the meat in the hot skillet.
- Brown the meat, turning it frequently.
- Remove excess accumulated fat during cooking.
- Continue according to the recipe and check the food’s doneness.
If butter is used for pan-broiling, it should be combined with oil to help prevent burning.
Braising Instructions
Braising combines initial browning with cooking in liquid at a lower temperature.
How to Braise Food
- Add a small amount of cooking fat to the electric skillet.
- Preheat the appliance to 400°F.
- Add the food and sear it until browned on all sides.
- Add the amount of liquid specified by the recipe.
- Cover the skillet with the tempered glass lid.
- Reduce the temperature toward 300°F.
- Lower the setting until the indicator light turns off at the simmer point.
- Continue cooking for the required time or until the food is tender.
- Check the liquid level during cooking.
- Add more liquid when necessary.
Important: Do not allow the skillet to boil dry.
Simmering Instructions
Simmering cooks food gently in liquid or sauce.
How to Simmer Food
- Add oil, shortening, butter, or margarine as required.
- Preheat the skillet to the temperature needed by the recipe.
- Brown the food if necessary.
- Add the required liquid or sauce.
- Set the temperature control between 300°F and 350°F to bring the liquid to a boil.
- Lower the dial until the indicator light turns off.
- Cover the skillet.
- Continue simmering for the time required by the recipe.
- Check periodically and add liquid if needed.
Do not allow the cooking liquid to evaporate completely.
Steaming Instructions
The electric skillet can steam vegetables and other suitable foods using a small quantity of water.
How to Steam Food
- Add a small amount of water to the bottom of the skillet.
- Place the vegetables or other prepared food inside.
- Cover the skillet with the glass lid.
- Set the temperature control to 300°F.
- Allow the food to steam until cooked.
- Check the water level frequently.
- Add more water as necessary.
Warning: Steam escaping from beneath the lid can cause burns.
Use oven mitts when removing the lid, and tilt it away from the hands and face.
Never allow the skillet to boil dry.
Warming Function
The WARMING setting is used after cooking to keep prepared food warm.
How to Use WARMING
- Finish cooking the food.
- Turn the temperature control dial down to WARMING.
- Leave the food in the skillet.
- Turn or stir the food occasionally.
For food that has already been cooked and cooled, the manual indicates that it may first need to be reheated before the dial is reduced to WARMING.
Electric Skillet Cooking Temperature and Time Chart
The following cooking temperatures and estimated times are provided in the instruction manual.
Cooking times vary depending on the food’s thickness, quantity, and preparation method. Use the appropriate cooking temperature and check doneness during cooking.
Frying and General Cooking Temperature Chart
| Food | Temperature | Approximate Cooking Time |
| Bacon | 325–350°F | 5–8 min |
| Chicken | 325–350°F | 25–40 min |
| Fried Eggs | 300°F | 3–5 min |
| Scrambled Eggs | 325°F | 2–3 min |
| Fish | 325–375°F | 5–10 min |
| French Toast | 300–325°F | 4–6 min |
| Ham, ½-inch Thick | 325–350°F | 10–12 min |
| Ham, ¾-inch Thick | 325–350°F | 14–16 min |
| Hamburgers, ½-inch Thick | 325–375°F | 8–12 min |
| Liver | 325–350°F | 5–10 min |
| Minute Steak | 375–400°F | 4–5 min |
| Pork Chops, ½-inch Thick | 325–375°F | 15–20 min |
| Pork Chops, ¾-inch Thick | 325–375°F | 20–25 min |
| Cottage-Fried Potatoes | 300–325°F | 10–12 min |
| Link Sausage | 300–325°F | 20–30 min |
| Precooked Sausage | 325–350°F | 10–12 min |
| Grilled Sandwiches | 300–325°F | 5–10 min |
Beef Steak Cooking Chart
The manual provides the following approximate cooking times for beef steaks of different thicknesses.
| Steak Thickness | Doneness | Temperature | Approximate Time |
| 1 inch | Rare | 350–400°F | 6–7 min |
| 1 inch | Medium | 350–400°F | 10–12 min |
| 1½ inches | Rare | 350–400°F | 8–10 min |
| 1½ inches | Medium | 350–400°F | 18–20 min |
These times are estimates from the cooking chart. Use a food thermometer to verify the internal temperature rather than relying only on cooking time or appearance.
Braising, Roasting, and Stewing Chart
| Cooking Method | Temperature | Approximate Cooking Time |
| Braising and Roasting — Browning | 325–400°F | 5–10 min |
| Roasting on a Rack | 325–350°F | 60–90 min |
| Stewing — Browning | 325–400°F | 10–15 min |
| Stewing | 200–225°F | 30–90 min |
| Casserole Dishes | WARM–225°F | 30–60 min |
Additional liquid may be added during cooking when necessary to maintain the desired consistency.
Baking and Warming Chart
| Food or Function | Temperature | Approximate Time |
| Pancakes | 350–400°F | 2–3 min |
| Holding Temperature After Cooking | WARM | As directed by the recipe |
Food Internal Temperature Guidelines
The instruction manual includes internal cooking temperature recommendations for meat and poultry.
| Food Category | Internal Temperature Listed in Manual |
| Ground Turkey and Chicken | 165°F / 74°C |
| Ground Beef, Veal, Lamb, and Pork | 160°F / 71°C |
| Whole Chicken and Turkey | 180°F / 82°C |
| Chicken or Turkey Breast | 170°F / 77°C |
| Goose and Duck | 180°F / 82°C |
| Fresh Beef, Veal, and Lamb | At least 145°F / 63°C |
| Fresh Pork | At least 160°F / 71°C |
| Reheated Meat and Poultry | 165°F / 74°C |
These are the temperatures printed in the supplied manual. Cooking-time estimates do not replace checking food with a thermometer.
Ceramic Nonstick Cooking Surface Care
The BELLA Make & Take Electric Skillet has a ceramic nonstick cooking surface that requires careful cleaning and handling.
Protecting the Ceramic Coating
To help maintain the cooking surface:
- Do not use aerosol cooking sprays.
- Avoid steel wool.
- Do not use metal scouring pads.
- Do not use abrasive cleaning materials.
- Avoid aggressive scrubbing.
- Clean hardened food residue gently.
- Allow the skillet to cool before cleaning.
Cooking sprays can leave buildup on the surface and reduce its nonstick performance.
Preventing Scratches
Use soft cleaning cloths and suitable plastic cleaning pads when removing food residue.
Do not scrub the ceramic coating aggressively.
Scratches may damage the finish and affect the surface’s condition.
Cleaning and Maintenance Instructions
The electric skillet requires regular cleaning of its cooking surface, glass lid, exterior, and removable temperature control probe.
Always disconnect the appliance and allow it to cool thoroughly before cleaning.
How to Clean the Electric Skillet
- Turn the temperature control dial to OFF.
- Unplug the power cord from the electrical outlet.
- Allow the skillet to cool completely.
- Remove the temperature control probe.
- Wash the skillet body by hand using warm, soapy water.
- Clean the ceramic nonstick surface with a soft cloth or sponge.
- Rinse the cleaned surfaces carefully.
- Dry the skillet thoroughly before its next use.
Important: The electric skillet is not dishwasher-safe.
Do not immerse the electrical cord, plug, or temperature control probe in water.
How to Clean the Temperature Control Probe
The removable temperature probe must not be submerged in water.
- Disconnect the power cord.
- Allow the probe and skillet to cool.
- Remove the temperature control probe.
- Wipe the probe and its housing with a soft, damp cloth.
- Dry the probe completely.
- Store it in the designated storage position when not in use.
How to Clean the Glass Lid
The tempered glass lid is top-rack dishwasher-safe.
It can also be cleaned by hand.
- Remove the glass lid after the appliance has cooled.
- Wash it in warm, soapy water.
- Use a sponge or soft cloth to remove residue.
- Rinse thoroughly.
- Dry completely before storage.
The glass lid is the only component identified as top-rack dishwasher-safe.
Removing Stubborn Food Residue
If food particles remain attached to the cooking surface:
- Allow the skillet to cool.
- Wash with warm, soapy water.
- Use a suitable plastic cleaning pad to loosen stubborn residue.
- Avoid hard scrubbing.
- Rinse and dry thoroughly.
Do not use metal scouring pads, steel wool, or abrasive cleaning products.
How to Remove Stains From the Ceramic Nonstick Coating
Stains may develop on the ceramic cooking surface after regular use.
The manual provides a baking soda cleaning procedure.
Baking Soda Stain Removal Method
- Identify the stained area on the ceramic cooking surface.
- Sprinkle a small amount of baking soda over the stain.
- Add a little water to create a paste-like consistency.
- Allow the mixture to remain on the stain for several minutes, but no longer than one hour.
- Gently rub the area using a soft, damp cloth.
- If necessary, lightly scrub using a suitable plastic cleaning pad.
- Wipe the surface clean.
- Dry thoroughly.
- Repeat the procedure once if the stain remains.
Caution: Do not scrub vigorously or use metal scouring pads.
The manual states that staining does not affect the cooking performance or nonstick properties of the ceramic coating.
Routine Maintenance
The electric skillet requires little maintenance beyond normal cleaning and careful handling.
| Maintenance Task | Instructions |
| Ceramic Cooking Surface | Clean after use with warm, soapy water and a soft cloth or sponge. |
| Tempered Glass Lid | Wash by hand or in the top rack of a dishwasher. |
| Temperature Control Probe | Wipe with a damp cloth and dry completely. |
| Probe Connection | Attach the supplied probe securely before connecting power. |
| Power Cord | Avoid excessive pulling, tight wrapping, or stress near the connection. |
| Lid Locking Clamps | Keep open when placing or removing the lid. |
| Ceramic Stains | Use the baking soda cleaning procedure when necessary. |
| Internal Repairs | Refer to a qualified appliance repair technician. |
The electric skillet contains no user-serviceable internal components.
Any servicing requiring disassembly beyond routine cleaning must be performed by a qualified appliance repair technician.
Troubleshooting Guide
The following table covers common operating conditions and corrective actions supported by the electric skillet’s instructions.
| Problem or Situation | Possible Cause or Explanation | Recommended Action |
| Skillet does not heat as expected | The temperature probe may not be securely attached, or the electrical circuit may be overloaded. | Check the probe connection and use a separate electrical circuit when possible. |
| Indicator light turns off during preheating | The selected temperature has been reached. | Begin cooking according to the recipe. |
| Indicator light repeatedly turns on and off | The skillet is maintaining the selected temperature. | This is normal during cooking. |
| Cooking temperature appears inaccurate | The probe may have been dropped or struck, affecting its calibration. | Discontinue use of a damaged or malfunctioning probe and seek authorized service. |
| Oil begins to smoke | The cooking temperature may be too high for the selected oil or fat. | Turn the control to OFF immediately and allow the skillet to cool. |
| Food sticks to the ceramic coating | Cooking spray buildup or residue may affect nonstick performance. | Clean the cooking surface according to the ceramic coating care instructions. |
| Ceramic surface becomes stained | Stains may develop during normal cooking. | Use the baking soda stain removal procedure. |
| Hardened food remains on the skillet | Food residue has adhered to the surface. | Clean gently with warm, soapy water and a suitable plastic cleaning pad. |
| Appliance malfunctions during operation | An appliance fault has occurred. | Turn OFF, unplug immediately, allow cooling, and discontinue use. Do not attempt repairs. |
Electric Skillet Not Heating
If the skillet does not heat as expected:
- Make sure the temperature control dial is turned to OFF.
- Disconnect the power cord before checking connections.
- Check that the supplied temperature control probe is correctly inserted into the probe socket.
- Confirm that the power cord is connected to the appropriate 120 V AC outlet.
- Select the required cooking temperature.
- Check whether the probe’s indicator light illuminates.
If the skillet continues to malfunction, discontinue use and contact authorized service personnel.
Temperature Indicator Light Goes On and Off
The indicator light switches on when the skillet is heating.
It switches off when the selected temperature is reached.
During cooking, the light may cycle on and off as the appliance maintains its temperature.
This is normal operation.
Electric Skillet Temperature Is Inaccurate
The removable temperature control probe regulates the cooking temperature.
Dropping or striking the probe may affect its calibration.
The probe should be handled carefully and protected from impact.
Do not attempt to repair a damaged or malfunctioning temperature control probe.
Oil Smoking During Cooking
If cooking oil begins smoking:
- Immediately turn the temperature control dial to OFF.
- Stop the cooking process.
- Allow the skillet and oil to cool.
The manual recommends vegetable or peanut oil for pan-frying and lower temperature settings when sautéing with butter or olive oil.
Food Sticking to the Ceramic Cooking Surface
Cooking spray residue may reduce the ceramic nonstick surface’s performance.
Avoid aerosol cooking sprays.
Clean the skillet using warm, soapy water and a soft cloth or sponge.
For stains or stubborn residue, follow the ceramic coating cleaning instructions.
When to Contact Customer Service
If the skillet malfunctions or becomes damaged:
- Turn the control dial to OFF.
- Immediately disconnect the power cord.
- Allow the appliance to cool.
- Remove the temperature probe after cooling.
- Stop using the skillet.
- Contact Customer Service or an authorized repair facility.
Never attempt internal electrical repairs.
Storage Instructions
The BELLA Make & Take Electric Skillet includes locking clamps and dedicated storage areas for the removable temperature probe and power cord.
The appliance can be stored horizontally or vertically.
How to Store the Electric Skillet
- Turn the temperature control dial to OFF.
- Unplug the appliance from the electrical outlet.
- Allow the skillet to cool completely.
- Clean the appliance thoroughly.
- Dry all parts.
- Place the tempered glass lid onto the skillet rim with the lid knob positioned downward, as shown in the storage instructions.
- Slide the locking clamps on both sides of the cool-touch handles to secure the lid.
- Attach the cooled temperature control probe to its designated storage position on the side.
- Wind the power cord around the built-in cord storage area.
- Store the skillet horizontally or vertically in a clean, dry place.
Vertical Storage
The skillet’s storage design allows it to stand vertically when the lid and accessories are properly secured.
Before positioning the appliance vertically:
- Make sure the lid is secured by the locking clamps.
- Check that the temperature probe is stored correctly.
- Make sure the power cord is organized.
- Confirm that the appliance is completely cool and dry.
Warning: Do not lift or move the skillet using the glass lid handle. Always use the handles on the skillet base.
Power Cord Storage Precautions
Never wrap the power cord tightly around the appliance.
Avoid placing tension on the cord, particularly where it enters the appliance or temperature probe assembly.
Excessive stress can cause the cord to fray or break.
Unwind the power cord completely from its storage position before the next use.
Warranty Information
The BELLA Make & Take Electric Skillet includes a limited two-year warranty provided by SENSIO Inc.
The warranty begins on the date of purchase and applies only to the original retail purchaser.
Limited Warranty Coverage
| Warranty Detail | Coverage |
| Warranty Provider | SENSIO Inc. |
| Mechanical Defects | 2 years from the purchase date |
| Non-Mechanical Parts | 90 days |
| Warranty Start Date | Original retail purchase date |
| Eligible Purchaser | Original retail purchaser |
| Transferability | Non-transferable |
| Proof of Purchase | Original sales receipt required |
| Available Remedies | Repair, replacement, or refund at SENSIO Inc.’s discretion |
The two-year warranty covers mechanical defects in materials and workmanship.
Non-mechanical parts are covered for 90 days.
During the applicable warranty period, SENSIO Inc. may repair or replace a defective appliance or issue a refund.
Warranty Exclusions
The limited warranty does not cover normal wear or damage caused by:
- Negligent use.
- Incorrect electrical voltage or current.
- Improper routine maintenance.
- Operation contrary to the instructions.
- Unauthorized disassembly.
- Repairs or modifications performed by anyone other than qualified SENSIO Inc. personnel.
- Natural disasters, including fires, floods, hurricanes, and tornadoes.
The warranty also includes limitations concerning incidental and consequential damages and implied warranties.
Certain exclusions or limitations may not apply in every state, province, or jurisdiction. Specific legal rights may vary.
How to Request Warranty Service
- Contact Customer Service at 1-866-832-4843.
- Describe the problem with the electric skillet.
- Follow the assistance provided by the customer service representative.
- If the problem cannot be resolved by telephone, obtain a case number and return instructions.
- Attach a tag to the product containing the purchaser’s name, address, daytime telephone number, case number, and description of the problem.
- Include a copy of the original sales receipt.
- Carefully package the appliance with the required documentation.
- Return it according to the supplied instructions, with shipping and insurance prepaid.
SENSIO Inc. does not accept responsibility or liability for the returned product while it is in transit to its customer service center.
Customer Support and Contact Information
BELLA provides customer service for product questions, operating problems, and warranty assistance.
| Contact Type | Details |
| Brand | BELLA |
| Warranty Provider | SENSIO Inc. |
| Company | SENSIO Inc. dba Made by Gather |
| Customer Service Phone | 1-866-832-4843 |
| Customer Service Email | help@bellahousewares.com |
| Website | https://bellakitchenware.com |
| Company Location | New York, NY 10016, USA |
Product Registration
The instruction manual provides a product registration option through the BELLA website.
Registration can be accessed at https://bellakitchenware.com.
Keep the original sales receipt because proof of purchase is required for warranty validation.
Frequently Asked Questions
How do you use the BELLA Make & Take Electric Skillet?
Place the skillet on a flat, heat-resistant surface with at least 4 inches of clearance from nearby objects. Turn the temperature control to OFF, attach the supplied probe, and plug the cord into a 120 V AC outlet. Select the desired temperature and preheat for approximately 5 minutes.
When the indicator light turns off, add food and cook according to the recipe. After cooking, turn OFF, unplug, and allow the skillet to cool.
What temperature settings does the BELLA Make & Take Electric Skillet have?
The skillet has an adjustable temperature control dial with cooking temperatures listed up to 400°F and a WARMING setting. The manual recommends approximately 350°F for frying and sautéing, 400°F for pan-broiling and initial braising, and 300°F for steaming.
Why does the temperature control light turn on and off?
The temperature indicator light turns on while the skillet is heating and turns off when the selected temperature is reached. During cooking, it cycles on and off to maintain the selected temperature. This is normal operation.
Can the BELLA Make & Take Electric Skillet be used for deep frying?
No. The appliance is not intended for deep frying. The manual specifically limits pan-frying to a maximum of 1 cup of oil and recommends removing the lid whenever oil is being heated.
How do you clean the BELLA Make & Take Electric Skillet?
Turn the temperature control to OFF, unplug the appliance, and allow it to cool completely. Remove the temperature control probe and wash the skillet body by hand with warm, soapy water. Use a soft sponge or cloth and dry thoroughly. The glass lid is top-rack dishwasher-safe, but the skillet itself is not dishwasher-safe. Never immerse the cord, plug, or temperature probe in water.
How do you remove stains from the ceramic nonstick coating?
Sprinkle baking soda on the stained surface and add a little water to form a paste. Leave it for several minutes, but no longer than one hour. Gently wipe with a soft, damp cloth or suitable plastic cleaning pad. Rinse and dry thoroughly. Avoid metal scouring pads and aggressive scrubbing.
Can the BELLA Make & Take Electric Skillet be stored vertically?
Yes. After the skillet has cooled and been cleaned, place the glass lid onto the rim with the knob facing downward, secure the lid using the side locking clamps, and store the temperature probe and power cord in their designated positions. The appliance can then be stored horizontally or vertically in a clean, dry location.
What is the warranty on the BELLA Make & Take Electric Skillet?
The skillet includes a limited two-year warranty covering mechanical defects in materials and workmanship and 90 days of coverage for non-mechanical parts. The warranty begins on the original retail purchase date, applies to the original purchaser, and requires proof of purchase.
For assistance, contact Customer Service at 1-866-832-4843 or help@bellahousewares.com.