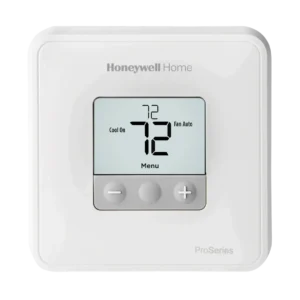
| Field | Details |
| Document Title | T1 Pro Non-Programmable Thermostat User Guide |
| Document Type | User Guide |
| Brand Name | Honeywell Home |
| Product Name | T1 Pro Non-Programmable Thermostat |
| Model Number(s) | TH1110D |
| PDF File Size | 236.5 KB |
| Total Number of Pages | 12 |
| Languages Covered | English, French, Spanish |
Honeywell Home T1 Pro Non-Programmable Thermostat TH1110D
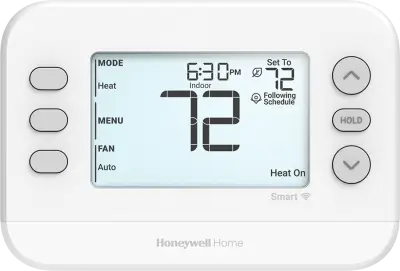
The Honeywell Home T1 Pro is a non-programmable digital thermostat designed for simple heating and cooling control. It features a digital temperature display, three-button operation, adjustable system and fan modes, and built-in compressor protection.
The thermostat allows the desired indoor temperature to be changed using the Plus (+) and Minus (–) buttons. The selected temperature is displayed alongside the actual indoor temperature, making it easy to check the heating or cooling setting.
The T1 Pro offers three system modes: Heat, Cool, and Off. It also provides two fan settings: Auto and On. Available modes depend on the thermostat model and the connected heating or cooling equipment.
The thermostat can operate using two AA batteries or through an AC-powered connection established during installation. When a C-wire connection supplies power, batteries can provide backup power. If AC power is not connected, batteries are required.
The T1 Pro also includes built-in compressor protection. When the heating or cooling system requires a compressor restart, the thermostat may delay operation briefly to help prevent compressor damage.
Product Overview and Features
| Feature | Description |
| Product Type | Non-programmable digital thermostat |
| Temperature Control | Manual adjustment using Plus and Minus buttons |
| Digital Display | Shows indoor temperature and selected setpoint |
| System Modes | Heat, Cool, Off |
| Fan Modes | Auto, On |
| Menu Control | Accesses system, fan, and advanced settings |
| Temperature Units | Fahrenheit or Celsius |
| Compressor Protection | Delays compressor restarting to protect equipment |
| Battery Operation | Uses two AA batteries |
| C-Wire Power | Supports AC-powered operation when correctly installed |
| Battery Backup | Available when the thermostat uses AC power |
| Low-Battery Indicator | Warns when batteries are nearing depletion |
| Display Backlight | Activates when a button is pressed |
| Temperature Range Limits | Can be configured by the installer |
| Mounting System | UWP mounting system |
| Warranty | Five-year limited warranty |
What’s Included in the Box
The Honeywell Home T1 Pro package includes the following components.
| Item | Quantity |
| T1 Pro Thermostat | 1 |
| UWP Mounting System | 1 |
| Decorative Cover Plate | 1 |
| Screws and Anchors | Included |
| AA Batteries | 2 |
| Thermostat Literature | Included |
The supplied UWP mounting system holds the thermostat in place after installation.
The decorative cover plate can be used with the mounting arrangement.
Technical Specifications
General Specifications
| Specification | Details |
| Brand | Honeywell Home |
| Product Series | T1 Pro |
| Product Type | Non-Programmable Thermostat |
| Specifically Referenced Model | TH1110D |
| Battery Type | AA |
| Battery Quantity | 2 |
| Recommended Battery Chemistry | Alkaline |
| AC Power | Supported through compatible installed wiring |
| Temperature Units | °F or °C |
| Setup Option for Temperature Units | 125 |
| Fahrenheit Setting | 0 |
| Celsius Setting | 1 |
| C-Wire Backlight Duration | 45 seconds after changes |
| Battery-Only Backlight Duration | 8 seconds |
| System Modes | Heat, Cool, Off |
| Fan Modes | Auto, On |
| Recommended Battery Replacement | Once per year |
| Warranty | Five-year limited warranty |
Electrical Ratings
The electrical ratings are specified for each thermostat terminal.
| Terminal | Voltage (50/60 Hz) | Running Current |
| W – Heating | 20–30 VAC | 0.02–1.0 A |
| Y – Compressor Stage 1 | 20–30 VAC | 0.02–1.0 A |
| G – Fan | 20–30 VAC | 0.02–0.5 A |
| O/B – Changeover (TH1110D only) | 20–30 VAC | 0.02–0.5 A |
The O/B changeover terminal rating applies specifically to the TH1110D model identified in the guide.
Temperature Setting Ranges
| Mode | Temperature Range |
| Heating | 32–90°F (0–32°C) |
| Cooling | 50–99°F (10–37°C) |
An installer may configure temperature range stops that limit the available settings.
Parts and Components
The T1 Pro thermostat has a rectangular digital display and three control buttons positioned beneath the screen.
Main Components
| Component | Function |
| Digital Display | Shows room temperature, setpoint, and operating information |
| Minus (–) Button | Decreases temperature and changes menu settings |
| Menu Button | Opens system and fan settings |
| Plus (+) Button | Increases temperature and changes menu settings |
| System Status Display | Shows heating, cooling, and compressor protection information |
| Indoor Temperature Setpoint | Shows the selected temperature |
| Actual Indoor Temperature | Shows the measured room temperature |
| UWP Mounting System | Secures the thermostat to the wall |
| Battery Compartment | Holds two AA batteries |
Button Layout
The thermostat uses three physical buttons:
- Left: Minus (–)
- Center: Menu
- Right: Plus (+)
The buttons also perform menu functions when the thermostat is displaying system or advanced settings.
Thermostat Control Buttons
Menu Button
The center Menu button provides access to the thermostat’s operating modes and settings.
Pressing Menu displays the Mode and Fan options.
Pressing and holding Menu for approximately three seconds opens the advanced settings menu.
Plus (+) Button
The Plus button increases the desired temperature.
When a menu is open, it can also be used to select or change available menu options.
Minus (–) Button
The Minus button decreases the desired temperature.
It is also used to edit values in the advanced settings menu.
Changing the Desired Temperature
- Press + to increase the temperature.
- Press – to decrease the temperature.
- Continue adjusting until the desired temperature appears.
- The thermostat controls the connected heating or cooling system according to the selected mode and temperature setting.
Thermostat Display Guide
The digital screen shows the actual indoor temperature, temperature setpoint, operating mode, and system status.
Display Indicators
| Display Indicator | Meaning |
| Indoor Temperature | Current measured indoor temperature |
| Setpoint Temperature | Desired temperature selected by the user |
| Heat On | Heating system is operating |
| Cool On | Cooling system is operating |
| Flashing Cool On | Compressor protection is active |
| Flashing Heat On | Compressor protection is active on a heat pump |
| Fan Auto | Automatic fan operation |
| Fan On | Continuous fan operation |
| Mode | System operating mode selection |
| Menu | Access to settings |
| Low-Battery Icon | Batteries are nearing depletion |
Actual Indoor Temperature
The actual indoor temperature indicates the temperature currently measured by the thermostat.
Indoor Temperature Setpoint
The setpoint is the temperature the thermostat is instructed to maintain.
Pressing + or – changes the selected setpoint.
Heat On Indicator
Heat On indicates that the thermostat is calling for heating.
Cool On Indicator
Cool On indicates that the thermostat is calling for cooling.
When Cool On flashes, the compressor protection function is active.
Low-Battery Indicator
The low-battery icon appears when the batteries are nearing depletion.
Fresh batteries should be installed when this warning appears.
Display Backlight Operation
The T1 Pro screen wakes when any of the three buttons is pressed.
The backlight duration depends on the power connection.
Backlight Duration
| Power Source | Display Backlight Duration |
| AC power through C-wire | 45 seconds after changes are completed |
| Battery-only power | 8 seconds |
| Certain installation configurations | Display may remain illuminated |
How to Wake the Display
Press any of the three thermostat buttons.
The screen illuminates and displays the operating information.
Why Does the Screen Turn Off Quickly?
When operating only on batteries, the screen remains lit for approximately eight seconds after activation.
This is normal thermostat behavior.
When supplied through the C-wire connection, the backlight remains on for approximately 45 seconds after changes are completed.
Important Safety Instructions
Electrical Hazard Warning
CAUTION: ELECTRICAL HAZARD
Electrical connections can cause shock or equipment damage.
Disconnect power before beginning installation.
Compressor Damage Warning
CAUTION: EQUIPMENT DAMAGE HAZARD
Compressor protection is bypassed during testing.
Avoid switching the compressor on and off rapidly during testing to prevent equipment damage.
Mercury Disposal Warning
CAUTION: MERCURY NOTICE
If the T1 Pro replaces an existing thermostat containing mercury in a sealed tube, the old thermostat must not be disposed of with ordinary household waste.
Contact the local waste management authority for recycling and disposal instructions.
Electronic Waste Disposal
The T1 Pro must not be disposed of with ordinary household waste at the end of its service life.
Use an authorized collection center or electronic waste recycler.
Proper disposal helps reduce environmental and health risks.
Before First Use
After the thermostat has been installed and connected to the heating or cooling system, the operating settings can be configured.
Initial Setup
- Confirm that the thermostat is receiving power.
- Check that the digital display operates when a button is pressed.
- Open the Menu to review the available system modes.
- Select the required Heat, Cool, or Off setting.
- Select the fan operating mode.
- Adjust the desired indoor temperature.
- Change the temperature display units if needed.
The available operating modes depend on the connected system and installer configuration.
Setting the Heating or Cooling Mode
The Mode setting determines whether the thermostat controls heating, cooling, or neither.
How to Change the System Mode
- Press the center Menu button.
- The Mode and Fan options appear on the display.
- Press the Mode control, shown above the Minus (–) button.
- Continue pressing Mode to cycle through the available system modes.
- Stop when the required mode appears.
Available System Modes
| Mode | Function |
| Heat | Controls heating |
| Cool | Controls cooling |
| Off | Turns off heating and cooling control |
How to Turn On Heating
- Press Menu.
- Select Mode.
- Continue until Heat appears.
- Press + or – to choose the desired temperature.
- Set the temperature above the current indoor temperature when heating is required.
When heating is operating, Heat On appears on the display.
How to Turn On Cooling
- Press Menu.
- Select Mode.
- Continue until Cool appears.
- Use + or – to choose the desired temperature.
- Set the temperature below the current indoor temperature when cooling is required.
When cooling is operating, Cool On appears.
How to Turn Off Heating and Cooling
- Press Menu.
- Select Mode.
- Continue until Off appears.
The thermostat stops normal heating and cooling operation.
Selecting the Fan Mode
The fan setting determines how the connected system fan operates.
How to Change the Fan Setting
- Press Menu.
- The Mode and Fan options appear.
- Press Fan, shown above the Plus (+) button.
- Continue pressing Fan to cycle through the available options.
- Stop when the desired fan mode appears.
Fan Modes
| Fan Mode | Operation |
| Auto | Fan runs only while heating or cooling is operating |
| On | Fan operates continuously |
Auto Fan Mode
Select Auto when the fan should operate only while the heating or cooling system is running.
Continuous Fan Mode
Select On when the fan should run continuously.
Available fan settings depend on the system configuration.
Changing Between Fahrenheit and Celsius
The T1 Pro can display temperatures in either Fahrenheit or Celsius.
The temperature format is controlled through advanced setup option 125.
How to Change the Temperature Unit
- Press and hold the center Menu button for approximately three seconds.
- The thermostat opens the advanced settings menu.
- Locate setup option 125.
- Press Edit, shown above the Minus (–) button.
- Select the required value.
- Press Done to save the setting and return to the main menu.
Temperature Unit Values
| Setup Option | Value | Temperature Unit |
| 125 | 0 | Fahrenheit (°F) |
| 125 | 1 | Celsius (°C) |
Changing from Fahrenheit to Celsius
Set option 125 to 1.
Changing from Celsius to Fahrenheit
Set option 125 to 0.
Press Done after selecting the required value.
Built-In Compressor Protection
The thermostat includes a compressor protection function to help prevent damage caused by restarting a compressor too soon after shutdown.
When the compressor stops, the thermostat may temporarily delay its next start.
How Compressor Protection Works
- The heating or cooling compressor stops operating.
- A new call for compressor operation occurs.
- The thermostat temporarily prevents the compressor from restarting.
- Cool On or Heat On flashes during the waiting period.
- The message stops flashing when the protection delay ends.
- The compressor starts when safe operation is permitted.
Why Is Cool On Flashing?
A flashing Cool On message indicates that compressor protection is active.
The compressor is waiting for the restart protection period to finish.
The system may require approximately five minutes before cooling resumes.
Why Is Heat On Flashing?
On systems using a heat pump, Heat On may flash when compressor protection is active.
The thermostat delays compressor operation until the safe restart period has elapsed.
What to Do When the Indicator Flashes
Allow the protection period to finish.
The thermostat automatically resumes compressor operation when the safe restart time has elapsed.
Power Supply and Battery Operation
The T1 Pro supports battery power and compatible AC-powered installations.
Battery-Powered Operation
If the thermostat does not use an AC power connection, batteries are required.
The thermostat operates using two AA batteries.
AC Power Through the C-Wire
If the thermostat is connected to AC power through the C-wire, batteries are optional and can provide backup power.
Power Source Comparison
| Power Configuration | Battery Requirement | Display Backlight |
| AC power connected through C-wire | Batteries optional for backup | 45 seconds after changes |
| Battery-only operation | Batteries required | 8 seconds |
The display may remain continuously illuminated under certain installation configurations.
Battery Replacement Instructions
The thermostat uses two AA batteries.
Fresh alkaline batteries are recommended.
When to Replace the Batteries
Replace the batteries:
- Immediately when the low-battery icon appears.
- Once per year, even without a low-battery warning.
- Before leaving home for more than one month.
The low-battery indicator appears approximately two months before the batteries are depleted.
How to Replace the AA Batteries
- Locate the thermostat on its wall mount.
- Press gently to loosen the thermostat.
- Carefully pull the thermostat away from the wall mount.
- Locate the battery compartment on the back.
- Remove the old batteries.
- Insert two fresh AA alkaline batteries, following the polarity markings.
- Position the thermostat on the wall mount.
- Reinstall it securely.
Battery Orientation
The battery installation diagram shows two AA batteries fitted into the rear compartment.
Each battery must be inserted according to the positive and negative polarity markings.
Recommended Battery Maintenance
| Maintenance Action | Recommendation |
| Battery Type | AA alkaline |
| Number of Batteries | 2 |
| Replace When Warning Appears | Immediately |
| Routine Replacement | Once per year |
| Before Extended Absence | Replace before leaving for more than one month |
| Battery Warning Time | Approximately two months before depletion |
Troubleshooting Guide
The following troubleshooting procedures address operating problems identified for the Honeywell Home T1 Pro.
Common Problems and Solutions
| Problem | Possible Cause | Recommended Solution |
| Thermostat display is blank | Power or battery issue | Check circuit breaker, system power, furnace door, and AA batteries |
| Heating does not respond | Incorrect mode or temperature setting | Select Heat and increase setpoint above room temperature |
| Cooling does not respond | Incorrect mode or temperature setting | Select Cool and decrease setpoint below room temperature |
| Heating or cooling remains inactive | System startup delay | Wait five minutes |
| Temperature cannot be changed | Installer-configured temperature limits | Check range stops with installer |
| Cool On flashes | Compressor protection is active | Wait five minutes |
| Heat On flashes | Heat pump compressor protection is active | Wait five minutes |
| Low-battery icon appears | Batteries nearing depletion | Replace both AA batteries |
| Screen light turns off after eight seconds | Battery-only power operation | Normal backlight behavior |
Thermostat Display Is Blank
If the display shows no information:
- Check the circuit breaker and reset it if necessary.
- Make sure the heating and cooling system’s power switch is on.
- Confirm that the furnace door is securely closed.
- Check that fresh AA alkaline batteries are correctly installed.
Heating System Does Not Respond
If the thermostat does not activate heating:
- Press Menu.
- Select Heat using the Mode control.
- Set the desired temperature above the current indoor temperature.
- Check the circuit breaker if necessary.
- Confirm that the heating system power switch is on.
- Make sure the furnace door is closed securely.
- Wait five minutes for the system to respond.
Cooling System Does Not Respond
If the cooling system does not start:
- Press Menu.
- Select Cool using the Mode control.
- Set the desired temperature below the current indoor temperature.
- Check the circuit breaker.
- Confirm the cooling system power switch is on.
- Make sure the furnace door is closed securely.
- Wait five minutes for the system to respond.
Temperature Settings Do Not Change
If the thermostat is in the correct operating mode but the desired temperature cannot be selected, the installer may have configured temperature range stops.
The guide identifies the following setting ranges:
| Operating Mode | Temperature Range |
| Heat | 32–90°F (0–32°C) |
| Cool | 50–99°F (10–37°C) |
If the temperature cannot be changed within these ranges, contact the installer to check whether range stops have been configured.
Cool On or Heat On Is Flashing
Flashing Cool On or Heat On indicates compressor protection.
The thermostat is delaying compressor operation to prevent damage.
Wait five minutes for the system to restart safely.
Low-Battery Indicator Appears
The low-battery warning indicates that the batteries are approaching depletion.
Remove the thermostat from its wall mount and install two fresh AA alkaline batteries.
Indicator Lights and Display Messages
| Display Message or Indicator | Meaning | Action |
| Heat On | Heating is operating | Normal heating status |
| Cool On | Cooling is operating | Normal cooling status |
| Flashing Cool On | Compressor protection is active | Wait five minutes |
| Flashing Heat On | Compressor protection is active on a heat pump | Wait five minutes |
| Fan Auto | Automatic fan operation | Fan operates during heating or cooling |
| Fan On | Continuous fan operation | Fan runs continuously |
| Low-Battery Icon | Batteries approaching depletion | Replace both AA batteries |
| Mode | System operating menu | Select Heat, Cool, or Off |
| Setup Option 125 | Temperature unit configuration | Select 0 for °F or 1 for °C |
Maintenance Instructions
Routine maintenance focuses on battery replacement and checking the thermostat’s operating status.
Battery Maintenance
- Replace both AA batteries once each year.
- Replace batteries immediately when the low-battery warning appears.
- Use fresh alkaline batteries.
- Replace the batteries before leaving home for more than one month.
Checking Thermostat Operation
The thermostat display can be used to check:
- Current indoor temperature
- Selected temperature
- Heating status
- Cooling status
- Fan operating mode
- Low-battery warning
- Compressor protection status
Checking the Thermostat After Battery Replacement
After reinstalling the thermostat on its wall mount:
- Check that the display operates.
- Confirm that the desired system mode is selected.
- Check the indoor temperature setting.
- Verify the fan setting.
Warranty Information
The Honeywell Home T1 Pro thermostat is covered by a five-year limited warranty.
Warranty information and assistance are available through the official Honeywell Home support website.
| Warranty Detail | Information |
| Warranty Type | Limited Warranty |
| Warranty Duration | 5 years |
| Support Provider | Honeywell Home / Resideo |
| Warranty Support Website | https://www.honeywellhome.com/support |
Customer Support Information
For questions about thermostat operation, system settings, or troubleshooting, use the Honeywell Home support resources.
| Support Information | Details |
| Brand | Honeywell Home |
| Manufacturer | Resideo Technologies, Inc. |
| Official Support Website | https://www.honeywellhome.com/support |
| Manufacturer Website | www.resideo.com |
| Manufacturer Address | 1985 Douglas Drive North, Golden Valley, MN 55422, USA |
| Product Series | T1 Pro |
| Product Type | Non-Programmable Thermostat |
| Document Number | 33-00190EFS-09 |
Environmental and Disposal Information
Mercury-Containing Thermostat Disposal
If the T1 Pro replaces an older thermostat containing mercury in a sealed tube, the old thermostat must not be placed in ordinary household waste.
Contact the local waste management authority for the correct recycling and disposal procedure.
Electronic Waste Disposal
At the end of its service life, the T1 Pro should be taken to an authorized electronic waste collection or recycling center.
Do not dispose of the product with ordinary household waste.
Proper disposal helps prevent environmental pollution and potential harm to human health.
Frequently Asked Questions
1. How do I set the temperature on a Honeywell T1 Pro thermostat?
Press the Plus (+) button to increase the desired temperature or the Minus (–) button to decrease it. The thermostat displays the selected setpoint alongside the actual indoor temperature.
2. How do I switch the Honeywell T1 Pro between Heat and Cool?
Press the center Menu button, then press Mode to cycle through the available operating modes. Select Heat for heating, Cool for cooling, or Off to turn off heating and cooling.
3. How do I change the fan setting from Auto to On?
Press Menu, then select Fan. Continue pressing the Fan control to choose Auto or On. Auto operates the fan only during heating or cooling, while On runs the fan continuously.
4. How do I change the Honeywell T1 Pro from Fahrenheit to Celsius?
Press and hold Menu for approximately three seconds. In advanced settings, select setup option 125 and press Edit. Choose 0 for Fahrenheit or 1 for Celsius, then press Done to save.
5. Why is Cool On flashing on my Honeywell T1 Pro thermostat?
Flashing Cool On indicates that compressor protection is active. The thermostat delays compressor restarting to prevent equipment damage. Wait approximately five minutes for the system to resume operation.
6. How do I replace the batteries in a Honeywell T1 Pro thermostat?
Press gently to loosen the thermostat and carefully remove it from the wall mount. Replace the two AA batteries with fresh alkaline batteries, observing the polarity markings, then reinstall the thermostat.
7. Why is my Honeywell T1 Pro thermostat screen blank?
Check the circuit breaker, make sure the heating and cooling system power switch is on, confirm that the furnace door is closed, and verify that two fresh AA alkaline batteries are installed correctly.
8. Does the Honeywell T1 Pro thermostat support programmable schedules?
No. The T1 Pro is a non-programmable thermostat. The desired temperature is adjusted manually using the Plus and Minus buttons, and the system mode is selected through the Menu controls.