| Field | Details |
| Document Title | X7 Series Smart Thermostat |
| Document Type | User Guide |
| Brand Name | Honeywell Home |
| Product Name | X7 Series Smart Thermostat |
| Model Number(s) | X7SWF3W, X7SMC4B, X7SWF4WC, X7SMC4BC, X7BMC2B, X7BWF1W |
| PDF File Size | 289.6 KB |
| Number of Pages | 2 |
| Languages Covered | English and Spanish |
Honeywell Home X7 Series Smart Thermostat
The Honeywell Home X7 Series Smart Thermostat is a connected home temperature control device featuring a color touchscreen, customizable display, WiFi connectivity, remote control through the First Alert by Resideo app, and compatibility with Matter-enabled smart home automations.
The X7 Series includes six model variants available in different finishes for the United States and Canada. All six models belong to the X7 Series family, while room prioritization using compatible wireless indoor room sensors is an X7S-only feature.
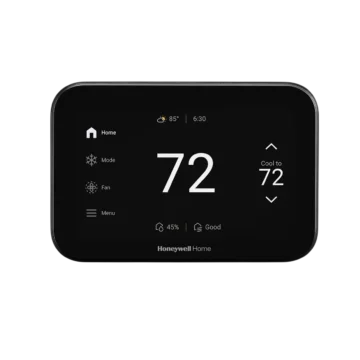
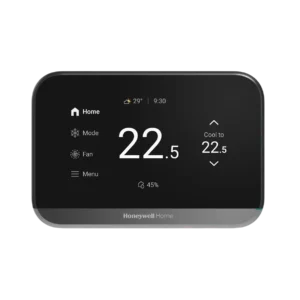
The thermostat displays the current indoor temperature, selected temperature setpoint, operating mode, fan control, weather information, and time. Temperature adjustments can be made directly from the touchscreen.
Through the First Alert by Resideo app, the thermostat supports Auto Away, Smart Scheduling, alerts, reminders, monthly energy reports, and remote thermostat control. The app can also monitor compatible water leak detectors, smoke detectors, and carbon monoxide detectors sold separately.
The thermostat allows owners to customize the idle screen using seven display styles and colors. Matter connectivity provides additional control of temperature setpoints and system modes through compatible smart home controllers.
The X7 Series also includes compressor protection, WiFi connection diagnostics, and configurable temperature restrictions that may be established during installation.
Technical Specifications and Features
| Specification | Details |
| Brand | Honeywell Home |
| Product Name | X7 Series Smart Thermostat |
| Product Type | Smart Thermostat |
| Model Numbers | X7SWF3W, X7SMC4B, X7SWF4WC, X7SMC4BC, X7BMC2B, X7BWF1W |
| Manufacturer | Resideo Technologies, Inc. |
| Display | Color Touchscreen |
| Temperature Adjustment | On-Screen Temperature Controls |
| Current Temperature Display | Yes |
| Weather and Time Display | Yes |
| System Mode Control | Yes |
| Fan Control | Yes |
| Mobile App | First Alert by Resideo |
| WiFi Connectivity | Supported |
| Smart Scheduling | Supported Through App |
| Auto Away | Supported Through App |
| Remote Thermostat Control | Supported Through App |
| Alerts and Reminders | Supported Through App |
| Monthly Energy Reports | Supported Through App |
| Idle Screen Customization | Seven Styles and Colors |
| Wireless Room Priority | X7S Models Only |
| Room Priority Options | Selected Rooms and Active Rooms |
| Compatible Room Sensors | Wireless Indoor Room Sensors |
| Matter Compatibility | Supported |
| Matter Functions | Temperature Setpoint and System Mode Control |
| Compressor Protection | Yes |
| Heating Setpoint Range Referenced in Troubleshooting | 40–90°F (4.5–32°C) |
| Cooling Setpoint Range Referenced in Troubleshooting | 50–99°F (10–37°C) |
| Minimum RF Antenna Separation | 20 cm |
| Warranty | 2-Year Limited Warranty |
The available operating modes and temperature settings depend on the connected heating and cooling equipment and the thermostat’s configuration.
X7 Series Thermostat Models and Colors
The X7 Series includes six models with different finishes and regional availability.
| Model Number | Color and Accent | Market |
| X7SWF3W | White with Light Silver Accent | United States |
| X7SMC4B | Black with Dark Silver Accent | United States |
| X7SWF4WC | White with Light Silver Accent | Canada |
| X7SMC4BC | Black with Dark Silver Accent | Canada |
| X7BMC2B | Black | United States and Canada |
| X7BWF1W | White with Gray Accent | United States and Canada |
X7S and X7B Model Differences
The X7 Series includes models with X7S and X7B designations.
The X7S versions support room prioritization using compatible wireless indoor room sensors.
The X7B models are included in the X7 Series family, but the room prioritization function is identified specifically for X7S models.
Thermostat Touchscreen and Display Guide
The X7 Series Smart Thermostat uses a touchscreen for daily temperature control and access to additional settings.
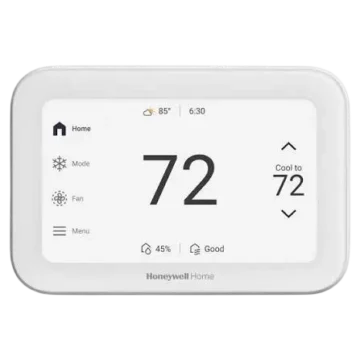
The Home screen provides a view of indoor temperature, desired temperature, weather, time, operating mode, and fan controls.
Home Screen Components
| Screen Component | Description and Function |
| Home | Identifies the main thermostat screen. |
| Weather | Displays weather information. |
| Time | Shows the current time. |
| Current Temperature | Displays the measured indoor temperature. |
| Set Temperature | Shows the desired temperature setting. |
| Temperature Arrows | Increase or decrease the selected temperature. |
| Mode | Provides access to the thermostat’s operating mode. |
| Fan | Provides access to fan control. |
| Menu | Opens additional thermostat settings and functions. |
| Humidity Indicator | Displays an indoor humidity reading. |
Current Temperature
The current indoor temperature is displayed prominently near the center of the Home screen.
It represents the temperature currently measured by the thermostat.
Desired Temperature
The desired temperature, also called the setpoint, appears separately from the current indoor temperature.
The temperature adjustment arrows appear beside the setpoint.
System Mode
The Mode control provides access to the thermostat’s heating and cooling operating modes.
Operating modes referenced in the troubleshooting instructions include:
- Heat
- Cool
- Emergency Heat
- Auto
Available operating modes depend on the heating and cooling equipment and the thermostat configuration.
Fan Control
The Home screen includes a Fan control.
The available fan functions depend on the connected heating and cooling system.
Weather and Time
Weather information and the current time appear near the top of the display.
Humidity Indicator
The Home screen includes an indoor humidity indicator.
The example display shows a humidity reading of 45%.
How to Adjust the Temperature
The desired temperature can be adjusted directly from the touchscreen.
Step-by-Step Temperature Adjustment
- Open the thermostat Home screen.
- Locate the selected temperature on the right side of the display.
- Touch the Up arrow to increase the desired temperature.
- Touch the Down arrow to decrease the desired temperature.
- Check the updated setpoint displayed on the screen.
The thermostat displays the current indoor temperature separately from the desired temperature.
Temperature Setpoint Ranges
The troubleshooting instructions identify the following temperature ranges when explaining installer-configured restrictions.
| Operating Mode | Referenced Temperature Range |
| Heat | 40–90°F (4.5–32°C) |
| Cool | 50–99°F (10–37°C) |
The thermostat may have range stops that restrict the temperatures an owner can select.
If temperature changes are limited, the operating mode and any configured restrictions should be checked.
How to Change the Operating Mode
The thermostat’s operating mode can be accessed from the Home screen.
Checking the Operating Mode
- Open the Home screen.
- Locate the Mode control.
- Check the selected operating mode.
- Use the available mode controls to select the required mode.
The troubleshooting instructions reference Heat, Cool, Emergency Heat, and Auto.
The available choices depend on the installed equipment and thermostat configuration.
How to Connect the X7 Series Thermostat to WiFi
The X7 Series Smart Thermostat supports WiFi connectivity for connected features and mobile app access.
The WiFi menu is used to select the wireless network and enter the required credentials.
Step-by-Step WiFi Setup
- Touch Menu on the thermostat.
- Scroll through the available settings.
- Select WiFi.
- Follow the instructions shown on the thermostat screen.
- Enter the wireless network name (SSID).
- Enter the WiFi password.
- Complete the on-screen connection process.
Menu path: Menu > WiFi
WiFi Connection Requirements
| Requirement | Description |
| Wireless Network | WiFi network available at the installation location |
| Network Name | SSID |
| Network Password | Correct WiFi password |
| Router IP Configuration | Automatic IP Address Assignment (DHCP) |
| Internet Connection | Working internet connection for connected features |
If the thermostat cannot establish a WiFi connection, the troubleshooting procedures below should be followed.
Connecting the Thermostat to the First Alert by Resideo App
The X7 Series Smart Thermostat supports connection to the First Alert by Resideo mobile app.
The app provides remote thermostat control and additional connected functions.
How to Get the First Alert App
The manufacturer’s app download page is:
https://info.firstalert.com/FA-app-download
The user guide also provides a QR code for accessing the app.
How to Start the App Connection Process
- Open the First Alert by Resideo app download page using the provided link or QR code.
- Follow the app installation instructions.
- Begin the thermostat connection process.
- Follow the app’s prompts to connect the X7 Series thermostat.
- Complete the requested configuration.
After the thermostat is connected, supported features can be accessed through the First Alert app.
First Alert App Features
The First Alert by Resideo app supports several connected thermostat features.
| App Feature | Function |
| Auto Away | Supports automatic Away operation. |
| Smart Scheduling | Provides connected temperature scheduling features. |
| Alerts and Reminders | Provides supported thermostat notifications. |
| Monthly Energy Reports | Provides monthly energy reports. |
| Energy Rebate Program | Provides access to energy incentive information. |
| Remote Thermostat Control | Allows supported thermostat settings to be managed from another location. |
| Water Leak Detector Monitoring | Supports compatible water leak detectors sold separately. |
| Smoke Detector Monitoring | Supports compatible smoke detectors sold separately. |
| Carbon Monoxide Detector Monitoring | Supports compatible carbon monoxide detectors sold separately. |
Auto Away and Smart Scheduling
Auto Away and Smart Scheduling are supported through the First Alert app.
These connected features provide automatic Away operation and scheduling capabilities.
Alerts and Reminders
The First Alert app provides access to supported thermostat alerts and reminders.
Monthly Energy Reports
Monthly energy reports are available through the app.
Remote Thermostat Control
The app supports thermostat control from outside the home.
This allows supported settings to be managed without using the thermostat’s physical touchscreen.
Monitoring Compatible Safety Devices
The First Alert app can also monitor compatible:
- Water leak detectors
- Smoke detectors
- Carbon monoxide detectors
These devices are sold separately.
How to Customize the Idle Screen
The X7 Series Smart Thermostat allows the idle screen to be customized.
Seven display styles and colors are available.
The selected appearance can be previewed before it is saved.
How to Change the Idle Screen
- Touch Menu.
- Select Preferences.
- Select Display.
- Select Idle Screen.
- Choose one of the seven available styles and colors.
- Select Preview to view the chosen appearance.
- Touch Save to store the setting.
Menu path: Menu > Preferences > Display > Idle Screen
Idle Screen Controls
| Control | Function |
| Style Selection | Selects one of seven display styles and colors. |
| Preview | Shows the selected display appearance. |
| Save | Stores the selected preference. |
How to Prioritize Rooms for Comfort — X7S Models Only
The X7S thermostat supports room prioritization using compatible wireless indoor room sensors.
Room prioritization allows the thermostat to use temperature readings from selected areas of the home.
The function provides two methods:
- Selected Rooms
- Active Rooms
How Room Prioritization Works
Compatible wireless indoor room sensors measure conditions in different areas of the home.
The thermostat can use manually selected rooms or automatically selected active rooms when determining the temperature average.
The Priority screen displays room names and their sensor readings.
How to Open Room Priority Settings
- Touch Menu.
- Scroll through the available options.
- Select Priority.
- Choose the required room priority method.
- Save the selected settings.
Menu path: Menu > Priority
Selected Rooms — Manual Priority
The Selected Rooms option allows the owner to choose which rooms contribute to the temperature average.
The illustrated Priority screen includes:
| Room | Example Temperature |
| Living Room | 75°F |
| Kitchen | 75°F |
| Family Room | 75°F |
| Rec Room | 75°F |
| Basement | 75°F |
| Guest Room | 75°F |
These are example readings from the illustrated thermostat interface.
How to Select Rooms Manually
- Open Menu > Priority.
- Select Selected Rooms.
- Choose the rooms that should contribute to the average temperature.
- Review the selected room tiles.
- Touch Save.
Only the selected rooms contribute to the calculated temperature average.
Active Rooms — Automatic Priority
The Active Rooms option uses detected activity to determine which areas receive priority.
Compatible wireless indoor room sensors automatically select rooms when activity is detected.
How to Use Active Rooms
- Open Menu > Priority.
- Select Active Rooms.
- Allow compatible room sensors to detect activity.
- The thermostat automatically selects active rooms.
- Save the selected configuration.
Selected Rooms vs. Active Rooms
| Feature | Selected Rooms | Active Rooms |
| Room Selection | Manual | Automatic |
| Priority Basis | Rooms chosen by the owner | Detected room activity |
| Average Temperature | Uses manually selected rooms | Uses rooms selected through detected activity |
| Wireless Sensors | Compatible indoor room sensors | Compatible indoor room sensors |
| Availability | X7S Only | X7S Only |
How to Set Up Matter
The X7 Series Smart Thermostat supports Matter connectivity.
Matter allows compatible smart home controllers to manage supported thermostat functions through enabled automations.
Matter Functions
The thermostat supports Matter-based control of:
- Temperature setpoints
- System mode
How to Pair the X7 Thermostat with Matter
- Touch Menu on the thermostat.
- Scroll through the available settings.
- Select Matter.
- Follow the instructions displayed on the thermostat screen.
- Open the pairing process on a compatible Matter controller.
- Scan the QR code displayed on the thermostat screen or enter the displayed pairing code.
- Complete the pairing process using the controller’s instructions.
Menu path: Menu > Matter
Matter Pairing Methods
| Pairing Method | Description |
| On-Screen QR Code | Scan the displayed code using a compatible Matter controller. |
| Pairing Code | Enter the displayed code through the Matter controller. |
Matter Smart Home Automations
After pairing with a compatible Matter controller, supported automations can control thermostat temperature setpoints and change the system mode.
Energy Rebates and Incentives
Energy providers may offer incentives or rebates for eligible thermostats.
Available programs can be searched through the manufacturer’s utility savings resource:
https://resideo.info/utility-savings-programs
Program availability depends on the energy provider and applicable eligibility requirements.
Troubleshooting Guide
The following troubleshooting procedures address display, equipment protection, temperature adjustment, and WiFi connection problems.
Quick Troubleshooting Table
| Problem | Possible Cause | Recommended Action |
| Thermostat display is blank | Circuit breaker, HVAC power switch, or furnace door condition | Check the circuit breaker, equipment power switch, and furnace door. |
| Waiting for equipment appears | Compressor protection is active | Wait approximately 5 minutes. |
| Temperature setpoint cannot be changed | Lockout, incorrect operating mode, or range stops | Check the lockout message, operating mode, and installer settings. |
| WiFi connection fails | Incorrect network password | Verify the password and enter it again. |
| Router does not assign an IP address | Automatic address assignment issue | Check DHCP settings and restart the thermostat using the specified procedure. |
| WiFi has no internet link | Router or network problem | Verify router settings and restart the router if necessary. |
Thermostat Display Is Blank
A blank thermostat display may indicate that the heating and cooling equipment is not receiving power.
Recommended Actions
- Check the circuit breaker.
- Reset the breaker if necessary.
- Make sure the heating and cooling system’s power switch is on.
- Confirm that the furnace door is securely closed.
Waiting for Equipment Message
The thermostat may display:
Waiting for equipment
This message indicates that the compressor protection feature is active.
The compressor protection delay prevents the equipment from restarting too quickly.
Recommended Action
Wait approximately five minutes for the system to restart safely.
This delay helps prevent compressor damage.
Cannot Change the Temperature Setpoint
The thermostat may restrict temperature adjustments for several reasons.
Owner-Defined Lockout
If the display shows Unlock, the thermostat owner may have enabled a lockout setting.
The lockout must be addressed before unrestricted adjustment is possible.
Incorrect Operating Mode
Confirm that the thermostat is operating in the correct mode.
Modes referenced in the troubleshooting instructions include Heat, Cool, Emergency Heat, and Auto.
Installer-Configured Range Stops
The thermostat may have temperature limits set by the installer.
The troubleshooting instructions reference:
| Mode | Referenced Range |
| Heating | 40–90°F (4.5–32°C) |
| Cooling | 50–99°F (10–37°C) |
If the correct operating mode is selected but the desired temperature within the referenced range cannot be set, range stops may be restricting the adjustment.
Recommended Action
Contact the installer to determine whether temperature range stops were configured.
WiFi Troubleshooting
WiFi connection failures can occur because of incorrect credentials, router address configuration, or internet connectivity problems.
Incorrect WiFi Password
Possible Cause: An invalid WiFi password has been entered.
Recommended Action
- Verify the correct network password.
- Open the thermostat’s WiFi menu.
- Enter the password again.
- Repeat the connection process.
No IP Address Assigned by the Router
Possible Cause: The router has not assigned an IP address to the thermostat.
Recommended Actions
- Check that the router is configured for automatic IP address assignment using DHCP.
- If DHCP is already configured, remove the thermostat from the wall plate to disconnect power.
- Wait approximately 10 seconds.
- Reattach the thermostat to the wall plate.
- Run through the WiFi setup process again.
No Internet Link
Possible Cause: The network connection does not provide internet access.
Recommended Actions
- Verify the router settings.
- Restart the router if necessary.
- Attempt to connect the thermostat again.
WiFi Connection Checklist
| Item | Check |
| SSID | Correct network name entered |
| Password | Correct password entered |
| Router IP Assignment | DHCP enabled |
| Internet Connection | Router has internet connectivity |
| Thermostat Restart | Remove from wall plate, wait 10 seconds, and reinstall when required |
Regulatory and Compliance Information
FCC Regulations
The X7 Series Smart Thermostat complies with Part 15 of the FCC Rules.
Operation is subject to the following conditions:
- The device must not cause harmful interference.
- The device must accept received interference, including interference that may cause undesired operation.
Changes or modifications not expressly approved by the party responsible for compliance may void the user’s authority to operate the equipment.
Additional FCC compliance information is available through:
Canadian IC Regulations
The thermostat contains licence-exempt transmitters or receivers that comply with Innovation, Science and Economic Development Canada’s applicable licence-exempt RSS requirements.
Operation is subject to the following conditions:
- The device must not cause interference.
- The device must accept received interference, including interference that may cause undesired operation.
RF Exposure Requirements
The transmitter antennas must be installed with a minimum separation distance of 20 cm from all persons.
The antennas must not be co-located or operated together with another antenna or transmitter.
Wireless Frequency Restrictions
Operation in the following frequency bands is restricted to indoor use:
| Frequency Band | Restriction |
| 5150–5250 MHz | Indoor Use Only |
| 5250–5350 MHz | Indoor Use Only |
These restrictions help reduce the risk of harmful interference to co-channel mobile satellite systems.
Electronic Waste Disposal
The X7 Series Smart Thermostat must not be discarded with ordinary household waste.
When the device reaches the end of its service life, it should be taken to an authorized collection center or electronic equipment recycler.
Proper electronic waste disposal helps reduce potential environmental and health impacts.
Warranty Information
The Honeywell Home X7 Series Smart Thermostat is covered by a 2-year limited warranty.
Warranty Details
The manufacturer’s warranty terms are available at:
https://resideo.info/US-Warranty-THERMOSTAT
How to Request a Printed Warranty
A printed copy of the warranty can be requested from Resideo Customer Care.
Telephone: 1-800-633-3991
The manufacturer states that a printed warranty copy will be mailed free of charge.
Customer Support Information
The X7 Series Smart Thermostat is manufactured by Resideo Technologies, Inc. and its affiliates.
The Honeywell Home trademark is used under license from Honeywell International Inc.
| Contact Type | Details |
| Brand | Honeywell Home |
| Manufacturer | Resideo Technologies, Inc. |
| Customer Care Phone | 1-800-633-3991 |
| Complete User Manual | https://info.honeywellhome.com/elitepro-x7-um |
| First Alert App | https://info.firstalert.com/FA-app-download |
| Warranty Information | https://resideo.info/US-Warranty-THERMOSTAT |
| Energy Rebates | https://resideo.info/utility-savings-programs |
Manufacturer Address
Resideo Technologies Inc.
Scottsdale, AZ 85254
United States
When to Contact the Installer
The installer should be contacted if temperature range stops prevent the thermostat from accepting the required setpoint.
For product assistance and warranty information, contact Resideo Customer Care at 1-800-633-3991.
Frequently Asked Questions
1. How do I connect the Honeywell X7 thermostat to WiFi?
Touch Menu on the thermostat, scroll to WiFi, and select it. Follow the on-screen instructions to enter the wireless network name (SSID) and password. If the connection fails, verify the password, check that the router supports automatic IP address assignment using DHCP, and confirm that the internet connection is working.
2. How do I connect the X7 thermostat to the First Alert app?
The X7 Series Smart Thermostat connects to the First Alert by Resideo app. Access info.firstalert.com/FA-app-download or scan the QR code in the user guide. Follow the app’s installation and connection instructions. The app supports remote control, Auto Away, Smart Scheduling, alerts, reminders, and monthly energy reports.
3. How do I change the idle screen on the Honeywell X7?
Touch Menu, select Preferences, then Display, and open Idle Screen. Choose one of the seven available display styles and colors. Use Preview to check the appearance, then select Save to store the setting.
4. Can the Honeywell X7 prioritize different rooms?
Room prioritization is supported on X7S models only. Compatible wireless indoor room sensors allow owners to manually select rooms through Selected Rooms or use Active Rooms for automatic prioritization based on detected activity. The feature can be accessed through Menu > Priority.
5. How do I connect the Honeywell X7 thermostat to Matter?
Touch Menu, scroll down, and select Matter. Follow the on-screen instructions. Use a compatible Matter controller to scan the displayed QR code or enter the pairing code. Once paired, supported Matter automations can control thermostat temperature setpoints and system modes.
6. What does Waiting for equipment mean on the Honeywell X7?
The Waiting for equipment message indicates that compressor protection is active. The thermostat temporarily delays equipment operation to prevent the compressor from restarting too quickly. Wait approximately five minutes for the system to restart safely.
7. What should I do if the Honeywell X7 display is blank or the temperature cannot be changed?
For a blank display, check the circuit breaker, confirm that the heating and cooling equipment’s power switch is on, and make sure the furnace door is securely closed. If temperature adjustments are restricted, check for an Unlock message, verify the operating mode, and contact the installer if temperature range stops may have been configured.