| Field | Details |
| Document Title | X8Q Smart Thermostat — User Guide |
| Document Type | User Guide |
| Brand Name | Honeywell Home |
| Product Name | X8Q Smart Thermostat |
| Model Number(s) | X8SWF5W, X8SMC6B |
| PDF File Size | 562.3 KiB |
| Number of Pages | 2 |
| Languages Covered | English and Spanish |
Honeywell Home X8Q Smart Thermostat
The Honeywell Home X8Q Smart Thermostat is a connected home temperature control device featuring a customizable touchscreen, indoor temperature and humidity information, smart scheduling, wireless room prioritization, and Matter-compatible smart home controls.
The X8Q is available in two versions: X8SWF5W with a white finish and X8SMC6B with a black finish. Both models provide touchscreen controls for adjusting the desired temperature and accessing thermostat settings.
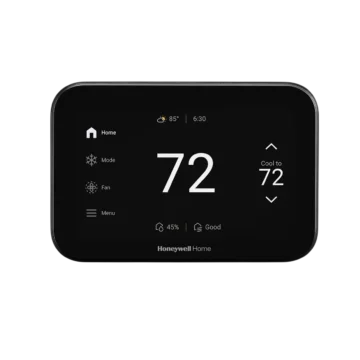
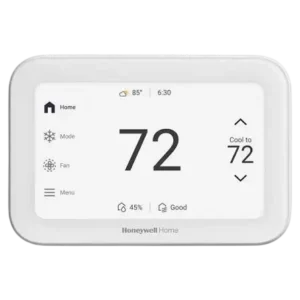
The Home screen displays the current indoor temperature, selected temperature setpoint, system mode, fan mode, weather, time, indoor humidity, and indoor air quality information. The thermostat can also display schedule status and provides a menu for accessing additional features.
When used with compatible XRSENSOR wireless indoor room sensors, the thermostat can prioritize specific rooms. Owners can manually choose which rooms contribute to the home’s average temperature or use activity-based prioritization so that rooms with detected activity are selected automatically.
The X8Q supports connection to the First Alert by Resideo app for remote thermostat control, Auto Away, Smart Scheduling, alerts, reminders, and monthly energy reports. It also supports Matter pairing for compatible smart home automations involving temperature setpoints and system modes.
Additional features include seven customizable idle-screen styles and colors, indoor air quality equipment controls when configured, and access to energy rebate information.
Technical Specifications and Features
| Specification | Details |
| Brand | Honeywell Home |
| Product Name | X8Q Smart Thermostat |
| Product Type | Smart Thermostat |
| White Model | X8SWF5W |
| Black Model | X8SMC6B |
| Manufacturer | Resideo Technologies, Inc. |
| Display | Customizable Touchscreen |
| Indoor Temperature Display | Yes |
| Desired Temperature Setting | Touchscreen Up and Down Controls |
| Indoor Humidity Display | Yes |
| Indoor Air Quality Display | Yes |
| Weather and Time Display | Yes |
| System Mode Control | Yes |
| Fan Mode Control | Yes |
| Schedule Status | Displayed on Home Screen |
| Mobile App | First Alert by Resideo |
| Remote Thermostat Control | Supported Through App |
| Auto Away | Supported Through App |
| Smart Scheduling | Supported Through App |
| Energy Reports | Monthly Reports Through App |
| Wireless Room Sensors | XRSENSOR |
| Room Priority Methods | Manual Selection and Activity-Based Selection |
| Idle-Screen Customization | Seven Styles and Colors |
| Indoor Air Quality Equipment Controls | Humidification, Dehumidification, Ventilation When Configured |
| Smart Home Compatibility | Matter |
| Matter Functions | Temperature Setpoint and System Mode Control |
| Wireless Operating Restriction | 5150–5250 MHz and 5250–5350 MHz Bands Restricted to Indoor Use |
| RF Antenna Separation Requirement | At Least 20 cm |
| Warranty | 2-Year Limited Warranty |
The available thermostat functions and indoor air quality controls depend on the connected equipment and configuration.
Thermostat Models and Color Options
The Honeywell Home X8Q comes in two color variants.
| Model Number | Color |
| X8SWF5W | White |
| X8SMC6B | Black |
The white thermostat is illustrated in the product guide. The appearance may differ depending on the selected model.
Touchscreen Controls and Home Screen Guide
The X8Q Smart Thermostat uses an interactive touchscreen to display indoor conditions and provide access to temperature controls, operating modes, and additional settings.
Home Screen Components
The Home screen diagram identifies the following controls and information areas.
| Screen Component | Description and Function |
| Home Screen | Main display for thermostat information and controls. |
| Weather | Displays weather information. |
| Time | Shows the current time. |
| Current Temperature | Displays the current indoor temperature. |
| System Mode | Shows the selected heating or cooling operating mode. |
| Fan Mode | Shows the selected fan operating mode. |
| Home Icon | Identifies the Home screen. |
| Options Menu | Provides access to additional thermostat options. |
| Indoor Humidity | Shows the current indoor humidity reading. |
| Indoor Air Quality | Displays indoor air quality information. |
| Set Temperature | Shows the desired temperature setting. |
| Temperature Adjustment Arrows | Increase or decrease the selected temperature. |
| Schedule Status | Shows scheduling information, such as Following Schedule. |
Current Indoor Temperature
The current indoor temperature appears prominently near the center of the Home screen.
It represents the temperature currently measured by the thermostat.
Desired Temperature
The desired temperature, also called the temperature setpoint, appears separately from the current room temperature.
The thermostat uses the selected temperature as the target for controlling compatible heating or cooling equipment.
Weather and Time
The upper portion of the Home screen provides weather and time information.
System Mode
The System Mode area identifies the thermostat’s selected operating mode.
The operating mode can be accessed through the thermostat’s touchscreen controls.
Fan Mode
The Fan Mode area provides access to the fan’s operating mode.
The available options depend on the connected heating and cooling equipment and thermostat configuration.
Indoor Humidity
The Home screen displays the indoor humidity reading.
This information provides a view of the current humidity conditions inside the home.
Indoor Air Quality
The thermostat includes an indoor air quality information area.
The illustrated Home screen displays an indoor air quality status of Good.
When compatible indoor air quality equipment has been configured, additional controls are available through the user menu.
Following Schedule Indicator
The Home screen can display Following Schedule.
This indicates the thermostat’s current schedule status.
How to Adjust the Temperature
The desired temperature can be changed directly from the X8Q touchscreen.
Step-by-Step Temperature Adjustment
- Open the thermostat Home screen.
- Locate the temperature setpoint on the right side of the display.
- Touch the Up arrow to increase the desired temperature.
- Touch the Down arrow to decrease the desired temperature.
- Check the selected setpoint shown on the screen.
The thermostat displays the desired temperature separately from the current indoor temperature.
Current Temperature vs. Set Temperature
| Display | Meaning |
| Current Temperature | The indoor temperature measured by the thermostat. |
| Set Temperature | The desired temperature selected for the home. |
First Alert by Resideo App Setup
The Honeywell Home X8Q Smart Thermostat supports connection to the First Alert by Resideo mobile app.
The app provides remote thermostat control and several connected features.
How to Get the First Alert App
The manufacturer’s app download page is:
First Alert by Resideo App Download
The user guide also includes a QR code that directs users to the app connection process.
How to Start App Connection
- Open the First Alert app download page using the provided link or QR code.
- Follow the app installation and connection instructions.
- Complete the prompts for connecting the X8Q Smart Thermostat.
- Use the First Alert app to access supported thermostat controls and features.
First Alert App Features
The First Alert by Resideo app supports the following connected functions.
| Feature | Function |
| Auto Away | Supports automatic Away operation. |
| Smart Scheduling | Provides connected scheduling features. |
| Alerts and Reminders | Provides supported thermostat notifications and reminders. |
| Monthly Energy Reports | Provides monthly energy information. |
| Energy Rebate Program | Provides access to thermostat incentives and rebate information. |
| Remote Thermostat Control | Allows supported thermostat controls to be accessed from another location. |
| Water Leak Detector Monitoring | Supports compatible water leak detectors sold separately. |
| Smoke and Carbon Monoxide Detector Monitoring | Supports compatible smoke and carbon monoxide detectors sold separately. |
Auto Away and Smart Scheduling
Auto Away and Smart Scheduling are connected features available through the First Alert app.
These functions support temperature management and scheduling.
Alerts and Reminders
The app provides access to supported thermostat alerts and reminders.
Monthly Energy Reports
Monthly energy reports are available through the app.
Remote Thermostat Control
The app provides access to thermostat controls from outside the home.
Monitoring Other Compatible Devices
The First Alert app can also monitor compatible:
- Water leak detectors
- Smoke detectors
- Carbon monoxide detectors
These devices are sold separately.
How to Prioritize Rooms for Comfort
The X8Q Smart Thermostat supports room prioritization using compatible XRSENSOR wireless indoor room sensors.
Room prioritization allows the thermostat to calculate an average temperature using selected areas of the home.
Two methods are available:
- Selected Rooms
- Active Rooms
How Room Prioritization Works
When multiple compatible wireless room sensors are installed, the thermostat can use readings from selected rooms to calculate an average indoor temperature.
Rooms that are not selected do not contribute to the average.
This allows temperature control to focus on the areas currently receiving priority.
How to Open Room Priority Settings
- Touch Menu on the thermostat.
- Scroll through the available options.
- Select Priority.
- Choose the required room priority method.
- Save the selected settings.
Menu path: Menu > Priority
Selected Rooms — Manual Room Priority
The Selected Rooms option allows specific areas of the home to be chosen manually.
Only the selected rooms contribute to the average temperature used for prioritization.
The example Priority screen shows individual room tiles for areas such as:
- Living Room
- Kitchen
- Family Room
- Rec Room
- Basement
- Guest Room
How to Use Selected Rooms
- Open Menu > Priority.
- Select Selected Rooms.
- Choose the rooms that should contribute to the average temperature.
- Review the selected rooms.
- Touch Save.
Selected vs. Unselected Rooms
| Room Status | Effect on Temperature Calculation |
| Selected | Contributes to the average temperature. |
| Unselected | Does not contribute to the average temperature. |
For example, if the Living Room, Kitchen, and Family Room are selected, the thermostat uses the selected rooms’ readings to calculate an average.
Other rooms that are not selected do not contribute to that calculation.
Active Rooms — Activity-Based Priority
The Active Rooms option uses activity detected by compatible XRSENSOR wireless room sensors.
Rooms with detected activity are selected automatically to contribute to the average temperature.
Rooms without detected activity are excluded from the active-room average.
How to Use Active Rooms
- Open Menu > Priority.
- Select Active Rooms.
- Allow the compatible wireless room sensors to detect activity.
- The thermostat automatically selects rooms with detected activity.
- Save the selected priority configuration.
Activity-Based Priority Behavior
| Sensor Status | Temperature Priority |
| Activity Detected | Room contributes to the average temperature. |
| No Activity Detected | Room does not contribute to the average temperature. |
Manual vs. Activity-Based Priority
| Feature | Selected Rooms | Active Rooms |
| Room Selection | Manual | Automatic |
| Room Priority Basis | User-selected rooms | Detected activity |
| Temperature Calculation | Average of manually selected rooms | Average of rooms with detected activity |
| Wireless Room Sensors | Used | Used |
| Available Through | Menu > Priority | Menu > Priority |
XRSENSOR Wireless Indoor Room Sensors
The X8Q uses compatible XRSENSOR wireless indoor room sensors for its room prioritization features.
These sensors provide readings from different areas of the home.
The thermostat uses the sensor readings to determine which rooms contribute to the selected temperature average.
Room Sensor Functions
| Function | Description |
| Room Temperature Reading | Provides room-specific temperature information. |
| Manual Room Priority | Allows readings from selected rooms to contribute to the average. |
| Activity-Based Priority | Uses detected activity to determine which rooms contribute to the average automatically. |
Managing Room Comfort
The Priority screen allows the owner to choose between manually selected rooms and activity-based selection.
The screen displays the room names and their temperature readings.
The Save control stores the selected priority configuration.
Indoor Air Quality Controls
The X8Q Smart Thermostat supports indoor air quality control when it has been configured to operate compatible equipment.
Depending on the installation, the following controls may be available:
- Humidification
- Dehumidification
- Ventilation
These functions can be adjusted through the thermostat’s user menu or the First Alert app.
How to Access Indoor Air Quality Settings
- Touch Menu on the thermostat.
- Scroll through the available menu options.
- Select the required indoor air quality function.
Indoor Air Quality Menu Paths
| Feature | Menu Path |
| Humidification | Menu > Humidification |
| Dehumidification | Menu > Dehumidification |
| Ventilation | Menu > Ventilation |
The available controls depend on the equipment configured for the thermostat.
Humidification Control
If the thermostat is configured to control compatible humidification equipment, the Humidification menu provides access to its settings.
Dehumidification Control
If compatible dehumidification equipment is configured, the Dehumidification menu provides access to its controls.
Ventilation Control
The Ventilation menu provides operating options for configured ventilation equipment.
The illustrated Ventilation screen contains the following areas:
| Control | Function |
| Mode | Opens ventilation operating mode selections. |
| Timer | Provides access to ventilation timer settings. |
| Options | Opens additional ventilation options. |
| Auto | Operates ventilation automatically according to the configured schedule. |
| Off | Turns off the ventilation operating mode. |
| Save | Stores the selected ventilation setting. |
How to Change the Ventilation Mode
- Touch Menu.
- Scroll to Ventilation.
- Select the required operating mode.
- Choose Auto or Off as appropriate.
- Touch Save.
How to Customize the Idle Screen
The X8Q includes a customizable idle screen.
Seven different styles and colors are available.
These options allow the thermostat display to show information in a preferred visual arrangement.
How to Change the Idle Screen
- Touch Menu.
- Select Preferences.
- Select Display.
- Select Idle Screen.
- Choose one of the available display styles.
- Use Preview to check the selected appearance.
- Select Save to store the setting.
Menu path: Menu > Preferences > Display > Idle Screen
Idle Screen Customization Options
| Setting | Description |
| Display Style | Seven available styles and colors |
| Preview | Shows the selected appearance before saving |
| Save | Stores the selected setting |
The idle screen can be customized to display information using a style that matches the preferred appearance.
How to Set Up Matter
The X8Q supports Matter connectivity for compatible smart home automations.
Matter-enabled controllers can be used to control supported thermostat functions.
Matter Functions
The thermostat supports Matter-based control of:
- Temperature setpoints
- System mode
How to Pair the X8Q with Matter
- Touch Menu on the thermostat.
- Scroll down through the available options.
- Select Matter.
- Follow the instructions shown on the thermostat screen.
- Open the pairing procedure on the compatible Matter controller.
- Scan the QR code displayed on the thermostat screen or enter the displayed pairing code.
- Follow the Matter controller’s instructions to complete pairing.
Menu path: Menu > Matter
Matter Pairing Methods
| Pairing Method | Description |
| QR Code | Scan the on-screen QR code using the Matter controller. |
| Pairing Code | Enter the displayed pairing code through the Matter controller. |
Matter Smart Home Control
Once paired with a compatible Matter controller, supported automations can control thermostat temperature setpoints and change the system mode.
Energy Rebates and Incentives
The X8Q user guide provides access to energy provider incentives and rebate programs.
Energy providers may offer incentives to eligible thermostat owners.
Available programs can be searched through the manufacturer’s utility savings resource:
Resideo Utility Savings Programs
Program availability and eligibility depend on the energy provider.
Regulatory and Safety Information
FCC Regulations
The Honeywell Home X8Q Smart Thermostat complies with Part 15 of the FCC Rules.
Its operation is subject to two conditions:
- The device must not cause harmful interference.
- The device must accept received interference, including interference that may cause undesired operation.
Changes or modifications not expressly approved by the party responsible for compliance may void the user’s authority to operate the equipment.
Additional FCC information is available through:
Resideo FCC Compliance Information
RF Exposure Requirements
The antennas used by the thermostat’s wireless transmitters must be installed with a minimum separation distance of 20 cm from all persons.
The antennas must not be co-located or operated together with another antenna or transmitter.
Wireless Frequency Restrictions
Operation in the following frequency bands is restricted to indoor use:
| Frequency Band | Operating Restriction |
| 5150–5250 MHz | Indoor Use Only |
| 5250–5350 MHz | Indoor Use Only |
These restrictions reduce the potential for harmful interference to co-channel mobile satellite systems.
Electronic Waste Disposal
The X8Q Smart Thermostat must not be discarded with ordinary household waste.
When the device reaches the end of its service life, it should be taken to an authorized electronic waste collection center or recycler.
Proper disposal helps reduce potential negative effects on the environment and human health.
Warranty Information
The Honeywell Home X8Q Smart Thermostat models X8SWF5W and X8SMC6B are covered by a 2-year limited warranty.
Warranty Coverage Information
The manufacturer’s warranty terms are available at:
Resideo Thermostat Warranty Information
Professional Installation and Warranty
The Spanish-language warranty notice identifies the thermostat as a trade product and states that warranty coverage may be void if the thermostat is not installed by a professional.
How to Request a Printed Warranty
A printed copy of the warranty can be requested through Resideo Customer Care.
Telephone: 1-800-633-3991
The manufacturer states that the printed warranty will be mailed free of charge.
Customer Support Information
The X8Q Smart Thermostat is manufactured by Resideo Technologies, Inc. and its affiliates.
The Honeywell Home trademark is used under license from Honeywell International Inc.
| Contact Type | Details |
| Brand | Honeywell Home |
| Manufacturer | Resideo Technologies, Inc. |
| Customer Care Phone | 1-800-633-3991 |
| Complete User Manual | info.honeywellhome.com/x8q-um |
| First Alert App | info.firstalert.com/FA-app-download |
| Warranty Information | resideo.info/US-Warranty-THERMOSTAT |
| Energy Rebates | resideo.info/utility-savings-programs |
Manufacturer Address
Resideo Technologies Inc.
Scottsdale, AZ 85254
United States
Customer Care
For warranty information, printed warranty requests, and manufacturer assistance, contact:
Resideo Customer Care: 1-800-633-3991
Frequently Asked Questions
1. How do I connect the Honeywell X8Q Smart Thermostat to the First Alert app?
The thermostat can be connected through the First Alert by Resideo app. Access the manufacturer’s app download page at info.firstalert.com/FA-app-download or scan the QR code in the user guide. Follow the app’s installation and connection instructions to access supported thermostat features.
2. How do I change the temperature on the Honeywell X8Q thermostat?
Locate the desired temperature setting on the Home screen. Touch the Up arrow to increase the temperature or the Down arrow to decrease it. The current indoor temperature and desired temperature are displayed separately.
3. How do I prioritize different rooms using the Honeywell X8Q?
Touch Menu and select Priority. With compatible XRSENSOR wireless room sensors, the thermostat allows manual room selection through Selected Rooms or automatic prioritization through Active Rooms. Selected rooms contribute to the home’s average temperature, while activity-based priority uses rooms where activity is detected.
4. How do I change the idle screen on the X8Q Smart Thermostat?
Touch Menu, select Preferences, then Display, and open Idle Screen. Choose from the seven available styles and colors. Select Preview to view the appearance, then Save to store the setting.
5. Does the Honeywell X8Q support Matter smart home connectivity?
Yes. The X8Q supports Matter-compatible control of temperature setpoints and system modes. To begin pairing, open Menu and select Matter. Follow the on-screen instructions, then scan the displayed QR code or enter the pairing code using a compatible Matter controller.
6. Can the Honeywell X8Q control humidity and ventilation?
Yes, when the thermostat has been configured to control compatible indoor air quality equipment. Humidification, Dehumidification, and Ventilation options are available through the user menu or First Alert app when applicable. The Ventilation menu includes operating controls such as Auto and Off.
7. What is the warranty on the Honeywell Home X8Q Smart Thermostat?
The X8Q has a 2-year limited warranty. The Spanish-language warranty notice states that coverage may be void if this trade product is not installed by a professional.
Warranty details are available at resideo.info/US-Warranty-THERMOSTAT, and a free printed copy can be requested by calling Resideo Customer Care at 1-800-633-3991.