| Field | Details |
| Document Title | X8S Smart Thermostat Getting Started Guide |
| Document Type | Getting Started Guide |
| Brand Name | Honeywell Home |
| Product Name | X8S Smart Thermostat |
| Model Number(s) | X8VWF7WC, X8VMC9W, X8VWF7W, X8VMC8BC, X8VWF10B, X8VMC8B |
| PDF File Size | 181.3 KB |
| Total Number of Pages | 2 |
| Languages Covered | English, Spanish |
Honeywell Home X8S Smart Thermostat X8VWF7WC
The Honeywell Home X8S Smart Thermostat is a connected temperature controller designed to operate compatible residential heating and cooling equipment. It features a digital touchscreen, dual-band WiFi connectivity, wireless room sensor compatibility, and integration with the First Alert by Resideo app.
The X8S supports remote thermostat control through the First Alert app, allowing access to smart scheduling, Auto Away functionality, alerts, reminders, and monthly energy reports. The thermostat also supports compatible video doorbell and indoor air quality features.
The thermostat communicates with supported wireless indoor sensors through RedLINK technology operating at 900 MHz. It also supports Bluetooth Low Energy (BLE) at 2.4 GHz and dual-band WiFi at 2.4 GHz and 5 GHz.
Before installation, the existing heating and cooling system must be assessed for wiring compatibility. The X8S uses a UWP wall plate and may require a C-wire adapter when the existing thermostat cable does not provide a suitable common wire.
Initial configuration can be completed through the First Alert by Resideo app or directly on the thermostat. The Advanced Settings menu is available for installer configuration after the initial setup.
Product Overview and Technical Specifications
The X8S Smart Thermostat is available in white and black configurations for the United States and Canada.
Some models are supplied with a wireless room sensor.
| Specification | Details |
| Brand | Honeywell Home |
| Manufacturer | Resideo Technologies, Inc. |
| Product Name | X8S Smart Thermostat |
| Product Series | X8S |
| Product Type | Smart Heating and Cooling Thermostat |
| Display | Digital touchscreen |
| Available Colors | White and Black |
| Wall Mounting | UWP Wall Plate |
| Setup Options | First Alert app or local thermostat configuration |
| Mobile App | First Alert by Resideo |
| WiFi | Dual-band 2.4 GHz and 5 GHz |
| Bluetooth | BLE 2.4 GHz |
| Wireless Sensor Communication | RedLINK 900 MHz |
| Compatible Wireless Sensor | XRSENSOR |
| Compatible Sensor Packages | XRSENSOR-1PK, XRSENSOR-2PK |
| Optional Cover Plate | THP2400WH |
| C-Wire Adapter | Supported for qualifying wiring arrangements |
| Heating Setpoint Range Identified | 40–90°F (4.5–32°C) |
| Cooling Setpoint Range Identified | 50–99°F (10–37°C) |
| Compressor Protection | Supported |
| Video Doorbell Connection | First Alert VX1; additional compatibility covered in full installation instructions |
| Installer Configuration | Menu > Advanced Settings |
| Customer Support | 1-800-633-3991 |
Honeywell Home X8S Thermostat Models
The X8S is available under six model numbers.
The model number identifies the product version, color, region, and whether a room sensor is included in the package.
Model Comparison
| Model Number | Color | Region | Package Configuration |
| X8VWF7WC | White | Canada | Thermostat |
| X8VMC9W | White | United States | Thermostat with room sensor |
| X8VWF7W | White | United States | Thermostat |
| X8VMC8BC | Black | Canada | Thermostat |
| X8VWF10B | Black | United States | Thermostat with room sensor |
| X8VMC8B | Black | United States | Thermostat |
White Thermostat Models
The white models include X8VWF7WC, X8VMC9W, and X8VWF7W.
Black Thermostat Models
The black models include X8VMC8BC, X8VWF10B, and X8VMC8B.
Models With a Room Sensor
The following United States configurations include a room sensor:
- X8VMC9W — White thermostat with room sensor.
- X8VWF10B — Black thermostat with room sensor.
What’s Included in the Box
The X8S Smart Thermostat package contains the thermostat and its standard mounting components.
| Included Component | Function |
| X8S Smart Thermostat | Controls the compatible heating and cooling system |
| UWP Wall Plate | Provides the wall-mounting and wiring connection base |
| Screws | Secure the mounting plate |
| Wall Anchors | Support the wall installation |
| Thermostat Literature | Provides product setup and operating information |
The manufacturer’s guide also identifies an offer for a C-wire adapter. The adapter itself is not listed among the standard package contents.
Some X8S packages include an XRSENSOR wireless indoor sensor, as identified in the model comparison table.
Optional Accessories and Replacement Parts
The X8S supports the following accessories listed by the manufacturer.
| Accessory Model | Description |
| XRSENSOR-1PK | Wireless Indoor Room Sensor, 1-Pack |
| XRSENSOR-2PK | Wireless Indoor Room Sensor, 2-Pack |
| THP2400WH | Optional White Cover Plate |
XRSENSOR Wireless Indoor Sensors
The XRSENSOR accessories are wireless indoor room sensors intended for use with compatible X8S thermostat configurations.
They are offered in single-sensor and two-sensor packages.
Optional White Cover Plate
The THP2400WH is an optional white cover plate for the thermostat installation.
Understanding the Thermostat Display and Controls
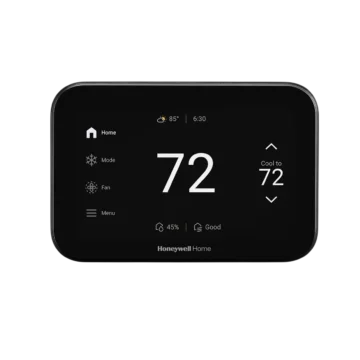
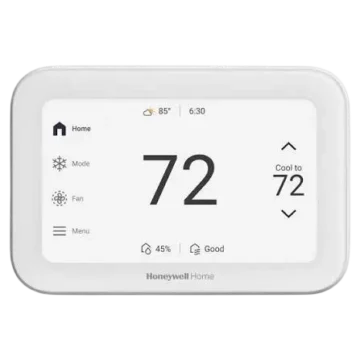
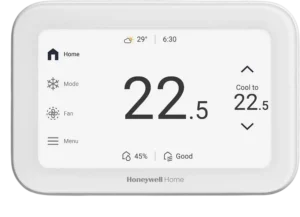
The X8S includes a touchscreen with temperature information, operating mode controls, fan controls, and a settings menu.
The manufacturer’s front-view illustration identifies the main display components.
Main Display Components
| Display Component | Function |
| Home Indicator | Identifies the main thermostat screen |
| Current Temperature | Displays the measured indoor temperature |
| Set Temperature | Shows the selected heating or cooling target |
| Up Arrow | Increases the selected temperature |
| Down Arrow | Decreases the selected temperature |
| System Mode | Identifies the selected operating mode |
| Fan Mode | Displays the fan operating setting |
| Menu | Opens additional thermostat settings |
| Weather | Displays weather information |
| Time | Displays the current time |
| Indoor Humidity | Displays indoor humidity information |
| Indoor Air Quality | Displays indoor air quality status |
Current Temperature
The large temperature reading in the center of the home screen represents the current measured temperature.
Set Temperature
The Set Temperature area displays the desired temperature.
The Up and Down arrows beside this setting provide direct temperature adjustment.
System Mode
The System Mode area shows the selected heating or cooling operating mode.
Available choices depend on the connected system configuration.
Fan Mode
The Fan Mode area provides access to the configured fan operation.
Menu
The Menu control opens additional operating and setup features, including WiFi and Advanced Settings.
Safety Instructions and Installation Precautions
The X8S must be installed according to the manufacturer’s system compatibility, wiring, and configuration requirements.
Warning: Electrical shock or equipment damage can occur if power is not disconnected before installation.
Electrical Safety
Power to the heating and cooling equipment must be disconnected before installation begins.
The thermostat must be installed using the correct wiring arrangement for the existing system.
Equipment Damage Warning
The thermostat includes compressor protection to prevent rapid cycling.
Compressor protection is bypassed during installer testing.
Avoid rapidly switching the compressor on and off during testing because equipment damage may occur.
Wiring Compatibility
The existing heating and cooling system must be assessed before installing the thermostat.
Incorrect wiring or configuration can cause improper operation or equipment damage.
The complete installation instructions are available at:
https://info.honeywellhome.com/x8s-im
Mercury Disposal
If the existing thermostat contains mercury in a sealed tube, it must not be disposed of with ordinary household waste.
The local waste management authority should be contacted for proper recycling and disposal instructions.
Before Installing the X8S Smart Thermostat
Installation begins by assessing the existing heating and cooling system.
Step 1: Identify the Existing System
Determine the type of heating and cooling equipment currently installed.
The wiring must support the smart thermostat configuration.
Step 2: Check Wiring Compatibility
Inspect the existing thermostat wiring arrangement.
The system must have wiring suitable for the X8S or qualify for an appropriate C-wire adapter installation.
Step 3: Check the C-Wire Connection
Determine whether the existing thermostat cable includes a C-wire or another unused conductor.
If no suitable common wire is available, the C-wire adapter option may be applicable.
Step 4: Prepare the Installation
Before removing the existing thermostat, disconnect power to the heating and cooling equipment.
The mounting and wiring arrangement must follow the model-specific installation instructions.
Understanding the C-Wire Requirement
The manufacturer’s Getting Started Guide includes a C-wire assessment as part of the installation process.
The existing thermostat wiring must be checked to determine whether a suitable common connection is available.
When a C-Wire Adapter May Be Used
A C-wire adapter may be used when the following wiring conditions apply:
- The previous thermostat does not have a connected C-wire.
- No additional unused wire is available in the thermostat cable bundle.
- The previous thermostat uses both Y and G wires.
For this arrangement, the manufacturer identifies the C-wire adapter as an available option.
C-Wire Adapter Assistance
The manufacturer’s guide includes a QR code for additional information about the C-wire adapter.
The full installation documentation provides the required compatibility and connection guidance.
Mounting and Wiring the X8S Thermostat
The X8S uses the UWP wall plate supplied with the thermostat.
The exact terminal connections and mounting sequence must follow the X8S installation instructions.
Step 1: Disconnect Power
Switch off power to the heating and cooling system.
Do not handle the existing thermostat wiring while the equipment is energized.
Step 2: Confirm System Compatibility
Check the existing system type and wiring configuration.
Determine whether a C-wire adapter is required.
Step 3: Install the UWP Wall Plate
Use the supplied UWP wall plate, screws, and wall anchors as specified in the installation documentation.
Step 4: Connect the Thermostat Wiring
Connect the existing thermostat wires according to the approved wiring arrangement.
The wiring must match the connected HVAC equipment.
Step 5: Complete Thermostat Installation
Attach the thermostat to the installed UWP wall plate according to the manufacturer’s installation instructions.
Step 6: Restore Power
After the installation has been completed and checked, restore power to the heating and cooling equipment.
Step 7: Begin Thermostat Configuration
Initial configuration can be completed using:
- The First Alert by Resideo app.
- The thermostat’s local setup interface.
For the full wiring instructions, use:
https://info.honeywellhome.com/x8s-im
Setting Up the Thermostat With the First Alert App
The First Alert by Resideo app provides guided initial setup.
Step 1: Access the First Alert App
The manufacturer’s Getting Started Guide provides a QR code for accessing the application.
The app can also be accessed at:
https://info.firstalert.com/FA-app-download
Step 2: Open the App
Open the First Alert by Resideo application on the mobile device.
Step 3: Continue Installation
Follow the setup instructions in the application.
The app guides the user through the thermostat configuration process.
Step 4: Complete Setup
Complete the configuration prompts until thermostat setup is finished.
Configuring the Thermostat Without the App
The X8S also supports local initial configuration.
The thermostat provides on-screen setup instructions that guide users through the configuration process.
Local Setup Procedure
- Begin the thermostat’s initial setup.
- Follow the instructions displayed on the touchscreen.
- Enter the required configuration information.
- Continue until the setup process is complete.
Accessing Advanced Settings
The thermostat provides an Installer Setup menu for changing configuration settings after the initial setup.
How to Open Installer Setup
- Touch Menu on the thermostat.
- Select Advanced Settings.
The installer configuration options can then be accessed.
The configured values must match the connected heating and cooling equipment.
Connecting the X8S to WiFi
The X8S supports dual-band WiFi connectivity.
The thermostat can connect to networks operating at 2.4 GHz or 5 GHz.
How to Connect to WiFi
- Touch Menu on the thermostat.
- Scroll to WiFi.
- Select WiFi.
- Follow the on-screen setup prompts.
- Enter the network SSID when requested.
- Enter the WiFi password.
- Complete the connection procedure.
WiFi Network Requirements
| Feature | Specification |
| WiFi Frequency Band 1 | 2.4 GHz |
| WiFi Frequency Band 2 | 5 GHz |
| Network Identification | SSID |
| Network Authentication | WiFi password |
| Router IP Configuration | Automatic DHCP assignment |
Wireless Communication Specifications
The X8S supports several wireless communication technologies.
| Technology | Frequency |
| Bluetooth Low Energy | 2.4 GHz |
| Dual-Band WiFi | 2.4 GHz and 5 GHz |
| RedLINK | 900 MHz |
Bluetooth Low Energy
The thermostat includes BLE communication operating at 2.4 GHz.
Dual-Band WiFi
The X8S supports both 2.4 GHz and 5 GHz WiFi networks.
RedLINK Wireless Communication
The thermostat supports RedLINK communication at 900 MHz.
This technology is used with compatible wireless accessories.
Connecting a First Alert Video Doorbell
The X8S supports connection to the First Alert VX1 video doorbell.
How to Connect the Doorbell
- Open the First Alert by Resideo app.
- Begin the video doorbell setup process.
- Follow the app instructions to connect the compatible First Alert VX1 doorbell.
The full installer documentation provides additional information about compatible video doorbells.
Understanding Compressor Protection
The X8S includes compressor protection to reduce the risk of damage caused by rapid compressor cycling.
Waiting for Equipment Message
When the display shows Waiting for equipment, compressor protection is active.
The thermostat temporarily delays the system restart.
How Long to Wait
Wait approximately five minutes.
The delay allows the heating or cooling equipment to restart safely without damaging the compressor.
Compressor Protection During Testing
The installer test bypasses the normal compressor protection delay.
Rapid compressor cycling must be avoided during equipment testing.
Temperature Adjustment and Setpoint Limits
The X8S provides temperature adjustment through the touchscreen.
The permitted setpoint range depends on the selected operating mode and installer configuration.
Heating Temperature Range
| Setting | Temperature |
| Minimum Heating Setpoint | 40°F (4.5°C) |
| Maximum Heating Setpoint | 90°F (32°C) |
Cooling Temperature Range
| Setting | Temperature |
| Minimum Cooling Setpoint | 50°F (10°C) |
| Maximum Cooling Setpoint | 99°F (37°C) |
Installer Setpoint Restrictions
The installer may configure range stops that restrict the available temperature adjustment.
If the temperature cannot be changed to a desired value within the stated range, the installed restrictions should be checked.
Troubleshooting the X8S Smart Thermostat
The following troubleshooting procedures address common thermostat, network, and operating problems.
Thermostat Displays Waiting for Equipment
Cause: Compressor protection is active.
Action:
Wait five minutes for the compressor protection period to end.
The heating or cooling system can then restart safely.
Cannot Change the Temperature Setpoint
Several conditions can restrict temperature adjustment.
Check the Thermostat Lock
If the display shows Unlock, the thermostat owner has enabled a lockout setting.
The thermostat must be unlocked before the restricted controls can be changed.
Check the System Mode
Confirm that the thermostat is in the intended operating mode.
The guide identifies Heat, Cool, Emergency Heat, and Auto as relevant modes.
Check the Temperature Range
Heating is limited to 40–90°F (4.5–32°C), and cooling is limited to 50–99°F (10–37°C), subject to configured restrictions.
Check Installer Range Stops
If the requested temperature is within the normal range but cannot be selected, the installer may have configured range stops.
Contact the installer to confirm the permitted temperature settings.
Thermostat Display Is Blank
A blank thermostat display may indicate a power supply problem.
Step 1: Check the Circuit Breaker
Inspect the circuit breaker controlling the heating and cooling system.
Reset it if necessary.
Step 2: Check the HVAC Power Switch
Confirm that the heating and cooling system power switch is turned on.
Step 3: Check the Furnace Door
Make sure the furnace door is closed securely.
A furnace door that is not properly closed may prevent normal equipment operation.
WiFi Connection Is Unsuccessful
WiFi connection problems may be caused by an incorrect password, router configuration, or internet connectivity.
Incorrect WiFi Password
Possible Cause: The entered network password is incorrect.
Action:
- Check the WiFi password.
- Enter the correct password.
- Repeat the WiFi connection procedure.
Router Does Not Assign an IP Address
Possible Cause: The router has not assigned an IP address to the thermostat.
Action:
- Open the router configuration.
- Confirm that automatic IP address assignment is enabled.
- Check that DHCP is correctly configured.
- Repeat the thermostat connection procedure.
The printed troubleshooting text also describes a 10-second wall-plate power-cycle step, but identifies the device as ElitePRO rather than X8S. The X8S-specific installation instructions should be checked before applying that procedure.
No Internet Connection
Possible Cause: The local network does not have a working internet link.
Action:
- Check the router’s connection settings.
- Verify that the router is connected to the internet.
- Restart the router if necessary.
- Repeat the thermostat connection procedure.
Troubleshooting Reference Table
| Problem | Possible Cause | Recommended Action |
| Waiting for equipment | Compressor protection active | Wait five minutes |
| Cannot adjust temperature | Keypad lock enabled | Unlock the thermostat |
| Cannot change heating setpoint | Wrong system mode or setpoint restrictions | Check operating mode and installer range stops |
| Cannot change cooling setpoint | Wrong system mode or setpoint restrictions | Check operating mode and installer range stops |
| Blank display | Circuit breaker is off or tripped | Check and reset breaker if necessary |
| Blank display | HVAC equipment power switch is off | Turn on the equipment power switch |
| Blank display | Furnace door is not properly closed | Close furnace door securely |
| WiFi connection fails | Incorrect password | Re-enter the correct password |
| No IP address | Router DHCP configuration issue | Enable automatic IP assignment |
| No internet link | Router or network connection problem | Check router settings and restart if required |
Energy Savings Programs and Rebates
The manufacturer’s Getting Started Guide provides access to utility incentives and energy savings programs.
Participating energy providers may offer rebates for eligible smart thermostat installations.
Information about available programs can be found at:
Program eligibility and rebate availability depend on the participating energy provider.
Regulatory Information
The X8S Smart Thermostat complies with applicable United States and Canadian radio equipment requirements.
FCC Compliance
The thermostat complies with Part 15 of the FCC Rules.
Operation is subject to the following conditions:
- The device must not cause harmful interference.
- The device must accept interference received, including interference that may cause undesired operation.
FCC Modification Warning
Changes or modifications not expressly approved by the responsible party may void authorization to operate the equipment.
Canadian IC Compliance
The thermostat contains licence-exempt radio transmitters and receivers that comply with applicable Innovation, Science and Economic Development Canada requirements.
Operation is subject to the requirements that the device must not cause interference and must accept received interference.
Radio-Frequency Exposure Requirements
The manufacturer specifies antenna installation requirements for compliance with FCC and IC radio-frequency exposure regulations.
Minimum Separation Distance
The transmitting antennas must be installed with a minimum separation distance of 20 cm from all persons.
Antenna Placement
The transmitter antennas must not be positioned or operated together with another antenna or transmitter.
Indoor Frequency Restrictions
The following frequency bands are restricted to indoor operation:
| Frequency Band | Restriction |
| 5150–5250 MHz | Indoor use only |
| 5250–5350 MHz | Indoor use only |
These restrictions reduce the potential for interference with mobile satellite systems operating on the same channels.
Electronic Waste Disposal
The X8S Smart Thermostat and batteries must not be disposed of with ordinary household waste.
The manufacturer recommends using authorized electronic waste collection centers or recyclers.
Correct disposal of electronic equipment helps prevent potential environmental and human health impacts.
Customer Support and Manufacturer Information
The X8S Smart Thermostat is manufactured by Resideo Technologies, Inc. under license to use the Honeywell Home trademark.
| Information | Details |
| Brand | Honeywell Home |
| Manufacturer | Resideo Technologies, Inc. |
| Product | X8S Smart Thermostat |
| Customer Support Phone | 1-800-633-3991 |
| Manufacturer Location | Scottsdale, AZ 85254, United States |
| Installation Instructions | https://info.honeywellhome.com/x8s-im |
| First Alert App | https://info.firstalert.com/FA-app-download |
| Utility Rebates | https://resideo.info/utility-savings-programs |
Frequently Asked Questions
1. How is the Honeywell Home X8S Smart Thermostat installed?
Installation begins by identifying the existing heating and cooling system and checking the thermostat wiring for compatibility.
The X8S uses the included UWP wall plate, mounting screws, and anchors.
Power must be disconnected before installation.
The wiring and mounting procedures must follow the manufacturer’s X8S installation instructions at https://info.honeywellhome.com/x8s-im.
2. Does the Honeywell X8S require a C-wire adapter?
A C-wire adapter may be used when the previous thermostat has no C-wire, no spare conductor is available in the wire bundle, and the existing thermostat uses both Y and G wires.
The manufacturer’s guide provides additional adapter assistance through a QR code.
3. How is the Honeywell X8S connected to WiFi?
Touch Menu, scroll to WiFi, and select it.
Follow the on-screen instructions to enter the network SSID and password.
The X8S supports both 2.4 GHz and 5 GHz WiFi networks.
4. Why does the X8S display Waiting for equipment?
Waiting for equipment indicates that compressor protection is active.
The thermostat delays the equipment restart to prevent compressor damage.
Wait approximately five minutes for normal operation to resume.
5. Why is the Honeywell X8S thermostat screen blank?
Check the heating and cooling system’s circuit breaker and reset it if necessary.
Confirm that the HVAC power switch is on and the furnace door is closed securely.
These are the primary checks identified in the manufacturer’s Getting Started Guide.
6. Why can’t the X8S temperature be changed?
The thermostat may be locked, the wrong system mode may be selected, or installer-configured range stops may restrict temperature adjustment.
The heating range identified in the guide is 40–90°F (4.5–32°C), and the cooling range is 50–99°F (10–37°C).
If the normal range is restricted, the installer should be consulted.
7. Which wireless technologies does the X8S support?
The X8S supports three wireless communication technologies:
- Bluetooth Low Energy at 2.4 GHz.
- Dual-band WiFi at 2.4 GHz and 5 GHz.
- RedLINK at 900 MHz.
8. How is the X8S configured without the First Alert app?
The X8S supports local initial setup directly through its touchscreen.
Follow the on-screen configuration instructions to complete the setup.
After installation, the Installer Setup options can be accessed through Menu > Advanced Settings.