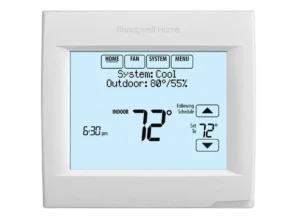
| Field | Details |
| Document Title | VisionPRO 8000 Smart User Guide |
| Document Type | User Guide |
| Brand Name | Honeywell Home |
| Product Name | VisionPRO 8000 Smart Thermostat |
| Model Number(s) | TH8321WF1001 |
| PDF File Size | 1.74 MB |
| Total Number of Pages | 76 |
| Languages Covered | English, French, Spanish |
Honeywell Home VisionPRO 8000 Smart Thermostat
The Honeywell Home VisionPRO 8000 Smart is a Wi-Fi-enabled programmable thermostat designed to manage compatible residential and light commercial heating and cooling systems. It provides touchscreen temperature controls, customizable schedules, remote access, humidity management, ventilation settings, and equipment status information.
The VisionPRO 8000 Smart thermostat can connect to a wireless network and be registered with Total Connect Comfort. Once connected and registered, the thermostat can be monitored and controlled remotely through a compatible computer, tablet, or smartphone using the Total Connect Comfort service.
The thermostat also provides access to indoor temperature and humidity information, outdoor weather information through supported connections, heating and cooling schedules, system status, and maintenance reminders.
The TH8321WF1001 supports several operating modes, including Heat, Cool, Off, Auto, and Emergency Heat on compatible systems. Fan operation can be configured for automatic, continuous, intermittent, or scheduled operation.
For residential use, the thermostat supports four daily program periods: Wake, Leave, Return, and Sleep. For light commercial applications, it offers occupied and unoccupied schedules, holiday programming, and temporary occupancy overrides.
Additional functions include Adaptive Intelligent Recovery, vacation scheduling, humidity control, window frost protection, ventilation management, touchscreen locking, and compressor protection.
Product Overview and Features
| Feature | Description |
| Product Type | Wi-Fi programmable smart thermostat |
| Touchscreen Display | Provides temperature, scheduling, and system controls |
| Wi-Fi Connectivity | Connects the thermostat to a wireless network |
| Remote Access | Supports remote monitoring and control through Total Connect Comfort |
| Mobile App | Total Connect Comfort |
| Temperature Scheduling | Customizable heating and cooling schedules |
| Residential Scheduling | Wake, Leave, Return, Sleep |
| Commercial Scheduling | Occupied and Unoccupied periods |
| System Modes | Heat, Cool, Off, Auto, Em Heat on supported systems |
| Fan Settings | On, Auto, Circ, Follow Schedule |
| Vacation Mode | Adjusts temperatures for an extended absence |
| Holiday Scheduling | Provides special schedules for commercial applications |
| Humidity Control | Supports configured humidification and dehumidification equipment |
| Ventilation Control | Supports automatic, continuous, and temporary ventilation |
| Equipment Status | Displays operating information for connected systems |
| Adaptive Intelligent Recovery | Starts heating or cooling early to reach scheduled temperatures |
| Compressor Protection | Temporarily delays compressor restarting |
| Security Settings | Unlocked, Partially Locked, Fully Locked |
| Maintenance Reminders | Provides configurable reminders |
| Alerts | Supports on-screen alerts and email notifications through connected services |
| Software Updates | Supports automatic upgrades through the connected service |
Technical Specifications
General Specifications
| Specification | Details |
| Product Series | VisionPRO 8000 Smart |
| Model Number | TH8321WF1001 |
| Thermostat Type | Programmable Wi-Fi Thermostat |
| User Interface | Touchscreen |
| Wi-Fi Connectivity | Supported |
| Remote Service | Total Connect Comfort |
| Indoor Temperature Display | Supported |
| Indoor Humidity Display | Supported |
| Outdoor Temperature Information | Supported with appropriate sensor or connected weather data |
| System Modes | Heat, Cool, Off, Auto, Em Heat |
| Fan Modes | On, Auto, Circ, Follow Schedule |
| Residential Program Periods | 4 |
| Residential Schedule Groups | Weekdays and Weekends |
| Commercial Program Periods | Occupied and Unoccupied |
| Screen Illumination | 45 seconds after changes |
| Continuous Screen Illumination | Depends on installation |
| Fan Circulation Setting | Approximately 35% of the time in residential Circ mode |
| Compressor Restart Protection | Built-in delay |
| Warranty | 5-year limited warranty |
Electrical Ratings
| Terminal | Voltage | Maximum Current Rating |
| W – OB | 18–30 VAC and 750 mVDC | 1.00 A |
| Y – Cooling | 18–30 VAC | 1.00 A |
| G – Fan | 18–30 VAC | 0.50 A |
| W2 – Aux Heating | 18–30 VAC | 0.60 A |
| Y2 – Cooling | 18–30 VAC | 0.60 A |
| A-L/A – Output | 18–30 VAC | 1.00 A |
| U1/U1 | 30 VAC maximum | 0.50 A |
The electrical ratings apply to the terminals identified in the thermostat’s technical information. Available equipment functions depend on the installation configuration.
Thermostat Parts and Touchscreen Controls
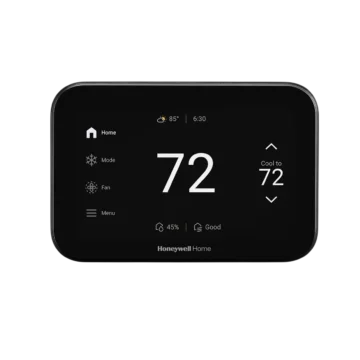
The VisionPRO 8000 Smart uses an interactive touchscreen rather than a conventional set of mechanical programming buttons.
The display provides direct access to temperature adjustments, fan modes, heating and cooling settings, schedules, and additional menus.
Main Touchscreen Controls
| Control | Function |
| HOME | Returns to the Home screen |
| FAN | Opens fan operating settings |
| SYSTEM | Opens heating and cooling mode settings |
| MENU | Opens scheduling, preferences, Wi-Fi, and other options |
| Up Arrow | Increases temperature or selected values |
| Down Arrow | Decreases temperature or selected values |
| Select | Confirms a selected menu option |
| Done | Saves settings and exits |
| Cancel | Exits without saving changes |
| Next | Moves to the next configuration screen |
| Back | Returns to a previous screen |
| Hold Until | Sets the end time for a temporary schedule override |
| Cancel Hold | Cancels an active temperature override |
HOME Control
Touch HOME to return to the main operating screen.
The Home screen shows temperature, system status, scheduling information, and other operating details.
FAN Control
Touch FAN to select the required fan setting.
Available options depend on the thermostat’s residential or commercial configuration.
SYSTEM Control
Touch SYSTEM to change the heating or cooling mode.
The available settings may include Heat, Cool, Off, Auto, and Em Heat.
MENU Control
Touch MENU to access functions such as:
- Wi-Fi Setup
- Edit Schedule
- Equipment Status
- Vacation Mode
- Holiday Schedule
- Humidification
- Dehumidification
- Ventilation
- Preferences
- Clean Screen
- Security Settings
- Dealer Information
- Installer Options
The menus displayed depend on how the thermostat is configured and which equipment functions are installed.
Thermostat Display Guide
The touchscreen presents information about indoor conditions, system settings, and operating status.
Display Indicators and Functions
| Display Information | Meaning |
| Indoor Temperature | Current measured room temperature |
| Indoor Humidity | Current indoor relative humidity |
| Temperature Setpoint | Desired heating or cooling temperature |
| Current Time | Thermostat clock |
| Current Schedule | Active programmed period |
| System Status | Current heating or cooling operating state |
| Heat On | Heating equipment is operating |
| Cool On | Cooling equipment is operating |
| Em Heat On | Emergency heating is operating |
| In Recovery | Adaptive Intelligent Recovery is active |
| Wait | Compressor restart protection is active |
| Alert Light | An alert is active or Emergency Heat is selected |
| Outdoor Temperature | Outdoor temperature information when available |
| Override | Commercial schedule override control |
| Register Online | Online registration is required |
Residential Home Screen
The residential screen displays:
- Current time
- System operating mode
- Indoor temperature
- Indoor humidity
- Temperature setpoint
- Schedule information
- Temperature adjustment arrows
- Alert status
Commercial Home Screen
The commercial screen provides similar operating information, with additional controls for:
- Occupancy status
- Scheduled occupied and unoccupied periods
- Temporary schedule overrides
- Commercial operating schedules
Display Backlight
The touchscreen illuminates when a button is pressed.
The screen normally remains illuminated for approximately 45 seconds after changes are completed.
Depending on the installation, the display may remain illuminated continuously.
Before First Use
After the thermostat has been installed and configured for the connected HVAC equipment, the operating settings can be reviewed.
Initial Setup
- Check that the thermostat display is operating.
- Select the desired system mode.
- Choose the fan operating setting.
- Set the current time and date.
- Review the programmed heating and cooling schedule.
- Connect the thermostat to Wi-Fi if remote access is required.
- Register the thermostat with Total Connect Comfort.
- Review available preferences and maintenance reminders.
The available functions depend on the installed equipment and thermostat configuration.
Connecting the Thermostat to Wi-Fi
The VisionPRO 8000 Smart can connect directly to a wireless network.
A Wi-Fi connection is required before the thermostat can be registered for remote access through Total Connect Comfort.
Step 1: Open Wi-Fi Setup
- Touch MENU.
- Select Wi-Fi Setup.
- The thermostat begins scanning for available wireless networks.
- The screen displays Finding Networks Please Wait.
Step 2: Select a Wi-Fi Network
- Wait for the thermostat to display the available networks.
- Use the arrow controls to move through the network list.
- Find the required network name.
- Touch the network name.
- Touch Select.
Step 3: Enter the Wi-Fi Password
If the selected network requires a password:
- Touch the password entry area.
- Use the up and down arrow controls to choose a letter or number.
- Move to the next character using the navigation arrow.
- Use the opposite arrow to return to the previous character.
- Use the lower arrow controls to change between uppercase and lowercase letters.
- Use Delete or Space when needed.
- Touch Done after entering the password.
Step 4: Confirm the Connection
The thermostat attempts to connect to the selected network.
If successful, the screen displays:
Connection Successful
Touch Done to finish.
If the connection fails, the thermostat displays the reason and provides additional instructions.
Step 5: Prepare for Remote Access
For remote access, the thermostat must also be registered with Total Connect Comfort.
The following identifiers are required:
- MAC ID
- MAC CRC
These can be found through MENU → Wi-Fi Setup.
Registering the Thermostat With Total Connect Comfort
Total Connect Comfort allows registered thermostats to be monitored and controlled remotely.
The registration instructions in the guide use the Total Connect Comfort website.
Step 1: Open Total Connect Comfort
Visit:
Step 2: Sign In or Create an Account
If an account already exists, select Login.
To create a new account:
- Select Create An Account.
- Follow the registration instructions.
- Check the email inbox for an activation message.
- Open the activation email.
- Follow the activation instructions.
- Sign in to the account.
If the activation message does not arrive, check the junk mail folder or use another email address.
Step 3: Register the Thermostat
After signing in:
- Begin the thermostat registration process.
- Add the thermostat location.
- Enter the device’s unique MAC ID.
- Enter the MAC CRC.
- Follow the remaining on-screen instructions.
The identifiers are not case-sensitive.
Step 4: Confirm Registration
When registration succeeds, Total Connect Comfort displays a success message.
The thermostat can then be controlled remotely through the supported service.
Total Connect Comfort Mobile App
The guide describes the free Total Connect Comfort app for compatible Apple and Android mobile devices.
Once the thermostat is connected and registered, remote functions can include:
- Viewing thermostat conditions
- Changing temperature settings
- Adjusting heating and cooling operation
- Managing schedules
- Receiving supported alerts
Service availability and app compatibility depend on the current Total Connect Comfort service and supported device software.
Connecting to a Hidden Wi-Fi Network
A hidden network does not broadcast its name in the normal list of available Wi-Fi networks.
The network name must be entered manually.
Hidden Network Setup
- Touch MENU.
- Select Wi-Fi Setup.
- Select Other.
- Touch Select.
- Touch the network name entry field.
- Enter the network name using the arrow controls.
- Use the navigation buttons to move between characters.
- Change letter case when necessary.
- Touch Done.
- Select the appropriate network security setting.
- Touch Select.
- Enter the Wi-Fi password.
- Complete the connection process.
Checking Wi-Fi Signal Strength
The thermostat displays wireless signal strength after connecting to a network.
How to Check Signal Strength
- Touch MENU.
- Select Wi-Fi Setup.
- Review the displayed network information and signal strength.
Signal Strength Indicators
| Signal Strength | Display Range |
| High | 75–100% |
| Medium | 50–75% |
| Low | 0–50% |
These ranges correspond to the signal indicators shown on the thermostat.
Disconnecting From a Wi-Fi Network
The thermostat can be disconnected from its current wireless network.
This may be necessary when replacing a router or changing the network.
How to Disconnect Wi-Fi
- Touch MENU.
- Select Wi-Fi Setup.
- Scroll to Disconnect Wi-Fi Network.
- Select Yes.
- Confirm the disconnection by touching Yes again.
- The display shows Disconnecting Please Wait.
- Wait for the message Wi-Fi Disconnected Successfully.
- Touch Done.
The thermostat returns to the Wi-Fi Setup screen.
Reconnecting the Thermostat to Wi-Fi
After disconnection, the thermostat can be connected to another available wireless network.
Reconnection Procedure
- Touch MENU.
- Select Wi-Fi Setup.
- Locate the required network name.
- Select the network.
- Touch Select.
- Enter the password if requested.
- Touch Done.
- Wait for Connecting Please Wait.
- Confirm that Connection Successful appears.
- Touch Done.
If the thermostat is already registered, the screen displays signal strength and other status information.
If registration is required, the thermostat prompts the user to register online.
Removing Total Connect Comfort Registration
The guide provides an account-removal procedure for situations such as moving to another location and leaving the thermostat behind.
Its printed procedure is:
- Sign in at mytotalconnectcomfort.com.
- Open My Account.
- Select Edit My Profile.
- Select Delete My Account.
The thermostat then displays a Register Online button.
Important: Delete My Account is an account-deletion action. Users should confirm that they intend to delete the associated Total Connect Comfort account before selecting it.
Setting the Time and Date
The thermostat allows the current time and date to be adjusted directly from the Home screen.
How to Set the Time
- Touch the current time on the display.
- The Select Option screen appears.
- Select Time.
- Touch Select.
- Use the up or down arrows to adjust the time.
- Touch Done to save.
- Touch Home to return to the main screen.
How to Set the Date
- Touch the current time.
- Select Date.
- Touch Select.
- Adjust the date using the arrows.
- Touch Done to save.
- Touch Home.
Automatic Time Adjustment
When the thermostat is registered with Total Connect Comfort, it can automatically set the time and adjust for daylight saving time.
Selecting the Heating or Cooling Mode
The SYSTEM control determines which heating or cooling function is active.
How to Change the System Mode
- Touch SYSTEM.
- The available system modes appear.
- Select the desired mode.
- Touch Done to save and exit.
Available System Modes
| System Mode | Function |
| Heat | Controls heating only |
| Cool | Controls cooling only |
| Off | Turns off heating and cooling |
| Auto | Selects heating or cooling according to indoor temperature |
| Em Heat | Controls auxiliary/emergency heating and locks out the compressor |
Auto and Em Heat may not appear on every thermostat because availability depends on the installation.
Heat Mode
Heat mode operates the heating system.
- Touch SYSTEM.
- Select Heat.
- Touch Done.
- Adjust the heating temperature.
Cool Mode
Cool mode operates the cooling system.
- Touch SYSTEM.
- Select Cool.
- Touch Done.
- Adjust the cooling temperature.
Auto Mode
Auto mode allows the thermostat to select heating or cooling based on indoor temperature.
Emergency Heat Mode
Em Heat is used with supported heat pump systems that have auxiliary or emergency heating.
When Em Heat is selected, the compressor is locked out.
Selecting the Fan Operating Mode
The thermostat provides multiple fan options.
How to Change the Fan Setting
- Touch FAN.
- Select the desired fan mode.
- Touch Done.
Fan Modes
| Fan Mode | Operation |
| On | Fan runs continuously |
| Auto | Fan operates only during heating or cooling |
| Circ | Fan operates intermittently, approximately 35% of the time |
| Follow Schedule | Fan follows the programmed fan settings |
Circ is available for residential use.
In commercial operation, Auto and On can temporarily override the programmed fan schedule.
Residential Temperature Scheduling
The residential configuration supports four daily program periods.
Each period can have its own start time and temperature settings.
Schedule Periods
| Period | Purpose |
| Wake | Morning temperature |
| Leave | Temperature while occupants are away |
| Return | Evening temperature |
| Sleep | Overnight temperature |
Factory Residential Schedule
| Period | Start Time | Weekday Heat | Weekday Cool | Weekend Heat | Weekend Cool |
| Wake | 6:00 AM | 70°F | 78°F | 70°F | 78°F |
| Leave | 8:00 AM | 62°F | 85°F | 62°F | 85°F |
| Return | 6:00 PM | 70°F | 78°F | 70°F | 78°F |
| Sleep | 10:00 PM | 62°F | 82°F | 62°F | 82°F |
Wake Period
Wake sets the morning heating and cooling temperatures.
Leave Period
Leave uses temperatures intended for periods when the home is unoccupied.
Return Period
Return restores the selected evening temperatures.
Sleep Period
Sleep provides overnight temperature settings.
How to Program the Thermostat Schedule
The VisionPRO 8000 Smart allows a schedule to be created manually or through its scheduling assistant.
Step 1: Open Schedule Settings
- Touch MENU.
- Select Edit Schedule.
- The thermostat displays Use Scheduling Assistant?
Step 2: Choose a Programming Method
Select:
- Yes: Create a schedule by answering guided questions.
- No: Configure the schedule manually.
Step 3: Select the Days
- Choose the day or days to program.
- Touch Next.
Step 4: Set the Wake Period
- Use the arrows to select the Wake start time.
- Adjust the heating temperature.
- Adjust the cooling temperature.
Step 5: Configure Other Periods
Select Leave, Return, and Sleep.
Adjust the start times and temperatures for each period.
Step 6: Customize Fan Settings
Touch Fan Setting to configure the fan mode for an individual period.
Step 7: Remove an Unnecessary Period
Touch Cancel Period to remove a period from the schedule.
Step 8: Save the Schedule
Touch Done to save and exit.
Touch Cancel to exit without saving changes.
Temporarily Overriding the Residential Schedule
The thermostat allows the programmed temperature to be changed temporarily.
How to Set a Temporary Hold
- Touch the temperature adjustment arrows on the right side of the screen.
- Select the desired temperature.
- Adjust the Hold Until time using the arrows on the left side.
The new temperature remains active until the selected Hold Until time.
How to Set Permanent Hold
- Adjust the temperature.
- Select Permanent Hold.
The thermostat maintains the selected temperature until it is changed or the programmed schedule is resumed.
How to Cancel a Temperature Hold
Touch Cancel Hold.
The thermostat returns to its programmed schedule.
Viewing Equipment Status
The Equipment Status menu shows operating information for the equipment controlled by the thermostat.
How to Check Equipment Status
- Touch MENU.
- Select Equipment Status.
- Use the arrows to move through the available information.
Equipment Status Information
Depending on the installation, the thermostat can display information for:
- Heating and cooling equipment
- Fan
- Humidification
- Dehumidification
- Ventilation
- Maintenance reminders
- Thermostat information
Residential Vacation Mode
Vacation Mode allows the thermostat to maintain selected temperatures during an extended absence.
The thermostat can restore comfortable settings before the scheduled return.
How to Set Vacation Mode
- Touch MENU.
- Select Vacation Mode.
- Use the arrows to select the departure date.
- Touch Next.
- Configure the requested settings, including departure time, temperature settings, return date, and return settings.
- Review the selected schedule.
- Touch Done to save.
Touch Cancel to discard the changes.
Commercial Program Scheduling
When configured for light commercial use, the thermostat uses occupied and unoccupied schedules.
Factory Commercial Schedule
| Period | Start Time | Heat | Cool | Fan |
| Occupied 1 | 8:00 AM | 70°F | 75°F | On |
| Unoccupied 1 | 10:00 PM | 55°F | 85°F | Auto |
| Occupied 2 | 12:00 AM | 70°F | 75°F | On |
| Unoccupied 2 | 12:00 AM | 55°F | 85°F | Auto |
Occupied 2 and Unoccupied 2 are cancelled by default. Their displayed values apply if those periods are activated.
Occupied Period
The Occupied period uses temperature and fan settings intended for building occupancy.
Unoccupied Period
The Unoccupied period uses energy-saving settings when the building is not occupied.
Temporarily Overriding a Commercial Schedule
Commercial schedule settings can be overridden for a selected duration.
Changing the Temperature Temporarily
- Touch the temperature adjustment arrows.
- Select the desired temperature.
- Adjust the Hold Until time.
The selected temperature is maintained until the timer expires.
The maximum override duration may be restricted by the installer.
Using the Override Control
Touch Override to activate a preset occupied temperature during an unoccupied period.
The override initially lasts one hour.
The duration can be adjusted up to the maximum allowed by the installer.
Cancelling the Override
Touch Cancel Hold.
The thermostat returns to its normal commercial schedule.
Commercial Holiday and Event Scheduling
The thermostat can use special temperature schedules for holidays and other events.
Holiday Schedule Options
| Option | Function |
| Custom Events | Creates schedules for selected dates or recurring events |
| US Holidays | Provides a list of commonly observed U.S. holidays |
| Canadian Holidays | Provides a list of commonly observed Canadian holidays |
How to Open Holiday Scheduling
- Touch MENU.
- Select Holiday Schedule.
- Choose the required scheduling option.
- Touch Next.
- Follow the screen instructions.
- Touch Done to save.
Setting Custom Events
Custom Events allows a special temperature schedule to be used during a selected event.
How to Create a Custom Event
- Open Holiday Schedule.
- Select Custom Events.
- Select Create New Event.
- Choose Specific Date or Month/Weekday.
Specific Date
The thermostat requests:
- Event start date
- Temperature settings
- End date
- Frequency
Month/Weekday
The thermostat requests:
- Month
- Day of the week
- Week of the month
- Temperature settings
- Event duration
- Frequency
Review the selected settings and touch Done.
The thermostat resumes normal scheduling after the event.
Setting National Holiday Schedules
The thermostat includes selectable lists of U.S. and Canadian holidays.
How to Configure Holiday Temperatures
- Open Holiday Schedule.
- Select US Holidays or Canadian Holidays.
- Select Add/Edit Holidays.
- Choose the required holidays using their checkboxes.
- Touch Next.
- Select occupied or unoccupied temperature settings.
- Adjust heating and cooling temperatures.
- Touch Done to save.
Commercial Holiday Override
Holiday Mode can maintain special temperatures until a selected return date.
How to Set Holiday Mode
- Touch MENU.
- Select Holiday Mode.
- The screen displays Temperature While Away.
- Adjust heating and cooling temperatures.
- Touch Next.
- Select the return date.
- Review the settings.
- Touch Done.
The cooling temperature must be higher than the programmed unoccupied cooling setting.
The heating temperature must be lower than the programmed unoccupied heating setting.
Commercial Occupancy Mode
The thermostat can support an occupancy-start function when enabled by the installer.
The display shows:
Press HERE to Start Occupancy
How Occupancy Mode Works
The system maintains an energy-saving temperature until occupancy begins.
When a person arrives:
- Touch Press HERE to Start Occupancy.
- Adjust the temperature if needed.
- Adjust the Hold Until time.
The thermostat maintains the selected temperature until the timer expires or the occupied period ends.
This function is available only when configured by the installer.
Humidification Settings
The VisionPRO 8000 Smart can manage compatible humidification equipment.
How to Set Humidification
- Touch MENU.
- Select Humidification.
- Select Auto.
- Use the arrows to choose the desired humidity level.
- Touch Done to save.
Touch Cancel to discard changes.
Window Frost Protection
Window Protection can help reduce frost or condensation on windows.
How to Adjust Window Protection
- Touch MENU.
- Select Window Protection.
- Adjust the setting.
A lower setting helps reduce frost or condensation.
A higher setting can be used when indoor air is too dry.
Requirements
Window Protection is available when:
- An outdoor air sensor is installed; or
- Outdoor temperature data is available through the thermostat’s Wi-Fi weather connection.
Depending on the installation, the thermostat may maintain a 15% separation between humidification and dehumidification settings.
Residential Dehumidification Settings
The thermostat can control a compatible dehumidifier or use air conditioning to reduce indoor humidity.
How to Set Dehumidification
- Touch MENU.
- Select Dehumidification.
- Select Auto.
- Use the arrows to choose the humidity level.
- Touch Done.
Cooling During Dehumidification
When air conditioning is used to reduce humidity, indoor temperature may fall as much as 3°F below the selected temperature until the desired humidity level is reached.
Commercial Dehumidification Settings
Commercial dehumidification offers several possible methods, depending on the installed system.
How to Configure Dehumidification
- Touch MENU.
- Select Dehumidification.
- Select Auto.
- Adjust the humidity level.
- Touch Done.
Commercial Humidity Control Methods
The thermostat may:
- Cool the space 1–5°F below the selected temperature.
- Run cooling for the minimum required operating time.
- Operate heating and cooling simultaneously to reduce humidity without lowering room temperature.
Available methods depend on the equipment configuration.
Ventilation Settings
The thermostat can control compatible ventilation equipment.
How to Configure Ventilation
- Touch MENU.
- Select Ventilation.
- Choose Mode, Temporary Boost, or Lockout.
- Adjust the required settings.
- Touch Done.
Ventilation Modes
| Mode | Operation |
| Auto | Ventilation follows installer-programmed settings |
| Off | Ventilation remains off unless activated by the timer |
| On | Ventilation runs continuously |
Temporary Ventilation Boost
Temporary Boost runs ventilation for a selected period.
How to Set a Temporary Boost
- Open MENU.
- Select Ventilation.
- Choose Temporary Boost.
- Use the arrows to select the operating duration.
- Touch Done.
To stop the boost, set its duration to zero.
Ventilation Lockout
Ventilation Lockout can prevent ventilation during selected periods or outdoor conditions.
How to Configure Lockout
- Open Ventilation settings.
- Select Lockout.
- Choose Yes or No.
- Touch Next.
- Review the remaining settings.
- Touch Done.
When enabled, lockout can prevent ventilation during Sleep or commercial Unoccupied periods, or when outdoor conditions exceed installer-configured limits.
Thermostat Preferences
The Preferences menu provides settings for display behavior, scheduling, and reminders.
How to Access Preferences
- Touch MENU.
- Select Preferences.
- Choose the required option.
- Follow the screen prompts.
- Touch Done to save.
Available Preferences
| Preference | Function |
| Reminders | Configures maintenance and filter reminders |
| Fahrenheit/Celsius | Changes the displayed temperature unit |
| 12/24-Hour Clock | Selects the clock format |
| Screen Backlighting | Adjusts screen illumination |
| Alert Light Options | Configures supported alert-light behavior |
| Scheduling Options | Adjusts scheduling preferences |
| Adaptive Recovery | Configures supported early-start behavior |
| Default Schedule | Provides default schedule settings |
| Daylight Saving Time | Controls seasonal clock adjustments |
Adjusting Security Settings
The thermostat includes security controls to restrict changes to operating settings.
How to Open Security Settings
- Touch MENU.
- Select Security Settings.
- Choose the required security option.
- Follow the screen instructions.
Security Modes
| Security Mode | Access |
| Unlocked | Full access to thermostat controls |
| Partially Locked | Temperature adjustments only |
| Fully Locked | No access to thermostat controls |
Password Protection
A password can be created for additional security.
If password protection is used, the password should be retained for future access.
Viewing Dealer Information
The thermostat can display information about the installer or servicing dealer.
How to View Dealer Information
- Touch MENU.
- Select Dealer Information.
- Scroll through the displayed details.
- Touch Done to return to the menu.
The stored dealer information can be used when contacting the installer for servicing, repairs, or equipment upgrades.
Adaptive Intelligent Recovery
Adaptive Intelligent Recovery is available for residential applications.
The thermostat learns how long the heating or cooling system normally takes to reach the programmed temperature.
How Recovery Works
The thermostat begins heating or cooling before the scheduled start time when necessary.
This allows the selected temperature to be reached by the scheduled period.
When early system operation is active, the display shows:
In Recovery
Dehumidification Away Mode
Dehumidification Away Mode allows compatible equipment to manage indoor temperature and humidity while the home is vacant during humid conditions.
How to Activate Dehumidification Away Mode
- Touch MENU.
- Select Dehum Away Mode.
- Configure the available settings.
The thermostat maintains temperature and humidity according to the configured away settings.
Cancelling Dehumidification Away Mode
Touch Cancel when normal operation should resume.
Pre-Occupancy Purge
Pre-Occupancy Purge is a commercial feature that operates the fan before a scheduled occupied period.
The fan can run one to three hours before occupancy to prepare the indoor environment.
This function is available when configured for commercial operation.
Compressor Protection
The thermostat includes protection that prevents the compressor from restarting immediately after shutdown.
What Does Wait Mean?
When the display shows:
Wait
The compressor protection function is active.
The thermostat temporarily holds the compressor off to prevent equipment damage.
How Long Does the Delay Last?
The thermostat can require approximately five minutes before restarting the system.
What to Do
Allow the protection period to finish.
The thermostat will permit the compressor to restart when the delay is complete.
Cleaning the Thermostat Screen
The touchscreen includes a cleaning mode that temporarily locks the screen to prevent accidental setting changes.
How to Activate Clean Screen
- Touch MENU.
- Select Clean Screen.
- The thermostat asks whether the screen should be locked for 30 seconds.
- Touch Yes.
- A countdown timer appears.
- The screen becomes active again after 30 seconds.
Cleaning Precautions
- Do not spray liquid directly onto the thermostat.
- Apply water or household glass cleaner to a cloth.
- Use the damp cloth to clean the screen.
- Avoid abrasive cleaning products.
Troubleshooting Guide
The following troubleshooting procedures cover operating and Wi-Fi connection problems identified for the VisionPRO 8000 Smart.
Common Problems and Solutions
| Problem | Possible Cause | Recommended Solution |
| Thermostat screen is blank | Power issue | Check circuit breaker, system power switch, and furnace door |
| Screen is difficult to read | Display brightness setting | Adjust brightness through Preferences |
| Red alert light is on | Emergency Heat active or system alert | Check system mode and alert message |
| Heating does not respond | Incorrect mode or setpoint | Select Heat and set temperature above room temperature |
| Cooling does not respond | Incorrect mode or setpoint | Select Cool and set temperature below room temperature |
| Wait appears | Compressor protection active | Wait five minutes |
| Wi-Fi connection fails | Incorrect password | Check password and reconnect |
| No IP Address appears | Router did not assign an IP address | Check router configuration |
| No Internet Link appears | Router has no internet connection | Check internet connection and router |
| Wi-Fi network is hidden | Network name not broadcast | Use Other in Wi-Fi Setup |
| Wi-Fi connection is weak | Low wireless signal | Check signal strength in Wi-Fi Setup |
Thermostat Screen Is Blank
If the screen does not display information:
- Check the circuit breaker.
- Reset it if necessary.
- Confirm that the heating and cooling system power switch is on.
- Make sure the furnace door is securely closed.
Screen Is Difficult to Read
Open MENU → Preferences.
Adjust the screen brightness setting.
Red Alert Light Is On
The red indicator can have two meanings.
If the thermostat is in Emergency Heat mode, the red light is normal.
If Emergency Heat is not active, the light indicates an alert.
Check the message displayed on the thermostat screen.
Heating System Does Not Respond
- Touch SYSTEM.
- Select Heat.
- Set the heating temperature above the current indoor temperature.
- Check the circuit breaker.
- Make sure the HVAC power switch is on.
- Confirm that the furnace door is closed.
- If Wait appears, allow five minutes for compressor protection to finish.
Cooling System Does Not Respond
- Touch SYSTEM.
- Select Cool.
- Set the cooling temperature below the current indoor temperature.
- Check the circuit breaker.
- Confirm that the cooling system power switch is on.
- Check that the furnace door is closed.
- If Wait appears, wait five minutes.
Wi-Fi Troubleshooting
Invalid Password
The password entered for the selected Wi-Fi network is incorrect.
Check the password and attempt the connection again.
No IP Address
The thermostat could not obtain an IP address from the router.
- Check that the router is configured to assign IP addresses automatically.
- Allow several minutes for the connection.
- If the thermostat remains disconnected, remove it from its wallplate for 10 seconds.
- Reattach the thermostat.
- Attempt the connection again.
No Internet Link
The thermostat connected to Wi-Fi but could not reach the internet.
- Check the router configuration.
- Confirm that the router has an internet connection.
- Check that the Ethernet cable is connected where applicable.
- Restart the router if necessary.
- Try connecting again.
Connection Failed
If the thermostat displays Connection Failed:
- Review the message.
- Touch the down arrow for additional information.
- Follow the displayed instructions.
- Touch Done to return to the menu when needed.
Display Messages and Indicator Guide
| Message | Meaning |
| Finding Networks Please Wait | Searching for Wi-Fi networks |
| Connection Successful | Wi-Fi connection established |
| Connection Failed | Wi-Fi connection unsuccessful |
| Invalid Password | Incorrect Wi-Fi password |
| No IP Address | Router did not provide an IP address |
| No Internet Link | Connected to Wi-Fi without internet access |
| Disconnecting Please Wait | Wi-Fi disconnection in progress |
| Wi-Fi Disconnected Successfully | Wireless connection removed |
| Register Online | Total Connect Comfort registration required |
| In Recovery | Adaptive Intelligent Recovery active |
| Wait | Compressor protection active |
| Heat On | Heating equipment operating |
| Cool On | Cooling equipment operating |
| Em Heat On | Emergency heating operating |
| Red Alert Light | Emergency Heat mode or active system alert |
| Temporary Hold | Temporary temperature override |
| Permanent Hold | Continuous temperature override |
| Cancel Hold | Returns thermostat to programmed schedule |
Installer Options
Installer Options are password-protected settings intended for qualified technicians.
These settings affect the thermostat’s equipment configuration and operation.
Installer Options should only be changed by a qualified technician.
Changing these settings incorrectly can cause unintended equipment operation or damage.
Warranty Information
The VisionPRO 8000 Smart thermostat is covered by a five-year limited warranty from Resideo.
Warranty Details
| Warranty Information | Details |
| Warranty Provider | Resideo |
| Warranty Duration | 5 years |
| Coverage Begins | Date of first purchase by the original purchaser |
| Covered Defects | Defects in materials or workmanship under normal use and service |
| Warranty Remedy | Repair or replacement at Resideo’s discretion |
| Battery Coverage | Batteries excluded |
| Removal and Reinstallation Costs | Not covered |
How to Request Warranty Service
If the thermostat is defective during the warranty period:
- Return it to the original place of purchase with dated proof of purchase; or
- Contact Resideo Customer Care at 1-800-468-1502.
Customer Care will determine whether the thermostat must be returned for inspection or whether a replacement can be provided.
Warranty Return Address
Resideo Return Goods
1985 Douglas Dr. N.
Golden Valley, MN 55422
USA
Warranty Exclusions
The warranty does not cover:
- Batteries
- Removal costs
- Reinstallation costs
- Damage occurring while the product was in the consumer’s possession
Resideo’s liability is limited to repair or replacement under the stated warranty terms. Certain limitations and exclusions may not apply in all jurisdictions.
Customer Support Information
| Support Information | Details |
| Brand | Honeywell Home |
| Manufacturer | Resideo Technologies, Inc. |
| Product | VisionPRO 8000 Smart Thermostat |
| Model Number | TH8321WF1001 |
| Official Website | www.resideo.com |
| Technical Assistance | 1-855-733-5465 |
| Customer Care / Warranty | 1-800-468-1502 |
| Manufacturer Address | 1985 Douglas Drive North, Golden Valley, MN 55422, USA |
| Total Connect Comfort Website | mytotalconnectcomfort.com |
Regulatory and Environmental Information
FCC Compliance
The thermostat complies with Part 15 of the FCC Rules.
Operation is subject to two conditions:
- The device must not cause harmful interference.
- The device must accept received interference, including interference that may cause undesired operation.
The equipment has been tested for compliance with Class B digital device limits.
Radio Interference
If the thermostat causes radio or television interference, the following measures may help:
- Reorient or relocate the receiving antenna.
- Increase the distance between the thermostat equipment and receiver.
- Connect the receiving equipment to a different electrical circuit.
- Contact a qualified radio or television technician.
Electronic Waste Disposal
The thermostat must not be discarded with ordinary household waste at the end of its service life.
Take the product to an authorized electronic waste collection center or recycler.
Proper disposal helps reduce potential harm to human health and the environment.
Frequently Asked Questions
1. How do I connect the Honeywell VisionPRO 8000 Smart TH8321WF1001 to Wi-Fi?
Touch MENU and select Wi-Fi Setup. Choose the wireless network, enter its password using the touchscreen controls, and touch Done. When the screen displays Connection Successful, the thermostat is connected. Remote access also requires registration with Total Connect Comfort.
2. How do I register the VisionPRO 8000 Smart thermostat with Total Connect Comfort?
Visit mytotalconnectcomfort.com and sign in or create an account. Add the thermostat location and enter its MAC ID and MAC CRC, which can be found under MENU → Wi-Fi Setup. Follow the registration instructions until a success message appears.
3. How do I program a Honeywell VisionPRO 8000 Smart thermostat?
Touch MENU and select Edit Schedule. Choose Yes to use the Scheduling Assistant or No to configure the schedule manually. Select the days, set the start time and heating/cooling temperatures for each period, and touch Done to save.
4. How do I set a permanent temperature hold on the VisionPRO 8000?
Adjust the temperature using the touchscreen arrows, then select Permanent Hold. The thermostat maintains the selected temperature until it is changed or Cancel Hold is touched to resume scheduled operation.
5. Why does my Honeywell VisionPRO 8000 say Wait?
Wait indicates that compressor protection is active. The thermostat temporarily prevents the compressor from restarting too soon after shutdown. Allow approximately five minutes for the system to restart safely.
6. How do I reconnect my Honeywell VisionPRO 8000 to a new Wi-Fi network?
Touch MENU, select Wi-Fi Setup, choose the new network, and enter its password. Touch Done and wait for Connection Successful. If the thermostat has not been registered, follow the registration prompt.
7. How do I adjust humidity on the Honeywell VisionPRO 8000 Smart?
Touch MENU and select Humidification or Dehumidification, depending on the installed equipment. Select Auto, adjust the desired humidity level using the arrows, and touch Done to save.
8. How do I unlock the Honeywell VisionPRO 8000 Smart thermostat?
Touch MENU and open Security Settings. The available access modes are Unlocked, Partially Locked, and Fully Locked. If password protection was configured, the applicable password is required to change restricted settings.