
This Bella non-stick Belgian waffle maker user manual explains how to use the waffle maker safely, preheat it the right way, pour batter without overflow, rotate and lock it correctly, cook waffles to the color you want, and clean the plates without damaging the non-stick coating.
It also covers small details people often miss, like why cooking sprays cause build-up, why the unit stays on until it’s unplugged, how to unlock it the safe way, and how to remove stains from the non-stick surface using a simple baking soda paste.
Getting to Know the Waffle Maker
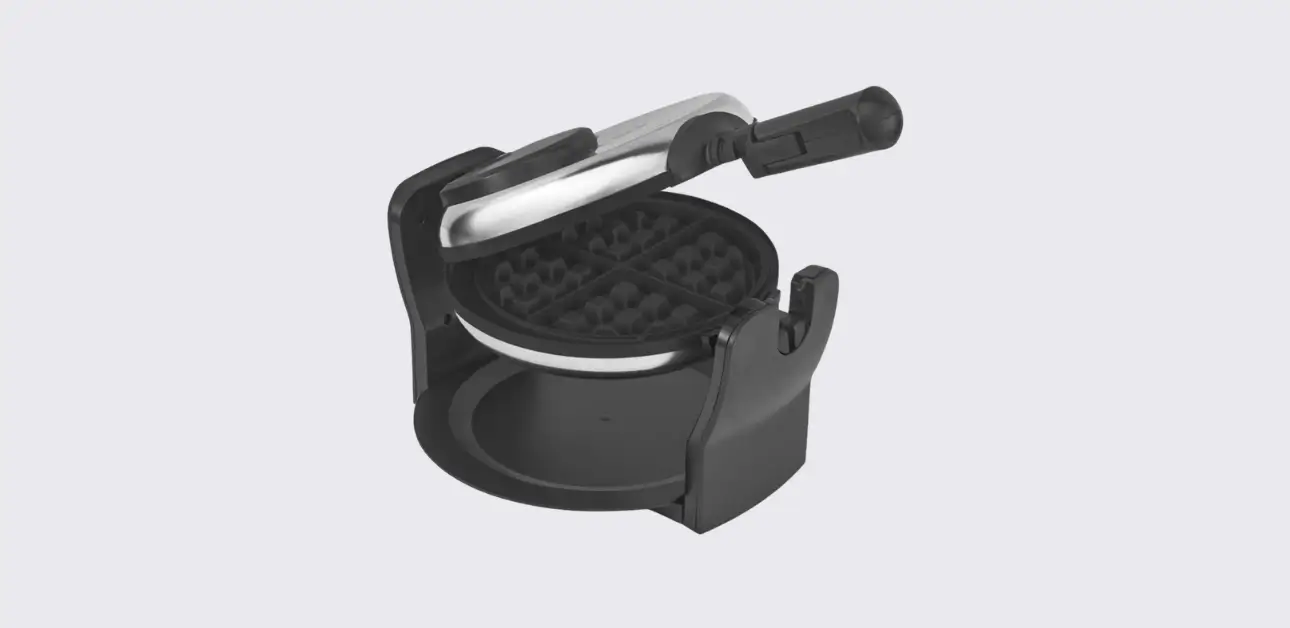
The non-stick Belgian waffle maker helps people make thick, Belgian-style waffles at home without needing special skills. It uses two heated plates and a rotating design. That rotating feature sounds fancy, but it’s actually simple.
It helps the batter spread more evenly across the plates, which improves the waffle’s shape and texture. When the batter spreads evenly, the waffle cooks evenly too.
That means fewer raw spots, fewer thin edges, and fewer torn waffles.
This model uses two indicator lights: a red Power light and a green Ready light (some versions have two green lights depending on design).
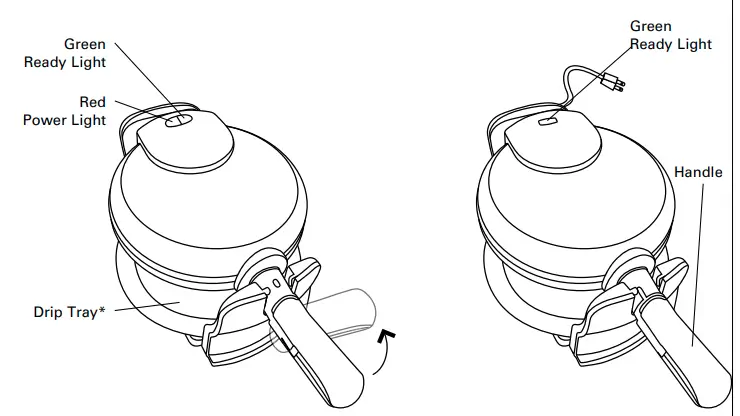
The red light shows the unit has power.
The green light helps the user know when the unit reaches cooking temperature and when it returns to ready status during cooking.
The waffle maker does not have an “OFF” button. The unit stays on as long as it remains plugged in. That small detail matters for safety and for daily habits in the kitchen. The user should unplug the unit when finished.
The waffle maker also includes a drip tray. This tray catches overflow and crumbs. It makes cleanup easier and helps protect the countertop. Speaking of countertops, this manual includes an important warning about plasticizer.
Some countertop finishes can stain or darken if a hot appliance sits directly on certain plastic mats or surfaces. The safest approach is to place the waffle maker on a heat-resistant counter or use a non-plastic heat-safe mat or coaster.
Safety Rules and Smart Kitchen Habits
A waffle maker looks harmless, but it produces high heat and steam. Most accidents happen when people rush or ignore basic safety. These rules keep things safe and also protect the appliance.
Hot surfaces mean real burns
The waffle maker’s plates and outside surfaces get very hot during use. People often touch the handle and feel safe, then accidentally touch the metal or the plate edges. The best habit is simple: assume the unit stays hot until it fully cools.
- Keep hands away from the plates.
- Use the handle only.
- Keep kids away during use and cooling.
The unit stays ON until unplugged
This waffle maker does not “turn off” when the waffle finishes. It stays powered as long as it stays plugged in. The manual makes this clear: unplugging is the real off switch. That means the user should unplug the unit after cooking and before cleaning.
Don’t immerse the unit in water
Never put the waffle maker, cord, or plug in water. Never wash it under a faucet. Water and electricity don’t mix. The correct cleaning method uses a damp cloth, not soaking.
Use a stable, heat-resistant surface
A level surface prevents tipping. A heat-resistant surface prevents heat damage to counters. The manual also recommends proper ventilation. Steam and heat need space to escape.
Plug and cord safety
The waffle maker uses a polarized plug (one blade wider). That design helps reduce electrical risk. Users should not force the plug into an outlet that doesn’t fit.
If the outlet doesn’t accept the plug, use a qualified electrician to fix the outlet. Avoid using long extension cords unless necessary, and follow cord safety rules. A short cord reduces tripping risk.
Plasticizer warning (countertop protection)
This is a key note that many people skip. Some countertops can stain or darken if a hot appliance sits on certain mats or plastic surfaces. The safe approach:
- Place the waffle maker directly on a heat-safe countertop, or
- Use a non-plastic heat-resistant coaster or mat.
Avoid overloaded circuits
If too many appliances run on the same circuit, the breaker may trip. The manual suggests using a separate circuit if needed.
Safety isn’t just a legal section. It protects people from burns and prevents damage that can shorten the waffle maker’s life.
Parts, Lights, and Features
Understanding the parts makes the waffle maker easier to use from the first try.
Here’s what most users see on this rotating model.
Main parts
- Non-stick cooking plates (top and bottom)
- Handle (used for opening and rotation)
- Red Power light
- Green Ready light(s)
- Drip tray (catches overflow and crumbs)
- Housing (outer body)
What the lights actually mean
- Red Power light: The unit has power when plugged in.
- Green Ready light: The unit reached cooking temperature. It may turn off and on during heating cycles. That’s normal.
Some users misunderstand the green light and think it means the waffle is done. In reality, the green light mainly signals temperature readiness. During cooking, it can turn on again when the unit returns to heat-ready status.
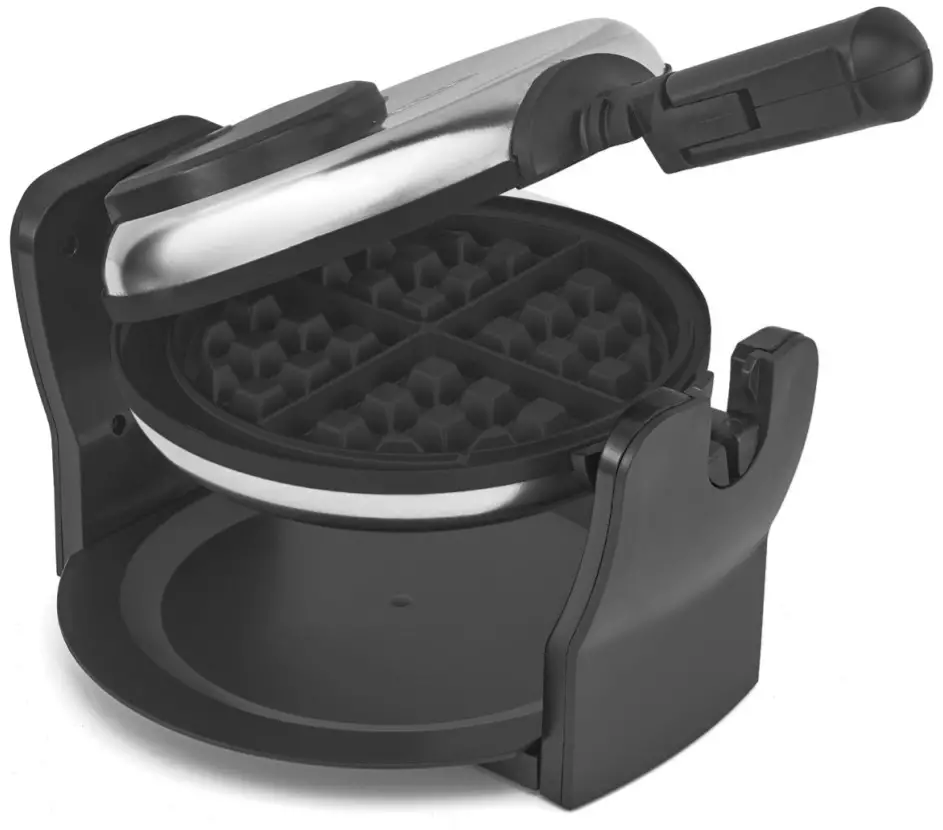
Rotating design and locking
This waffle maker rotates 180 degrees. Rotation spreads batter better across the plates. The manual tells users to rotate clockwise to lock and counterclockwise to unlock. The lock position matters because the waffle maker only opens safely when it’s unlocked.
Drip tray role
Waffles can overflow if the user pours too much batter. The drip tray catches overflow and crumbs, which:
- keeps counters cleaner
- reduces smoke or smell from batter burning on hot surfaces
- makes cleanup faster
Users should empty and wipe the drip tray after use.
Before First Use (Quick Setup)
The first use matters because new appliances can produce a light smell or smoke from manufacturing residue. The manual says this can happen and it’s normal. It also says not to eat the first waffle.
Step 1: Unpack and inspect
Remove all packaging materials. Make sure the unit looks intact. Place it on a stable, heat-resistant surface.
Step 2: Clean removable and touchable areas
Wash or wipe any removable parts. For the waffle maker itself:
- Wipe plates with a soft damp cloth.
- Dry with a soft cloth.
Do not immerse the unit in water.
Step 3: Expect a little smoke or odor
During the first heating cycle, the unit may smoke lightly or give a smell. That’s common for brand-new heating appliances. Let it run through one cycle. Do not eat the first waffle. After the first use, the smell typically goes away.
Step 4: Prepare plates correctly (oil, not spray)
Before cooking the first real waffle, lightly oil the plates with vegetable oil, olive oil, or canola oil. The manual warns against cooking sprays because they can create build-up and reduce non-stick performance over time.
Step 5: Place the drip tray properly
Make sure the drip tray sits under the waffle maker to catch overflow.
This setup creates a smoother first experience and helps protect the non-stick surface right away.
How to Use the Waffle Maker
This section gives the exact cooking flow the user should follow. It keeps the process simple and repeatable.
Step 1: Plug in the unit
Plug into a standard 120V outlet. The red Power light turns on. That means the unit is heating.
Step 2: Preheat
Let the waffle maker preheat for about 3 to 5 minutes. The green Ready light turns on when it reaches cooking temperature.
A beginner tip: preheating matters more than people think. If the user pours batter too early, the waffle can stick and cook unevenly.
Step 3: Lightly oil the plates
Use a small amount of vegetable oil, olive oil, or canola oil. Spread lightly. Avoid cooking sprays. Too much oil can cause smoke or greasy waffles.
Step 4: Add batter
Pour batter onto the lower plate. The manual suggests pouring enough batter to cover the plate and the peaks. Don’t pour too much. Overflow makes a mess and can burn.
A safe starting point: use about 1/3 cup batter. Then adjust based on batter thickness and waffle size.
Step 5: Close the lid
Close gently. Don’t slam it. Batter should spread naturally.
Step 6: Rotate to lock
Rotate the handle 180° clockwise until it locks. Locking ensures correct cooking position.
Step 7: Cook until ready
The green Ready light can turn on again when the waffle maker returns to ready temperature. That helps the user know the cooking cycle has progressed.
Important Rule: don’t open for at least 1 minute 30 seconds. Opening too early can tear the waffle.
Step 8: Unlock and open safely
When ready, rotate 180° counterclockwise to unlock, then open carefully. The waffle maker only opens when it’s in the unlocked position.
Step 9: Remove the waffle
Use a non-metal tool like a silicone spatula. Avoid forks and knives that can scratch the plates.
Step 10: Continue or finish
If cooking more waffles:
- Close the unit.
- Wait for green Ready light.
- Add batter again.
When finished:
- Unplug the unit.
- Let it cool completely before cleaning.
This step-by-step process prevents most beginner mistakes and keeps waffles from sticking.
Rotating and Locking (The Correct Way to Cook)
Many users struggle with the rotating feature at first. This section makes it clear so there’s no confusion.
Why rotation matters
Rotation spreads batter evenly. In a non-rotating waffle maker, thick batter sometimes piles toward the bottom and creates uneven thickness. With rotation, gravity helps batter flow into all corners and creates a more balanced waffle.
The correct direction to lock
- Rotate the handle 180° clockwise to lock for cooking.
Users should rotate smoothly. If the unit resists, don’t force it harshly. Check that the lid is fully closed first.
The correct direction to unlock
- Rotate 180° counterclockwise to unlock for opening.
The manual also explains a simple rule: the waffle maker unlocks only when the side with the indicator lights faces up. In other words, the unit must be in the correct orientation to open.
Don’t open too soon
The manual says the user should not open the waffle maker for at least 1 minute 30 seconds. That is not a random number. Waffles need time to set. If the user opens early:
- the waffle can tear
- batter can stick to the plate
- the waffle can collapse
So the best habit is: wait, then check. If the waffle looks light, cook in short extra time bursts.
Extra cooking in small increments
If the waffle isn’t dark enough, continue cooking in 30-second increments until it reaches the preferred color.
This system makes doneness control easy even without a dial.
Batter, Portion Size, and Doneness Control
Batter quality decides waffle quality. This section helps beginners handle batter without making it complicated.
Don’t overmix batter
Overmixing develops too much gluten and makes waffles tough. Mix until ingredients combine. A few lumps are fine. In fact, a slightly lumpy batter usually cooks better than a super-smooth one.
Use a consistent portion
Consistency helps you repeat results. If one waffle uses a random amount and the next uses double, cooking times and texture will change.
The manual’s recipe guide often uses about 1/3 cup batter as a typical amount.
A helpful habit:
- Use the same measuring cup or ladle every time.
- Adjust slightly only if overflow happens.
Batter thickness matters
Thicker batter spreads slower. It may need a bit more time. Thin batter spreads faster and can overflow. If the batter seems too thin, let it rest for a few minutes before pouring.
Doneness control without a dial
This waffle maker doesn’t require complicated settings. The user controls doneness using time.
- If the waffle looks too light → cook longer in 30-second steps
- If the waffle looks too dark → remove earlier next time
- If the waffle tears → the user opened too early
A realistic cooking time range
Many waffles cook around 2 to 4 minutes, depending on batter and desired color. That range matches the recipe guide instructions. The user should treat this as a starting point, not an exact promise.
Tips for Perfect Waffles
This section shares the best “small tricks” that make waffles better without extra effort.
Preheat fully
A full preheat creates a crisp outside and prevents sticking. If the user pours batter too early, the waffle cooks unevenly and sticks more.
Light oil works better than spray
The manual warns against cooking sprays.
They create residue. That residue can make waffles stick later, even if the plates are non-stick. Light oil keeps the surface clean and predictable.
Keep waffles crisp
Waffles soften fast when steam gets trapped.
For crisp waffles:
- Place cooked waffles on a wire rack, not a plate.
- If cooking many waffles, keep them warm in a 200°F oven.
That keeps them crisp and warm without drying them out.
Softer waffles need support
Soft waffles can bend when removed. The manual suggests cutting the waffle and supporting it with a spatula if it’s very soft. That prevents tearing and keeps the waffle intact.
Reheat properly
To reheat waffles:
- Put them back in the waffle maker for 1 to 2 minutes.
- Check every 30 seconds.
This method brings back crispness better than a microwave.
Freezing waffles
Waffles freeze well. To freeze:
- Let waffles cool fully.
- Place wax paper between waffles.
- Store in a freezer-safe bag.
Then reheat in the waffle maker for quick breakfasts.
These tips feel simple, but they dramatically improve texture and consistency.
Cleaning and Maintenance (Non-Stick Care)
Cleaning is where most waffle makers get ruined. People scrape plates with metal, use harsh cleaners, or wash the unit under water.
Always unplug and cool first
Unplug the unit. Let it cool completely. Cleaning a hot unit can burn hands and damage surfaces.
Never submerge the unit
Do not put the waffle maker in water. Do not place it in the dishwasher. Clean it by wiping only.
Wipe the plates
Use a soft, damp cloth or sponge. If crumbs stick:
- Use a soft brush or a dry paper towel first.
- Then wipe gently with a damp cloth.
Use safe utensils
Only use:
- nylon
- plastic
- wood
- rubber or silicone tools
Avoid metal utensils. They scratch non-stick coating.
Clean the drip tray
Remove the drip tray and wash it. Dry it before returning it to place.
Clean the outer housing
Wipe the outside with a soft cloth. If the housing is stainless steel, use stainless steel polish if needed. Keep it light. Don’t overdo it.
Fix hardened batter safely
If batter hardens on the plates:
- Add a little oil to the stuck area.
- Let it sit for 5 to 7 minutes.
- Then wipe gently.
That method softens dried batter without scraping.
Stain Removal and Plate Protection
Even when users clean correctly, non-stick plates can stain. Stains don’t always mean the surface is damaged.
This section explains the safe stain removal method described in the manual.
Baking soda paste method
- Make a paste using baking soda and water.
- Spread it gently on the stained area.
- Let it sit for a few minutes. If stains are stronger, let it sit longer, but not more than 1 hour.
- Wipe gently with a soft cloth or a plastic scrubbing pad.
- Rinse the cloth and wipe again to remove residue.
- Dry fully.
What not to use
Avoid:
- metal pads
- harsh abrasive powders
- sharp scraping tools
These can damage the non-stick coating and make sticking worse.
Why cooking sprays cause trouble
Cooking sprays often contain additives that leave a thin film. That film builds up over time and creates a sticky surface. Users then clean harder, which damages the coating.
So the best plan is:
- use a light oil layer
- clean gently after each use
- remove stains with baking soda paste when needed
This approach keeps the plates smooth and easy to clean.
Storage and Long-Term Care
A waffle maker lasts longer when stored clean and dry.
Cool, clean, and dry before storing
Make sure:
- plates are clean
- drip tray is empty and dry
- the unit is fully cool
Storing while warm can trap moisture and create odor.
Store in a safe place
Store in a dry cabinet or in the original box if possible. Avoid stacking heavy items on top of the waffle maker. Pressure can stress the hinge and housing.
Cord storage
Wrap the cord loosely. Tight wrapping can crack the cord over time.
Countertop tip
If the waffle maker stays on the counter, keep it away from:
- stove burners
- sinks
- areas where water splashes
Common Problems and Easy Fixes
This section covers the issues most users face and what usually fixes them.
Waffles stick to the plates
Common causes:
- not enough preheat
- opening too early
- cooking spray build-up
- batter too sugary or too thin
Fix:
- fully preheat until ready light
- wait at least 1 minute 30 seconds
- stop using cooking spray and clean plates
- lightly oil plates
Waffles tear when opening
Cause:
- opened too early
Fix:
- wait at least 1 minute 30 seconds before opening
- cook longer if needed
Batter overflows
Cause:
- too much batter
Fix:
- reduce portion size (start around 1/3 cup)
- use the drip tray
- pour batter closer to center so it spreads evenly
Waffles are too pale
Cause:
- not enough cooking time
Fix:
- cook longer in 30-second increments
- ensure full preheat
Waffles are too dark
Cause:
- too much cooking time
Fix:
- reduce time slightly next batch
- remove earlier once you learn your preferred doneness
Unit won’t turn off
This is normal behavior. The unit stays on until unplugged.
Fix:
- unplug when finished
Smell or light smoke on first use
Normal during first heating cycle.
Fix:
- run a first cycle and discard the first waffle
- clean and continue
These fixes cover the real-life issues people actually face.
Recipe Guide
This section provides a simple recipe base and a few common variations included in the manual.
Basic waffle mix (dry ingredients)
A common base includes:
- flour
- baking powder
- salt
- sugar
Then it typically uses wet ingredients (milk, eggs, butter, etc.) depending on the recipe style. The key habits stay the same:
- don’t overmix
- let batter rest briefly if needed
- use consistent portions
Buttermilk waffles
Buttermilk gives a richer flavor and a soft inside. Use the same cooking method:
- preheat
- lightly oil plates
- pour batter
- rotate and lock
- cook 2–4 minutes
- adjust in 30-second steps
Chocolate chip waffles
Chocolate chips can melt and cause small sticky spots. The safest approach:
- use a slightly smaller portion
- avoid overfilling
- clean crumbs and melted bits after each batch
Blueberry waffles
Blueberries release moisture. That can increase steam and soften waffles. To keep crispness:
- place waffles on a wire rack after cooking
- keep warm in a 200°F oven if making several
Quick serving ideas
- butter and syrup
- honey and fruit
- yogurt and berries
- peanut butter and banana
Waffles work as breakfast or dessert. The user can keep it simple.
Times, Portions, Do/Don’t
Basic timing and portion guide
| Item | Starting Point | Notes |
| Preheat time | 3–5 minutes | Green ready light indicates temp |
| Batter amount | ~1/3 cup | Adjust to prevent overflow |
| Cook time | 2–4 minutes | Depends on batter and color |
| Minimum open time | 1 min 30 sec | Opening early can tear waffles |
| Extra darkening | +30 sec steps | Repeat until desired color |
Do and Don’t chart
| Do | Don’t |
| Lightly oil plates | Use cooking spray |
| Preheat fully | Pour batter too early |
| Rotate 180° to lock | Force rotation if not closed |
| Use silicone or wood tools | Use metal forks or knives |
| Unplug to turn off | Leave plugged in after use |
| Wipe to clean | Submerge in water or dishwasher |
| Use baking soda paste for stains | Use metal pads or harsh abrasives |
Warranty and Support Information
This Bella waffle maker manual includes warranty coverage that typically separates mechanical and non-mechanical issues.
It also lists service contact details like a support phone and email, and notes that proof of purchase helps warranty claims.
A helpful habit for support:
- Keep the receipt.
- Note the model number (17174).
- Describe the issue clearly (sticking, overheating, light issue, hinge issue).
Users should also avoid actions that void warranty, such as:
- wrong voltage use
- improper maintenance
- unauthorized repairs
Contact Details
Website: https://bellakitchenware.com/
Email: help@bellahousewares.com
Phone No: 1-866-832-4843
Glossary
Belgian waffle: A thicker waffle with deeper pockets.
Non-stick coating: A special surface that helps food release easily.
Preheat: Heating the unit before cooking so the plates reach the right temperature.
Ready light: The light that indicates the waffle maker reached cooking temperature.
Rotate and lock: Turning the waffle maker 180° to spread batter evenly and lock into cooking position.
Plasticizer warning: A caution about countertop finishes that may stain or darken from heat or certain mats.
Polarized plug: A plug with one wider blade that fits only one way for safer use.