| Field | Details |
| Document Title | Honeywell Home RTH221 Programmable Thermostat User Guide |
| Document Type | User Guide |
| Brand Name | Honeywell Home |
| Product Name | Programmable Thermostat |
| Model Number | RTH221 |
| PDF File Size | 630 KB |
| Total Number of Pages | 9 |
| Languages Covered | English, French, Spanish |
Honeywell Home Programmable Thermostat RTH221
The Honeywell Home RTH221 is a programmable thermostat designed to control compatible heating and cooling systems. It provides simple push-button operation, automatic temperature scheduling, manual temperature adjustments, and separate heating and cooling settings.
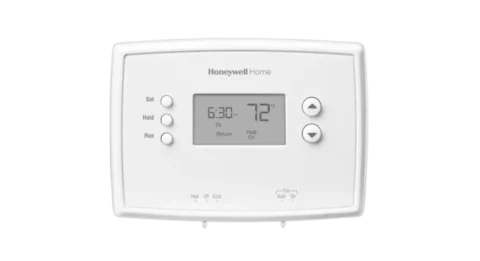
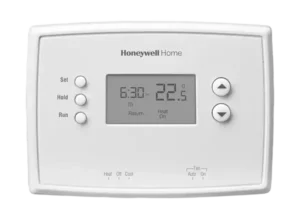
The thermostat has a digital display that shows the current room temperature, clock, operating status, and active schedule period. It also includes Set, Hold, and Run buttons for configuring the clock, modifying the temperature schedule, and overriding programmed settings.
The RTH221 supports four daily temperature periods: Wake, Leave, Return, and Sleep. Each period can have its own heating and cooling temperature settings. The same programmed schedule repeats every day, allowing the heating and cooling system to adjust automatically throughout the day.
The thermostat also features built-in compressor protection, which prevents an air conditioning compressor from restarting too quickly after shutdown.
The Honeywell RTH221 operates using two AAA batteries and includes a low-battery warning indicator. Most programmed settings are stored in permanent memory, allowing the schedule to remain saved when the batteries are replaced.
Product Overview and Features
| Feature | Description |
| Programmable Temperature Control | Controls heating and cooling according to a daily schedule |
| Digital Display | Shows the room temperature, clock, and operating information |
| Four Daily Program Periods | Wake, Leave, Return, and Sleep |
| Heating Schedule | Stores temperature settings for heating mode |
| Cooling Schedule | Stores temperature settings for cooling mode |
| Daily Schedule Repetition | Uses the same programmed schedule every day |
| Temporary Temperature Override | Changes the temperature until the next scheduled period |
| Permanent Temperature Hold | Maintains a selected temperature indefinitely |
| System Switch | Selects Heat, Cool, or Off |
| Fan Switch | Selects Auto or On |
| Temperature Adjustment | Up and Down buttons |
| Built-in Compressor Protection | Delays compressor restarting for five minutes |
| Low-Battery Warning | Displays Lo Batt when batteries need replacement |
| Permanent Memory | Retains most settings during battery replacement |
| Battery Operation | Uses two AAA batteries |
Technical Specifications
| Specification | Details |
| Model Number | RTH221 |
| Product Type | Programmable Thermostat |
| Power Supply | 2 AAA batteries |
| Maximum Electrical Load | 1 A at 24 VAC per output |
| Heating Temperature Range | 40–90°F (4.5–32°C) |
| Cooling Temperature Range | 50–99°F (10–37°C) |
| Operating Ambient Temperature | 32–122°F (0–50°C) |
| Shipping Temperature | -40–130°F (-40–55°C) |
| Operating Relative Humidity | 5–90%, non-condensing |
| Dimensions (H × W × D) | 4.7 × 2.9 × 1.1 inches |
| Dimensions (Metric) | 120 × 74 × 28 mm |
| Daily Schedule Periods | 4 |
| Scheduled Temperature Settings | Separate Heat and Cool settings |
| Schedule Repetition | Same settings every day |
| Compressor Protection Delay | 5 minutes |
| Battery Type | AAA |
| Battery Quantity | 2 |
| Recommended Battery Replacement | Once per year |
| Warranty | 1-year limited warranty |
| Manufacturer | Resideo Technologies, Inc. |
Thermostat Parts and Controls
The RTH221 has a digital display, three programming buttons, two temperature adjustment buttons, and separate switches for system and fan operation.
Main Controls
| Control | Function |
| Set Button | Configures the clock and temperature schedule |
| Hold Button | Overrides the schedule and maintains a selected temperature |
| Run Button | Resumes the programmed schedule |
| Up Button (▲) | Increases the temperature or selected setting |
| Down Button (▼) | Decreases the temperature or selected setting |
| System Switch | Selects Cool, Off, or Heat |
| Fan Switch | Selects Auto or On |
| Display | Shows temperature, time, schedule, and operating status |
Set Button
The Set button is used to configure the thermostat clock and programmed schedule.
Pressing Set once opens the clock setting.
Pressing Set twice opens the schedule programming menu.
Hold Button
The Hold button activates a permanent temperature override.
When Hold is active, the thermostat stops following the programmed schedule and maintains the selected temperature until the override is cancelled.
The Hold button is also used during schedule programming to skip a selected period.
Run Button
The Run button returns the thermostat to its programmed schedule.
It is also used to save changes when setting the clock or programming temperatures.
Temperature Adjustment Buttons
The ▲ and ▼ buttons control the selected temperature.
- Press ▲ to increase the temperature.
- Press ▼ to decrease the temperature.
- Press either button once to display the selected temperature.
- Press either button more than once to change the selected temperature.
System Switch
The System switch selects heating, cooling, or off.
Fan Switch
The Fan switch determines whether the fan operates automatically or continuously.
Thermostat Display Guide
The digital display shows the information required for everyday operation.
Display Indicators and Messages
| Display Indicator | Meaning |
| Clock | Current time |
| Room Temperature | Measured indoor temperature |
| Set | Selected temperature is being displayed |
| Wake | Morning schedule period |
| Leave | Daytime schedule period |
| Return | Evening schedule period |
| Sleep | Nighttime schedule period |
| Temporary | Temporary schedule override is active |
| Hold | Permanent temperature override is active |
| Heat On | Heating is activated |
| Cool On | Cooling is activated |
| Flashing Cool On | Compressor protection delay is active |
| Lo Batt | Low-battery warning |
| HI | Room temperature exceeds the measurable range |
| LO | Room temperature is below the measurable range |
| E1 | Temperature sensor circuit is open |
| E2 | Temperature sensor circuit is shorted |
Room Temperature Display
During normal operation, the thermostat displays the measured room temperature.
Viewing the Selected Temperature
- Press ▲ or ▼ once.
- The selected temperature appears.
- The Set indicator is displayed.
- The selected temperature remains visible for approximately five seconds.
- The display returns to the measured room temperature.
Important Safety Instructions
Cooling System Precaution
CAUTION: EQUIPMENT DAMAGE HAZARD
Do not operate the cooling system when the outdoor temperature is below 50°F (10°C).
Operating the air conditioning system below this temperature may damage the equipment.
Battery Replacement Precaution
Before removing the thermostat batteries, move the System switch to Off.
If the batteries are removed while the System switch remains in Heat or Cool, the heating or cooling system could remain activated even after the batteries are removed.
Compressor Protection
The thermostat includes a compressor protection function.
This function prevents the air conditioning compressor from restarting immediately after shutdown.
When compressor protection is active, the thermostat delays the compressor restart for five minutes.
Before First Use
Before using the RTH221 thermostat, the batteries, clock, system mode, and temperature schedule should be checked.
Initial Setup
- Confirm that two fresh AAA batteries are correctly installed.
- Set the correct time.
- Select the required heating or cooling mode.
- Choose the preferred fan setting.
- Review the factory-programmed temperature schedule.
- Change the scheduled temperatures if needed.
- Press Run to activate the programmed schedule.
Setting the Clock
The thermostat uses its clock to determine when scheduled temperature changes should occur.
How to Set the Time
- Press the Set button.
- The display shows Set Time.
- The time begins flashing.
- Press ▲ or ▼ to adjust the time.
- Press Run to save the setting and exit.
The thermostat also saves the changes automatically when no button is pressed for 60 seconds.
What Happens if the Clock Flashes?
A flashing clock indicates that the thermostat has lost its time setting.
If the thermostat is following its programmed schedule, it uses the temperature settings assigned to the Wake period until the clock is adjusted.
To restore normal scheduling:
- Press Set.
- Adjust the clock using ▲ or ▼.
- Press Run to save.
Selecting the Heating or Cooling Mode
The System switch controls the thermostat’s operating mode.
System Switch Settings
| Mode | Function |
| Heat | Places the system in heating mode |
| Cool | Places the system in cooling mode |
| Off | Turns the heating and cooling system off |
How to Turn On Heating
- Move the System switch to Heat.
- Press ▲ or ▼ to select the desired temperature.
- Set the temperature above the measured room temperature when heating is required.
- The display shows Heat On when heating is activated.
How to Turn On Cooling
- Move the System switch to Cool.
- Use ▲ or ▼ to select the desired temperature.
- Set the temperature below the measured room temperature when cooling is required.
- The display shows Cool On when cooling is activated.
Do not use cooling mode when the outdoor temperature is below 50°F (10°C).
How to Turn Off Heating and Cooling
Move the System switch to Off.
The thermostat stops normal heating and cooling control.
Selecting the Fan Mode
The Fan switch has two settings: Auto and On.
Fan Settings
| Fan Mode | Operation |
| Auto | Fan operates only while heating or cooling is taking place |
| On | Fan operates continuously |
Auto Fan Mode
Move the Fan switch to Auto.
This is the commonly used setting.
The fan operates when the heating or cooling system is running.
Continuous Fan Mode
Move the Fan switch to On.
The fan runs continuously instead of operating only during heating and cooling cycles.
Adjusting the Temperature
The thermostat normally displays the measured room temperature.
The temperature adjustment buttons allow the desired temperature to be viewed or changed.
How to Check the Setpoint
- Press ▲ or ▼ once.
- The setpoint temperature appears.
- The display returns to room temperature after approximately five seconds.
How to Change the Setpoint
- Press ▲ or ▼ to display the selected temperature.
- Continue pressing the button to increase or decrease the temperature.
- Stop when the desired temperature is displayed.
Temperature Adjustment Limits
| System Mode | Minimum Temperature | Maximum Temperature |
| Heat | 40°F (4.5°C) | 90°F (32°C) |
| Cool | 50°F (10°C) | 99°F (37°C) |
The thermostat will not accept a temperature outside the allowable range for the selected operating mode.
Built-In Compressor Protection
The RTH221 includes a protection function intended to prevent damage to the air conditioning compressor.
Restarting the compressor too soon after shutdown can cause equipment damage.
To reduce this risk, the thermostat prevents the compressor from restarting until the protection delay is complete.
How Compressor Protection Works
- The compressor stops operating.
- The thermostat activates a five-minute protection delay.
- The display shows Cool On flashing.
- The compressor remains off during the waiting period.
- After five minutes, Cool On stops flashing and the compressor can restart.
Why Is Cool On Flashing?
A flashing Cool On message indicates that compressor protection is active.
Cooling will not begin until the waiting period ends.
The maximum compressor protection delay is five minutes.
Understanding the Programmed Schedule
The RTH221 supports up to four temperature periods per day.
Each period has a start time and two temperature settings:
- One temperature for Heat mode
- One temperature for Cool mode
The same programmed schedule repeats every day.
Daily Program Periods
| Period | Description |
| Wake | Morning temperature |
| Leave | Daytime temperature |
| Return | Evening temperature |
| Sleep | Nighttime temperature |
Wake Period
The Wake period controls the temperature during the morning.
Leave Period
The Leave period controls the temperature during the day, such as when the home is unoccupied.
Return Period
The Return period controls the temperature during the evening.
Sleep Period
The Sleep period controls the temperature during the night.
Using the Programmed Schedule
Press Run to activate the stored schedule.
The thermostat follows the temperature settings assigned to the current period.
Factory-Programmed Heating and Cooling Schedule
The RTH221 includes preset heating and cooling temperatures.
Default Schedule
| Program Period | Start Time | Heating Temperature | Cooling Temperature |
| Wake | 6:00 AM | 70°F (21°C) | 75°F (24°C) |
| Leave | 8:00 AM | 62°F (16.5°C) | 83°F (28.5°C) |
| Return | 6:00 PM | 70°F (21°C) | 75°F (24°C) |
| Sleep | 10:00 PM | 62°F (16.5°C) | 78°F (25.5°C) |
Default Heating Schedule
The heating program maintains:
- 70°F during Wake
- 62°F during Leave
- 70°F during Return
- 62°F during Sleep
Default Cooling Schedule
The cooling program maintains:
- 75°F during Wake
- 83°F during Leave
- 75°F during Return
- 78°F during Sleep
The factory schedule uses lower heating temperatures and higher cooling temperatures during sleeping hours and daytime absences.
These settings can be modified according to household needs.
How to Program the Honeywell RTH221 Thermostat
The thermostat allows the start time and heating and cooling temperatures of each program period to be changed.
Step 1: Enter Schedule Programming
- Press the Set button twice.
- The display shows Set Schedule.
- The start time of the Wake period begins flashing.
Step 2: Set the Wake Start Time
- Press ▲ or ▼.
- Adjust the Wake start time.
- Press Set to continue.
Step 3: Select Heating or Cooling
The System switch determines which temperature setting is being programmed.
- Move the System switch to Heat to program heating temperatures.
- Move the System switch to Cool to program cooling temperatures.
Step 4: Set the Temperature
- Wait for the temperature setting to flash.
- Press ▲ or ▼.
- Select the desired temperature.
- Press Set to continue.
Step 5: Program the Next Period
After the Wake temperature is set:
- Press Set.
- The start time of the next period begins flashing.
- Adjust the start time.
- Press Set.
- Adjust the temperature.
Repeat the procedure for Leave, Return, and Sleep.
Step 6: Configure Both Heating and Cooling
Each period has separate heating and cooling temperature settings.
Use the System switch to select the mode being configured.
Program the desired heating temperatures in Heat mode and cooling temperatures in Cool mode.
Step 7: Save the Schedule
After the required changes are complete:
- Press Run.
- The thermostat saves the programmed settings.
- Schedule programming closes.
Changes are also saved automatically when no button is pressed for 60 seconds.
Skipping a Program Period
The thermostat allows certain schedule periods to be skipped.
This can be useful when the household routine does not require all four programmed periods.
How to Skip a Period
- Press Set twice to enter schedule programming.
- Continue until the required period appears.
- Press and hold Hold for four seconds.
- Dashes replace the start time and temperature for the selected period.
- Continue programming or press Run to save.
Which Periods Can Be Skipped?
The Leave, Return, and Sleep periods can be skipped.
The Wake period cannot be skipped.
Temporarily Overriding the Temperature Schedule
A temporary override changes the temperature without permanently changing the programmed schedule.
How to Set a Temporary Override
- Make sure the thermostat is following its programmed schedule.
- Press ▲ or ▼ until the desired temperature appears.
- The display shows Temporary.
- The current program period flashes.
The thermostat uses the selected temperature until the next scheduled period begins.
Example of a Temporary Override
If the thermostat is currently in the Wake period, the temperature can be changed manually.
The new temperature remains active until the Leave period begins.
When Leave starts, the thermostat returns to the programmed Leave temperature.
How to Cancel a Temporary Override
Press Run.
The temporary setting is cancelled immediately.
The thermostat returns to the programmed temperature for the current period.
Permanently Holding a Temperature
A permanent override allows the thermostat to maintain a selected temperature without following the schedule.
How to Activate Permanent Hold
- Press ▲ or ▼ until the desired temperature is displayed.
- Press Hold.
- The word Hold appears on the screen.
The thermostat maintains the selected temperature indefinitely.
How Long Does Hold Remain Active?
Permanent Hold remains active until the temperature is manually changed or the override is cancelled.
How to Cancel Hold
- Press Run.
- The word Hold disappears.
- The thermostat resumes the programmed schedule.
The thermostat returns to the temperature assigned to the current schedule period.
Temporary Override vs. Permanent Hold
| Function | Temporary Override | Permanent Hold |
| Activation | Press ▲ or ▼ | Select temperature, then press Hold |
| Display Message | Temporary | Hold |
| Schedule | Temporarily overridden | Continuously overridden |
| Duration | Until the next scheduled period | Indefinitely |
| Cancel Button | Run | Run |
| Stored Schedule | Remains unchanged | Remains unchanged |
Battery Replacement
The Honeywell RTH221 is powered by two AAA batteries.
Battery Type
| Specification | Details |
| Battery Size | AAA |
| Battery Quantity | 2 |
| Recommended Battery Type | Alkaline |
| Low-Battery Warning | Lo Batt |
| Recommended Replacement Interval | Once per year |
When to Replace the Batteries
Replace the batteries:
- When Lo Batt flashes on the display.
- Once every year.
- Before leaving home for more than one month.
The Lo Batt warning appears approximately 60 days before the batteries are depleted.
How to Replace the Batteries
- Move the System switch to Off before removing the batteries.
- Remove the old batteries.
- Install two fresh AAA alkaline batteries in the correct orientation.
- Confirm that the thermostat display operates normally.
- Reset the clock if necessary.
Important Battery Replacement Warning
Always place the System switch in Off before removing the batteries.
Otherwise, the heating or cooling system could remain activated even after the batteries have been removed.
Does Battery Replacement Erase the Schedule?
Most settings are stored in nonvolatile memory.
The programmed schedule and other stored settings remain saved after battery replacement.
If the thermostat has been without batteries, the clock must be set again.
Troubleshooting Guide
The following troubleshooting table covers the operating problems identified for the RTH221.
Common Problems and Solutions
| Problem | Possible Cause | Recommended Solution |
| Screen is blank | Batteries missing, depleted, or incorrectly installed | Install two fresh AAA alkaline batteries correctly |
| Temperature cannot be changed | System switch is Off | Select Heat or Cool |
| Temperature cannot be changed | Selected temperature is outside the allowable range | Check heating and cooling temperature limits |
| Cool On flashes | Compressor protection delay is active | Wait up to five minutes |
| HI appears | Measured room temperature exceeds 122°F (50°C) | Check room temperature conditions |
| LO appears | Measured room temperature is below 32°F (0°C) | Check room temperature conditions |
| E1 appears | Temperature sensor circuit is open | Replace the thermostat |
| E2 appears | Temperature sensor circuit is shorted | Replace the thermostat |
| Clock flashes | Clock settings have been lost | Reset the clock |
Thermostat Screen Is Blank
If nothing appears on the display:
- Check the installed batteries.
- Make sure two fresh AAA alkaline batteries are correctly positioned.
- Check the display again.
Temperature Settings Cannot Be Changed
The thermostat may prevent adjustments when:
- The System switch is set to Off.
- The selected temperature is outside the allowable range.
To correct the problem:
- Move the System switch to Heat or Cool.
- Check the corresponding temperature limits.
- Select a temperature within the supported range.
Cool On Is Flashing
When Cool On flashes, the compressor protection delay is active.
The cooling system will not start until the protection period ends.
Wait up to five minutes for cooling to begin.
HI Appears on the Screen
The HI message indicates that the measured room temperature is above:
122°F (50°C).
This temperature is outside the thermostat’s operating measurement range.
LO Appears on the Screen
The LO message indicates that the measured room temperature is below:
32°F (0°C).
This temperature is below the thermostat’s operating measurement range.
E1 Error Code Appears
An E1 error means the temperature sensor circuit is open.
The thermostat must be replaced.
E2 Error Code Appears
An E2 error means the temperature sensor circuit is shorted.
The thermostat must be replaced.
Thermostat Clock Is Flashing
A flashing clock indicates that the time setting has been lost.
Press Set, adjust the time using ▲ or ▼, and press Run to save.
Until the clock is reset, the thermostat uses the temperature settings assigned to the Wake period while following the programmed schedule.
Error Codes and Display Messages
| Code or Message | Meaning | Action |
| Lo Batt | Low battery warning | Replace both AAA batteries |
| HI | Measured temperature above 122°F (50°C) | Check temperature conditions |
| LO | Measured temperature below 32°F (0°C) | Check temperature conditions |
| E1 | Temperature sensor circuit open | Replace thermostat |
| E2 | Temperature sensor circuit shorted | Replace thermostat |
| Cool On Flashing | Compressor protection active | Wait up to five minutes |
| Heat On | Heating activated | Normal heating indicator |
| Cool On | Cooling activated | Normal cooling indicator |
| Temporary | Temporary override active | Press Run to cancel |
| Hold | Permanent override active | Press Run to cancel |
| Set Time | Clock setting active | Adjust time |
| Set Schedule | Schedule programming active | Configure schedule |
Maintenance and Battery Care
The RTH221 requires periodic battery replacement to maintain reliable operation.
Routine Battery Maintenance
- Replace both batteries annually.
- Replace batteries when Lo Batt appears.
- Use fresh AAA alkaline batteries.
- Move the System switch to Off before battery removal.
- Reset the clock after a period without batteries.
- Replace the batteries before an absence longer than one month.
Checking Thermostat Operation
The thermostat’s operating status can be checked using the display and switches.
- The display normally shows room temperature.
- Press ▲ or ▼ once to view the setpoint.
- Check the System switch for Heat, Cool, or Off.
- Check the Fan switch for Auto or On.
- Press Run to resume programmed operation.
- Check for low-battery or error messages.
Warranty Information
The Honeywell Home RTH221 includes a one-year limited warranty from Resideo.
Warranty Coverage
| Warranty Detail | Information |
| Warranty Provider | Resideo |
| Warranty Duration | 1 year |
| Coverage Begins | Date of first purchase by the original purchaser |
| Covered Defects | Defects in materials or workmanship under normal use and service |
| Warranty Remedy | Repair or replacement at Resideo’s discretion |
| Battery Coverage | Batteries excluded |
| Removal and Reinstallation Costs | Not covered |
How to Request Warranty Service
If the thermostat is defective during the warranty period:
- Return the product to the original place of purchase with dated proof of purchase; or
- Contact Resideo Customer Care at 1-800-468-1502.
Customer Care will determine whether the thermostat should be returned or whether a replacement can be provided.
Warranty Return Address
Resideo Return Goods
1985 Douglas Dr. N.
Golden Valley, MN 55422
USA
Warranty Exclusions
The warranty does not cover:
- Batteries
- Removal costs
- Reinstallation costs
- Damage that occurred while the product was in the consumer’s possession
Resideo’s responsibility under the warranty is limited to repair or replacement under the stated terms.
Exclusions and limitations may vary according to applicable state law.
The warranty provides specific legal rights, and additional rights may vary by jurisdiction.
Customer Support Information
For technical assistance, warranty questions, or product support, contact Resideo Customer Care.
| Support Information | Details |
| Brand | Honeywell Home |
| Manufacturer | Resideo Technologies, Inc. |
| Customer Support Website | http://honeywellhome.com |
| Manufacturer Website | www.resideo.com |
| Customer Care Phone | 1-800-468-1502 |
| Customer Care Address | 1985 Douglas Drive North, Golden Valley, MN 55422 |
| Product Model | RTH221 |
Frequently Asked Questions
1. How do I program the Honeywell RTH221 thermostat?
Press Set twice until Set Schedule appears. Adjust the start time of the Wake period with the Up and Down buttons, then press Set to change its temperature. Select Heat or Cool with the System switch to program the corresponding temperature. Repeat for Leave, Return, and Sleep, then press Run to save.
2. How do I set the time on a Honeywell RTH221 thermostat?
Press Set once until Set Time appears and the clock flashes. Use the Up or Down button to adjust the time, then press Run to save. The thermostat also saves changes automatically after 60 seconds without button activity.
3. What does Hold mean on the Honeywell RTH221?
Hold indicates that the thermostat is maintaining a selected temperature indefinitely instead of following the programmed schedule. Press Run to cancel Hold and resume the schedule.
4. How do I temporarily override the Honeywell RTH221 schedule?
Press the Up or Down button until the desired temperature appears. Temporary displays on the screen, and the thermostat maintains that temperature until the next programmed period starts. Press Run to cancel the override earlier.
5. Why is Cool On flashing on my Honeywell RTH221 thermostat?
Flashing Cool On indicates that compressor protection is active. The thermostat delays compressor restarting for up to five minutes to help prevent equipment damage.
6. How do I replace the batteries in the Honeywell RTH221?
Move the System switch to Off before removing the batteries. Replace both batteries with fresh AAA alkaline batteries and make sure they are correctly installed. Reset the clock if needed.
7. What do E1 and E2 mean on the Honeywell RTH221 thermostat?
E1 indicates an open temperature sensor circuit, while E2 indicates a shorted temperature sensor circuit. The thermostat must be replaced if either error appears.
8. Does the Honeywell RTH221 allow different schedules for weekdays and weekends?
The RTH221 uses the same four-period schedule every day. Each period has a programmable start time and separate heating and cooling temperatures, but the schedule repeats daily rather than using separate weekday and weekend programs.