

The Heatmiser neoAir V3 is a wireless smart thermostat from the Heatmiser neo Series. It is designed to send a wireless signal to a compatible receiver to control heating and, with selected receiver types, hot water. The thermostat can work in different modes depending on the connected receiver and system setup.
The official manual covers installation, battery setup, receiver pairing, neoHub pairing, thermostat controls, time clock mode, comfort levels, hot water boost, frost protection, optional settings, error codes, factory reset, remote sensor probe wiring, and support details.
Main Product Functions
The neoAir V3 can operate in three main modes:
| Mode | Function |
| Mode 1 | Thermostat mode |
| Mode 2 | Timer / time clock mode |
| Mode 3 | Thermostat with hot water timer |
Mode selection should be completed before pairing the neoAir V3 with a receiver. The correct mode depends on the receiver type being used.
Compatible Receiver Types
The neoAir V3 works with several Heatmiser receivers and hubs, including:
- UH8-RF
- UH8-RF V2
- RF-Switch
- RF-Switch V2
- RF-Switch 16 Amp
- neoHub Mini OT
- neoHub Mini HW
- neoHub
The manual includes a compatibility table showing which receivers support thermostat mode, timer mode, and thermostat with hot water mode. Hot water switching is only available with certain receiver types.
Important Safety and Use Notes
Before using or installing the Heatmiser neoAir V3, keep these important notes in mind:
- The thermostat is designed to be surface mounted.
- Install it at eye level for easy use and accurate readings.
- Do not install it near a direct heat source.
- Do not press hard on the LCD screen.
- Do not use rechargeable batteries.
- Insert batteries with the correct polarity.
- Remove discharged batteries and dispose of them according to local rules.
- Wear protective gloves and eye protection if batteries have leaked.
- The neoAir V3 must not be used to control electric underfloor heating.
Parts and Controls
The Heatmiser neoAir V3 has a square wall-mounted body with a large LCD display and touch keys below the screen.
Main Controls
| Control | Purpose |
| Left arrow | Scrolls through menu options or adjusts settings |
| Tick / confirm key | Confirms selections and opens selected menu items |
| Right arrow | Scrolls through menu options or adjusts settings |
| Down key | Reduces temperature, time, or setting values |
| Up key | Increases temperature, time, or setting values |
Main Menu Options
The display menu may show options such as:
- Power
- Setup
- Clock
- Heating
- Timer
- Hold
- Holiday
- Edit
- Cancel
Available menu options depend on the selected mode.
LCD Display Icons and Indicators
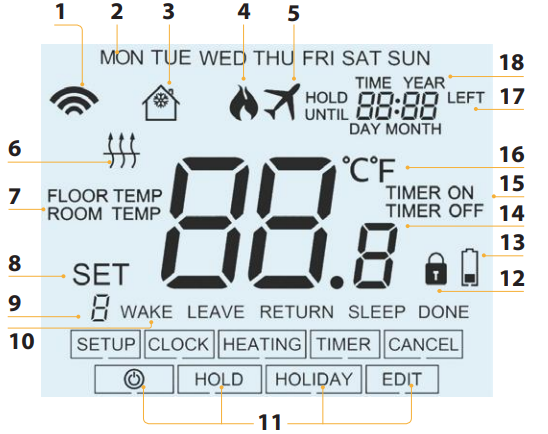
In thermostat mode, the neoAir V3 display includes several useful icons.
| Display Item | Meaning |
| Mesh symbol | Shows connection to neoHub, neoHub Mini HW, or neoHub Mini OT |
| Day indicator | Displays the current day |
| Frost symbol | Shows frost protection or standby mode |
| Flame symbol | Shows heating demand |
| Holiday icon | Shows holiday mode |
| Floor limit icon | Appears when the remote floor probe reaches the maximum floor limit |
| Floor/Room Temp | Shows active sensor mode |
| Set | Appears when changing schedule or set point |
| Program indicators | Show comfort level being edited |
| Key lock icon | Shows touch keys are locked |
| Battery icon | Shows batteries need replacing |
| Timer status | Shows timed output state |
| Temperature format | Shows °C or °F |
| Hold Left | Shows remaining hold time |
| Time/Day/Month/Year | Used when setting clock, calendar, or holiday period |
Product Specifications
| Specification | Detail |
| Product name | Heatmiser neoAir V3 |
| Product type | Wireless smart thermostat |
| Series | neo Series |
| Mounting type | Surface mounted |
| Battery type | 4 x AAA batteries |
| Rechargeable batteries | Not supported |
| Modes | Thermostat, Timer, Thermostat + Hot Water Timer |
| Wireless receiver control | Heating and selected hot water systems |
| Temperature format | °C or °F |
| Frost protection range | 5°C to 17°C |
| Frost default | 12°C |
| Switching differential | 0.5°C, 1.0°C, 2.0°C, or 3.0°C |
| Output delay | 00 to 15 minutes |
| Floor temperature limit | 18°C to 45°C |
| Floor limit default | 28°C |
| Program modes | Non-programmable, weekday/weekend, 7 day, 24 hour |
| Wireless frequencies | 868 MHz and 2.4 GHz |
| Compliance | Directive 2014/53/EU |
How to Install the Heatmiser neoAir V3
The neoAir V3 is surface mounted and does not need a flush wall box.
Installation Steps
- Separate the front from the back plate
Insert a small flat-head terminal driver into the slots on the bottom face of the thermostat. - Mark the wall fixing points
Use the back plate as a template and mark two hole positions on the wall. - Drill and insert wall plugs
Drill the marked positions and insert wall plugs. - Fix the back plate to the wall
Screw the thermostat back plate securely onto the wall. - Clip the thermostat front back on
Attach the front half of the thermostat to the mounted back plate.
Battery Installation
The neoAir V3 is supplied with 4 x AAA batteries.
How to Install the Batteries
- Push and release the battery compartment door on the bottom face of the thermostat.
- Insert the four AAA batteries into the battery holder.
- Make sure each battery follows the correct + / – polarity.
- Push the battery holder back into the thermostat until it is secure.
The thermostat displays a battery icon when the batteries need replacement. The manual warns not to use rechargeable batteries with this product.
Mode Select Instructions
Before pairing the neoAir V3, select the correct operating mode.
Available Modes
| Mode | Description |
| Mode 1 | Thermostat |
| Mode 2 | Timer |
| Mode 3 | Thermostat and hot water timer |
How to Change Mode
- Use the Left arrow to highlight the power icon on the menu.
- Press and hold the tick key for 3 seconds.
- When SETUP is highlighted, press and hold the tick key for 10 seconds until all icons appear.
- The current mode appears in the lower-left corner.
- Use the Left/Right arrows to change the mode.
- Press the tick key once to confirm.
The thermostat will return to the main display for the selected mode.
Pairing with Receivers
The neoAir V3 sends a wireless signal to a receiver to switch heating or hot water on and off. Pairing steps differ depending on the receiver.
Pairing with UH8-RF Wiring Centre
For UH8-RF, the channel number is set using two rotary dials inside the wiring centre. Each UH8-RF should have a unique channel number.
Pairing Summary
- Remove the cover from the UH8-RF.
- Note the channel number set on the rotary dials.
- On the neoAir, enter the setup menu.
- Select P2.
- Set the UH8-RF channel number.
- Select the zone type:
- rA = Radiators
- UF = Underfloor heating
- Set the zone number.
- Confirm settings to exit the setup menu.
Pairing with UH8-RF V2
Pairing Steps
- On the neoAir, enter the setup menu.
- Select P1.
- The display counts down from 99, showing pairing mode is active.
- On the UH8-RF V2, press and hold the pairing button on the desired channel until the output LED flashes.
- When the UH8-RF V2 detects the neoAir, the output light turns off.
- Press the tick key on the neoAir to confirm pairing.
The manual notes that the neoAir V3 can be paired to multiple channels on the UH8-RF V2.
Pairing with RF-Switch and RF-Switch V2
RF-Switch Pairing
- Put the neoAir into setup mode.
- Select P1.
- The neoAir starts counting down from 99.
- On the RF-Switch, press and hold the CH1 button for 5 seconds.
- The CH1 light flashes to show pairing mode.
- When pairing completes, the CH1 light turns off.
- Confirm pairing on the neoAir.
RF-Switch V2 Pairing
For RF-Switch V2, press and hold CH1 or CH2 for 5 seconds. The selected channel light flashes, then turns off after detecting the neoAir signal.
Pairing with RF-Switch 16 Amp
The RF-Switch 16 Amp should be used with the neoAir V3 in Mode 1.
Pairing Steps
- Configure the neoAir in Mode 1.
- Enter the neoAir setup menu.
- Select P1.
- The display counts down from 99.
- On the RF-Switch 16 Amp, press and hold the pair button for 5 seconds.
- The pair light flashes.
- When the receiver detects the neoAir signal, the pair light turns off.
- Confirm pairing on the neoAir.
Pairing with neoHub Mini OT/HW
neoHub Mini OT
For a single heating zone, pair the neoAir to CH1.
For a second heating zone, pair another neoAir to CH2.
neoHub Mini HW
For a single heating zone and hot water, configure the neoAir in Mode 3 and pair it to CH1. The neoAir automatically pairs to the hot water output at the same time.
Pairing Steps
- On the neoHub Mini OT/HW, press and hold CH1 or CH2 for 6 seconds.
- The zone light flashes green.
- On the neoAir, enter the setup menu.
- Select the hub pairing option.
- The mesh symbol flashes on the display.
- Open the neoApp and select Add neoHub Mini.
- Follow the in-app instructions.
- Once paired, the mesh symbol stays permanently displayed.
Pairing with neoHub and neoApp
To connect the neoAir V3 with a neoHub:
- Connect the neoHub to the router using the Ethernet cable.
- Connect the neoHub power supply.
- Download the neoApp.
- Register or sign in to the app.
- Select Add neoHub in the app.
- Follow the app instructions.
- Add the neoAir V3 as a zone.
- On the neoAir, enter setup mode and start hub pairing.
- The mesh symbol flashes while pairing.
- The app confirms when the zone is paired.
The manual notes that the neoHub only needs to be paired to the account once. Additional thermostats can be added from the app using Add Thermostat.
neoAir and Mesh Network Notes
The neoAir V3 cannot relay signals from one thermostat to another. To extend the wireless mesh network, the system needs a compatible repeater such as a neoPlug or Heatmiser Boost.
The manual also notes:
- neoPlug can act as a repeater when neoAir V3 is used with neoHub, UH8-RF, RF-Switch, or RF-Switch 16A.
- neoPlug is not compatible as a repeater when neoAir V3 is used with neoHub Mini HW or neoHub Mini OT.
- neoAir V3 can also communicate through wired mesh-capable neoStats.
Power On and Off
Turn Off the neoAir Display
- Use the Left arrow to highlight the power icon.
- Press and hold the tick key for 3 seconds.
- The display shows the power symbol.
- Temperature display and heating output turn off.
Turn the neoAir V3 Back On
Press the tick key once.
Setting the Clock
Clock Setup Steps
- Use the Left/Right arrows to highlight the power icon.
- Press and hold the tick key to turn off the display.
- Use the Right arrow to select CLOCK.
- Press the tick key to confirm.
- Use Up/Down to set the year.
- Confirm and repeat for month, day, and time.
- Confirm the new clock settings.
- Scroll back to the power icon and press the tick key to turn the display on.
Comfort Levels and Programming
The neoAir V3 supports the following program modes:
| Program Mode | Description |
| Weekday/Weekend | Monday–Friday and Saturday–Sunday schedules |
| 7 Day | Each day programmed separately |
| 24 Hour | Same schedule for every day |
| Non-programmable | Manual temperature control only |
Default Comfort Levels
| Period | Time | Temperature |
| Wake | 07:00 | 21°C |
| Leave | 09:00 | 16°C |
| Return | 16:00 | 21°C |
| Sleep | 22:00 | 16°C |
Unused levels can be disabled by changing the time to –:–.
How to Edit Comfort Levels
- Use the Left/Right arrows to scroll to EDIT.
- Select the day or period of the week.
- Select the comfort level, such as Wake, Leave, Return, or Sleep.
- Press the tick key to edit.
- Set the hour using Up/Down.
- Confirm.
- Set the minutes.
- Confirm.
- Set the temperature.
- Confirm.
- Repeat for all remaining comfort levels.
- Select DONE and confirm.
Temperature Control
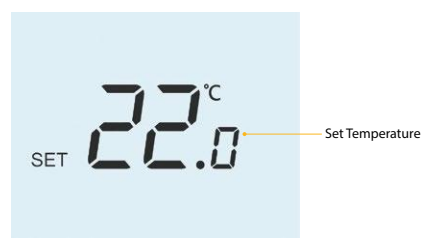
To adjust the set temperature:
- Press the Up or Down key.
- The display shows SET and the desired temperature.
- Use Up/Down to adjust the set value.
- Press the tick key to confirm.
In programmable mode, this manual temperature change stays active only until the next programmed comfort level.
Temperature Hold
Temperature Hold allows users to override the current heating program for a set time.
Mode 1: Heating Only
- Scroll to HOLD.
- Press the tick key.
- Set the hold period using Up/Down.
- Confirm.
- Set the hold temperature using Up/Down.
- Confirm.
The display shows HOLD LEFT and the remaining hold time. The thermostat returns to the normal program when the hold period ends.
Mode 3: Heating and Hot Water
In Mode 3, select HOLD, choose Heating, then set the hold period and temperature. To cancel, open HOLD again, choose Heating, then select CANCEL.
Hot Water Boost
Hot Water Boost is available in Mode 3: Heating and Hot Water.
How to Boost Hot Water
- Scroll to HOLD.
- Press the tick key.
- When Heating is highlighted, use the Left/Right keys to select Timer.
- Press the tick key.
- Use Up/Down to set the boost duration, such as 02:00 hours.
- Press the tick key to confirm.
To cancel the timer boost, go back to HOLD, select Timer, then choose Cancel.
Locking and Unlocking the neoAir V3
The neoAir V3 includes a touch key lock with a four-digit PIN.
How to Lock the Thermostat
- Scroll to HOLD.
- Press and hold the tick key for 10 seconds.
- The display shows 00:00.
- Use Up/Down to enter the first two digits.
- Confirm.
- Use Up/Down to enter the second two digits.
- Confirm.
- The lock icon appears on the main display.
How to Unlock the Thermostat
- Press the tick key once.
- Enter the same four-digit PIN.
- Confirm the first two digits and second two digits.
- The keys unlock and the thermostat returns to the main display.
Frost Protection and Standby Mode
In Frost Mode, the neoAir V3 only turns heating on if the room temperature drops below the frost temperature setting. The default frost temperature is 12°C.
Enable Frost Protection
- Highlight the power icon.
- Press the tick key once.
- The frost symbol appears.
Disable Frost Protection
Press the tick key again while the power icon is highlighted. The frost symbol disappears.
Standby Mode
In Frost Mode, remove the set temperature and set it to –. This means the thermostat will not call for heat while the frost icon is displayed.
Holiday Mode
Holiday mode changes system behavior until a selected date and time.
In thermostat mode:
- The thermostat reduces the set temperature to the frost protection temperature.
- It returns to the normal program at the selected date and time.
In time clock mode:
- The timed output stays OFF.
- The normal program resumes at the configured return time.
How to Set Holiday Mode
- Scroll to HOLIDAY.
- Press the tick key.
- Set the year using Up/Down.
- Confirm.
- Set the month, date, and time.
- Confirm each step.
The holiday period starts immediately and ends at the configured time and date.
Optional Features in Thermostat Mode
The neoAir V3 includes optional settings for pairing, temperature control, sensor behavior, program mode, and safety functions.
| Feature | Description | Setting Options |
| P3 | Failsafe | Disabled / Enabled |
| P2 | Pairing to UH8-RF | Receiver address, zone number, zone type |
| P1 | Pairing to RF-Switch and UH8-RF V2 | Countdown pairing |
| 01 | Pairing to hub | Adds zone to neoHub or neoHub Mini |
| 02 | Switching differential | 0.5°C, 1.0°C, 2.0°C, 3.0°C |
| 03 | Frost protection temperature | 5°C–17°C or disabled |
| 04 | Output delay | 00–15 minutes |
| 05 | Temperature up/down limit | 00°C–10°C |
| 06 | Sensor selection | Built-in, remote air, remote floor, built-in + remote floor |
| 07 | Floor temperature limit | 18°C–45°C |
| 08 | Optimum start | 00–05 hours |
| 09 | Rate of change | Minutes to raise temperature by 1°C |
| 10 | Cool enable | Used with compatible heat pump systems |
| 11 | Not used | Not used on this model |
| 12 | Program mode | Non-programmable, weekday/weekend, 7 day, 24 hour |
| 13 | Temperature format | °C or °F |
How to Adjust Optional Settings
- Highlight the power icon.
- Press and hold the tick key for 3 seconds.
- When SETUP is highlighted, press the tick key once.
- Use Up/Down to select the feature.
- Use Left/Right to adjust the setting.
- Press the tick key to confirm and exit.
Re-Calibrating the Thermostat
Re-calibration adjusts the displayed temperature reading.
Re-Calibration Steps
- Highlight the power icon.
- Press and hold the tick key for 3 seconds to turn off the display.
- Press and hold the tick key and Down key together for 10 seconds.
- The current temperature appears.
- Use Up/Down to adjust the value.
- Press the tick key to confirm.
- Turn the thermostat back on.
The thermostat returns to the main display using the adjusted temperature reading.
Error Codes and Troubleshooting
The manual lists two thermostat error codes.
| Error Code | Meaning | What to Check |
| E0 | Internal sensor fault | Built-in sensor may have developed a fault |
| E2 | Remote probe issue | Probe may be disconnected, wired incorrectly, or faulty |
Common Troubleshooting Guide
| Problem | Possible Cause | Recommended Action |
| Battery icon appears | Batteries are low | Replace with 4 x AAA batteries |
| Thermostat does not respond | Touch keys may be locked | Enter the four-digit PIN to unlock |
| Heating does not turn on | Frost/standby mode may be active | Check frost icon and set temperature |
| Pairing fails | Wrong receiver mode or pairing mode not active | Check mode compatibility and repeat pairing |
| Mesh symbol flashes | Hub pairing is not complete | Complete pairing in the neoApp |
| Remote probe error appears | Probe wiring or probe fault | Check remote probe wiring and connection |
| Hot water option missing | Wrong receiver or mode selected | Use a compatible receiver and Mode 3 |
| Temperature reading seems wrong | Calibration may be needed | Use the re-calibration steps |
Factory Reset
A factory reset erases pairing and programming settings. The thermostat must be paired again after reset.
Factory Reset Steps
- Highlight the power icon.
- Press and hold the tick key for 3 seconds.
- When SETUP is highlighted, press and hold the tick key for 10 seconds until all icons appear.
- Select Mode 1, 2, or 3 using the Left/Right keys.
- Press the tick key to confirm.
- Remove the batteries.
- Reinsert the batteries to complete the reset.
Remote Sensor Probe Wiring
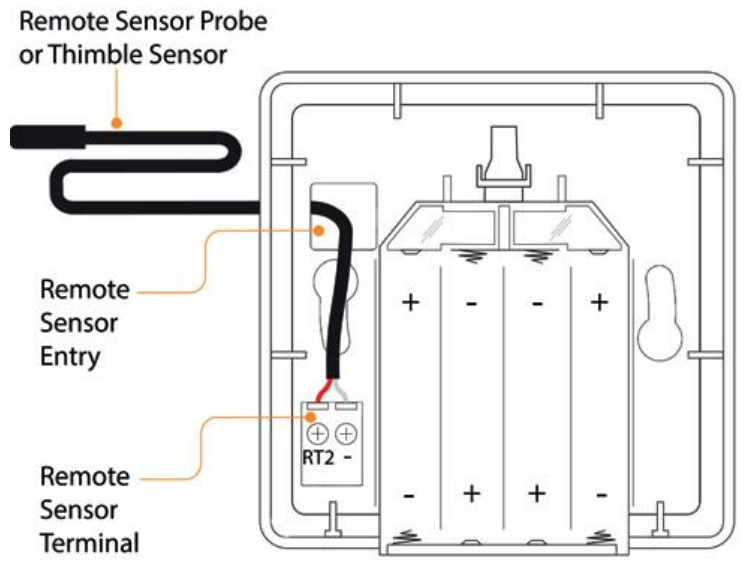
The manual includes a dedicated section for remote sensor probe wiring. The remote probe connects to the thermostat for remote air or floor temperature sensing. If the probe is missing, wired incorrectly, or faulty, the thermostat may show an E2 error.
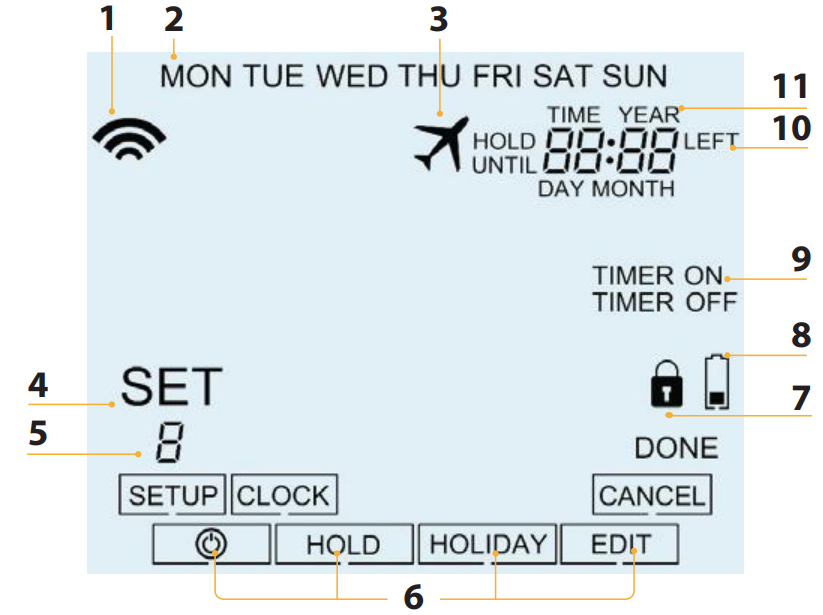
Time Clock Mode Overview
In Mode 2 – Time Clock, the neoAir V3 controls a timed output instead of temperature-based heating.
The display includes:
- Communication symbol
- Day indicator
- Holiday indicator
- Set icon
- Program indicator
- Main menu
- Keypad lock icon
- Battery icon
- Timer status
- Hold left indicator
- Time/date display
Setting Switching Times in Time Clock Mode
- Scroll to EDIT.
- Press the tick key.
- Select the day or period of the week.
- Confirm.
- Select switching period 1.
- Set the ON time hours and minutes.
- Set the OFF time hours and minutes.
- Repeat for the remaining switching periods.
- Set unused levels to –:–.
- Select DONE and confirm.
Timer Override
Timer Override turns the timed output on for a selected duration.
How to Use Timer Override
- Set the override duration using Up/Down.
- Press the tick key to confirm.
- The display shows HOLD LEFT and the remaining time.
To cancel the override, press the Down arrow once, select Cancel, and confirm.
Time Clock Optional Features
| Feature | Description | Setting |
| P3 | Failsafe | Disabled / Enabled |
| P2 | Pairing to UH8-RF | Receiver address, zone number, zone type |
| P1 | Pairing to RF-Switch, RF-Switch 16A, and UH8-RF V2 | Countdown pairing |
| 01 | Pairing to hub | Used to add the time clock to neoHub |
| 02 | Program mode | Weekday/weekend, 7 day, or 24 hour |
Support and Contact
Heatmiser provides support, FAQs, PDFs, videos, and technical specifications through its support channels.
Heatmiser UK Ltd
Address:
Heatmiser UK Ltd
Units 1-5 Hurstwood Court, Mercer Way
Shadsworth Business Park, Blackburn
Lancashire, BB1 2QU
United Kingdom
Support phone: +44 (0)1254 669090
Website: www.heatmiser.com
The manual also includes a statement that Heatmiser UK Ltd declares the radio equipment is compliant with Directive 2014/53/EU. RF frequency details listed are 868 MHz 12.43 dBm and 2.4 GHz 3.54 dBm.