| Field | Details |
| Document Title | FocusPRO P200 Series Thermostat User Guide |
| Document Type | User Guide |
| Brand Name | Honeywell Home |
| Product Name | FocusPRO P200 Series Thermostat |
| Model Numbers | TH2110U4004, TH2210U4005, TH2320U4006 |
| PDF File Size | 383.07 KB |
| Total Number of Pages | 2 |
| Languages Covered | English, French, Spanish |
Honeywell Home FocusPRO P200 Series Thermostat
The Honeywell Home FocusPRO P200 Series Thermostat provides temperature control for compatible heating and cooling systems. Models TH2110U4004, TH2210U4005, and TH2320U4006 feature a digital display, adjustable temperature settings, selectable system and fan modes, and programmable temperature schedules.
The thermostat displays the current indoor temperature, selected temperature setpoint, system operating status, time, and scheduling information. Available system modes include Heat, Off, Cool, Auto, and Emergency Heat, depending on the thermostat and heating or cooling system configuration.
The FocusPRO P200 also provides alerts for low batteries, heat pump faults, sensor problems, thermostat memory errors, and air filter replacement reminders.
Thermostat Controls and Display Overview
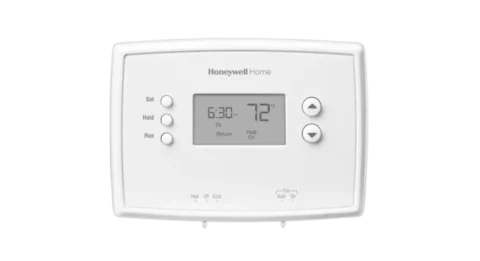
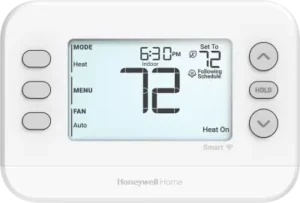
The FocusPRO P200 thermostat uses physical buttons and a digital display to control temperature settings and access available system functions.
The display provides information about the actual indoor temperature, selected setpoint, current operating mode, and equipment status.
Thermostat Buttons and Functions
| Button or Control | Function |
| MODE | Cycles through available system modes, including Heat, Off, Cool, Auto, and Emergency Heat |
| MENU | Opens the settings menu, including options for programmable schedules |
| FAN | Changes the fan setting between Auto, On, and Circulate |
| Up Arrow (▲) | Increases the temperature setpoint or changes a menu selection |
| Down Arrow (▼) | Decreases the temperature setpoint or changes a menu selection |
| SELECT | Confirms the currently displayed menu option |
| NEXT | Advances to the next step when configuring the time, date, or schedule |
| SAVE & EXIT | Saves the selected settings and exits the menu |
| EXIT | Leaves the selected menu |
Button labels such as SELECT, NEXT, and SAVE & EXIT appear during the corresponding menu operations.
Understanding the Thermostat Display
| Display Element | Description |
| Time | Displays the current clock time |
| Indoor Temperature | Shows the actual temperature measured indoors |
| Set To | Identifies the selected indoor temperature setpoint |
| System Mode | Shows the current operating mode, such as Heat or Cool |
| Schedule Information | Indicates time-based scheduling information and options |
| Heat On | Indicates that the heating system is operating |
| Cool On | Indicates that the cooling system is operating |
| Aux Heat On | Indicates auxiliary heating operation |
| Alert Indicator | Appears when the thermostat has an active alert |
| Filter Reminder Indicator | Appears with reminder number 181 when filter replacement is due |
The controls diagram on the first page illustrates the location of the Mode, Menu, Fan, and temperature adjustment buttons, along with the corresponding information displayed on the screen.
Thermostat Features and Operating Information
| Feature | Details |
| Product Series | FocusPRO P200 |
| Models | TH2110U4004, TH2210U4005, TH2320U4006 |
| Temperature Control | Adjustable heating and cooling setpoints |
| System Modes | Heat, Off, Cool, Auto, EM Heat |
| Fan Modes | Auto, On, Circulate |
| Fan Circulation | Approximately 33% of the time in Circulate mode |
| Clock Format | 12-hour or 24-hour |
| Scheduling | Time-based temperature programming |
| Heating Setpoint Range Referenced in Troubleshooting | 40°F–90°F (4.5°C–32°C) |
| Cooling Setpoint Range Referenced in Troubleshooting | 50°F–99°F (10°C–37°C) |
| Compressor Protection | Equipment restart delay |
| Alert System | On-screen alert numbers and reminder indicators |
The available operating modes and permitted temperature settings may be affected by the thermostat’s installed configuration.
Safety Instructions and Precautions
Cooling System Temperature Warning
CAUTION — Equipment damage hazard
The cooling system must not be operated when the outdoor temperature is below 50°F (10°C).
Operating the cooling system below this temperature can cause compressor damage.
Compressor Protection
The thermostat includes a compressor protection feature that delays system operation when necessary to prevent damage.
When protection is active, the display shows Waiting for Equipment.
The system should be allowed approximately five minutes to restart safely.
Temperature Setting Restrictions
The thermostat may have installer-configured minimum or maximum temperature settings.
These limits restrict the temperatures that can be selected for heating or cooling operation.
If the desired temperature is unavailable within the documented adjustment range, the installer should be consulted to verify the configured limits.
How to Adjust the Temperature Setting
The FocusPRO P200 thermostat uses the Up and Down Arrow buttons to adjust the indoor temperature setpoint.
The temperature setpoint represents the temperature selected for the active heating or cooling mode.
How to Increase or Decrease the Temperature
- Check the current indoor temperature and selected setpoint on the thermostat display.
- Press the Up Arrow (▲) to increase the temperature setting.
- Press the Down Arrow (▼) to decrease the temperature setting.
- Stop pressing the button when the required temperature appears.
The thermostat uses the selected temperature according to its active system operating mode.
Heating Temperature Settings
The troubleshooting instructions identify the following heating adjustment range:
| Setting | Temperature |
| Lower Heating Limit | 40°F (4.5°C) |
| Upper Heating Limit | 90°F (32°C) |
Installer-configured temperature limits may restrict the available adjustment range.
Cooling Temperature Settings
| Setting | Temperature |
| Lower Cooling Limit | 50°F (10°C) |
| Upper Cooling Limit | 99°F (37°C) |
If the thermostat cannot be adjusted to a temperature within the documented range, the installer may have configured additional minimum or maximum setpoint restrictions.
System Operating Modes
The thermostat provides system operating modes for controlling heating and cooling equipment.
Available modes depend on the installed system and thermostat configuration.
Available System Modes
| System Mode | Description |
| Heat | Heating operation |
| Off | Heating and cooling turned off |
| Cool | Cooling operation |
| Auto | Automatic heating and cooling operation |
| EM Heat | Emergency heat mode |
How to Change the System Mode
- Locate the MODE button on the thermostat.
- Press MODE to move to the next available system setting.
- Continue pressing the button until the required mode appears on the display.
- Stop pressing MODE when the desired setting is displayed.
- The selected mode activates.
How to Set the Thermostat to Heat
- Press MODE until Heat appears on the display.
- Leave the thermostat in Heat mode.
- Adjust the temperature using the Up or Down Arrow.
When heating equipment is operating, the display can show Heat On.
How to Set the Thermostat to Cool
- Press MODE to cycle through the available system modes.
- Stop when Cool appears.
- Adjust the desired cooling temperature with the arrow buttons.
When cooling equipment is operating, the screen can display Cool On.
Important: Cooling equipment must not operate when the outdoor temperature is below 50°F (10°C).
How to Turn Off Heating and Cooling
- Press MODE.
- Continue cycling through the settings until Off appears.
- Leave the thermostat in Off mode.
Auto and Emergency Heat Modes
Auto and EM Heat appear among the available operating modes when supported by the system configuration.
To select either mode, press MODE repeatedly until the required option appears, then stop pressing the button.
Fan Operation Settings
The FocusPRO P200 provides three fan operation settings: Auto, On, and Circulate.
Each setting controls how the system fan operates.
Fan Modes Explained
| Fan Mode | Operation |
| Auto | The fan runs only when the heating or cooling system is operating |
| On | The fan runs continuously |
| Circ | The fan operates intermittently for approximately 33% of the time to circulate air |
How to Change the Fan Mode
- Locate the FAN button.
- Press and release FAN to move to the next available fan setting.
- Continue pressing until the required mode appears.
- Stop pressing the button when the desired fan mode is displayed.
Using Auto Fan Mode
Auto mode operates the fan when heating or cooling equipment is running.
To activate it, press FAN until Auto appears.
Using On Fan Mode
On mode keeps the fan operating continuously.
To activate this setting, press FAN until On appears.
Using Circulate Fan Mode
Circulate mode operates the fan at varying intervals for approximately one-third of the time.
To activate this setting, press FAN until Circ appears.
Setting the Time and Date
The thermostat supports both 12-hour and 24-hour clock formats and allows the time and calendar date to be adjusted through the Menu.
How to Set the Time
- Press MENU on the thermostat.
- Use the Up or Down Arrow to navigate to TIME.
- Press SELECT.
- Use the arrow buttons to choose the 12-hour or 24-hour clock format.
- Press NEXT.
- Adjust the hour using the Up or Down Arrow.
- Press NEXT.
- Adjust the minutes using the arrow buttons.
- Press SAVE & EXIT to save the time setting.
How to Set the Date
- Press MENU.
- Use the arrow buttons to navigate to DATE.
- Press SELECT.
- Adjust the year using the Up or Down Arrow.
- Press NEXT.
- Adjust the month using the arrow buttons.
- Press NEXT.
- Adjust the date.
- Press SAVE & EXIT.
How to Change the Clock Format
To switch between 12-hour and 24-hour time:
- Open MENU.
- Navigate to TIME.
- Press SELECT.
- Choose the preferred format with the arrow buttons.
- Press NEXT to continue through the clock settings.
- Finish by pressing SAVE & EXIT.
Programming the Thermostat Schedule
The FocusPRO P200 supports time-based temperature scheduling.
The thermostat allows selected schedule periods to be enabled or disabled and permits the heating and cooling setpoints and start times to be adjusted.
How to Open Schedule Settings
- Press MENU.
- Use the Up or Down Arrow until SCHED appears.
- Press SELECT.
- A selection box appears around ON or OFF.
- To use a programmed schedule, select ON using the arrow buttons.
- Press NEXT to edit the schedule.
To leave the schedule menu without editing, press EXIT.
How to Edit the Schedule Days
- Open the schedule editing screen.
- The selected day or days flash on the display.
- Press NEXT to continue editing the displayed day or days.
- The thermostat advances to the schedule period settings.
How to Enable or Disable a Schedule Period
The Wake period appears during schedule editing.
- Wait for Wake to flash on the display.
- Press NEXT.
- Use the arrow buttons to turn the selected schedule period ON or OFF.
- Press NEXT.
If the period is enabled, the thermostat continues to its time and temperature settings.
How to Set a Schedule Period’s Start Time
- When the schedule period is ON, its start time flashes.
- Press the Up or Down Arrow to adjust the time.
- Press NEXT to continue.
How to Set the Heating Temperature
- Wait for the heating setpoint to flash.
- Press the Up or Down Arrow to select the required heating temperature.
- Press NEXT.
How to Set the Cooling Temperature
- Wait for the cooling setpoint to flash.
- Use the Up or Down Arrow to select the required cooling temperature.
- Press NEXT.
How to Program Additional Periods and Days
After completing the current schedule period, the thermostat displays the next period with its name flashing.
For each remaining period:
- Select whether the period is ON or OFF.
- Adjust the start time when the period is enabled.
- Set the heating temperature.
- Set the cooling temperature.
- Press NEXT to continue.
Repeat these steps for the remaining schedule periods and days.
How to Save the Programmed Schedule
When all required schedule settings have been adjusted, press SAVE & EXIT in the upper-left area of the thermostat display.
How to Turn Off the Schedule
- Press MENU.
- Navigate to SCHED.
- Press SELECT.
- Choose OFF using the arrow buttons.
- Press EXIT to leave the schedule menu.
Thermostat Alerts and Error Codes
The thermostat displays alert numbers when certain operating or maintenance conditions require attention.
When an alert becomes active, an alert icon appears in the lower portion of the screen together with the alert number.
FocusPRO P200 Alert Codes
| Alert Code | Meaning |
| 405 | Low thermostat batteries |
| 407 | Critically low thermostat batteries |
| 164 | Heat pump has detected a fault |
| 170 | Thermostat memory failure |
| 173 | Internal sensor error |
| 178 | Wired outdoor sensor error |
| 181 | Replace filter reminder |
Alert 405 — Low Batteries
Alert 405 indicates that the thermostat batteries are low.
The batteries require replacement.
Alert 407 — Critically Low Batteries
Alert 407 indicates a critically low battery condition.
The thermostat batteries require replacement.
Alert 164 — Heat Pump Fault
Alert 164 indicates that the heat pump has detected a fault.
The heating system requires attention to determine the cause of the reported fault.
Alert 170 — Thermostat Memory Failure
Alert 170 indicates a thermostat memory failure.
This message identifies a problem involving the thermostat’s internal memory.
Alert 173 — Internal Sensor Error
Alert 173 indicates a problem with the thermostat’s internal sensor.
Alert 178 — Wired Outdoor Sensor Error
Alert 178 indicates an error involving the wired outdoor sensor.
Alert 181 — Replace Filter
Alert 181 indicates that the thermostat’s filter replacement reminder is active.
The reminder timer can be reset after the air filter has been replaced.
Air Filter Replacement Reminder
The FocusPRO P200 provides an on-screen reminder to indicate when an air filter needs replacement.
When the filter reminder is active, the display shows its reminder icon and code 181.
How to Reset the Filter Reminder
After replacing the filter:
- Press MENU.
- Use the Up or Down Arrow to find FILT.
- Press SELECT.
- Read the scrolling reminder message.
- Press DISMISS to clear the reminder and reset its timer.
The filter reminder should be dismissed after the required filter replacement has been completed.
Troubleshooting Guide
The following procedures address common problems with thermostat operation, display power, compressor protection, and temperature adjustment.
Troubleshooting Table
| Problem | Possible Cause or Condition | Recommended Action |
| Thermostat display is blank | Circuit breaker interruption | Check the circuit breaker and reset it if necessary |
| Thermostat display is blank | Heating or cooling equipment power is off | Confirm that the system power switch is on |
| Thermostat display is blank | Furnace door is open | Make sure the furnace door is closed securely |
| Waiting for Equipment appears | Compressor protection delay | Allow approximately five minutes for the system to restart safely |
| Temperature settings do not change | Keypad lockout | Check whether UNLOCK appears on the display |
| Temperature settings do not change | Incorrect operating mode | Confirm that the thermostat is in the required Heat, Cool, EM Heat, or Auto mode |
| Heating setpoint is restricted | Configured minimum or maximum temperature limit | Ask the installer to verify the temperature limits |
| Cooling setpoint is restricted | Configured minimum or maximum temperature limit | Ask the installer to verify the temperature limits |
Thermostat Display Is Blank
If the thermostat display is blank, check the heating and cooling system’s power supply.
- Check the circuit breaker.
- Reset the breaker if necessary.
- Confirm that the heating and cooling system power switch is turned on.
- Make sure the furnace door is securely closed.
Waiting for Equipment Appears on the Screen
The Waiting for Equipment message indicates that the compressor protection feature is active.
This function delays compressor operation to help prevent damage from restarting the equipment too quickly.
When the message appears:
- Leave the thermostat in its selected operating mode.
- Allow approximately five minutes for the protection delay.
- Wait for the system to restart safely.
Temperature Settings Do Not Change
If the thermostat does not respond to a temperature adjustment:
- Check whether UNLOCK appears on the display.
- If UNLOCK appears, an owner-configured keypad lockout is active.
- If the thermostat is not locked, verify the system operating mode.
- Confirm that the selected mode matches the required heating or cooling operation.
- Check whether the desired temperature is within the permitted setting range.
Heating Temperature Cannot Be Adjusted to the Desired Setting
The troubleshooting instructions identify a heating adjustment range of 40°F–90°F (4.5°C–32°C).
If the correct operating mode is selected but the setpoint cannot be changed to a temperature within this range, a configured minimum or maximum limit may be restricting the setting.
The installer can verify whether temperature restrictions have been applied.
Cooling Temperature Cannot Be Adjusted to the Desired Setting
The documented cooling adjustment range is 50°F–99°F (10°C–37°C).
If the thermostat prevents adjustment within this range, installer-configured temperature limits may be active.
The installer should be consulted to check the configured restrictions.
Product Manufacturer Information
The FocusPRO P200 Series Thermostat is a Honeywell Home-branded product manufactured by Resideo Technologies, Inc. and its affiliates.
| Information | Details |
| Brand | Honeywell Home |
| Manufacturer | Resideo Technologies, Inc. |
| Manufacturer Location | Scottsdale, AZ 85254, USA |
| Manufacturer Website | www.resideo.com |
Frequently Asked Questions
1. How do I change the temperature on a Honeywell FocusPRO P200 thermostat?
Press the Up or Down Arrow on the thermostat to increase or decrease the selected temperature setpoint. The new setting appears on the digital display.
2. How do I switch the FocusPRO P200 thermostat from Heat to Cool?
Press MODE repeatedly until Cool appears on the display. Stop pressing the button to activate the selected mode. Cooling must not be operated when the outdoor temperature is below 50°F (10°C).
3. What does Waiting for Equipment mean on the FocusPRO P200 thermostat?
Waiting for Equipment means compressor protection is active. The thermostat delays operation to prevent equipment damage. Allow approximately five minutes for the system to restart safely.
4. How do I program the schedule on the Honeywell FocusPRO P200?
Press MENU, navigate to SCHED, and press SELECT. Choose ON and press NEXT to edit the schedule. Adjust the selected days, periods, start times, and heating and cooling setpoints, then press SAVE & EXIT.
5. What is the difference between Auto, On, and Circ fan modes?
Auto operates the fan when the heating or cooling system runs. On keeps the fan running continuously. Circ runs the fan intermittently for approximately 33% of the time.
6. How do I reset filter reminder 181 on the FocusPRO P200 thermostat?
After replacing the air filter, press MENU and navigate to FILT. Press SELECT, read the scrolling reminder text, and press DISMISS to reset the filter reminder timer.
7. Why can’t I change the temperature on my FocusPRO P200 thermostat?
The thermostat may have an active keypad lockout, an incorrect operating mode, or installer-configured minimum and maximum temperature restrictions. Check for UNLOCK on the screen, verify the selected system mode, and consult the installer if temperature limits are restricting adjustments.
8. What do alert codes 405 and 407 mean on a Honeywell P200 thermostat?
Alert 405 indicates low thermostat batteries. Alert 407 indicates that the battery level is critically low. Both alerts identify a battery condition requiring replacement.