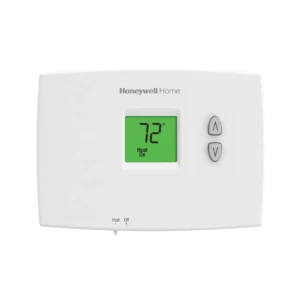
| Field | Details |
| Document Title | PRO 1000 Series Non-Programmable Thermostat Operating Manual |
| Document Type | Operating Manual |
| Brand Name | Honeywell Home |
| Product Name | PRO 1000 Series Non-Programmable Thermostat |
| Model Numbers | TH1100DH, TH1110DH, TH1110E, TH1210DH |
| PDF File Size | 441.93 KB |
| Total Number of Pages | 48 |
| Languages Covered | English, French, Spanish |
Honeywell Home PRO 1000 Series Non-Programmable
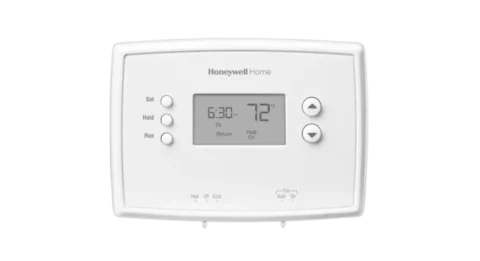
The Honeywell Home PRO 1000 Series Non-Programmable Thermostat provides manual temperature control for compatible heating and cooling systems. The thermostat features a backlit digital display, simple temperature adjustment buttons, physical system and fan switches, and built-in compressor protection.
The series includes four thermostat model families designed for different heating and cooling configurations. Model TH1100DH supports single-stage heating, TH1110DH and TH1110E support single-stage heating and cooling, and TH1210DH supports two-stage heating and single-stage cooling heat pump systems.
The thermostat continuously displays the measured indoor temperature. Its Up and Down buttons provide direct access to the selected temperature setting, while the SYSTEM and FAN switches determine how the connected equipment operates.
Product Overview and Model Compatibility
The PRO 1000 Series provides push-button temperature adjustment without requiring a programmed daily schedule. Heating and cooling operation is selected using the thermostat’s physical SYSTEM switch.
Supported Thermostat Models
| Model Number | Compatible System |
| TH1100DH | Single-stage heating system (1 Heat) |
| TH1110DH | Single-stage heating and single-stage cooling system (1 Heat/1 Cool) |
| TH1110E | Single-stage heating and single-stage cooling system (1 Heat/1 Cool) |
| TH1210DH | Heat pump with two heating stages and one cooling stage (2 Heat/1 Cool) |
The TH1110E1000 version has a larger display than the standard thermostat illustration. Some display indicators also appear in different positions on this version.
Main Features
The PRO 1000 Series includes the following features:
- Backlit digital display for reading temperature information.
- Continuous display of the measured indoor temperature.
- Direct access to the temperature setpoint through the Up and Down buttons.
- Physical SYSTEM switch for selecting heating and cooling operation.
- Physical FAN switch for automatic or continuous fan operation.
- Built-in compressor protection for compatible air conditioning and heat pump systems.
- Low-battery warning indicator.
- Battery-backed operation with stored thermostat settings.
How to Find the Thermostat Model Number
The model number and date code are located on the back of the thermostat.
To identify the model:
- Pull the bottom of the thermostat away from its wallplate.
- Carefully remove the thermostat from the mounting plate.
- Turn the thermostat over.
- Locate the model number and date code on the rear label.
- Reattach the thermostat to the wallplate after checking the information.
The model number identifies the heating and cooling configuration supported by the thermostat.
Thermostat Controls and Buttons
The PRO 1000 thermostat uses two temperature adjustment buttons and separate switches for system and fan operation.
Control Functions
| Control | Function |
| SYSTEM Switch | Selects Heat, Off, Cool, or Emergency Heat when available |
| FAN Switch | Selects Auto or On fan operation |
| Up Button (▲) | Increases the selected temperature |
| Down Button (▼) | Decreases the selected temperature |
| Digital Display | Shows indoor temperature, selected setpoint, equipment status, and battery warnings |
SYSTEM Switch Positions
The SYSTEM switch controls which heating or cooling function is active.
| Position | Function |
| Heat | Enables heating system control |
| Off | Turns off the heating and cooling systems |
| Cool | Enables cooling system control |
| Em Heat | Activates emergency and auxiliary heating on supported models and locks out the compressor |
Emergency Heat is available only on models and systems that support this function.
FAN Switch Positions
The FAN switch offers two operating settings.
| Position | Function |
| Auto | Fan operates when the heating or cooling system is running |
| On | Fan operates continuously |
Understanding the Thermostat Display
The digital display provides the current room temperature and indicates when heating, cooling, auxiliary heat, or compressor protection is active.
Display Indicators and Meanings
| Display Indicator | Meaning |
| Temperature | Current measured indoor temperature |
| Set | Indicates that the selected temperature setpoint is being displayed |
| Heat On | Heating system is operating |
| Cool On | Cooling system is operating |
| Aux On | Auxiliary heating is operating on compatible heat pump models |
| Lo Batt | Thermostat batteries are low |
| Battery Icon with One Bar | Low-battery warning on model TH1110E1000 |
| Flashing Heat On | Compressor protection delay is active |
| Flashing Cool On | Compressor protection delay is active |
Indoor Temperature Display
During normal operation, the thermostat displays the measured indoor temperature.
This is the actual room temperature rather than the selected heating or cooling setpoint.
How to View the Temperature Setpoint
- Press the Up or Down button once.
- The selected temperature appears on the display.
- The Set indicator identifies the displayed value as the temperature setpoint.
- After approximately five seconds, the display returns to the measured indoor temperature.
TH1110E1000 Display Differences
Model TH1110E1000 has a larger display than the standard illustration.
On this model:
- The Set indicator appears to the right of the temperature.
- A battery icon with one remaining charge bar appears in the lower-right corner when the batteries are low.
- The display does not use the Lo Batt text for its low-battery warning.
Electrical Specifications
The PRO 1000 Series includes the following electrical ratings for supported heating and cooling circuits.
Electrical Ratings Table
| System | Voltage | Running Current |
| Heating, First Stage | 20–30 VAC, 50/60 Hz | 0.02–1.0 A |
| Powerpile | 750 mV DC | 100 mA DC |
| Auxiliary Heating | 20–30 VAC, 50/60 Hz | 0.02–1.0 A |
| Cooling | 20–30 VAC, 50/60 Hz | 0.02–1.0 A |
The auxiliary heating rating applies to model TH1210DH only.
Battery Requirements
| Specification | Details |
| Battery Type | AAA alkaline |
| Number of Batteries | 2 |
| Replacement Recommendation | Once per year or before an absence lasting more than one month |
| Low-Battery Warning Period | Approximately 60 days before the batteries are depleted |
| Settings Memory | Nonvolatile memory preserves stored thermostat settings |
Safety Instructions and Precautions
Cooling System Temperature Warning
CAUTION — Equipment damage hazard
The cooling system must not be operated when the outdoor temperature is below 50°F (10°C).
Operating the cooling system below this temperature could damage the compressor.
Compressor Restart Protection
The thermostat includes a built-in compressor protection feature.
Restarting an air conditioner or heat pump compressor immediately after shutdown can cause equipment damage.
To prevent this condition, the thermostat applies a five-minute waiting period before allowing the compressor to restart.
During the delay, Heat On or Cool On flashes on the display.
Battery Replacement Precaution
Important: The SYSTEM switch must be moved to Off before removing the thermostat batteries.
If the batteries are removed while another system setting is selected, the heating or cooling equipment could remain activated even after the batteries have been removed.
Mercury Disposal Warning
If the PRO 1000 replaces an older thermostat containing mercury inside a sealed tube, the old thermostat must not be placed in household trash.
Contact the local waste management authority for appropriate recycling and disposal instructions.
Electronic Waste Disposal
The thermostat must not be discarded with ordinary household waste at the end of its service life.
Use an authorized electronic waste collection center or recycling facility.
How to Use the Honeywell PRO 1000 Thermostat
The thermostat is operated by selecting the required heating or cooling mode and adjusting the temperature with the Up and Down buttons.
Selecting the Heating System
To operate the heating system:
- Move the SYSTEM switch to Heat.
- Check the current indoor temperature on the display.
- Press the Up button to select a temperature higher than the current room temperature when heating is required.
- Allow the heating system to respond.
The display shows Heat On when the heating system is operating.
Selecting the Cooling System
To operate the cooling system:
- Move the SYSTEM switch to Cool.
- Check the current measured indoor temperature.
- Press the Down button to select a temperature lower than the current room temperature when cooling is required.
- Allow the cooling system to respond.
The display shows Cool On when the cooling system is operating.
Important: Cooling must not be operated when the outdoor temperature is below 50°F (10°C).
Turning Off Heating and Cooling
To turn off heating and cooling operation:
- Locate the SYSTEM switch.
- Move the switch to Off.
The thermostat no longer requests normal heating or cooling operation while the SYSTEM switch remains in Off.
Using Emergency Heat
Emergency Heat is available on supported thermostat models and heat pump systems.
When the SYSTEM switch is moved to Em Heat:
- Emergency and auxiliary heating control is activated.
- The compressor is locked out.
This setting applies only to models equipped with Emergency Heat functionality.
How to Adjust the Temperature
The thermostat temperature is adjusted using the Up and Down buttons located beside the display.
Increasing the Temperature
- Make sure the SYSTEM switch is set to the heating or cooling mode being controlled.
- Press the Up button.
- Continue adjusting until the required temperature appears.
- Release the button when the desired setpoint is displayed.
Decreasing the Temperature
- Check that the required system mode is selected.
- Press the Down button.
- Continue adjusting the setpoint until the required temperature is displayed.
- Release the button.
Heating Temperature Adjustment
When Heat is selected, the temperature should be set above the current room temperature to request heating.
For example, if the indoor temperature is below the selected heating setpoint, the thermostat can request heating from the connected equipment.
Cooling Temperature Adjustment
When Cool is selected, the temperature should be set below the current room temperature to request cooling.
The thermostat displays Cool On when cooling equipment is operating.
Fan Operation Settings
The PRO 1000 thermostat allows the fan to run automatically with the heating or cooling system or continuously.
Auto Fan Mode
Auto is the commonly used fan setting.
When the FAN switch is set to Auto, the fan operates only while the heating or cooling system is running.
To select Auto:
- Locate the FAN switch.
- Move it to Auto.
On Fan Mode
The On setting keeps the fan operating continuously.
To activate this mode:
- Locate the FAN switch.
- Move it to On.
Difference Between Auto and On
| Feature | Auto Mode | On Mode |
| Fan operation | Runs during heating or cooling operation | Runs continuously |
| Fan behavior between heating/cooling cycles | Does not run as part of normal automatic fan operation | Continues operating |
| Switch position | Auto | On |
Built-In Compressor Protection
The PRO 1000 thermostat includes compressor protection for compatible air conditioning and heat pump systems.
The feature prevents the compressor from restarting too quickly after a shutdown.
How Compressor Protection Works
After the compressor stops, the thermostat applies a five-minute delay before permitting it to restart.
This waiting period protects the equipment against damage associated with rapid compressor cycling.
Flashing Cool On Message
When cooling is requested during the protection period:
- The thermostat displays Cool On.
- The message flashes while the compressor is waiting.
- The compressor remains in the protection delay.
- After five minutes, the message stops flashing.
- The compressor starts when the safe waiting period has ended.
Flashing Heat On Message
When Heat On flashes, the compressor protection feature is also active.
The thermostat must be allowed five minutes for the heating or heat pump system to restart safely.
AAA Battery Replacement
The thermostat uses two AAA alkaline batteries.
The batteries should be replaced when the low-battery warning appears or according to the recommended replacement interval.
When to Replace the Batteries
Battery replacement is recommended:
- When Lo Batt appears on the display.
- When the low-battery icon appears on model TH1110E1000.
- Once every year.
- Before leaving the property for more than one month.
The low-battery indicator appears approximately 60 days before battery depletion.
How to Replace the Thermostat Batteries
- Move the SYSTEM switch to Off.
- Grasp the bottom of the thermostat.
- Pull the thermostat away from its wallplate.
- Turn the thermostat over to access the battery compartment.
- Remove the existing batteries.
- Insert two fresh AAA alkaline batteries, following the polarity markings.
- Reattach the thermostat to the wallplate.
Important: Always move the SYSTEM switch to Off before battery removal. Otherwise, the connected heating or cooling system could remain activated.
Settings After Battery Replacement
The thermostat stores its settings in nonvolatile memory.
These stored settings are preserved when the thermostat is without batteries.
Troubleshooting Guide
The following troubleshooting procedures address common PRO 1000 thermostat problems, including a blank display, unresponsive heating or cooling equipment, and flashing system indicators.
Troubleshooting Table
| Problem | Possible Cause or Condition | Recommended Action |
| Thermostat display is blank | Batteries are depleted or installed incorrectly | Install fresh AAA alkaline batteries correctly |
| Heating does not respond | Heating mode is not selected or setpoint is too low | Select Heat and increase the setpoint above the room temperature |
| Cooling does not respond | Cooling mode is not selected or setpoint is too high | Select Cool and lower the setpoint below the room temperature |
| Heating or cooling does not respond | Equipment may need time to respond | Wait five minutes |
| Heating or cooling does not respond | Circuit breaker interruption | Check and reset the breaker if necessary |
| Heating or cooling does not respond | Equipment power switch is off | Confirm that the heating or cooling system power switch is on |
| Heating or cooling does not respond | Furnace door is not secured | Make sure the furnace door is closed securely |
| Heat On or Cool On is flashing | Compressor protection is active | Wait five minutes for the equipment to restart safely |
| Heat On does not appear | Heating has not been requested | Select Heat and set the temperature above the room temperature |
| Cool On does not appear | Cooling has not been requested | Select Cool and set the temperature below the room temperature |
Thermostat Display Is Blank
If the thermostat screen does not display information:
- Check the installed batteries.
- Confirm that two AAA alkaline batteries are present.
- Replace depleted batteries with fresh ones.
- Make sure the batteries are installed according to the correct polarity.
Heating System Does Not Respond
If the heating system does not turn on:
- Move the SYSTEM switch to Heat.
- Check the measured indoor temperature.
- Adjust the temperature setpoint above the current indoor temperature.
- Wait five minutes for the system to respond.
- Check the circuit breaker and reset it if necessary.
- Confirm that the heating system power switch is on.
- Make sure the furnace door is securely closed.
Cooling System Does Not Respond
If the cooling system does not turn on:
- Move the SYSTEM switch to Cool.
- Check the current indoor temperature.
- Adjust the setpoint below the measured room temperature.
- Wait five minutes for the system to respond.
- Check the circuit breaker and reset it if required.
- Verify that the cooling equipment power switch is on.
- Check that the furnace door is properly closed.
The cooling system must not be operated when the outdoor temperature is below 50°F (10°C).
Heat On or Cool On Is Flashing
A flashing Heat On or Cool On message indicates that compressor protection is engaged.
The thermostat is applying its five-minute restart delay.
Allow the protection period to finish so the equipment can restart safely.
Heat On Does Not Appear
If Heat On does not appear:
- Move the SYSTEM switch to Heat.
- Adjust the selected temperature above the current room temperature.
Cool On Does Not Appear
If Cool On does not appear:
- Move the SYSTEM switch to Cool.
- Adjust the temperature below the current indoor temperature.
Customer Support Information
Honeywell Home PRO 1000 thermostats are manufactured by Resideo Technologies, Inc. and its affiliates.
For assistance with thermostat operation, product identification, and troubleshooting, the official support resources are listed below.
| Support Information | Details |
| Brand | Honeywell Home |
| Manufacturer | Resideo Technologies, Inc. |
| Official Support Website | Honeywellhome.com/support |
| Manufacturer Website | www.resideo.com |
| Manufacturer Address | 1985 Douglas Drive North, Golden Valley, MN 55422, USA |
Information Needed for Customer Support
The thermostat model number and date code can be found on the back of the thermostat.
To locate them:
- Pull the bottom of the thermostat away from its wallplate.
- Turn the thermostat over.
- Find the model number and date code on the rear label.
Warranty Information
The Honeywell Home PRO 1000 Series Non-Programmable Thermostat is covered by a 2-year limited warranty.
Details about warranty coverage, terms, and support are available at Honeywell Home Support.
Mexico Warranty Information
The warranty policy included in the Spanish-language portion of the manual provides additional terms for products sold in Mexico.
Under that regional policy, Instromet Mexicana S. de R.L. de C.V. provides two-year coverage for defects in materials and manufacturing under normal use, starting from the consumer’s purchase date.
Repair or replacement is determined according to the applicable warranty conditions. The regional policy specifies that coverage does not apply when the product has been used outside normal operating conditions, operated contrary to its instructions, or altered or repaired by unauthorized persons.
Reinstallation labor and damage resulting from consumer misuse or normal wear are excluded under the stated Mexico warranty terms.
Frequently Asked Questions
1. How do I change the temperature on a Honeywell PRO 1000 thermostat?
Press the Up or Down button to adjust the selected temperature. The SYSTEM switch must be in the required Heat or Cool position. The selected temperature appears on the screen, and the display normally returns to the measured room temperature after five seconds.
2. How do I switch the Honeywell PRO 1000 thermostat from Heat to Cool?
Move the SYSTEM switch from Heat to Cool. Then use the temperature adjustment buttons to set the cooling temperature below the current indoor temperature. Do not operate cooling when the outdoor temperature is below 50°F (10°C).
3. What does a flashing Cool On message mean?
Flashing Cool On indicates that the built-in compressor protection feature is active. The thermostat delays compressor startup for five minutes to prevent equipment damage. The message stops flashing when the safe waiting period ends.
4. What type of batteries does the Honeywell PRO 1000 thermostat use?
The thermostat uses two AAA alkaline batteries. The batteries should be replaced when the low-battery warning appears, once per year, or before leaving the property for more than one month.
5. What is the difference between Auto and On fan settings?
Auto allows the fan to run when the heating or cooling system operates. On keeps the fan running continuously. Both settings are selected using the physical FAN switch.
6. Why is my Honeywell PRO 1000 thermostat display blank?
A blank display may indicate depleted or incorrectly installed batteries. The manual recommends checking that fresh AAA alkaline batteries are installed correctly.
7. How do I find the model number on a Honeywell PRO 1000 thermostat?
Pull the bottom of the thermostat away from the wallplate and turn it over. The model number and date code are located on the back of the unit.
8. How long is the warranty on the Honeywell PRO 1000 thermostat?
The PRO 1000 Series Thermostat has a two-year limited warranty. Applicable warranty terms and support information are available through the official Honeywell Home support website.