Honeywell Programmable Thermostat Owner’s Manual
As a homeowner, having a reliable and efficient heating and cooling system is crucial for maintaining a comfortable living environment. The Honeywell programmable thermostat is a powerful tool designed to help you take control of your home’s temperature while saving energy and reducing utility costs.
In this comprehensive owner’s manual, I’ll guide you through the features, installation, programming, and troubleshooting of your Honeywell programmable thermostat, ensuring you get the most out of your investment.
Introduction
The Honeywell programmable thermostat is a state-of-the-art device that allows you to set customized temperature schedules for different times of the day and days of the week.
With its user-friendly interface and advanced features, you can effortlessly maintain a comfortable indoor environment while maximizing energy efficiency.
Whether you’re a tech-savvy homeowner or someone who prefers simplicity, this owner’s manual will provide you with the knowledge and confidence to navigate your thermostat like a pro.
Getting Started: Unpacking and Installation
Let’s begin by unpacking your Honeywell programmable thermostat. Inside the box, you’ll find the thermostat unit, a user manual, wire labels, screws, and anchors. Take a moment to familiarize yourself with these components, as they’ll play a crucial role in the installation process.
Before diving into the installation, it’s important to turn off the power to your heating and cooling system. This step ensures your safety and prevents any potential damage to the equipment.
Once the power is off, locate your old thermostat and carefully remove it from the wall, making sure to label each wire with the provided wire labels. This will make it easier to connect the wires to the new thermostat later on.
Mounting the New Thermostat
With the old thermostat removed, it’s time to mount the Honeywell programmable thermostat. Start by separating the wallplate from the thermostat unit itself.
Using the included screws and anchors, securely mount the wallplate onto the wall. If you’re installing the thermostat on drywall, drill 3/16-inch holes, and for plaster walls, drill 3/32-inch holes.
Next, connect the labeled wires to their respective terminals on the thermostat, matching the wire labels to the letters on the unit. If the labels don’t match the terminals, refer to the “Alternate Wiring” section in the user manual for guidance. Once the wires are connected, simply snap the thermostat unit onto the mounted wallplate.
Programming Your Thermostat
With the installation complete, it’s time to dive into programming your Honeywell programmable thermostat. This feature is what sets it apart from traditional thermostats, allowing you to create customized temperature schedules that align with your daily routine and preferences.
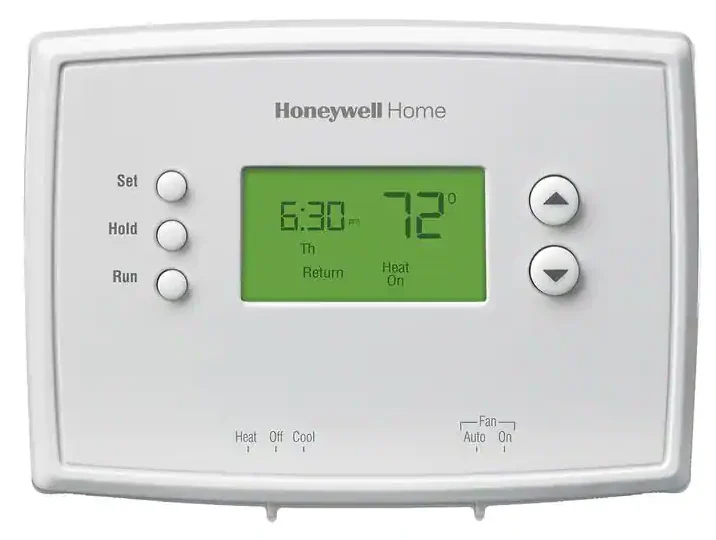
Setting the Clock and Day
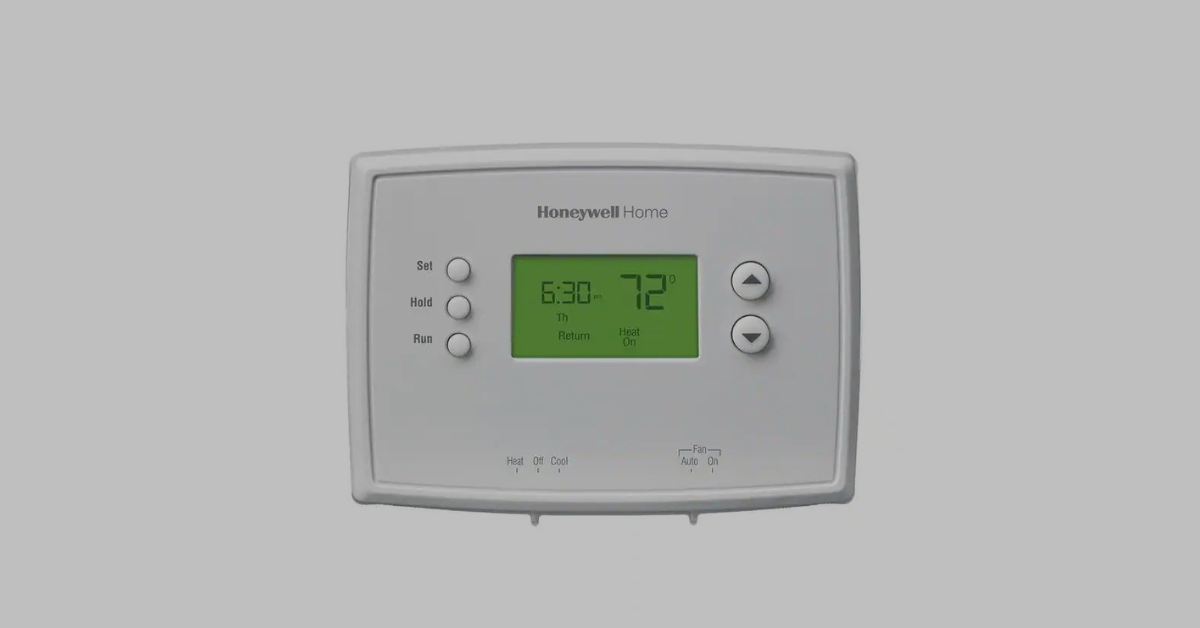
Before programming your schedules, you’ll need to set the correct time and day on your thermostat. Press the “Set Clock/Day/Schedule” button, then use the up and down arrows to adjust the time. Next, press the “Set Day” button and select the current day of the week. Once you’ve set the time and day, press “Done” to save your settings.
Programming Schedules
Your Honeywell programmable thermostat allows you to set up to four time periods per day, with different settings for weekdays and weekends. These time periods are typically referred to as “Wake,” “Leave,” “Return,” and “Sleep.” Here’s what they represent:
- Wake: Set the time you wake up and the temperature you want during the morning hours until you leave for the day.
- Leave: Set the time you leave home and the energy-saving temperature you prefer while you’re away.
- Return: Set the time you return home and the comfortable temperature you desire for the evening hours.
- Sleep: Set the time you go to bed and the energy-saving temperature you prefer overnight.
To program these schedules, press “Set Clock/Day/Schedule,” then “Set Schedule.” Follow the prompts to set the times and temperatures for each period, ensuring you program both weekday and weekend schedules. Don’t forget to press “Done” when you’ve finished programming to save your settings.
Overriding the Schedule
Life doesn’t always follow a strict schedule, and your Honeywell programmable thermostat understands that. If you need to temporarily override the programmed temperature, simply press the up or down arrow buttons to adjust the setting.
The word “Temporary” will appear on the display, indicating that this new temperature will only be maintained until the next programmed time period begins.
If you need to override the schedule for an extended period, such as when you’re on vacation or hosting guests, press the “Hold” button.
This feature turns off the program schedule and allows you to manually set a temperature that will be maintained 24 hours a day until you cancel the “Hold” mode.
Advanced Features
In addition to the basic programming capabilities, your Honeywell programmable thermostat offers several advanced features to further enhance your comfort and energy savings.
Smart Response® Technology
The Smart Response® Technology is a unique feature that allows your thermostat to “learn” how long it takes for your heating and cooling system to reach the programmed temperature settings.
This way, your system can start running early to ensure the desired temperature is achieved at the scheduled time.
For example, if you set the “Wake” time for 6 AM and the temperature to 70°F, the heat will turn on before 6 AM to ensure the house is at 70°F by the time you wake up.
Built-in Compressor Protection
If you have an air conditioning or heat pump system, your Honeywell thermostat comes equipped with a built-in compressor protection feature. This feature prevents damage to the compressor by forcing it to wait a few minutes before restarting after a shutdown.
During this wait time, the display will flash the message “Cool On” or “Heat On,” depending on your system type.
Auto Changeover (select models)
Certain Honeywell programmable thermostat models, such as the RTH6450 and RET95E, offer an Auto Changeover feature. This feature is ideal for climates where both air conditioning and heating are used on the same day.
When the system mode is set to “Auto,” the thermostat automatically selects heating or cooling based on the indoor temperature, maintaining a 3-degree separation between the cool and heat settings.
Troubleshooting and Maintenance
While your Honeywell programmable thermostat is designed for reliable operation, you may encounter some issues from time to time. This section will guide you through common troubleshooting steps and maintenance tips to keep your thermostat running smoothly.
Troubleshooting
If you’re experiencing issues with your thermostat, try these troubleshooting tips before seeking professional assistance:
- Blank display: Check that fresh AA alkaline batteries are correctly installed.
- Temperature settings not changing: Ensure heating and cooling temperatures are set within acceptable ranges (Heat: 40°F to 90°F, Cool: 50°F to 99°F).
- Cannot change system setting to Cool: Check Function 1 (System Type) to make sure it matches your heating and cooling equipment.
- Fan not turning on when heat is required: Check Function 3 (Heating Fan Control) to ensure it matches your heating equipment.
- Heating or cooling system not responding: Press the “System” button to set the system to Heat or Cool, and ensure the temperature is set higher or lower than the indoor temperature, respectively. Also, check the circuit breaker, power switch, and furnace door.
- “Cool On” or “Heat On” is flashing: This indicates the compressor protection feature is engaged. Wait 5 minutes for the system to restart safely.
- Heat pump issues: If your heat pump is cooling in heat mode or heating in cool mode, check Function 2 (Heat Pump Changeover Valve) to ensure it’s configured correctly.
- Heating and cooling equipment running simultaneously: Check Function 1 (System Type) to ensure it matches your equipment, and ensure bare wires are not touching each other.
If these troubleshooting steps don’t resolve the issue, don’t hesitate to reach out to Honeywell’s customer support for further assistance.
Maintenance
To keep your Honeywell programmable thermostat functioning at its best, follow these simple maintenance tips:
- Battery replacement: Replace the batteries once a year or when the “Replace Battery” warning flashes, which occurs about two months before the batteries are depleted.
- Cleaning: Gently wipe the thermostat with a soft, dry cloth to remove dust and fingerprints.
- User manual: Keep the user manual handy for reference and consult it whenever you have questions or need to adjust settings.
By following these maintenance guidelines, you’ll ensure your Honeywell programmable thermostat continues to provide reliable and efficient temperature control for years to come.
Official Honeywell Programmable Thermostat Owner’s Manual PDF
 Loading...