
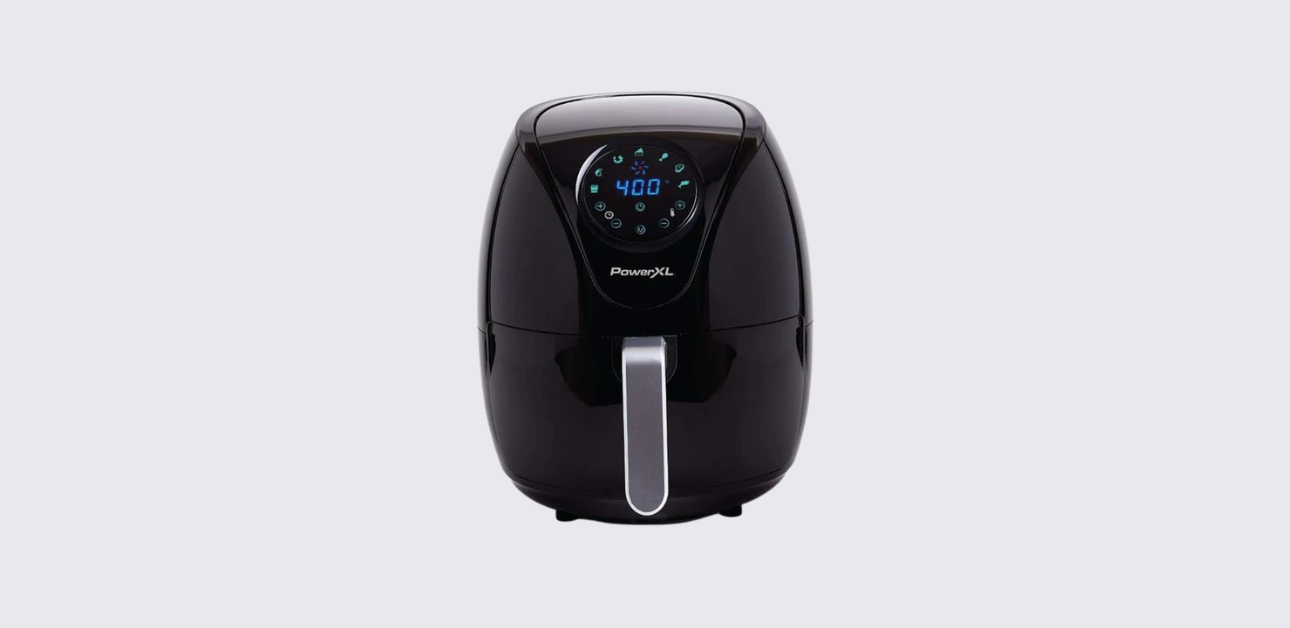
The PowerXL classic air fryer is a countertop cooking appliance designed to deliver crispy, flavorful food with little to no oil. Using rapid hot air circulation technology, it cooks food evenly while reducing the need for traditional deep frying. Available in 4-quart, 5-quart, and 7-quart capacities, the appliance offers adjustable temperature controls, cooking presets, automatic shut-off protection, and a nonstick cooking basket for easy meal preparation.
This detailed guide explains everything users need to know about the PowerXL Classic Air Fryer, including its features, parts, setup instructions, cooking functions, maintenance requirements, troubleshooting solutions, and warranty information.
Product Overview
The PowerXL Classic Air Fryer uses high-speed hot air circulation to cook food from all directions. Unlike traditional deep fryers, it does not require large amounts of oil. Instead, heated air flows around the food to create a crispy exterior while keeping the inside tender and moist.
The appliance is suitable for preparing:
- French fries
- Chicken
- Steak
- Fish
- Shrimp
- Frozen snacks
- Burgers
- Baked goods
- Reheated leftovers
The built-in digital control panel allows users to select cooking presets, adjust temperature settings, and customize cooking times according to different recipes. The appliance also includes safety features such as overheating protection, automatic shut-off, and a basket safety switch.
Available Models
The PowerXL Classic Air Fryer is available in three sizes:
| Model | Capacity |
| HF-509DT | 4 Quart |
| HF-8959DT | 5 Quart |
| HF-196DT | 7 Quart |
Each model offers similar functionality, with the larger models providing additional cooking presets and increased food capacity.
Parts and Components
The air fryer includes several key components that work together to provide efficient cooking performance.
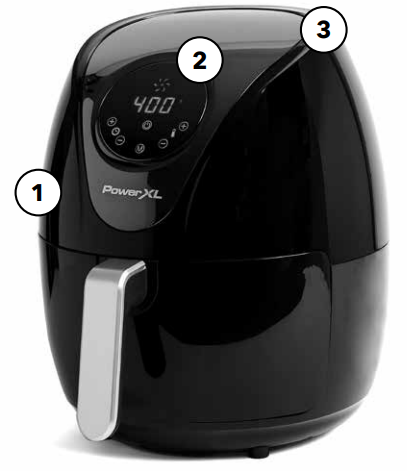
Main Unit Housing
The main housing contains the heating system, fan, electronics, and control panel. This section should never be immersed in water or cleaned under running water.
Control Panel
The digital control panel allows users to select cooking programs, adjust temperature settings, modify cooking times, and start or stop cooking cycles.
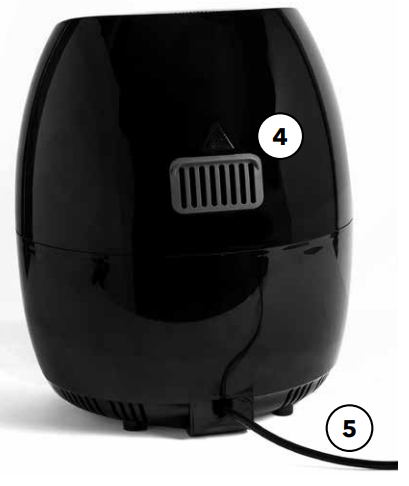
Air Inlet Vent
The air inlet vent allows fresh air to enter the appliance and supports proper airflow during cooking. Keeping this vent clear helps maintain efficient operation.
Hot Air Outlet Vent
The hot air outlet vent releases heated air and steam generated during cooking. Users should avoid placing their hands near this vent while the appliance is operating.
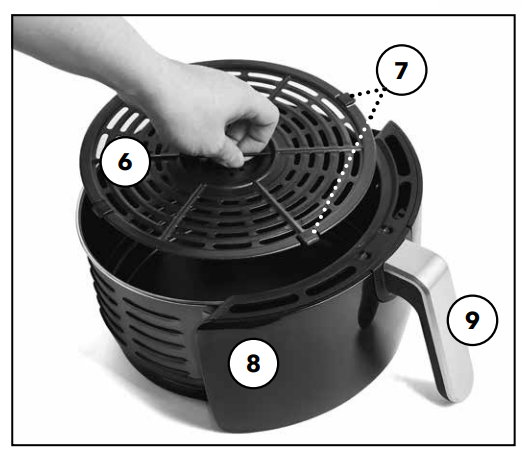
Fry Tray
The fry tray sits inside the basket and elevates food for improved airflow. The tray includes removable rubber bumpers that help protect the basket surface.
Basket
The basket holds food during cooking. It slides into the appliance and can be removed to shake ingredients, check food, or serve finished meals.
Handle
The basket handle provides a safe way to remove the basket during and after cooking. Since the basket becomes hot during operation, users should always use caution when handling it.
Specifications
| Model | Voltage | Power | Capacity | Temperature Range |
| HF-509DT | 120V ~60Hz | 1200W | 4 qt. | 180°F–400°F |
| HF-8959DT | 120V ~60Hz | 1500W | 5 qt. | 180°F–400°F |
| HF-196DT | 120V ~60Hz | 1700W | 7 qt. | 180°F–400°F |
The appliance allows cooking temperatures from 180°F to 400°F and cooking times up to 60 minutes.
Understanding the Control Panel
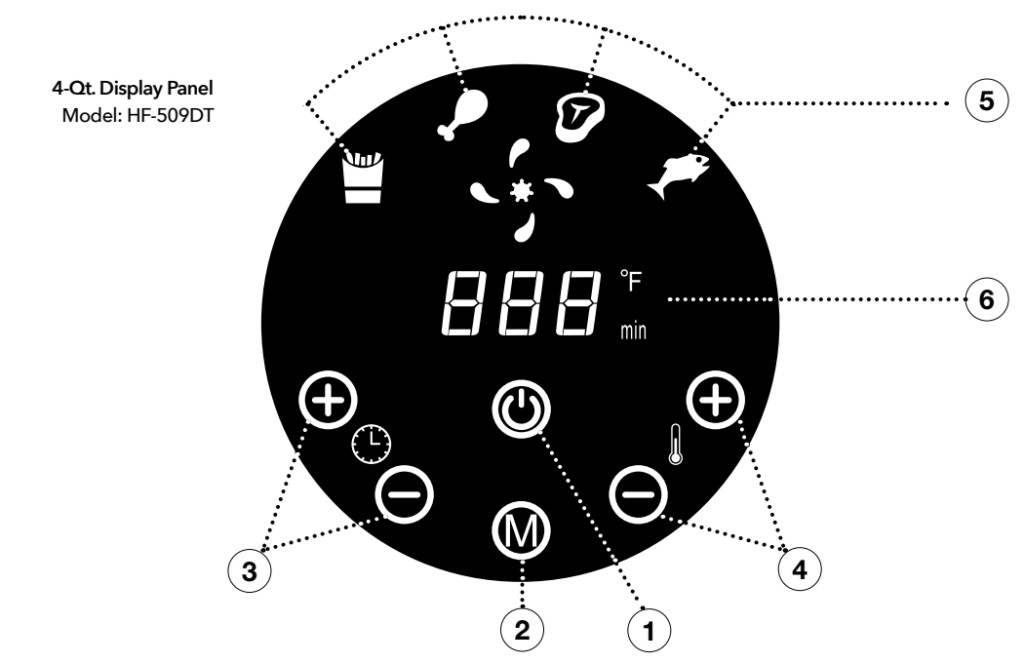
The control panel serves as the command center of the air fryer. It provides easy access to all cooking functions and settings.
Power Button
Pressing the Power button once activates the appliance and loads the default settings:
- Temperature: 370°F
- Cooking Time: 15 minutes
Pressing the Power button a second time starts the cooking cycle. Pressing it again during cooking turns the appliance off.
M Button
The M button cycles through available cooking presets. Users can select a preset based on the type of food being prepared.
Timer Controls
The timer buttons adjust cooking time in one-minute increments.
Features include:
- Cooking time range: 0–60 minutes
- Rapid adjustment when held down
Temperature Controls
The temperature controls adjust cooking temperature in 10-degree increments.
Temperature range:
- Minimum: 180°F
- Maximum: 400°F
Time and Temperature Display
The display continuously shows:
- Current cooking temperature
- Remaining cooking time
This helps users monitor cooking progress easily.
Cooking Presets
The PowerXL Classic Air Fryer includes built-in presets for common foods.
| Preset | Temperature | Time |
| French Fry | 400°F | 18 min |
| Roast* | 350°F | 25 min |
| Bake* | 310°F | 30 min |
| Fish | 350°F | 10 min |
| Shrimp* | 330°F | 8 min |
| Chicken | 360°F | 20 min |
| Steak | 400°F | 12 min |
*Available only on 5-quart and 7-quart models.
These presets provide a convenient starting point, though users can always customize temperature and cooking time.
How to Set Up the PowerXL Classic Air Fryer
Before using the appliance for the first time, complete the following steps.
Initial Preparation
- Remove all packaging materials.
- Remove stickers and labels.
- Wipe the appliance inside and outside with a damp cloth.
- Hand wash the basket and fry tray.
- Place the appliance on a stable, heat-resistant surface.
- Ensure proper airflow around the appliance.
Burn-In Cycle
The manufacturer recommends running a short preheating cycle before cooking food. This helps remove any protective coating residue left from manufacturing. After the cycle finishes, wipe the appliance clean with warm soapy water.
Installing the Fry Tray
Place the fry tray inside the basket and slide the basket into the appliance until it clicks securely into place. The appliance works best when the fry tray remains installed during cooking.
How to Use the PowerXL Classic Air Fryer
Using the appliance is simple once setup is complete.
Preheating
- Plug the appliance into a wall outlet.
- Press the Power button.
- Set the desired temperature.
- Set the timer to 3 minutes.
- Allow the preheating cycle to finish.
Preheating helps improve cooking consistency and food texture.
Cooking Food
After preheating:
- Remove the basket carefully.
- Place ingredients in the basket.
- Return the basket to the appliance.
- Set cooking time and temperature.
- Press the Power button to begin cooking.
When cooking is complete, the appliance beeps five times.
Removing Food
Use tongs or suitable utensils to remove food. Avoid turning the basket upside down because collected oil may spill onto the food.
Shaking Food During Cooking
Certain foods cook more evenly when shaken during the cooking process.
Examples include:
- French fries
- Potato wedges
- Frozen snacks
- Small vegetables
To shake food:
- Remove the basket.
- Shake ingredients gently.
- Return the basket to the appliance.
Always use oven mitts because the basket becomes hot during operation.
Cooking Tips and Best Practices
Following a few simple tips can improve cooking results significantly.
For Crispier Fries
Add a small amount of vegetable oil to fresh potatoes before cooking. This helps create a crisp exterior while maintaining a soft interior.
Cook in Smaller Batches
Avoid overcrowding the basket. Smaller batches allow hot air to circulate more effectively and cook food evenly.
Reheating Food
The air fryer works well for reheating leftovers. Simply set the desired temperature and cooking time until the food reaches the preferred serving temperature.
Capacity Guidelines
| Model | French Fry Capacity |
| 4 qt. | 16 oz |
| 5 qt. | 22 oz |
| 7 qt. | 28 oz |
Recommended Cooking Times
The manual provides suggested cooking guidelines for common foods.
Popular Foods
| Food | Temperature | Time |
| Thin Frozen Fries | 400°F | 15–16 min |
| Thick Frozen Fries | 400°F | 15–20 min |
| Homemade Fries | 400°F | 10–16 min |
| Chicken Breast | 360°F | 10–15 min |
| Chicken Drumsticks | 360°F | 18–22 min |
| Steak | 360°F | 8–12 min |
| Pork Chops | 360°F | 10–14 min |
| Frozen Nuggets | 400°F | 10–15 min |
| Fish Sticks | 400°F | 6–10 min |
| Mozzarella Sticks | 360°F | 8–10 min |
Troubleshooting Guide
Air Fryer Will Not Turn On
Possible causes:
- Appliance not plugged in
- Time and temperature not selected
- Appliance accidentally turned off
Solution:
- Verify power connection.
- Set cooking time and temperature.
- Restart the cooking cycle.
Food Is Not Fully Cooked
Possible causes:
- Basket overloaded
- Temperature too low
Solution:
- Cook smaller batches.
- Increase cooking temperature.
White Smoke Appears
Possible causes:
- Excess oil
- Grease buildup
Solution:
- Remove excess oil.
- Clean the basket thoroughly.
Error Codes
| Error | Meaning |
| E1 | Thermal sensor circuit failure |
| E2 | Thermal sensor short circuit |
For either error, contact customer support.
Cleaning and Maintenance
Clean the air fryer after every use to maintain performance and food quality.
Cleaning Steps
- Unplug the appliance.
- Allow it to cool completely.
- Wipe the exterior with a damp cloth.
- Wash the basket and fry tray with warm soapy water.
- Clean the interior with a soft sponge.
- Remove residue from the heating element if necessary.
Dishwasher Safety
The fry tray is dishwasher safe. The main appliance should never be submerged in water.
Storage
Before storing:
- Unplug the appliance.
- Allow it to cool completely.
- Ensure all components are dry.
- Store in a clean, dry location.
Frequently Asked Questions
Can the air fryer cook foods other than fried items?
Yes. The appliance can prepare meats, vegetables, baked goods, snacks, and reheated leftovers.
Can soups or sauces be cooked in the air fryer?
No. The manufacturer advises against cooking or reheating liquids in the appliance.
Can food be checked during cooking?
Yes. The basket can be removed at any time to inspect or shake food.
Warranty and Customer Support
The PowerXL Classic Air Fryer includes:
- 90-Day Money-Back Guarantee
- 1-Year Replacement Guarantee
Proof of purchase is required for warranty service.
Customer Support
Phone: 973-287-5129
Email: info@tvcustomerinfo.com
Return Address:
Empower Brands, LLC
500 Returns Road
Wallingford, CT 06495