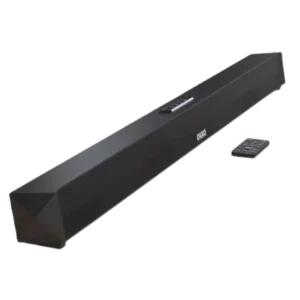
| Document Detail | Information |
| Document Type | User Guide |
| Brand Name | Tzumi |
| Product Name | ClearWave 37″ Wireless Soundbar |
| PDF File Size | 475.6 KB |
| Number of Pages | 1 |
| Languages Covered | English |
Tzumi ClearWave 37″ Wireless Soundbar
The Tzumi ClearWave 37″ Wireless Soundbar is a 2-channel home-audio soundbar designed for televisions, computers, mobile devices, gaming systems, and other compatible audio sources. It supports wireless Bluetooth playback as well as wired connections through optical, AUX/Line-In, stereo RCA, and coaxial inputs.
The soundbar provides 30W rated power output with a listed 60W maximum output and includes a full-function remote control for source selection, playback, volume, mute, and sound-mode functions. Its 37-inch cabinet can sit below most TVs and desktop computers or be installed using the supplied wall-mount hardware.
Bluetooth operation supports a range of up to approximately 30 feet, and after initial pairing the soundbar can automatically reconnect to the last Bluetooth device used.
What’s Included
The ClearWave package contains:
- ClearWave wireless soundbar
- Remote control
- Optical audio cable
- AC power adapter
- Wall-mount hardware
- User guide
Main Features
The user guide lists the following main features:
- Bluetooth connectivity with a range of up to 30 ft.
- 2-channel stereo sound
- Full-function remote control
- Digital volume control
- Compact 37-inch design
- Support for optical audio
- AUX/Line-In support
- Stereo RCA inputs
- Coaxial audio input
- Wall-mount capability
- Multiple sound-mode controls through the remote
Soundbar Interface and Controls
The soundbar itself includes front-panel controls and rear audio connections.
Top/Front Controls
| Control | Function |
| Volume Decrease | Lowers the listening volume |
| Power / Source | Turns the soundbar on and changes the selected input source |
| Volume Increase | Raises the listening volume |
| Play / Pause | Starts or pauses supported playback |
Rear Connections
| Port | Purpose |
| DC Power Input | Connects the supplied AC power adapter |
| Optical Audio Input | Accepts a digital optical audio connection |
| Line-In Audio Input | Accepts a 3.5 mm analog audio connection |
| Coaxial Input | Accepts digital coaxial audio |
| Stereo RCA Audio Inputs | Accept left and right analog RCA audio |
The product diagram in the manual identifies each of these controls and ports on the soundbar.
Remote Control Guide
The included remote provides direct access to the soundbar’s input sources, playback controls, volume, and listening modes.
| Remote Button | Function |
| Power | Turns the soundbar on or off |
| Mute | Mutes or restores audio |
| Bluetooth | Selects Bluetooth mode |
| Optical | Selects Optical mode |
| Coaxial | Selects Coaxial mode |
| AUX | Selects the stereo RCA/AUX source |
| Switch Modes | Changes input mode |
| Line-In | Selects the 3.5 mm Line-In source |
| Back/Rewind | Previous or rewind control where supported |
| Next/Forward | Next or forward control where supported |
| Play/Pause | Starts or pauses supported playback |
| Volume +/- | Raises or lowers volume |
| Talk | Selects the Talk sound setting |
| Rap | Selects the Rap sound setting |
| Standard | Selects the Standard sound setting |
| Movie | Selects the Movie sound setting |
| Music | Selects the Music sound setting |
Technical Specifications
| Specification | Value |
| Input | 12V / 3A |
| Power Output | 30W |
| Maximum Output | 60W |
| Frequency Response | 110 Hz–18 kHz |
| Dimensions | 37 × 2.8 × 3.2 in. |
| Audio Channels | 2-channel stereo |
| Bluetooth Range | Up to 30 ft. |
Setting Up the ClearWave Soundbar
Before choosing an audio source, the soundbar should be connected to power.
1. Connect the AC Power Adapter
- Connect one end of the supplied AC adapter to the power input on the ClearWave soundbar.
- Connect the adapter to an AC wall outlet.
2. Turn the Soundbar On
Press the Power/Source button on the soundbar.
The ClearWave starts in Bluetooth mode by default and is automatically ready for pairing.
The source can then be changed using either the Power/Source button or the appropriate remote-control input button.
Bluetooth Pairing and Wireless Audio
The ClearWave can connect wirelessly to a Bluetooth-compatible phone, tablet, computer, or other source device.
How to Pair the ClearWave With Bluetooth
- Connect the AC adapter and turn on the soundbar.
- The soundbar automatically enters Bluetooth mode.
- Open Bluetooth settings on the phone or other source device.
- Search for nearby Bluetooth devices.
- Select “Clearwave Soundbar.”
- Wait for the connection to complete.
- The soundbar announces “Bluetooth connected.”
After pairing, music or other audio can be selected from the connected device.
Bluetooth Playback Controls
Audio can be controlled in several ways:
- Through the source device.
- Through the soundbar’s buttons.
- Through the supplied remote control.
The Play/Pause and volume controls can therefore be operated without returning to the source device for basic playback functions.
Automatic Bluetooth Reconnection
After the first successful pairing, the ClearWave remembers the connected device.
When the soundbar is used again, it automatically attempts to reconnect to the last paired Bluetooth device.
Bluetooth Range
The listed Bluetooth operating range is up to approximately 30 feet.
Using the 3.5 mm Line-In Input
Line-In mode uses a standard 3.5 mm audio cable, which is not included with the soundbar.
Line-In Connection Instructions
- Connect one end of a 3.5 mm audio cable to the LINE IN port on the rear of the soundbar.
- Connect the opposite end to the audio output or headphone jack on the source device.
- Press the Power/Source button on the soundbar until Line-In mode is selected, or press LINE IN on the remote.
- A voice prompt announces the selected source.
- The soundbar’s indicator light turns green.
- Select and play audio from the connected source device.
Using the Stereo RCA Input
Stereo RCA mode requires an RCA stereo audio cable, which is not included.
RCA Connection Instructions
- Connect the RCA cable to the left and right RCA ports on the rear of the soundbar.
- Connect the opposite ends to the audio outputs on the television or other audio source.
- Match the red and white RCA plugs to their corresponding color-coded ports.
- Press Power/Source on the soundbar until Stereo RCA mode is selected, or press AUX on the remote.
- A voice prompt announces the source mode.
- The soundbar’s indicator light turns white.
- Begin audio playback on the connected device.
Using the Coaxial Audio Input
Coaxial mode requires a coaxial audio cable, which is not included.
Coaxial Connection Instructions
- Connect one end of a coaxial audio cable to the Coaxial In port on the rear of the soundbar.
- Connect the opposite end to the coaxial audio output on the source device.
- Press the Power/Source button until Coaxial mode is selected, or press COAXIAL on the remote.
- A voice prompt announces the source mode.
- The soundbar’s indicator light turns purple.
Using the Optical Audio Input
Optical mode uses the digital optical cable supplied with the ClearWave.
Optical Connection Instructions
- Connect one end of the included optical audio cable to the soundbar’s Optical Input.
- Connect the other end to the digital optical output of the television, amplifier, or other compatible audio source.
- Press Power/Source on the soundbar until Optical mode is selected, or press OPTICAL on the remote.
- A voice prompt announces the source mode.
- The soundbar’s indicator light turns orange.
- Start audio playback from the connected source.
Audio Format Requirement for Optical Mode
The guide specifically instructs users to make sure the source’s audio setting is configured for PCM or Optical Audio.
The correct optical cable should be used and should be securely connected at both ends. Depending on the source device, S/PDIF may need to be enabled in its settings menu.
Audio Input and Indicator Guide
| Input Mode | How to Select It | Indicator |
| Bluetooth | Default at startup or Bluetooth remote button | Voice prompt confirms connection |
| Line-In | Power/Source or LINE IN remote button | Green |
| Stereo RCA | Power/Source or AUX remote button | White |
| Coaxial | Power/Source or COAXIAL remote button | Purple |
| Optical | Power/Source or OPTICAL remote button | Orange |
Sound Modes
The remote includes dedicated buttons for five sound presets:
- Talk
- Rap
- Standard
- Movie
- Music
These buttons allow the selected audio profile to be changed directly from the remote control.
Wall-Mount Installation
Wall-mount hardware is included with the ClearWave soundbar.
The soundbar’s compact 37-inch design is intended to support either placement below a television or wall-mounted installation.
Only the supplied mounting hardware and installation method appropriate for the mounting surface should be used.
Maintenance and Care
The soundbar should be kept clean using a dry cloth.
The guide specifically instructs users not to use harsh chemicals or corrosive substances on the unit.
Cleaning Guidelines
- Wipe the exterior with a dry cloth.
- Keep the soundbar dry.
- Do not use chemical or corrosive cleaners.
- Keep liquids away from the unit.
Important Safety Instructions
The ClearWave should be handled according to the warnings provided in the guide.
- Do not drop the soundbar.
- Do not place heavy objects on top of it.
- Do not attempt to repair, disassemble, or modify the unit.
- There are no user-serviceable parts inside.
- Repairs should only be performed by a qualified electrician.
- Improper repair may expose the user to serious risk.
- Use the soundbar only for its intended purpose.
- Keep it away from heat sources and direct sunlight.
- Keep it away from humidity, water, and other liquids.
- Do not use the soundbar with wet hands.
- Do not use it if it has been dropped or damaged.
- Keep the device out of children’s reach.
- The soundbar is not a toy.
Customer Support
Tzumi provides the following technical support contacts:
| Support Method | Contact |
| support@tzumi.com | |
| Phone | 1-855-GO-TZUMI |
The manual directs users with questions or issues concerning the ClearWave Soundbar to Tzumi Technical Support.
Product and Distribution Information
The guide identifies the product as the Tzumi ClearWave Soundbar and states that it is distributed by Tzumi Inc., New York, NY.
The document carries a © 2022 Tzumi copyright notice and states that the product was made in China.
Frequently Asked Questions
How is the Tzumi ClearWave Soundbar paired with Bluetooth?
Turn on the soundbar; it starts in Bluetooth mode automatically. Open the source device’s Bluetooth settings and select “Clearwave Soundbar.” A “Bluetooth connected” voice prompt confirms successful pairing.
What is the Bluetooth range of the ClearWave Soundbar?
The guide lists a Bluetooth range of up to approximately 30 feet.
What audio connections does the ClearWave support?
The soundbar supports Bluetooth, 3.5 mm Line-In, stereo RCA, coaxial, and optical audio connections.
What does the green indicator light mean?
A green source indicator is used when the soundbar is in Line-In mode.
What does the orange indicator light mean?
An orange indicator identifies Optical mode.
Why might there be no sound when using the optical connection?
The guide instructs users to confirm that the optical cable is properly connected and that the source audio setting is configured for PCM or Optical Audio. Some devices may also require S/PDIF to be enabled.
Does the ClearWave automatically reconnect to Bluetooth devices?
Yes. After the first successful pairing, the soundbar remembers the device and attempts to reconnect automatically to the last paired Bluetooth device.
What are the ClearWave Soundbar’s power specifications?
The soundbar uses a 12V/3A input, has a listed 30W power output, and a 60W maximum output.