| Document Detail | Information |
| Document Type | User Guide |
| Brand Name | Tzumi |
| Product Name | Wireless Charging Alarm Clock |
| Model Number(s) | 7454 |
| PDF File Size | 462.8 KB |
| Number of Pages | 1 |
| Languages Covered | English |
Tzumi Wireless Charging Alarm Clock Item 7454
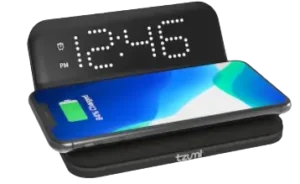
The Tzumi Wireless Charging Alarm Clock Item 7454 combines a digital LED alarm clock with a wireless charging pad for compatible smartphones, AirPods, and other wireless-charging devices. Its angled design allows the time to remain visible while a compatible device rests on the charging surface.
The clock provides both 12-hour and 24-hour time formats, adjustable alarm settings, a five-minute snooze function, and three display-brightness levels. The unit is powered through a Micro-USB connection and requires a 5V/2A power source.
What’s Included
The package contains:
- Wireless Charging Alarm Clock
- Micro-USB cable
- User Guide
Product Overview and Controls
The product diagram identifies the main display, charging, and control components.
| Component | Function |
| LED Screen | Displays the current time and alarm-setting information |
| Charge Pad | Wirelessly charges compatible devices |
| Micro-USB Port | Supplies power to the alarm clock |
| + Button | Increases time values and changes settings |
| – Button | Decreases time values and controls display brightness |
| Alarm Button | Programs, enables, and disables the alarm |
| Time Button | Enters and confirms clock settings |
The guide highlights easy-to-use settings, an LED digital display, and wireless charging for compatible smartphones and other devices.
Technical Specifications
| Specification | Value |
| Product Size | 5.6 × 5 × 2.1 in. |
| Weight | 5.7 oz. |
| Power Input | 5V / 2A |
| Materials | ABS + PC |
| Product Identifier | Item No. 7454 |
Getting Started
How to Power the Alarm Clock
The alarm clock must be connected to USB power for operation.
- Connect the Micro-USB end of the supplied cable to the charging port on the alarm clock.
- Connect the opposite USB end to a suitable USB power source.
- The LED display can then be used for clock and alarm setup.
The unit should only be connected to the type of power supply described in the operating instructions.
How to Set the Clock
The clock allows the time to be configured using the Time, +, and – buttons.
Enter Time-Setting Mode
- Press and hold the Time button for 3 seconds.
- Wait until the time display begins flashing.
The flashing display indicates that time-setting mode is active.
Choose 12-Hour or 24-Hour Time
- While setting the clock, press the Time button again.
- Use the + or – button to switch between:
- 12-hour mode
- 24-hour mode
Set the Hour
- Press the Time button again to enter the hour-setting mode.
- Press + or – until the correct hour is displayed.
Set the Minutes
- Press the Time button again to enter minute-setting mode.
- Use + or – to set the correct minutes.
Save the Time
Press the Time button again to confirm the selected time.
12-Hour and 24-Hour Clock Modes
The Wireless Charging Alarm Clock supports both common time-display formats.
| Time Format | Description |
| 12-Hour Mode | Displays time using a 12-hour clock format |
| 24-Hour Mode | Displays time using the 24-hour format |
The desired format is selected while programming the clock using the + and – controls.
Adjusting the Display Brightness
The LED display provides three brightness levels.
To change the brightness:
- Press and hold the – button for 3 seconds.
- The display changes to the next brightness level.
- Repeat the process as needed to move through the available levels.
The guide states that the maximum brightness level is the default setting when the clock is first used.
How to Set the Alarm
The alarm is programmed separately from the current clock time.
Enter Alarm-Setting Mode
- Press and hold the Alarm button for 3 seconds.
- Wait until the alarm time begins flashing.
The flashing alarm time indicates that alarm-setting mode is active.
Set the Alarm Hour
- Press the Alarm button again.
- Use the + or – buttons to adjust the alarm hour.
Set the Alarm Minutes
- Press the Alarm button again to enter minute-setting mode.
- Press + or – until the desired minutes are displayed.
Save the Alarm Time
Press the Alarm button again to confirm the programmed alarm time.
Turning the Alarm On or Off
After an alarm time has been configured, press the Alarm button twice to switch the alarm:
- ON
- OFF
Stopping or Snoozing the Alarm
When the alarm sounds, two actions are available.
Turn the Alarm Off
Press the Alarm button while the alarm is ringing.
Snooze the Alarm
Press any other button while the alarm is ringing.
The alarm will snooze for 5 minutes before sounding again.
Wireless Charging
The built-in charging pad supports compatible wireless-charging devices, including compatible:
- Smartphones
- AirPods
- Other wireless-charging devices
To use the charging pad, the alarm clock must first be connected to its required power source.
How to Charge a Compatible Device
- Connect the alarm clock to USB power.
- Place the compatible device on the charging pad.
- Position the device over the wireless charging area.
- Check the charging status indicator.
When wireless charging begins normally, the charging indicator light turns on.
Wireless Charging Indicator Guide
| Indicator Behavior | Meaning |
| Charging indicator illuminated | A compatible device is charging |
| Status light repeatedly blinking | A foreign object has been detected on the wireless charging pad |
If the status light repeatedly blinks, the guide indicates that a foreign object is present on the charging surface.
Important Safety Instructions
Improper operation of the Wireless Charging Alarm Clock can create a risk of electric shock or fire. The unit should be installed and used according to the safeguards in the user guide.
Keep the Alarm Clock Away From Water
The unit should not be used near water, including areas such as:
- Bathtubs
- Kitchen sinks
- Laundry tubs
- Wet basements
Exposure to these conditions may create a serious risk of electric shock.
Keep Away From Heat Sources
The alarm clock should be kept away from heat-producing equipment, including:
- Radiators
- Heat registers
- Other appliances that generate heat
Use the Correct Power Supply
The unit should only be connected to a power supply that matches the requirements described in the operating instructions.
The listed input specification is 5V/2A.
Do Not Attempt Repairs
If the unit becomes damaged or stops operating normally, it should be serviced by qualified service personnel.
The owner should not attempt to repair the alarm clock.
Protect the Unit From Rain and Moisture
The product should not be exposed to rain or moisture because doing so may increase the risk of electric shock.
Customer Support
Tzumi provides support for product-use questions and issues.
| Support Method | Contact Information |
| Phone | 1-855-GO-TZUMI |
| support@tzumi.com |
The manual identifies the product as Wireless Charging Alarm Clock Item No. 7454, distributed by Tzumi Inc., New York, NY 10016. It carries a © 2022 Tzumi Inc. notice and states that the product was made in China.
Frequently Asked Questions
How is the time set on the Tzumi Wireless Charging Alarm Clock?
Press and hold the Time button for 3 seconds until the display flashes. Use the Time button to move through the time-format, hour, and minute settings, and use the + and – buttons to change each value. Press Time again after setting the minutes to confirm.
Can the clock display 24-hour time?
Yes. During clock setup, the + and – controls can be used to switch between 12-hour and 24-hour modes.
How is the alarm set?
Press and hold the Alarm button for 3 seconds until the alarm time flashes. Use the Alarm button to move from hours to minutes and use + or – to change each value. Press Alarm again to save the alarm time.
How is the alarm turned on or off?
Press the Alarm button twice to switch the alarm ON or OFF.
How long is the snooze function?
Pressing any button other than the Alarm button while the alarm is sounding activates a 5-minute snooze.
How is the display brightness changed?
Press and hold the – button for 3 seconds to move to the next brightness level. The clock provides three brightness settings.
What does a blinking wireless charging status light mean?
A repeatedly blinking status light indicates that a foreign object is on the wireless charging pad.
What power input does the Tzumi alarm clock require?
The specification table lists an input requirement of 5V/2A.