| Document Detail | Information |
| Document Type | User Manual |
| Brand Name | Tzumi |
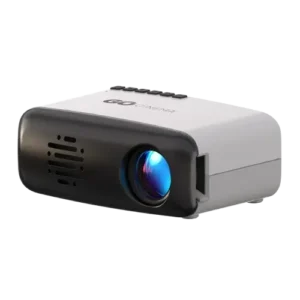
| Product Name | Go Cinema Portable LED Home Cinema Projector |
| PDF File Size | 2.0 MB |
| Total Number of Pages | 1 |
| Languages Covered | English |
Tzumi Go Cinema Portable LED Home Cinema Projector
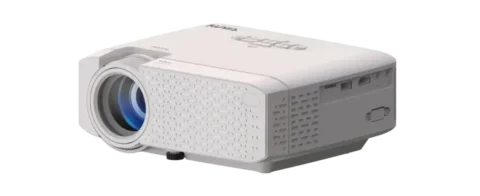
The Tzumi Go Cinema Portable LED Home Cinema Projector is a compact projector designed for displaying movies, video games, photos, text, and other compatible media. It can be used with HDMI and AV sources as well as files stored on USB drives and MicroSD cards.
The projector has a native resolution of 320 × 240, supports input resolutions up to 1920 × 1080, and produces a projected image from approximately 24 to 60 inches. The manual highlights an LED life of up to 30,000 hours and recommends using the projector in a darkened environment for better image visibility.
The Go Cinema can run from its supplied DC power adapter or from a compatible 5V/2A Micro-USB power source, including a USB adapter or portable battery pack.
Main Features
The Go Cinema manual highlights the following features:
- Projection image up to 60 inches.
- LED lifetime of up to 30,000 hours.
- Compact, portable design.
- Best viewing performance in a darkened environment.
- HDMI input.
- AV/RCA input.
- USB media playback.
- MicroSD card media playback.
- 3.5 mm audio output for headphones or external speakers.
- Remote control operation.
- Picture, audio, time, and system-option menus.
- Alternative Micro-USB power input for portable use.
What’s Included in the Box
The package contents listed in the manual are:
| Included Item | Quantity |
| Go Cinema projector | 1 |
| Wireless remote control | 1 |
| AC power adapter | 1 |
| AV/RCA cable | 1 |
| User manual | 1 |
Remote Control Guide
The Go Cinema remote requires two AAA batteries before use.
| Remote Button | Function |
| Power | Turns the projector on or off |
| Menu | Opens the projector’s settings menu |
| Source | Opens input-source selection |
| OK | Confirms the highlighted selection |
| Up | Moves upward through menus |
| Down | Moves downward through menus |
| Left | Moves left through menus or settings |
| Right | Moves right through menus or settings |
| Play/Pause | Controls supported media playback |
| Exit | Leaves the current menu or screen |
| Vol- | Decreases volume |
| Vol+ | Increases volume |
| Mute | Mutes or restores sound |
Many menu and media-selection functions can also be performed with the buttons on top of the projector.
Projector Connections and Ports
The manual diagrams show connections on both the rear and side of the projector.
Rear Connections
The rear area includes:
- Infrared receiver.
- 3.5 mm audio connection.
- AV connector.
- MicroSD card slot.
Side Connections
The side panel includes:
- DC power input.
- HDMI input.
- USB port.
- Micro-USB power input.
Before First Use
Install the Remote Batteries
Two AAA batteries should be installed in the wireless remote before it is used.
Choose a Suitable Projection Area
For the clearest picture, the projector should be aimed at a suitable projection surface in a darkened area.
The manual notes that the Go Cinema can be used indoors or outdoors, but the viewing area should be sufficiently dark for the projected image to be clearly visible.
Connect Power
The normal power connection uses the supplied AC adapter.
- Connect the DC 12V / 1.5A power connection to the projector.
- Plug the adapter into an available electrical outlet.
- Press the Power button on the projector or remote.
Powering the Projector With Micro-USB
The Go Cinema can also operate from a 5V/2A USB power source, such as a USB adapter or portable battery pack.
To use this power method:
- Connect a Micro-USB cable to the projector’s Micro-USB power port.
- Connect the opposite end to a compatible 5V/2A USB power source.
- Turn on the projector normally.
Important: The manual states that when the projector is powered through Micro-USB, its LED light will not be as bright as when the DC power input is used.
Starting the Go Cinema
After the projector is powered on, the main display appears after approximately 2 to 5 seconds.
The home screen presents media and source choices. The remote’s arrow buttons, or the navigation controls on top of the projector, can be used to move through the available selections.
Selecting an Input Source
To change the active source:
- Press the Source button on the remote.
- Use the navigation controls to select the required input.
- Confirm the selection.
The documented source menu includes:
| Source | Use |
| HDMI | HDMI-equipped video and audio devices |
| AV | Devices connected through the AV/RCA input |
| USB/SD Card | USB drives and MicroSD cards |
Adjusting the Projector Focus
The projector uses a manual focus control near the lens.
To focus the picture:
- Display an image on the projection surface.
- Move the focus lever located beside the lens.
- Watch the pixels near the center of the projected image while adjusting.
- Stop when the center pixels appear clearly defined.
The manual notes that with a larger projected picture, image sharpness near the edges may be lower than at the center.
Projection Size
The specification section lists a supported projection size of approximately:
24–60 inches
The feature section also highlights a 60-inch dynamic image.
Connecting an HDMI Device
HDMI carries both video and audio through one cable and can be used with compatible devices such as:
- Laptop computers.
- DTV tuners.
- DVD players.
- Blu-ray players.
- Chromecast devices.
- Fire TV devices.
- Other compatible HDMI sources.
HDMI Setup
- Connect an HDMI cable between the source device and the projector’s HDMI port.
- The HDMI port is located on the side of the Go Cinema and is marked HD.
- Turn on the projector and connected source.
- Press Source.
- Select HDMI from the Input Source menu.
- Begin playback from the connected device.
Connecting an AV/RCA Device
The Go Cinema supports analog AV/RCA devices through its AV connector.
The manual identifies the standard RCA colors as:
- Yellow — video.
- Red — audio.
- White — audio.
AV/RCA Setup
- Connect the supplied AV/RCA cable to the projector’s AV connection.
- Connect the yellow, red, and white plugs to the corresponding outputs on the source device.
- Turn on the projector and source equipment.
- Open the input-source menu.
- Select AV.
The projector’s female AV connector is located on the rear and marked AV.
Playing Media From a USB Drive
The Go Cinema can display compatible media stored on a USB flash drive.
- Insert the USB drive into the USB socket on the side of the projector.
- Press Source.
- Select USB/SD Card.
- Open the media interface.
- Choose the required content type: Photos, Music, Video, or Text.
- Use the remote or projector buttons to select the required folder and file.
Playing Media From a MicroSD Card
The MicroSD slot is located on the rear of the projector and is marked Micro SD.
To access a card:
- Insert a compatible MicroSD card.
- Select USB/SD Card from the source menu.
- Choose the required content category.
- Select the folder or file using the remote or projector controls.
Supported USB and MicroSD Media Formats
The manual provides the following supported media formats:
| Media Type | Supported Formats |
| Audio | MP3, WMA, OGG, AAC, FLAC, APE, WAV |
| Images | JPEG, BMP, PNG |
| Video | 3GP, AVI, MPG, MKV, FLV, MP4 |
After selecting the media category, folders and individual files can be selected using either the remote or the projector controls.
Using the 3.5 mm Audio Connection
The Go Cinema includes a 3.5 mm audio connection for external audio equipment.
It can be used with:
- 3.5 mm headphones.
- Compatible external speakers.
The audio jack is located on the rear of the projector.
Picture Settings
The projector includes an Image submenu for changing picture-related settings.
To access it:
- Press Menu.
- Use the Left or Right button to select the Image submenu.
- Use Up or Down to select the setting.
- Press OK to confirm.
Image Menu Options
| Setting | Options Listed in the Manual |
| Picture Mode | Text, Video, Picture, User Defined |
| Color Temperature | Cold, Hot, User Defined |
| Aspect Ratio | Auto, 4:3, 16:9, Point-to-Point, Panoramic, Zoom1, Zoom2, Just Scan |
| Noise Reduction | Close, Low, Middle, High |
Audio Settings
The Audio submenu is accessed in the same way:
- Press Menu.
- Select Audio using Left or Right.
- Choose a setting with Up or Down.
- Press OK.
The guide lists the following controls:
- Sound Mode: Music, Power, Sports, User Defined.
- Balance: -50 to +50.
- Frequency controls listed as 120Hz, 500Hz, 1.5Hz, 5Hz, and 10Hz.
- Auto Volume: On or Off.
- Surround Sound: Close, Surround, SRS.
The frequency labels above are reproduced as printed in the source manual.
Time Settings
The Time submenu provides several timer and scheduling functions.
| Setting | Available Options |
| Clock | Standard or 24-hour/military format |
| Off Time | Scheduled power-off setting |
| On Time | Scheduled power-on setting |
| Sleep Timer | 30 min., 60 min., 90 min., or User Defined |
| Auto Sleep | Automatic sleep setting |
To change these settings, press Menu, select the Time submenu, choose the required option with Up or Down, and confirm with OK.
Option and System Settings
The Option submenu provides system-level settings.
The manual lists:
- Text Language — 23 choices.
- Restore the projector to factory-default settings.
- Auto Set Color Range.
- Software/Firmware update through the USB port.
The manual does not provide a separate firmware-update procedure beyond identifying this menu option.
Technical Specifications
| Specification | Value |
| Native Display Resolution | 320 × 240 |
| Contrast Ratio | 800:1 |
| Maximum Supported Resolution | 1920 × 1080 |
| Operating Power Consumption | 10W–24W |
| Display Color | 16.7K |
| Projection Size | 24–60 in. |
| Supported Signal/Input Ports | USB, HDMI, MicroSD Card, AV/RCA |
| Dimensions | 5.1 × 3.6 × 2 in. |
| Metric Dimensions | 129 × 91 × 52 mm |
| Primary DC Input | DC 12V / 1.5A |
| Alternative USB Power | 5V / 2A |
| LED Life | Up to 30,000 hours |
The projector’s 1920 × 1080 figure is the maximum supported input resolution; the manual separately lists the native display resolution as 320 × 240.
Storage and Transport
The manual provides several instructions for storage and transportation:
- The projector should be kept in a dry, clean location.
- If it will not be used for an extended period, it should be switched off and unplugged.
- The original factory foam and other shock-resistant packing materials should be used when transporting the projector.
Important Safety Instructions
The Go Cinema should be operated only as described in the manual.
- Use the projector only for its intended purpose.
- Do not look directly into the projector lens while it is operating.
- Do not place cloth or other materials over the ventilation openings.
- The projector is not waterproof. Keep it away from water, cups, bowls, vases, and other liquid sources.
- Use and store the projector in a clean, dry location.
- When the projector will not be used for a long period, switch it off and unplug its power cord.
- Use the original protective foam or other shock-resistant materials when transporting it.
- If the projector becomes defective or damaged, do not attempt to repair it. Contact Tzumi customer support.
- To reduce the risk of electric shock, do not disassemble or attempt to repair the projector.
Customer Support
For product-use or care questions, the manual provides the following Tzumi Technical Support contacts:
| Support Method | Contact |
| support@tzumi.com | |
| Phone | 1-855-GO-TZUMI |
The manual identifies the Go Cinema projector as distributed by Tzumi Inc., New York, NY 10016, carries a © 2021 Tzumi Inc. notice, and states that the product was made in China.
Frequently Asked Questions
What is the native resolution of the Tzumi Go Cinema projector?
The projector’s native display resolution is 320 × 240. The manual also states that it supports input resolutions up to 1920 × 1080.
How large can the Go Cinema projected image be?
The specification section lists a projection range of approximately 24 to 60 inches.
Can the Go Cinema projector run from a power bank?
Yes. The manual states that the projector can operate from a 5V/2A power source through its Micro-USB port, including a portable battery pack. However, projection brightness is lower through Micro-USB power than when using the DC input.
How is the Go Cinema focus adjusted?
The focus lever beside the lens should be moved while watching the pixels near the center of the projected picture. Optimal focus is reached when the center pixels appear clearly defined.
What devices can connect through HDMI?
The manual gives examples including laptops, DTV tuners, DVD and Blu-ray players, Chromecast, Fire TV, and other compatible HDMI sources.
Can the Go Cinema play files directly from a USB drive or MicroSD card?
Yes. The projector supports direct USB and MicroSD media playback. It can display compatible photos, music, video, and text selections through its media interface.
What video formats does the Go Cinema support from USB or MicroSD?
The supported video formats listed in the manual are 3GP, AVI, MPG, MKV, FLV, and MP4.
Can external speakers or headphones be connected?
Yes. The rear 3.5 mm audio jack can be used with compatible headphones or external speakers.