
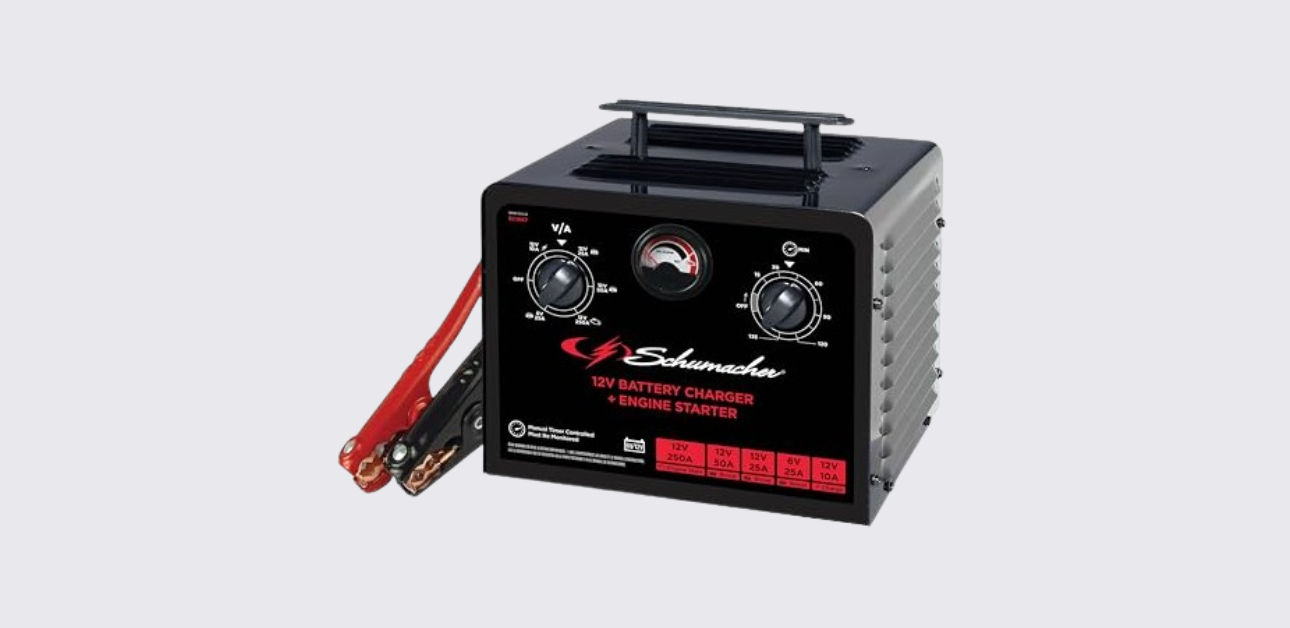
The Schumacher SC1667 Manual Timer-Controlled Battery Charger is a heavy-duty 12-volt battery charger and engine starter designed for charging automotive, marine, and deep-cycle lead-acid batteries. Featuring multiple charging rates, a manual timer, engine start assistance, boost mode, and an easy-to-read ammeter, the SC1667 provides dependable charging and emergency starting support for a wide range of vehicles and equipment.
Product Overview
The Schumacher SC1667 combines battery charging and engine starting capabilities in one durable metal housing. It is intended for charging 12-volt lead-acid batteries, including:
- Standard flooded batteries
- AGM batteries
- Gel batteries
- Deep-cycle batteries
The charger is not designed for charging dry-cell household batteries or powering low-voltage systems other than starter-motor applications.
Main Functions
The SC1667 offers three primary operating modes:
Charge Mode
Used for charging automotive, marine, and deep-cycle batteries.
Boost Mode
Provides a high-rate charging boost to quickly add energy to heavily discharged batteries before starting.
Engine Start Mode
Supplies additional starting current to assist vehicles with weak or discharged batteries.
Parts and Components
The charger includes several external components designed for easy operation. The product diagram in the manual identifies the following parts:
| Component | Function |
| Metal Case | Protects internal components |
| Carry Handle | Easy transport and storage |
| Charge Rate Selector Switch | Selects charging or starting mode |
| Manual Timer | Controls charging duration |
| Ammeter | Displays charging current |
| Color-Coded Battery Clamps | Connects to battery terminals |
| 120V AC Power Plug | Connects charger to household power |
Key Features
Heavy-Duty Metal Construction
The SC1667 features a durable metal housing designed for workshop, garage, and home use.
Multiple Charging Rates
The charger supports several charging levels, allowing users to match charging output to battery condition and size.
Manual Charging Timer
The built-in timer gives users full control over charging duration and prevents prolonged charging when properly monitored.
Engine Starting Assistance
The engine start function delivers additional current for cranking engines with weak batteries. It is intended for temporary starting assistance and must always be used with a battery installed.
Built-In Ammeter
The front-mounted ammeter allows users to monitor charging activity and battery condition during operation.
Important Safety Information
Battery charging involves electrical current and explosive battery gases. Always follow the safety precautions outlined in the owner’s manual.
Personal Safety Precautions
Before using the charger:
- Wear eye protection.
- Wear protective clothing.
- Remove rings, bracelets, watches, and necklaces.
- Keep fresh water and soap nearby.
- Avoid touching your eyes while working around batteries.
Battery acid can cause severe burns and requires immediate medical attention if it contacts the eyes.
Battery Safety
Always:
- Work in a well-ventilated area.
- Keep sparks and flames away from batteries.
- Never smoke near batteries.
- Keep charger clamps from touching each other.
- Never charge a frozen battery.
Lead-acid batteries generate explosive gases during normal operation.
Charger Placement Guidelines
For safe operation:
- Position the charger as far from the battery as cables allow.
- Never place the charger directly above a battery.
- Do not place batteries on top of the charger.
- Ensure adequate ventilation around the charger.
Battery gases and electrolyte can damage the charger if improperly positioned.
Understanding the Control Panel
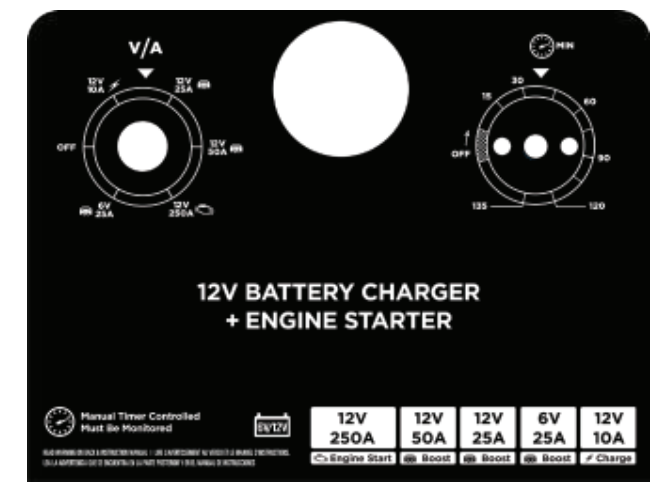
The SC1667 uses two primary controls: the Charge Rate Selector Switch and the Timer.
Charge Rate Selector Switch
The selector switch controls operating mode.
Charge
Used for normal battery charging.
Boost
Used to quickly add charge to a severely discharged battery before starting.
Engine Start
Provides extra cranking current to help start a vehicle with a weak battery. Always use this setting with a battery connected.
Manual Timer
The timer controls charging duration.
Functions include:
- Setting charging time manually
- Preventing overcharging
- Allowing customized charging periods
Users should determine battery size and state of charge before setting the timer.
Ammeter
The ammeter shows charging current in amperes.
What the Readings Mean
- High readings indicate the battery is accepting significant charge.
- Readings gradually decrease as the battery approaches full charge.
- When current stops decreasing, the battery is typically fully charged.
- During engine cranking, the needle moves to the far right of the meter.
How to Set Up the Charger
Before first use:
- Remove all packaging materials.
- Remove cord wraps.
- Fully uncoil all cables.
- Inspect the charger for damage.
- Verify that the power cord and clamps are in good condition.
The manual recommends fully extending and organizing cables before operation.
Connecting the Charger to a Battery
Charging a Battery Installed in a Vehicle
Negative-Ground Vehicles
Most vehicles use a negative-ground system.
- Connect the red clamp to the positive battery terminal.
- Connect the black clamp to the vehicle chassis or engine block away from the battery.
- Avoid carburetors, fuel lines, and sheet metal.
- Connect to a heavy metal frame or engine component.
Positive-Ground Vehicles
- Connect the black clamp to the negative battery terminal.
- Connect the red clamp to the vehicle chassis or engine block away from the battery.
Always disconnect in reverse order after charging.
Charging a Battery Outside the Vehicle
- Verify battery polarity.
- Connect the red clamp to the positive terminal.
- Attach a 24-inch insulated cable to the negative terminal.
- Connect the black clamp to the free end of the cable.
- Stay away from the battery during the final connection.
This procedure helps reduce the risk of sparks near the battery.
Charging a Battery
Charging a Battery Installed in a Vehicle
- Turn off all vehicle accessories.
- Open the hood.
- Clean battery terminals.
- Set the timer to OFF.
- Connect the battery clamps.
- Plug the charger into a 120V outlet.
- Select the desired charging rate.
- Set the timer to the required charging time.
- Monitor both the charger and battery throughout charging.
- Disconnect when charging is complete.
Charging a Battery Outside a Vehicle
- Place the battery in a ventilated location.
- Set the timer to OFF.
- Clean terminals.
- Connect clamps correctly.
- Plug in the charger.
- Select charging rate.
- Set timer.
- Monitor charging progress.
- Disconnect clamps in reverse order when finished.
Using Charge Mode
Charge Mode is intended for:
- Passenger vehicles
- Trucks
- Marine batteries
- Deep-cycle batteries
The charging process must be monitored continuously. Stop charging when the battery reaches full charge to prevent damage.
Using Boost Mode
Boost Mode quickly restores energy to:
- Heavily discharged batteries
- Large-capacity batteries
This mode is commonly used before attempting engine starting. Monitor the battery throughout the process.
Using Engine Start Mode
The Engine Start feature provides temporary starting assistance for vehicles with weak batteries.
Engine Start Procedure
- Set the timer to OFF.
- Connect the charger to the battery.
- Plug the charger into a 120V outlet.
- Turn the selector switch to Engine Start.
- Crank the engine for up to 5 seconds.
- If the engine does not start, wait 3 minutes.
- Try again.
In very cold weather or when battery voltage falls below 2 volts, use Boost or Engine Start for 5 minutes before attempting to crank the engine.
Important Engine Start Notes
- Never use Engine Start without a battery installed.
- If the battery has been charged and the vehicle still will not start, have the battery tested.
- Repeated unsuccessful starting attempts may indicate vehicle problems unrelated to the battery.
Fan Operation
The internal cooling fan operates whenever the timer is active.
Keep the charger vents clear of obstructions to ensure proper airflow and cooling. Fan operation during charging is normal.
Calculating Charge Time
The charger uses manual timing, so estimating charging duration is important.
Charge Time Formula
- Determine battery amp-hour (Ah) rating.
- Determine percentage of charge required.
- Multiply Ah rating by required charge percentage.
- Divide by charging rate.
- Multiply by 1.25.
- Add one additional hour for deep-cycle batteries.
Example:
100 Ah × 50% × 1.25 ÷ 20A = approximately 3.1 hours
This calculation provides an estimated charging duration.
Typical Charging Times
Cars and Trucks
| Battery Rating | 10A | 20A | 40A | 50A |
| 200–315 CCA | 2¼–3 hrs | 1–1½ hrs | ½–¾ hr | 25–35 min |
| 315–550 CCA | 3–3¾ hrs | 1½–2 hrs | ¾–1 hr | ½–¾ hr |
| 550–1000 CCA | 3¾–7 hrs | 2–3½ hrs | 1–1¾ hrs | ¾–1½ hrs |
Marine and Deep-Cycle Batteries
| Battery Rating | 10A | 20A |
| 80 RC | 3½ hrs | 1¾ hrs |
| 140 RC | 5½ hrs | 2¾ hrs |
| 160 RC | 6 hrs | 3 hrs |
| 180 RC | 6½ hrs | 3¼ hrs |
These estimates assume a battery starting at approximately 50% charge.
Maintenance
Routine maintenance helps maximize charger life.
Cleaning
After each use:
- Clean battery clamps.
- Remove battery residue and acid.
- Wipe down the charger housing.
- Inspect cables for wear.
Periodic cleaning helps prevent corrosion and maintains reliable operation.
Storage
When storing the charger:
- Unplug it from AC power.
- Coil cables neatly.
- Store upright.
- Keep in a cool, dry indoor location.
- Do not clip clamps together.
- Avoid storing clamps against metal objects.
Proper storage helps prevent cable damage and corrosion.
Troubleshooting
Charger Will Not Turn On
Possible Causes:
- Dead AC outlet
- Loose electrical connection
Solutions:
- Check circuit breakers and fuses.
- Verify power cord connections.
- Inspect extension cords.
Battery Is Connected But Not Charging
Possible Cause:
- Poor clamp connection
Solution:
- Clean battery terminals.
- Reposition clamps.
- Ensure a solid connection to battery and frame.
Charger Makes Clicking Sounds
Possible Causes:
- Circuit breaker cycling
- Defective battery
- Shorted cables
- Reverse polarity
Solutions:
- Check charger settings.
- Inspect battery condition.
- Verify correct clamp connections.
- Replace damaged cables.
Charger Produces Loud Buzzing
Possible Causes:
- Transformer vibration
- Internal component issue
Solution:
- Mild buzzing may be normal.
- Persistent humming should be inspected by a qualified technician.
Engine Start Function Does Not Work Properly
Possible Causes:
- Excessive current draw
- Insufficient cooling time
- Poor battery connections
- Overheating protection activated
Solutions:
- Wait 3 minutes between cranking attempts.
- Check clamp connections.
- Verify AC power supply.
- Use Boost mode for 10–15 minutes before starting heavily discharged batteries.
Technical Specifications
| Specification | Details |
| Product Type | Manual Timer-Controlled Battery Charger |
| Battery Compatibility | 12V Lead-Acid (STD, AGM, GEL, Deep-Cycle) |
| Input Voltage | 120V AC |
| Charging Modes | Charge, Boost, Engine Start |
| Timer Type | Manual |
| Display Type | Analog Ammeter |
| Cooling System | Internal Fan |
| Case Material | Metal |
Specifications are based on information provided in the owner’s manual.
Warranty and Support
The Schumacher SC1667 includes a one-year limited warranty. Warranty details are available directly from Schumacher Electric.
Website:
www.schumacherelectric.com
Warranty Assistance:
1-800-621-5485
Repairs and Returns:
www.365rma.com