
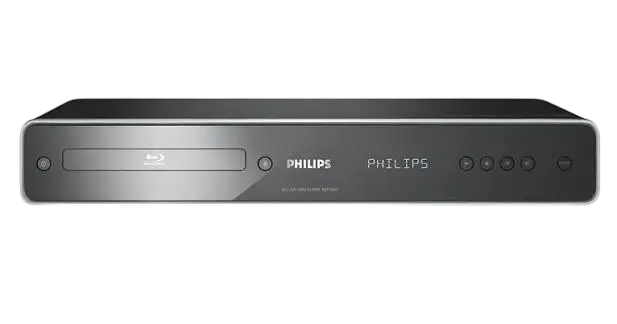
The Philips BDP7200 is a Blu-ray Disc player for owners with a high-definition TV. It outputs video up to 1080p over HDMI and upconverts standard DVDs to as high as 1080p. It plays BD-video, DVD-video, audio CDs, DTS CDs, and discs holding DivX, MP3, Windows Media Audio, or JPEG files. Besides HDMI, it has component, composite, 5.1-channel analog, and digital coaxial and optical outputs, so it also works with older TVs and receivers. BD-specific features include BD Java, picture-in-picture, and pop-up menus. EasyLink (HDMI CEC) can link the player to a Philips TV that supports it. The BDP7200/37 is built for North American discs: BD region A and DVD region 1 or ALL, in the NTSC color system.
Product Specifications
| Item | Detail |
| Power | 120V AC, 60Hz |
| Power consumption | 30W (standby 0.8W) |
| Dimensions (W x H x D) | 17.2 x 2.8 x 13.8 inches (435 x 70 x 348mm) |
| Weight | 9.1 lbs (4.1kg) |
| Operating temperature | 41°F to 104°F (5°C to 40°C) |
| Operating humidity | Less than 80%, no condensation |
| HDMI output | 480p, 720p, 1080i, 1080p |
| Component output | Y: 1Vp-p; PB/CB and PR/CR: 700mVp-p (75Ω) |
| Composite video output | 1Vp-p (75Ω) |
| Analog audio | 2-channel RCA plus 5.1-channel RCA; 2Vrms (subwoofer 1.15Vrms) |
| Digital audio | One coaxial (500mVp-p, 75Ω), one optical |
The player has no RF modulator, so it cannot connect to a TV’s antenna input (p. 9).
What’s in the Box
- Remote control with two AA batteries
- RCA audio/video cables
- AC cord
- User manual and Quick Start Guide
- Registration card
Placement and Safety
Put the player on a stable, horizontal surface. Don’t set it on top of the TV or put anything on top of it. Keep it out of direct sunlight, away from heat sources, and in a spot where the ventilation holes on the sides stay clear.
If you move the player from a cold place to a warm one, wait at least two hours before using it so any condensation inside can dry (p. 5). Remove the disc and unplug the AC cord before carrying the unit.
The player contains a laser. Don’t open the cover, and don’t stare into the beam. Only qualified service personnel should service it. Don’t expose the player to rain or moisture, and keep liquid-filled objects such as vases off it. Unplug it during lightning storms or when it will go unused for a long time.
For the remote, don’t mix old and new batteries or different battery types. Remove them if the remote won’t be used for a month or more.
Connecting the Player
Turn off all devices before changing any connections. Four video options are available:
- Composite (standard picture): Use the supplied RCA video cable and the AUDIO OUT jacks.
- Component (better picture): Use a component video cable, which is not supplied, plus analog audio.
- HDMI (best audio and picture): One cable carries both. Philips recommends a category 2 (High Speed) HDMI cable.
- HDMI-DVI: Use an HDMI-DVI cable for a DVI-D display. You’ll need a separate audio connection.
For HDMI, the display must support HDCP copy protection, or the picture won’t display properly. Some displays, such as projectors, don’t take audio over HDMI.
For audio, choose from three connections:
- 2-channel analog to a stereo system
- 5.1-channel analog to a receiver with multichannel inputs
- Coaxial or optical digital to a receiver or decoder
Connect the AC cord last, and push the plugs in fully. Loose connections cause noise (p. 16).
First Power-On
- Press the STANDBY-ON button to turn on the player.
- Turn on your TV.
- Switch the TV to the matching external input. The manual suggests pressing “2” on the TV remote, then channel down until the Philips splash screen appears. A SOURCE, AV, or SELECT button may also do this.
- When the home menu shows Disc Tray, Settings, and Product Info, the connection works.
Playing Discs
Disc and Region Compatibility
The player handles BD-video, BD-R, BD-RE ver. 2, DVD-video, DVD+R/+RW, finalized DVD-R/-RW in video mode, CD, CD-R/-RW, and DTS-CD. It won’t play DVD-Audio, Video CD, SVCD, HD DVD, DVD-RAM, BD-RE ver. 1 or 3, unfinalized discs, or DVD-R/-RW recorded in VR mode. Super Audio CDs play only their standard CD layer. Discs with special shapes, such as hearts or octagons, can damage the unit (p. 5).
Starting Playback
- Press OPEN/CLOSE and place the disc label side up, aligned with the tray guide.
- Press OPEN/CLOSE again. Loading can take a moment.
- If playback doesn’t begin automatically, press PLAY.
STOP puts the player in Resume-On-Stop mode, so the next PLAY press continues from where you stopped. Pressing OK instead starts from the beginning. Resume is canceled when you eject the disc, and it isn’t available for BD Java applications.
Files on Data Discs
Insert the disc, choose Disc Tray, then pick Video, Music, or Pictures on the media filter screen. For DivX, the player handles video up to 720 x 480 at 30 fps or 720 x 576 at 25 fps, and files over 2 GB won’t play. MP3 files should be 112 to 320 kbps. JPEG files can be up to 5 MB each.
For external DivX subtitles, the subtitle file needs the same name as the video and must sit in the same folder. Highlight the video, press Green, and choose the subtitle file (p. 25).
Special Playback Controls
- Fast forward/reverse: Press FFW or REW repeatedly to change speed.
- Slow forward: Pause, then press FFW (1/16, 1/8, or 1/2 speed).
- Step forward: While paused, press PAUSE repeatedly.
- Zoom: Not available during BD-video playback.
- A-B repeat: Press REPEAT A-B at the start and end points.
- Search: Press INFO to jump by title, chapter, or time. You can also type a chapter number with the number buttons.
- Subtitles, audio, and angles: Use the SUBTITLE, AUDIO, and ANGLE buttons.
Key Settings
Open the settings with HOME, then Settings, then Advanced Setup.
HDMI Video Resolution offers Auto, 480p, 720p, 1080i, and 1080p. The front-panel OUTPUT button cycles the same options, but not during BD playback or while the settings menu is open. If the picture disappears after a change, press OUTPUT again. You can also hold the front PLAY button for 5 seconds to restore the default (p. 35).
TV Shape has four options:
- 4:3 Letter Box
- 4:3 Pan & Scan
- 16:9 Widescreen
- 16:9 Squeeze
Pick the one that matches your TV so the picture isn’t distorted.
HDMI Audio and Digital Out control the sound format. To change the Analog Audio settings, set HDMI Audio to Off. Digital Out can be Bitstream or PCM.
Speaker Setup covers speaker size, distance, and level. Press Red to send a test tone to each speaker.
Parental limits playback by rating level, from 1 (Kid Safe) to 8 (Adult). Enter a four-digit PIN to set it. “4737” can’t be used as your PIN, and it’s also the code that clears a forgotten PIN (p. 38).
EasyLink (HDMI CEC) enables One Touch Play, linked standby, and automatic menu language when the player is paired with a compatible Philips TV. Philips doesn’t guarantee full compatibility with other brands.
Factory Default resets the settings, though not the Parental setting. A separate option clears local storage used by BD applications.
Cleaning and Maintenance
Wipe the cabinet with a soft, slightly damp cloth. Never use solvent, thinner, benzene, or alcohol, and don’t spray insecticide near the unit. Clean discs with a cleaning cloth, wiping from the center outward rather than in circles. Don’t use solvents, household cleaners, abrasives, or anti-static record spray. If the player still misbehaves after you’ve worked through troubleshooting, the laser lens may be dirty. Take it to a dealer or authorized service center for cleaning, since the lens isn’t user-serviceable (p. 5).
Troubleshooting
| Problem | What to try |
| Remote doesn’t respond | Check the power connection, aim at the sensor, fit fresh batteries with correct polarity |
| No picture | Turn on the TV, select the correct input, use OUTPUT to change resolution, or hold PLAY for 5 seconds to reset |
| No HD picture | The disc or the TV may not support high definition |
| No sound from TV speakers | Match the TV’s audio input to the video input |
| No 5.1 sound | The disc or the audio system may not support it. Set HDMI Audio to Off |
| Disc won’t play | Check the disc type and region code (BD: A, DVD: ALL or 1), finalize recordable DVDs, and clean the disc |
| MP3 files won’t play | Use UDF, ISO9660, or Joliet format, 112 to 320 kbps, and 32, 44.1, or 48 kHz sampling |
| DivX files won’t play | Use the file extension .avi or .divx |
Frequently Asked Questions
Which discs and regions will the BDP7200 play?
It plays region A Blu-ray discs and region 1 or ALL DVDs, all in NTSC. Discs from other regions or color systems won’t play.
Why is my screen blank after changing the HDMI resolution?
The TV may not support the resolution you chose. Press OUTPUT on the front panel repeatedly to step to another setting. If that doesn’t help, hold PLAY on the front panel for 5 seconds to return to the default.
Can it play DVDs I recorded myself?
Only if they’re finalized and recorded in video mode. Discs recorded in VR mode or left unfinalized won’t play.
Why isn’t my receiver getting 5.1 surround sound?
The disc itself must contain 5.1 audio, and your receiver must support it. For analog 5.1 connections, set HDMI Audio to Off.
What if I forget my parental control PIN?
Open the Parental menu, enter 4737, and press OK. This clears the current PIN, and you can then set a new one.
How do I check or update the firmware?
Choose Product Info from the home menu. It shows the hardware and software versions and the website where you can download the latest firmware.
Can the remote control my TV?
Only partly. The volume, mute, and channel buttons work with Philips-brand TVs. EasyLink also links the player to a compatible Philips TV over HDMI.
How long is the warranty?
The Philips limited warranty runs one year from the original purchase date, and you’ll need your sales receipt as proof. For assistance in the U.S., call 1-888-744-5477.