
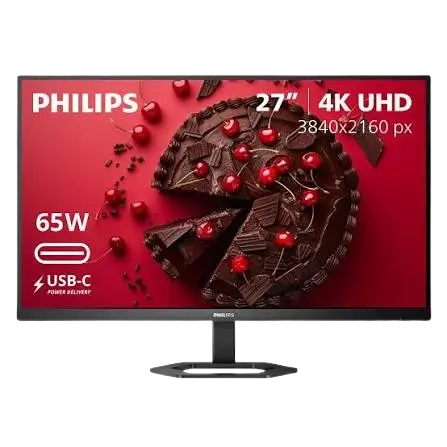
The Philips 27E1N5900R is a 27-inch IPS monitor with a native resolution of 3840 x 2160 at 60 Hz. It accepts video over HDMI 2.0, DisplayPort 1.4, or USB-C, and the USB-C port also carries USB 3.2 Gen1 data and up to 65 W of power. The stand tilts, pivots, and raises the screen by 130 mm, and the panel fits a 100 x 100 mm VESA mount. It also offers MultiView for two sources at once, SmartImage presets, LowBlue Mode, and HDR support, all controlled by one joystick-style button on the back.
Product Specifications
| Item | Detail |
| Panel | 27″ W (68.6 cm) IPS, W-LED backlight, 16:9 |
| Resolution | 3840 x 2160 @ 60 Hz (native and maximum) |
| Contrast / viewing angle | 1200:1 (typ.) / 178° H, 178° V |
| Colors | 1.07 billion (8 bits + A-FRC) |
| Video inputs | HDMI 2.0, DisplayPort 1.4, USB-C (all HDCP 1.4/2.2) |
| USB-C | DisplayPort Alt mode, Power Delivery up to 65 W, USB 3.2 Gen1 (5 Gbps) |
| Other ports | 2 USB downstream (one with BC 1.2 fast charge), audio out |
| Stand | Tilt -5°/+20°, height 130 mm, pivot -90°/+90° |
| Power supply | Built-in, 100–240 VAC, 50/60 Hz |
| Power use (typ.) | 24.8 W at 100/115 VAC (24.6 W at 230 VAC); sleep 0.5 W; off 0.3 W |
| Weight | 6.05 kg with stand, 4.18 kg without |
| Operating range | 0–40 °C, 20–80% humidity |
What’s in the Box
The package includes the monitor, a Quick Start guide, and a power cable. HDMI, DisplayPort, and USB C-to-C cables are also pictured, but they vary by region. SmartUniformity and Delta E information sheets are included too (p. 21).
Installation and Setup
Attach the Stand
- Place the monitor face down on a smooth surface, taking care not to scratch the screen.
- Hold the stand with both hands and gently attach the base to it.
- Tighten the screw at the bottom of the base by hand, then finish with a screwdriver so the base sits firmly.
- Gently push the stand onto the VESA mount area until the latch locks.
Connect to Your Computer
- Connect the power cord firmly to the back of the monitor.
- Turn off your computer and unplug its power cable.
- Connect the signal cable to the video connector on the computer.
- Plug the computer and monitor power cords into a nearby outlet.
- Turn on the computer and monitor. If an image appears, setup is done.
USB Charging
USB ports marked with a power icon can charge a smartphone or power an external hard drive, but only while the monitor is on. If a 2.4 GHz wireless receiver becomes unreliable, move it away from the USB 3.2 ports using a standard extension cable or hub.
Adjust the Stand or Remove the Base
Tilt runs from -5° to +20°. Never tilt the screen down more than 5°, because the panel can peel from the bezel and that damage is not covered by warranty (p. 3, p. 11). Hold only the bezel, and don’t press on the screen.
To remove the base for wall or arm mounting, lay the monitor face down on a smooth surface and lift the stand. Hold the release button down, tilt the base, and slide it out. The mount pattern is 100 x 100 mm with M4 screws. Contact the manufacturer for wall-mount installation (p. 12).
Controls and On-Screen Menu
The single toggle button on the back works like a joystick: move it in four directions to navigate and press it to select.
| Action | Function |
| Press | Power on; hold more than 3 seconds to power off |
| Toggle right | Open the menu or confirm a setting |
| Toggle down | Adjust brightness, or move down in the menu |
| Toggle up | Change input source, or move up in the menu |
| Toggle left | Open SmartImage Game menu, or go back one level |
The main menu covers Game Setting, LowBlue Mode, Input, Picture, PIP/PBP, SmartSize, Audio, Color, Language, OSD Setting, USB Setting, and Setup. Under Setup you can switch off the resolution alert that appears when the signal isn’t 3840 x 2160, or choose Reset to restore factory settings. The USB Setting menu offers High Data Speed or High Resolution for USB-C and a USB Standby Mode toggle.
MultiView (PIP and PBP)
MultiView shows two sources at once, for example a desktop and a notebook. PIP places a small window over the main picture. PBP puts the two pictures side by side. Any input can pair with any other.
- Toggle right to open the menu.
- Select PIP/PBP, then PIP/PBP Mode, and choose PIP or PBP.
- Set the PIP/PBP Input for the second source.
- In PIP, choose a size (Small, Middle, Large) and a corner position. Use Swap to exchange main and sub sources, which also swaps their audio.
In PBP mode, black strips appear above and below to keep the correct aspect ratio. Set your devices to 1920 x 2160 to remove them. HDMI 2.0 handles 1920 x 2160 at 60 Hz in 8-bit color only, so switch to 8-bit if you use PBP over HDMI (p. 14).
Picture Modes and HDR
Toggle left to open SmartImage and choose FPS, Racing, RTS, Gamer 1, Gamer 2, LowBlue Mode, EasyRead, SmartUniformity, or Off. LowBlue Mode reduces harmful short-wavelength blue light, EasyRead boosts text contrast, and SmartUniformity evens out screen brightness.
When an HDR signal arrives, the same button offers HDR Game, HDR Movie, HDR Photo, DisplayHDR 400, Personal, and Off. In Windows 11 or 10, right-click the desktop, open Display settings, select the monitor, choose Windows HD Color settings, and adjust brightness for SDR content. To turn HDR off, disable it on the source device, since mismatched settings can produce poor images.
Support for 3840 x 2160 at 60 Hz with 10-bit color depends on format and input:
| Format | HDMI 2.0 | DisplayPort 1.4 | USB-C |
| 4:2:2 / 4:2:0 | OK | OK | OK |
| 4:4:4 / RGB | N/A | OK | N/A |
Safety Instructions
- Use only the Philips-approved power cord and the specified voltage. A wrong supply can cause malfunction, fire, or electric shock.
- Keep the plug and outlet reachable. After unplugging, wait 6 seconds before reconnecting.
- Don’t block the ventilation holes, and keep the monitor away from direct sunlight, heat sources, oil, dust, rain, and moisture.
- Don’t pull, bend, or load heavy objects onto cables.
- Lift the monitor by the frame, never by pressing on the LCD panel.
- Only qualified service personnel should open the casing. If water or a foreign object gets inside, power off, unplug, and send the monitor for service.
- For eye comfort, take a 5–10 minute break after 50–60 minutes of continuous use.
- Use a moving screen saver or screen refresh application. Static images left on screen for long periods can cause burn-in that may become permanent and isn’t covered by warranty (pp. 4–5).
Cleaning and Maintenance
Unplug the monitor before cleaning. Wipe the screen with a slightly damp cloth, or with a dry cloth once the power is off. If the monitor gets wet, dry it with a cloth as soon as possible. Oil-based cleaners can damage the plastic parts and void the warranty. The safety section also rules out organic solvents, alcohol, and ammonia-based liquids, while the FAQ permits isopropyl alcohol only for extensive cleaning and warns against ethyl alcohol, ethanol, acetone, and hexane. A plain soft cloth is the safer choice.
Unplug the monitor if you won’t use it for a long time.
Troubleshooting
| Problem | What to try |
| No picture, power LED off | Check the power cord at the outlet and monitor. Make sure the rear power button is off, then switch it on. |
| No picture, power LED white | Confirm the computer is on and the signal cable is secure with no bent pins. The monitor may be in energy-saving sleep. |
| Image vibrates | Reseat the signal cable at the graphics board or PC. |
| Blurry, indistinct, or too dark | Adjust brightness and contrast in the menu. |
| Fuzzy or distorted text | Set the PC to 3840 x 2160. |
| Ghost image after power off | Use a moving screen saver. Most ghost images fade gradually once power is off. |
| Colored or dark dots | A normal characteristic of LCD panels (see below). |
| Smoke or sparks | Don’t troubleshoot. Disconnect from mains power immediately and contact Philips customer service. |
Pixel Defects and Warranty
Pixel defects qualify for warranty repair or replacement only when they exceed the tolerances: 2 bright dots, 3 black dots, or 5 dots in total, with defects more than 15 mm apart (p. 26). The warranty period depends on your region. One-, two-, or three-year extensions can be bought within 30 calendar days of purchase.
Frequently Asked Questions
What resolution and refresh rate should I use?
Use 3840 x 2160 at 60 Hz. If you see “Cannot display this video mode,” reconnect your previous monitor, set the PC to 3840 x 2160 at 60 Hz, restart, then reconnect this one.
Can I get 10-bit 4K at 60 Hz with full RGB?
Only over DisplayPort 1.4. HDMI 2.0 and USB-C support 10-bit 4:2:2 or 4:2:0 at that resolution, not 4:4:4 or RGB.
Can I choose which source plays audio in MultiView?
Yes. Audio follows the main picture by default, but you can pick HDMI, DisplayPort, or USB C under Audio Source. The monitor remembers your choice at the next power-on.
Why does the PIP or PBP window flicker?
The sub-window source is likely using interlaced timing. Switch it to a progressive signal.
How do I lock or unlock the buttons?
Hold the down direction on the toggle button for 10 seconds. A message confirms whether the controls are locked or unlocked.
Does it work with Macs?
Yes. The monitor is Plug and Play with Windows 11/10 and Mac OS X. A cable adapter may be needed for some Macs.