

The Honeywell programmable thermostat gives homeowners a simple way to control heating and cooling with a daily schedule, quick temperature changes, and a clear screen.
Product Overview
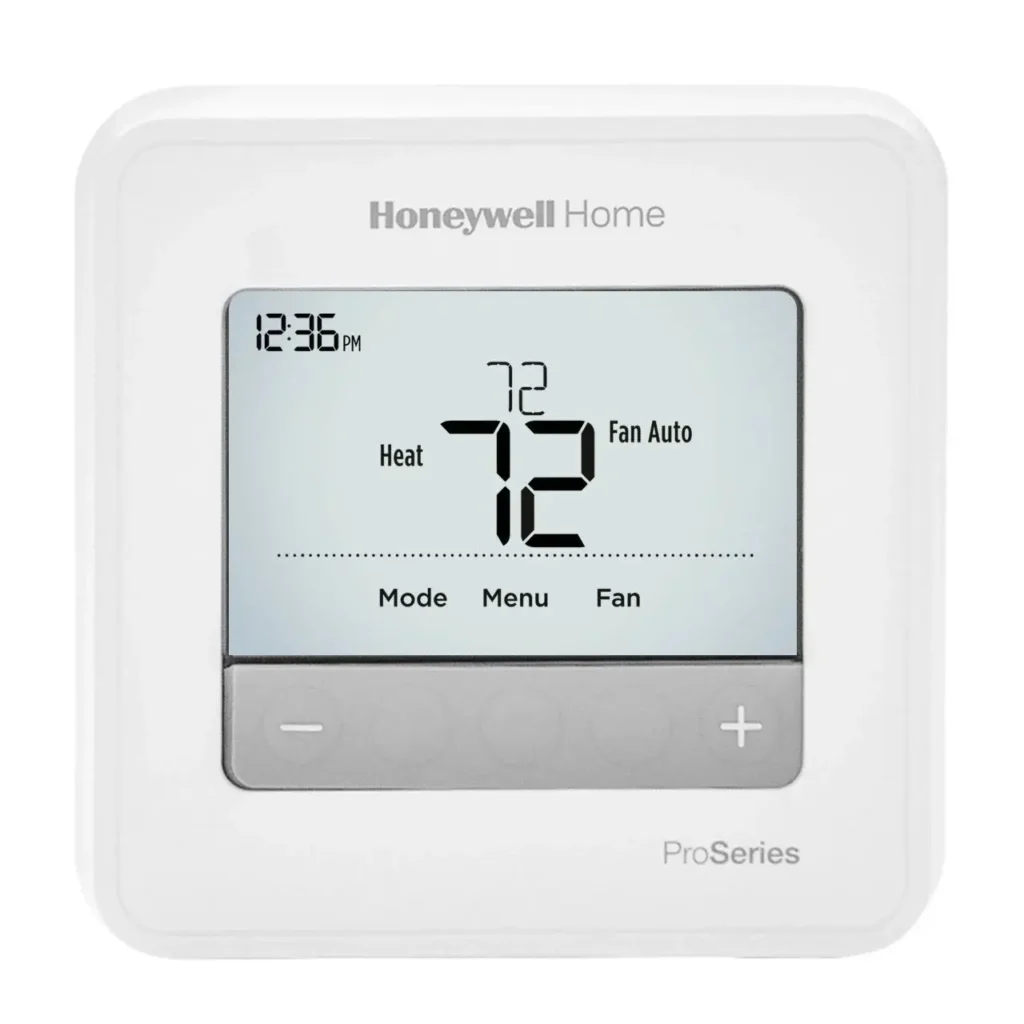
The Honeywell T4 Pro programmable thermostat is made for people who want a schedule-based thermostat without a confusing interface.
It supports routine daily comfort with four schedule periods: Wake, Away, Home, and Sleep. The thermostat can run one pattern for weekdays and another for weekends.
It also lets the user turn the schedule on or off and even disable individual periods when needed.
This thermostat appears in models such as TH4110U2005 and TH4210U2002. The TH4210U model supports Emergency Heat (Em Heat), while the other model does not.
On the screen, users may see status messages like Cool On, Heat On, Em Heat On, Recovery, and Compressor Protection, depending on system type and what the thermostat is doing at that moment.
A nice part of this thermostat is that it works well for both routine use and quick changes. Someone can follow the programmed schedule most of the time, then raise or lower the temperature for a short while when plans change.
That means the thermostat fits real life. It also includes useful extras like battery alerts, an air filter reminder, keypad lockout, and a backlight brightness setting on systems that use a C-wire.
What Comes in the Box
The package for the Honeywell programmable thermostat includes everything most users need for a standard setup.
According to the official guide, the box includes the thermostat itself, the UWP mounting system, a decorative cover plate, screws and anchors, 2 AA batteries, and printed literature.
Each item has a clear purpose. The thermostat is the control unit the user sees on the wall every day. The UWP mounting system holds the unit in place.
The decorative cover plate helps cover marks or holes from an older thermostat. The screws and anchors support wall mounting.
The batteries power the thermostat in systems that do not use constant AC power through a C-wire, and they also help support operation depending on setup.
The included literature matters too. The printed guide gives basic use instructions, while the support site provides more help for users who want deeper setup information.
The official support page is honeywellhome.com/support, and the manufacturer listed in the guide is Resideo Technologies Inc., 1985 Douglas Drive North, Golden Valley, MN 55422.
The thermostat also carries a 5-year limited warranty, which adds peace of mind for long-term use.
A user should keep the box contents together, especially during the first week. People often install the thermostat, then later realize they still need the decorative plate, the batteries, or the guide when setting a schedule.
Keeping those parts nearby makes setup easier and avoids last-minute frustration.
Controls and Screen Layout
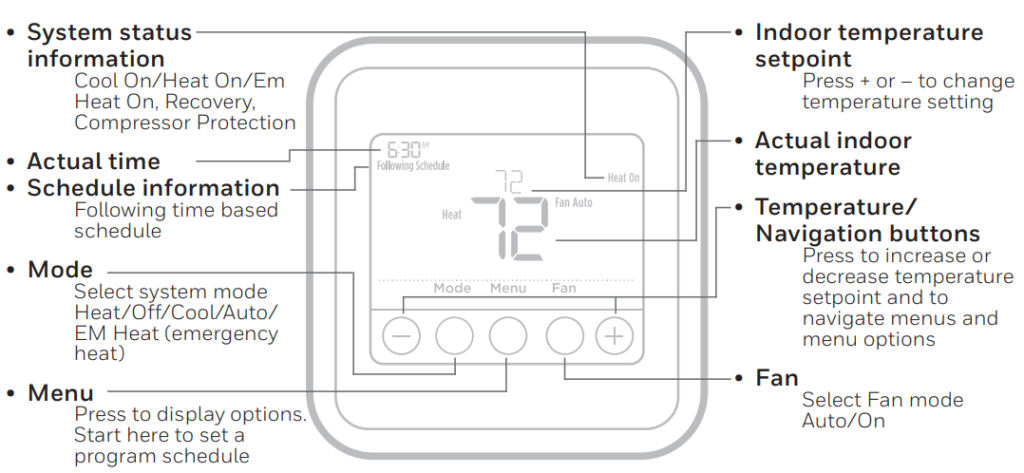
The T4 Pro thermostat uses a small group of buttons instead of a large touchscreen. That keeps the design simple. The main controls are Mode, Menu, Fan, and the + / – buttons.
The official guide explains that Mode cycles through system choices such as Heat, Cool, Off, Auto, and Em Heat on supported models. Fan switches between Auto and On. Menu opens options like schedule and other settings. The + / – buttons change the temperature and also help move through menu items.
The screen itself shows more than just the room temperature. It can display the current indoor temperature, the selected setpoint, the time, schedule details, and system status.
Depending on what the thermostat is doing, the screen may show Cool On, Heat On, Em Heat On, Recovery, or Compressor Protection. These messages help the user understand whether the system is actively running, waiting to protect equipment, or preparing to reach a scheduled temperature.
The screen lighting behaves differently depending on how the thermostat gets power. If the thermostat uses a C-wire, the screen stays lit for around 45 seconds after the user makes a change.
If it runs on battery only, the screen stays lit for about 8 seconds after a change. In some setups, the display may stay lit all the time. The guide also notes that idle backlight brightness can be adjusted from LITE 1 to LITE 5, but only when the thermostat has C-wire power.
This layout works well because users can glance at the thermostat and quickly tell what it is doing.
If the user sees the right time, a reasonable setpoint, and the correct mode, most of the system is already under control.
Basic Operation (Mode and Fan Settings)
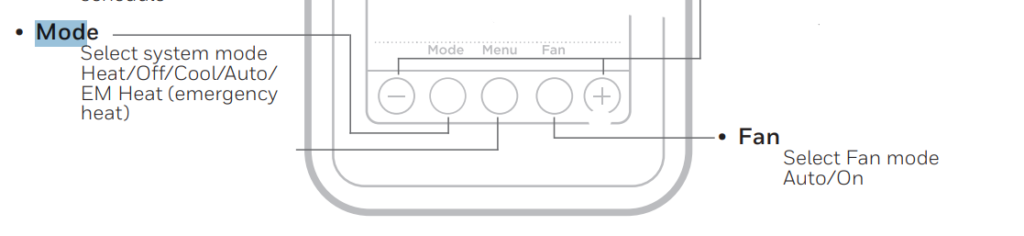
Daily use starts with two simple choices: system mode and fan mode. On this thermostat, Mode controls whether the system heats, cools, stays off, or works in automatic switching when supported.
The official guide states that the available choices are Auto, Heat, Cool, Off, and Em Heat on the TH4210U model.
Heat mode calls for heating when the room drops below the setpoint. Cool mode calls for cooling when the room rises above the setpoint. Off stops both heating and cooling.
Auto allows the thermostat to manage heating and cooling automatically if the system supports it. Em Heat is only for certain heat pump systems and is meant for emergency heating situations. It is not a daily-use mode for most homes.
The Fan button gives two options: Auto and On. In Auto, the fan runs only when heating or cooling is active.
In On, the fan runs continuously.
Auto works best for most homes because it is quieter and usually uses less energy. On can help improve airflow when someone wants more air movement across the house.
A good everyday routine is simple:
- Set Mode to the season: Heat in winter, Cool in summer.
- Keep Fan on Auto unless there is a reason to run it all the time.
- Use + / – to raise or lower the temperature as needed.
This setup keeps operation easy and avoids many “why is my fan always running?” questions.
If the user only remembers one thing, it should be this: Mode chooses the job, and Fan chooses how air moves.
Setting the Time and Date
A schedule-based thermostat only works properly when the clock and date are correct. If the time is wrong, the temperature changes happen at the wrong times too.
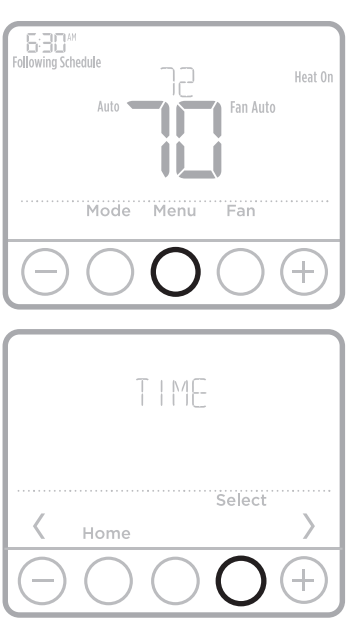
That is why one of the first setup tasks on the Honeywell T4 Pro thermostat is setting the clock and date through the Menu system.
The guide confirms that the thermostat supports 12-hour or 24-hour time and year, month, and date setup.
The thermostat uses a menu-driven process rather than separate physical “set time” buttons.
The user enters the menu, moves to time and date, and changes values with the + / – controls. This design keeps the front panel neat while still giving enough control for different households.
This step matters even more after battery changes.
The guide explains that if batteries are replaced within two minutes, the time and day often do not need to be reset.
Other settings remain stored in memory even when time and date need to be updated.
That’s helpful, because users do not need to rebuild the whole schedule after every battery change.
A good habit is to check time and date whenever:
- the thermostat restarts,
- batteries get replaced,
- daylight saving time changes, or
- the schedule seems to run at odd times.
That quick check solves many schedule complaints before they become bigger troubleshooting tasks. If the thermostat seems “wrong,” time and date are always a smart first stop.
Honeywell T4 Pro Thermostat Schedule Setup
The Honeywell T4 Pro programmable thermostat uses a four-period daily schedule: Wake, Away, Home, and Sleep. The user can program one version for weekdays and another for weekends.
The official guide also notes that the schedule can be turned ON or OFF, and each period can be turned off individually if someone does not want to use all four.
This setup gives a nice balance between control and simplicity.
Many people live by a routine: warmer or cooler comfort when waking up, more energy-saving settings during work hours, comfort again in the evening, and a different temperature overnight.
The thermostat is built around that routine.
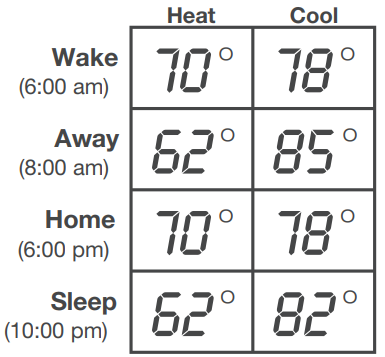
The guide includes recommended preset schedule values:
| Period | Heat | Cool |
| Wake | 70° | 78° |
| Away | 62° | 85° |
| Home | 70° | 78° |
| Sleep | 62° | 82° |
These values aim to reduce energy use while still keeping the home comfortable.
A simple way to think about schedule setup is:
- Wake: Comfort when the day starts
- Away: Save energy while no one is home
- Home: Comfort returns
- Sleep: A quieter comfort setting for night
Once the schedule is set, the thermostat follows it automatically. If the user wants to skip scheduling for a while, the guide confirms that the schedule can be turned off.
For many homes, the best first move is to start with the recommended values, then make small changes after a few days.
That way, the user avoids overthinking the first setup and still gets a schedule that makes sense.
Honeywell T10 Pro Smart Thermostat Installation Guide
Temporary Override and Permanent Hold
Life rarely follows a perfect thermostat schedule.
That is why the Honeywell Home T4 Pro programmable thermostat includes both temporary override and permanent hold.
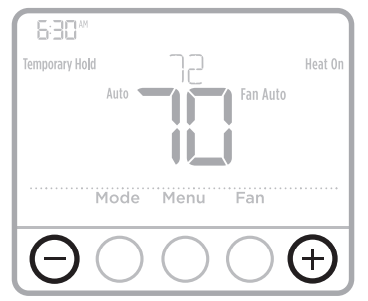
Temporary Override
A temporary override lets the user raise or lower the temperature for a short period without changing the saved schedule.
The official guide explains that a temporary override lasts until the next scheduled period begins.
This is ideal when someone comes home early, stays up late, or just wants a quick comfort change.
For example, if the thermostat is in Away mode and someone unexpectedly stays home, they can raise or lower the temperature without rebuilding the schedule.
Permanent Hold
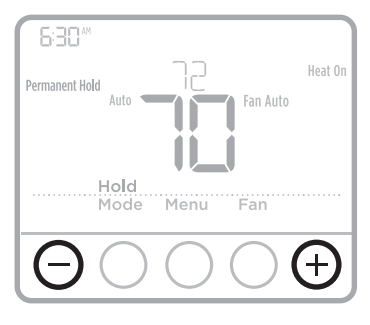
A permanent hold keeps one temperature in place until the user cancels it.
According to the guide, the user can enter a permanent hold by making a temporary change first and then pressing Hold while the temporary setting flashes.
Both temporary override and permanent hold can be canceled with Cancel.
Hold works well for:
- vacation periods,
- holidays,
- guests staying over,
- days when the household routine changes.
The difference is simple:
- Temporary override = “just for now”
- Permanent hold = “keep it here until I stop it”
That split keeps the thermostat practical. The user doesn’t need to edit the schedule every time life shifts a little.
Helpful Comfort Features
The T4 Pro programmable thermostat includes two comfort and protection features that deserve a closer look: Adaptive Intelligent Recovery and Compressor Protection.
Adaptive Intelligent Recovery
This feature helps the home reach the right temperature at the right time. The thermostat learns how long the heating or cooling system takes to bring the home to a target temperature.
Then it starts earlier when needed, so the home reaches the scheduled temperature right when that period begins.
The guide calls this Adaptive Intelligent Recovery.
That means if Wake is set for 6:00 AM, the thermostat may begin heating or cooling before 6:00 AM so the house feels right at 6:00, not ten or twenty minutes later.
This feature makes the schedule feel smarter without asking the user to do anything extra.
Built-in Compressor Protection
The thermostat also protects HVAC equipment. The guide explains that it includes compressor protection that delays the system from restarting too quickly.
During this wait, Cool On or Heat On flashes on the display until the safe restart time passes.
People sometimes think a flashing message means the thermostat is broken. In most cases, it simply means the thermostat is protecting the system. That delay helps prevent wear on the compressor.
These features matter because they make the thermostat feel more dependable. One helps comfort arrive on time. The other helps the equipment stay safe.
Keypad Lockout and Display Settings
The Honeywell T4 Pro programmable thermostat also includes settings that control what users can change and how the display looks.
Keypad Lockout
The guide explains three keypad lockout options:
- OFF = no lockout
- PART = only temperature changes allowed
- ON = no user access
The unlock code is 1234.
This feature works well in homes with children, rental properties, offices, or shared spaces where someone wants to stop casual setting changes.
PART lockout is especially useful because it still lets people adjust temperature while protecting deeper menu changes.
Honeywell T9 Smart Thermostat User Guide
Idle Backlight Brightness
The thermostat also supports idle backlight brightness adjustment through the LITE setting, with levels 1 through 5. This feature only works when the thermostat uses a C-wire.
A brighter display is easier to read from across a room, while a dimmer display feels less distracting in a bedroom or hallway.
These settings may seem small, but they improve daily use. Lockout protects the schedule, and backlight control helps the thermostat fit the room better.
Battery Use and Replacement
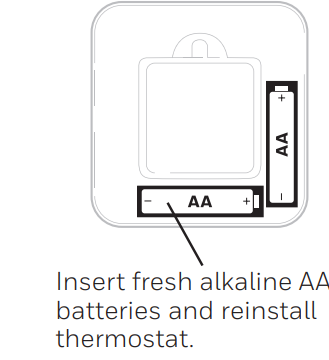
Battery use depends on how the thermostat gets power. The guide states that batteries are optional when the thermostat is powered by AC/C-wire, but they are required when there is no AC power source. The thermostat uses fresh alkaline AA batteries.
A low battery icon appears about two months before the batteries fully deplete. The guide recommends replacing batteries once a year and also before leaving home for more than a month.
That advice makes sense because low battery issues often show up at the worst time, like during travel or weather extremes.
If the user replaces batteries within two minutes, the time and day usually do not need to be reset.
Other settings stay stored in memory even when time/day need to be restored.
A simple maintenance plan looks like this:
- Check the battery icon every month or so.
- Replace batteries once a year before a heating or cooling season begins.
- Keep a spare pair of alkaline AA batteries nearby.
That tiny habit helps prevent most battery-related thermostat problems before they start.
Honeywell T5+ Smart Thermostat Quick Install Guide
Alerts and Reminders
The T4 Pro programmable thermostat includes a useful alert system. The official guide mentions two common alerts:
- Low battery warning
- Air filter reminder shown as REPL
The air filter reminder helps users remember one of the most forgotten HVAC tasks. A dirty filter can reduce airflow and make heating or cooling less effective.
The thermostat doesn’t physically check the filter. It acts as a timed reminder, which is still very helpful.
The guide also explains that reminders and alerts can often be handled through the ALRT menu. In many cases, users can:
- Snooze an alert for 7 days, or
- Clear it once the task is done.
The guide notes that some alerts cannot be snoozed or cleared and may require HVAC service.
That’s important because it reminds users not to ignore every alert as “just a message.” Some warnings point to a real service issue.
This system makes the thermostat more helpful over time. It does not only react to temperature. It also reminds the household to handle basic maintenance that supports better system performance.
Troubleshooting Common Problems
The official guide includes basic troubleshooting, and most problems fall into a few familiar categories. The good news is that many issues have simple causes.
Blank Display
If the display is blank, the first thing to check is power. If the thermostat uses batteries, replace them with fresh alkaline AA cells.
If it uses a C-wire, check whether the HVAC system has power. A blank screen often comes from a simple power issue.
System Not Responding
If heating or cooling does not start right away, check the Mode setting first. Then check whether Cool On or Heat On is flashing.
If it is, the thermostat may be in compressor protection delay. That is normal. Wait for the delay to finish.
Temperature Will Not Change
The guide notes that temperature settings may not change because of keypad lockout, the selected mode, or installer-defined range stops.
So if the user cannot move the setpoint where they want, the thermostat may be intentionally limiting changes.
Alerts Keep Returning
If the user clears or snoozes an alert but it comes back, the issue may not be solved yet.
A filter reminder returns if the filter has not been replaced or the reminder has not been handled properly. Some alerts may need service attention.
Check power, mode, battery status, lockout setting, and flashing messages first. Those steps solve a large share of user problems without tools or extra service calls.
Honeywell FocusPRO P200 Series Thermostat User Guide
Support, Warranty, and Contact Details
The official guide directs users to honeywellhome.com/support for customer help.
This is the best place to find product support, additional documentation, and troubleshooting help.
The manufacturer listed in the guide is:
Resideo Technologies Inc.
1985 Douglas Drive North
Golden Valley, MN 55422
The thermostat also includes a 5-year limited warranty.
That is useful information for anyone who runs into a product issue after normal use.
Users should keep purchase records when possible, since warranty support often moves faster when proof of purchase is available.
Glossary
C-wire: A constant power wire that can keep the thermostat powered all the time. The guide notes that some features, like longer backlight behavior and brightness settings, depend on C-wire power.
Setpoint: The target temperature the user wants the home to reach.
Temporary Override: A short-term temperature change that lasts until the next scheduled period starts.
Permanent Hold: A manual setting that keeps one temperature until the user cancels it.
Adaptive Intelligent Recovery: A feature that learns how long the HVAC system takes to reach the target temperature and starts early when needed.
Compressor Protection: A restart delay that helps protect HVAC equipment. The thermostat may flash Heat On or Cool On while waiting.
REPL: Air filter reminder message.Keypad Lockout: A setting that limits or blocks user access to controls. The T4 Pro supports OFF, PART, and ON lockout states.