
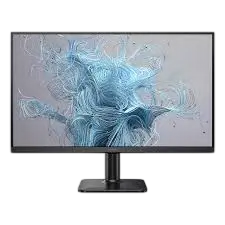
The Philips 24E2N2100 is a 23.8-inch Full HD monitor from the 2000 Series. It uses an IPS panel with a W-LED backlight and a 16:9 aspect ratio. It connects to a computer through HDMI 1.4 or VGA. Its native resolution is 1920 x 1080, and the Overclock option raises the HDMI refresh rate to 144 Hz. The monitor includes SmartImage presets, LowBlue Mode, EasyRead, Adaptive Sync and a flicker-free display. It comes in black (24E2N2100) and white (24E2N2100W). Page numbers below are the printed numbers in the manual.
What’s in the Box
The box contains the monitor, a Quick Start guide, the base column and base stand, an AC/DC adapter, an HDMI cable and a VGA cable. Cables vary by region. Use only the adapter listed for your region. Worldwide units use the Philips ADPC1925EX. China-only units use the Philips S025AAC1900131 (page 5).
Installation and Setup
Attach the Stand
- Place the monitor face down on a soft, smooth surface so the screen isn’t scratched.
- Slide the base column onto the monitor until it clicks into position.
- Hold the base stand with both hands and push it firmly into the base column.
Connect to a Computer
- Plug the power cord firmly into the back of the monitor.
- Turn off your computer and unplug its power cable.
- Connect the signal cable (HDMI or VGA) to the video connector on the computer.
- Plug the computer and the monitor into a nearby outlet.
- Turn on the computer and the monitor. If an image appears, setup is done.
The back panel has a DC power input, a VGA input, an HDMI input and a Kensington anti-theft lock slot.
Tilt Range
The stand tilts from -5° to +20°. Don’t tilt the screen downward more than -5°, because the panel can peel from the bezel. This damage is not covered by warranty. Hold the bezel only when adjusting the angle, and never press on the screen (pages 1 and 8).
VESA Wall Mounting
To remove the stand, lay the monitor face down on a smooth surface and press the release button to detach the base column. The monitor accepts a 100 x 100 mm VESA mount with M4 screws. The threaded post is 7.8 mm, and the mounting hole is 10 mm deep including the back cover. The manual advises contacting the manufacturer for wall-mount installation.
Controls and On-Screen Display
The front-bezel buttons handle the following functions:
- Power: switches the monitor on and off.
- Menu/OK: opens the OSD menu and confirms changes.
- Up/Down: moves through the OSD menu.
- Brightness: adjusts the brightness level.
- Input: changes the signal source.
- Back: returns to the previous OSD level.
- SmartImage: cycles through the picture presets.
The main OSD menus are LowBlue Mode, Input, Picture, Game Setting, Color, Language, OSD Setting and Setup. The Picture menu covers Picture Format, Brightness, Contrast and Sharpness. SmartContrast and Gamma are listed in the OSD menu structure on page 7. The Game Setting menu includes Adaptive Sync, MPRT, SmartResponse, SmartFrame and Overclock. The OSD is available in 21 languages. If you get lost in the menus, choose Setup > Reset to restore the factory settings.
Lock or Unlock the OSD
With the monitor off, press and hold the Menu/OK button, then press the power button to turn the monitor on. Repeat the same steps to unlock. The screen confirms with a “Monitor controls locked” or “Monitor control unlocked” message.
Color Settings
Under Color, Color Temperature offers Native, 5000K, 6500K, 7500K, 8200K, 9300K and 11500K. Lower values look warmer and higher values look cooler. You can also choose sRGB, or User Define to set red, green and blue from 0 to 100 yourself.
Image Optimization
SmartImage changes brightness, contrast, color and sharpness for the type of content on screen. Press the SmartImage button to open it, keep pressing to cycle, and press OK to confirm. It closes by itself after 5 seconds.
| Mode | Purpose |
| FPS | Improves dark-scene black-level detail for first-person shooters |
| Racing | Fast response time and high color saturation |
| RTS | Highlights a user-selected area through SmartFrame |
| Gamer1 / Gamer2 | Saves your own preferred settings |
| LowBlue Mode | Reduces short-wavelength blue light for comfortable productivity |
| EasyRead | Raises text contrast and edge sharpness for reading |
| Off | No SmartImage optimization |
SmartContrast is a separate feature. It analyzes the picture in real time and adjusts contrast and backlight intensity automatically. According to the manual, it can also lower power consumption.
Overclock and Adaptive Sync
Overclock raises the native refresh rate, but it carries a risk of irreversible damage to the monitor. The manual says it’s off by default. Before turning it on, confirm that your graphics card supports the target resolution and refresh rate, and update its driver if needed. Then go to OSD menu > Game Setting > Overclock. HDR is not supported over HDMI while Overclock is on.
If the screen looks abnormal after a restart, unplug the power cable. Hold the monitor’s left menu button while plugging the cable back in, and keep holding until the screen turns on. That turns Overclock off and restores the default refresh rate (page 8).
Adaptive Sync reduces tearing and stutter by letting the graphics card update the monitor the moment a new frame is ready. It works on Windows 11 and 10 with the compatible AMD graphics cards and processors listed on page 13. These include Radeon R9 and R7 cards, the RX 6000 series listed there, and several A-Series APUs.
Product Specifications
| Item | Specification |
| Panel | 23.8″ IPS, W-LED backlight, 16:9 |
| Native resolution | 1920 x 1080 @ 75 Hz (VGA), 60 Hz (HDMI) |
| Maximum resolution | 1920 x 1080 @ 144 Hz (HDMI, Overclock on) |
| Contrast ratio | 1500:1 (typ.) |
| Viewing angle | 178° horizontal / 178° vertical |
| Colors | 16.7 million (6-bit + FRC) |
| Pixel pitch | 0.2745 x 0.2745 mm |
| Vertical refresh | 48–75 Hz (VGA); 48–120 Hz (HDMI, Overclock off); 55–144 Hz (HDMI, Overclock on) |
| Inputs | 1 x VGA, 1 x HDMI 1.4 (HDCP 1.4) |
| Power use | 16.3 W typical in operation, 0.5 W in sleep, 0.3 W when off |
| Power supply | External, 100–240 VAC, 50/60 Hz |
| Size with stand (W x H x D) | 544 x 413 x 180 mm |
| Weight with stand | 2.46 kg |
| Operating conditions | 0–40°C, 20–80% humidity |
| Storage conditions | -20 to 60°C, 10–90% humidity |
The preset timing table on page 17 lists supported modes from 640 x 480 up to 1920 x 1080. The 100 Hz, 120 Hz and 144 Hz modes are HDMI only, and 144 Hz needs Overclock.
Safety Instructions
- Keep the monitor out of direct sunlight, strong light and heat sources.
- Keep it away from oil, dust, rain, water and heavy moisture.
- Don’t block the ventilation holes.
- Keep the power plug and outlet easy to reach.
- Wait 6 seconds before plugging the power cord back in after unplugging it.
- Use only the approved power cord and the specified supply voltage.
- Never disassemble the AC adapter. Only qualified service personnel should open the casing.
- Don’t pull or bend the cables, and don’t place heavy objects on them.
- Lift the monitor by the frame, never by pressing on the LCD panel.
- If water or a foreign object gets inside, switch off, unplug the cord and send the monitor for service.
- To rest your eyes, take a 5–10 minute break after 50–60 minutes of screen use. The manual also suggests blinking often and adjusting brightness and contrast.
Burn-In Warning
Showing a still image for a long time can cause burn-in, also called after-imaging or ghost imaging. It usually fades gradually after the monitor is switched off. Use a moving screen saver when you leave the monitor unattended. Use a periodic screen-refresh application if you’ll display static content. Severe burn-in may be permanent, and the manual says it is not covered by warranty.
Cleaning and Maintenance
Unplug the monitor before cleaning. The manual says a dry cloth works on the screen when the power is off. For normal cleaning, use a clean, soft cloth. For heavier cleaning, use isopropyl alcohol only. Don’t use ethyl alcohol, ethanol, acetone, hexane, ammonia-based liquids or other organic solvents. Oil-based cleaners can damage the plastic parts and void the warranty. If the monitor gets wet, wipe it with a dry cloth as soon as possible. Unplug it if you won’t use it for a long time.
Pixel Defects and Warranty
Philips says a few defective pixels on TFT panels are sometimes unavoidable. A monitor qualifies for repair or replacement only if it exceeds these limits: 2 lit sub-pixels, 3 dark sub-pixels, or 5 dot defects in total. Bright defects must also be more than 15 mm apart. Warranty length depends on region. Extended warranty of 1, 2 or 3 years can be bought through a certified service center, and it must be purchased within 30 calendar days of the original purchase. Proof of purchase is required for any claim.
Troubleshooting
| Problem | What to try |
| No picture, power LED off | Check that the power cord is plugged into the outlet and the monitor. Check that the rear power button is on. |
| No picture, LED white | Make sure the computer is on and the signal cable is firmly connected. Check the cable for bent pins. Energy saving may be active. |
| Image off-center, vibrating or flickering | Use Auto, or adjust Phase/Clock in Setup. Phase/Clock and Auto work in VGA mode only. Check the cable connection. |
| Image blurred or too dark | Adjust contrast and brightness in the OSD. |
| Text fuzzy or distorted | Set the PC to 1920 x 1080. |
| Colored or dark dots | These are normal for LCD technology. See the pixel policy above. |
| Power LED too bright | Change the Power LED setting in the Setup menu. |
| Smoke or sparks | Don’t troubleshoot. Disconnect from mains power immediately and contact customer service. |
Frequently Asked Questions
What should I do if the screen shows “Cannot display this video mode”?
Set your PC to 1920 x 1080. Unplug all cables and reconnect the previously used monitor. In Windows display settings, move the resolution to 1920 x 1080 and set the refresh rate to 60 Hz. Restart the PC, check the settings, then shut down and reconnect the Philips monitor.
What refresh rate should I use?
For standard use, the manual recommends 60 Hz. If you see screen disturbance, try 75 Hz. Higher HDMI rates up to 144 Hz are available only with Overclock enabled and a compatible graphics card.
Is the monitor Plug and Play, and does it work with Macs?
Yes. It is Plug and Play with Windows 11/10 and Mac OS X. It is described as compatible with standard PCs, Macs and workstations, though you may need a cable adapter for some Macs.
Do I need to install the .inf and .icm driver files?
Your computer may ask for them when you first connect the monitor. Follow the on-screen instructions and the drivers install automatically.
How do I restore the factory settings?
Open the OSD menu and choose Setup > Reset.
How do I lock the OSD buttons?
With the monitor off, press and hold the Menu/OK button, then press the power button to turn on the monitor. Do the same thing to unlock.
Is the screen scratch-resistant?
The manual doesn’t give a scratch rating. It advises protecting the panel from shocks and from sharp or blunt objects. It also says pressure on the panel may affect warranty conditions.
Where is the “Important information” manual?
It can be downloaded from the Philips website support page, where the regional service hotlines and warranty statement also appear.